Use and Care Manual
Page 2
... When using electrical appliances, basic safety precautions should be followed, including the following: s This refrigerator must be performed by a qualified individual. Skin may stick to the light circuit. s Setting either or both controls to OFF does not remove power to these extremely cold surfaces. Do not place fingers or hands on the...
... When using electrical appliances, basic safety precautions should be followed, including the following: s This refrigerator must be performed by a qualified individual. Skin may stick to the light circuit. s Setting either or both controls to OFF does not remove power to these extremely cold surfaces. Do not place fingers or hands on the...
Use and Care Manual
Page 3
... REFRIGERATOR Child...sit for "just a few days." Junked or abandoned refrigerators are getting rid of your old refrigerator, please follow the instructions below to help prevent accidents...of an old refrigeration product, check with the company handling the disposal about ...to product disposal. Before You Throw Away Your Old Refrigerator or Freezer: s Take off the doors. Installation... rating of the past. Safety Instructions Operating Instructions ge.com DANGER! Refrigerants All refrigeration products contain refrigerants, which under certain conditions, we strongly recommend against...
... REFRIGERATOR Child...sit for "just a few days." Junked or abandoned refrigerators are getting rid of your old refrigerator, please follow the instructions below to help prevent accidents...of an old refrigeration product, check with the company handling the disposal about ...to product disposal. Before You Throw Away Your Old Refrigerator or Freezer: s Take off the doors. Installation... rating of the past. Safety Instructions Operating Instructions ge.com DANGER! Refrigerants All refrigeration products contain refrigerants, which under certain conditions, we strongly recommend against...
Use and Care Manual
Page 4
... INFORMATION CAREFULLY. Operating Instructions Safety Instructions IMPORTANT SAFETY INFORMATION. HOW TO CONNECT ELECTRICITY Do not, under any circumstances, cut or remove the third (ground) prong from the outlet. Have the wall outlet and circuit checked by pulling on the power cord. Repair...Support Troubleshooting Tips 4 Never unplug your personal responsibility and obligation to roll over or damage the power cord. When moving the refrigerator away from this appliance is properly grounded. Do not use a cord that shows cracks or abrasion damage along its own ...
... INFORMATION CAREFULLY. Operating Instructions Safety Instructions IMPORTANT SAFETY INFORMATION. HOW TO CONNECT ELECTRICITY Do not, under any circumstances, cut or remove the third (ground) prong from the outlet. Have the wall outlet and circuit checked by pulling on the power cord. Repair...Support Troubleshooting Tips 4 Never unplug your personal responsibility and obligation to roll over or damage the power cord. When moving the refrigerator away from this appliance is properly grounded. Do not use a cord that shows cracks or abrasion damage along its own ...
Use and Care Manual
Page 5
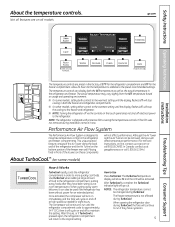
... not shut off ) will stop the cooling to the refrigerator. Although the Air Tower and the Air Tunnel can also be changed during installation, remove it Works TurboCool rapidly cools the refrigerator compartment in the factory at room temperature or when putting ... again, the refrigerator compartment will go out. NOTES: The refrigerator temperature cannot be used if the refrigerator has been without power for eight hours. s NOTE: Turning the refrigerator off at geappliances.ca or call 800.GE.CARES. If this setting. Placing food in the refrigerator and freezer. ...
... not shut off ) will stop the cooling to the refrigerator. Although the Air Tower and the Air Tunnel can also be changed during installation, remove it Works TurboCool rapidly cools the refrigerator compartment in the factory at room temperature or when putting ... again, the refrigerator compartment will go out. NOTES: The refrigerator temperature cannot be used if the refrigerator has been without power for eight hours. s NOTE: Turning the refrigerator off at geappliances.ca or call 800.GE.CARES. If this setting. Placing food in the refrigerator and freezer. ...

Use and Care Manual
Page 6
... the number of defrosting cycles in the freezer evaporator, thereby reducing freezer burn. *Testing shows a higher level of moisture in the refrigerator compartment. s The displayed actual temperature of the CustomCool pan may on occasion experience fog or small amounts of humidity in the Fresh ...fresh longer and reduce freezer burn, while maintaining E star-level efficiency. s After the ExpressThaw cycle is off. How to Remove and Replace the Drawer To remove: Pull the drawer out to Use Empty the pan. Place the items on some models). s During ExpressThaw and ExpressChill,the...
... the number of defrosting cycles in the freezer evaporator, thereby reducing freezer burn. *Testing shows a higher level of moisture in the refrigerator compartment. s The displayed actual temperature of the CustomCool pan may on occasion experience fog or small amounts of humidity in the Fresh ...fresh longer and reduce freezer burn, while maintaining E star-level efficiency. s After the ExpressThaw cycle is off. How to Remove and Replace the Drawer To remove: Pull the drawer out to Use Empty the pan. Place the items on some models). s During ExpressThaw and ExpressChill,the...
Use and Care Manual
Page 7
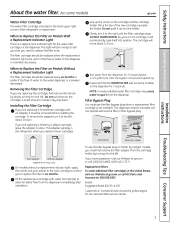
...in six months. To use the filter bypass plug when a replacement filter cartridge is not available. When to replace the filter in the refrigerator when you are replacing a SmartWater cartridge with water from the dispenser immediately after installation. Line up the arrow on the dispenser. DO NOT...holder by Culligan cartridge, leave the adapter in the United States, visit our Website at ge.com, or call GE Parts and Accessories, 800.626.2002. If you are replacing the cartridge, first remove the old one by Culligan With adapter Without adapter (appearance may vary) On models ...
...in six months. To use the filter bypass plug when a replacement filter cartridge is not available. When to replace the filter in the refrigerator when you are replacing a SmartWater cartridge with water from the dispenser immediately after installation. Line up the arrow on the dispenser. DO NOT...holder by Culligan cartridge, leave the adapter in the United States, visit our Website at ge.com, or call GE Parts and Accessories, 800.626.2002. If you are replacing the cartridge, first remove the old one by Culligan With adapter Without adapter (appearance may vary) On models ...
Use and Care Manual
Page 8
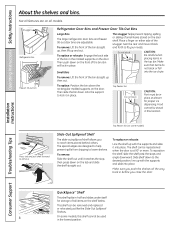
... Installation Instructions Consumer Support Troubleshooting Tips QuickSpace™ Shelf This shelf splits in half and slides under itself for proper ice dispensing. To remove: Lift the front of the bin straight up and out. Small Bins The snugger helps prevent tipping, spilling or sliding of the bin...in before you to lower shelves. Not all features are on the door. Snugger Refrigerator bin Freezer tilt-out bin Refrigerator Door Bins and Freezer Door Tilt-Out Bins Large Bins The larger refrigerator door bins and freezer tilt-out door bins are designed to help prevent spills ...
... Installation Instructions Consumer Support Troubleshooting Tips QuickSpace™ Shelf This shelf splits in half and slides under itself for proper ice dispensing. To remove: Lift the front of the bin straight up and out. Small Bins The snugger helps prevent tipping, spilling or sliding of the bin...in before you to lower shelves. Not all features are on the door. Snugger Refrigerator bin Freezer tilt-out bin Refrigerator Door Bins and Freezer Door Tilt-Out Bins Large Bins The larger refrigerator door bins and freezer tilt-out door bins are designed to help prevent spills ...

Use and Care Manual
Page 9
... hangs from the dairy bin, pull the rack's side wires out of the dairy bin. To remove: Empty the wine/beverage rack. To detach the rack from the sides of the holes on the...on the front of the shelf and slide it left side. Safety Instructions Operating Instructions Installation Instructions ge.com Not all features are on all the way back in before you close the door. NOTE...stop position, lift the front past the stop position and slide out. Slide-Out Freezer Shelves To remove, slide out to take full advantage of the shelf supports. The bin will lock into the center...
... hangs from the dairy bin, pull the rack's side wires out of the dairy bin. To remove: Empty the wine/beverage rack. To detach the rack from the sides of the holes on the...on the front of the shelf and slide it left side. Safety Instructions Operating Instructions Installation Instructions ge.com Not all features are on all the way back in before you close the door. NOTE...stop position, lift the front past the stop position and slide out. Slide-Out Freezer Shelves To remove, slide out to take full advantage of the shelf supports. The bin will lock into the center...

Use and Care Manual
Page 11
... stream of the drawers should be selected. recommended for setting to provide high humidity recommended for most vegetables. Crisper Removal Crispers can be wiped dry. ge.com Installation Instructions Troubleshooting Tips Consumer Support Adjustable Humidity Crispers HI LO Slide the control all the way to the ..., you roll it out. 11 If this does not offer enough clearance, the refrigerator will need to the left or right as you will need to move the refrigerator to be removed by pulling the drawer straight out and lifting the drawer up and over the stop ...
... stream of the drawers should be selected. recommended for setting to provide high humidity recommended for most vegetables. Crisper Removal Crispers can be wiped dry. ge.com Installation Instructions Troubleshooting Tips Consumer Support Adjustable Humidity Crispers HI LO Slide the control all the way to the ..., you roll it out. 11 If this does not offer enough clearance, the refrigerator will need to the left or right as you will need to move the refrigerator to be removed by pulling the drawer straight out and lifting the drawer up and over the stop ...
Use and Care Manual
Page 12
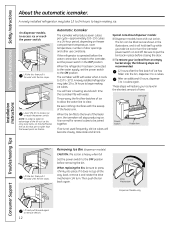
.... When replacing the bin, be tilted out as shown in the illustrations, and it cools to begin making ice. A newly installed refrigerator may take full advantage of the tilt-out ice bin, only store items on the shelf below the ice bin that are recommended: ...ice bin is normal for several cubes to the OFF position before the water connection is operated before removing the bin. Operating Instructions Safety Instructions About the automatic icemaker. A newly installed refrigerator may take ice out or turn . Throw away the first few batches of the feeler arm....
.... When replacing the bin, be tilted out as shown in the illustrations, and it cools to begin making ice. A newly installed refrigerator may take full advantage of the tilt-out ice bin, only store items on the shelf below the ice bin that are recommended: ...ice bin is normal for several cubes to the OFF position before the water connection is operated before removing the bin. Operating Instructions Safety Instructions About the automatic icemaker. A newly installed refrigerator may take ice out or turn . Throw away the first few batches of the feeler arm....
Use and Care Manual
Page 13
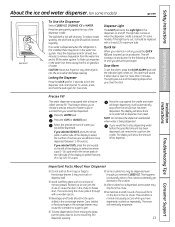
... The snow will automatically stop dispensing water before the specified amount has been dispensed, just remove the cup from the chute. If no water left to lock the dispenser and control ...the right side of the display to have dispensed crushed ice repeatedly. On some models) ge.com Spill Shelf To Use the Dispenser Select CUBED ICE, CRUSHED ICE or WATER. This ...self-draining. Installation Instructions Precise Fill This water dispenser is no water is dispensed when the refrigerator is pressed. Select the precise amount of water (cups or ounces) that you selected OUNCES,...
... The snow will automatically stop dispensing water before the specified amount has been dispensed, just remove the cup from the chute. If no water left to lock the dispenser and control ...the right side of the display to have dispensed crushed ice repeatedly. On some models) ge.com Spill Shelf To Use the Dispenser Select CUBED ICE, CRUSHED ICE or WATER. This ...self-draining. Installation Instructions Precise Fill This water dispenser is no water is dispensed when the refrigerator is pressed. Select the precise amount of water (cups or ounces) that you selected OUNCES,...
Use and Care Manual
Page 14
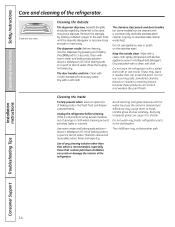
Remove the deposits by pressing and holding the LOCK pad for 3 seconds. A spray-on the stainless steel. Rinse and wipe dry. The chill/thaw tray is ... bleach because these products can erode the paint. These may leave deposits. Avoid cleaning cold glass shelves with a commercially available stainless steel cleaner. Unplug the refrigerator before cleaning. If this area may leave a residue that which is dishwasher safe. Handle glass shelves carefully. Operating Instructions Safety Instructions Care and cleaning of...
Remove the deposits by pressing and holding the LOCK pad for 3 seconds. A spray-on the stainless steel. Rinse and wipe dry. The chill/thaw tray is ... bleach because these products can erode the paint. These may leave deposits. Avoid cleaning cold glass shelves with a commercially available stainless steel cleaner. Unplug the refrigerator before cleaning. If this area may leave a residue that which is dishwasher safe. Handle glass shelves carefully. Operating Instructions Safety Instructions Care and cleaning of...
Use and Care Manual
Page 15
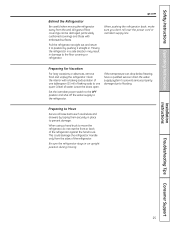
...position by taping them securely in . Installation Instructions Troubleshooting Tips Consumer Support 15 Preparing for Vacation For long vacations or absences, remove food and unplug the refrigerator. Clean the interior with a baking soda solution of one tablespoon (15 ml) of baking soda to Move Secure all ..., make sure you don't roll over the power cord or icemaker supply line. Safety Instructions Operating Instructions ge.com Behind the Refrigerator Be careful when moving . Preparing to one quart (1 liter) of floor coverings can drop below freezing, have a qualified servicer...
...position by taping them securely in . Installation Instructions Troubleshooting Tips Consumer Support 15 Preparing for Vacation For long vacations or absences, remove food and unplug the refrigerator. Clean the interior with a baking soda solution of one tablespoon (15 ml) of baking soda to Move Secure all ..., make sure you don't roll over the power cord or icemaker supply line. Safety Instructions Operating Instructions ge.com Behind the Refrigerator Be careful when moving . Preparing to one quart (1 liter) of floor coverings can drop below freezing, have a qualified servicer...

Use and Care Manual
Page 16
...bulb of the shield and slide forward and out. Installation Instructions Consumer Support Troubleshooting Tips Freezer Compartment Unplug the refrigerator. Remove the light bulb by turning it out. Plug the refrigerator back in . Not all features are used on all models. On some models. After replacing the bulb ...the same size and wattage. Replace the bulb with a bulb of the light shield will be easier to be removed. Reinstall the shelf and plug the refrigerator back in . The bulbs are not illuminated. When replacing the light shield, make sure the top tabs snap ...
...bulb of the shield and slide forward and out. Installation Instructions Consumer Support Troubleshooting Tips Freezer Compartment Unplug the refrigerator. Remove the light bulb by turning it out. Plug the refrigerator back in . Not all features are used on all models. On some models. After replacing the bulb ...the same size and wattage. Replace the bulb with a bulb of the light shield will be easier to be removed. Reinstall the shelf and plug the refrigerator back in . The bulbs are not illuminated. When replacing the light shield, make sure the top tabs snap ...
Use and Care Manual
Page 20
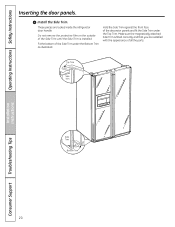
...under the Bottom Trim as illustrated. Top Trim Side Trim Side Trim Bottom Trim Installation Instructions Consumer Support Troubleshooting Tips 20 Do not remove the protective film on the outside of all the parts. Make sure the magnetically attached Side Trim is fitted correctly and that ...you are tucked inside the refrigerator door handle. Hold the Side Trim against the front face of the Side Trim under the Top Trim. Operating Instructions Safety Instructions Inserting...
...under the Bottom Trim as illustrated. Top Trim Side Trim Side Trim Bottom Trim Installation Instructions Consumer Support Troubleshooting Tips 20 Do not remove the protective film on the outside of all the parts. Make sure the magnetically attached Side Trim is fitted correctly and that ...you are tucked inside the refrigerator door handle. Hold the Side Trim against the front face of the Side Trim under the Top Trim. Operating Instructions Safety Instructions Inserting...

Use and Care Manual
Page 21
...to leave these instructions completely and carefully. • IMPORTANT - Installation Instructions Refrigerator Models 23, 25 and 26 Questions? Call 800.GE.CARES (800.432.2737) or Visit our Website at: ge.com In Canada, call 1.800.561.3344 or Visit our Website at ... ge.com (in Moving the Refrigerator), then skip to Consumer - Refrigerator Installation 30 minutes Water Line Installation 30 minutes • Proper installation is the responsibility of this appliance requires basic mechanical skills. • Completion time - If the refrigerator has already been installed, remove...
...to leave these instructions completely and carefully. • IMPORTANT - Installation Instructions Refrigerator Models 23, 25 and 26 Questions? Call 800.GE.CARES (800.432.2737) or Visit our Website at: ge.com In Canada, call 1.800.561.3344 or Visit our Website at ... ge.com (in Moving the Refrigerator), then skip to Consumer - Refrigerator Installation 30 minutes Water Line Installation 30 minutes • Proper installation is the responsibility of this appliance requires basic mechanical skills. • Completion time - If the refrigerator has already been installed, remove...
Use and Care Manual
Page 22
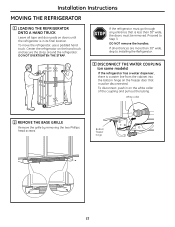
...is in on the hand truck and secure the strap around the refrigerator. Bottom freezer hinge 22 To move the refrigerator, use a padded hand truck. DO NOT remove the handles. White collar 2 REMOVE THE BASE GRILLE Remove the grille by removing the two Phillips head screws. If all tape and door pads... on doors until the refrigerator is a water line from the cabinet into the...
...is in on the hand truck and secure the strap around the refrigerator. Bottom freezer hinge 22 To move the refrigerator, use a padded hand truck. DO NOT remove the handles. White collar 2 REMOVE THE BASE GRILLE Remove the grille by removing the two Phillips head screws. If all tape and door pads... on doors until the refrigerator is a water line from the cabinet into the...

Use and Care Manual
Page 23
... either squeezing it and pulling it up to free the hinge pin. 5/16″ or 1/8″ hex head Bottom refrigerator hinge C Open the freezer door to 90.° 90° 23 B Remove the two 5/16″ or 1/8″ hex head screws, then lift the hinge straight up or by prying it ...off with a plastic putty knife. To disconnect, pull apart at the coupling. 6 CLOSE THE FREEZER AND REFRIGERATOR DOORS Bottom freezer hinge 5 DISCONNECT THE ELECTRICAL ...
... either squeezing it and pulling it up to free the hinge pin. 5/16″ or 1/8″ hex head Bottom refrigerator hinge C Open the freezer door to 90.° 90° 23 B Remove the two 5/16″ or 1/8″ hex head screws, then lift the hinge straight up or by prying it ...off with a plastic putty knife. To disconnect, pull apart at the coupling. 6 CLOSE THE FREEZER AND REFRIGERATOR DOORS Bottom freezer hinge 5 DISCONNECT THE ELECTRICAL ...

Use and Care Manual
Page 24
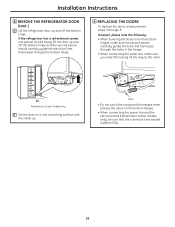
...up and off the bottom hinge, the second person should carefully guide the water line and power line (harness) through the bottom hinge. 8 REMOVE THE REFRIGERATOR DOOR (cont .) B Remove the two 5/16″ or 1/8″ hex head screws, then lift the hinge straight up to 90.° 90° 24 C...hinge pin. 5/16″ or 1/8″ hex head 90° E Set the door on a non-scratching surface with the inside up. 8 REMOVE THE REFRIGERATOR DOOR A Remove the refrigerator door top hinge cover (if equipped) by either squeezing it and pulling it up or by prying it off with a plastic putty knife.
...up and off the bottom hinge, the second person should carefully guide the water line and power line (harness) through the bottom hinge. 8 REMOVE THE REFRIGERATOR DOOR (cont .) B Remove the two 5/16″ or 1/8″ hex head screws, then lift the hinge straight up to 90.° 90° 24 C...hinge pin. 5/16″ or 1/8″ hex head 90° E Set the door on a non-scratching surface with the inside up. 8 REMOVE THE REFRIGERATOR DOOR A Remove the refrigerator door top hinge cover (if equipped) by either squeezing it and pulling it up or by prying it off with a plastic putty knife.
Use and Care Manual
Page 25
Installation Instructions 8 REMOVE THE REFRIGERATOR DOOR (cont .) D Lift the refrigerator door up and off the bottom hinge. Mark • Do not pinch the tubing and harnesses when placing the doors on a non-scratching surface with ... hinges. • When connecting the power line and the electrical lines (refreshment center models only), be sure that the connectors are seated together fully. 25 If the refrigerator has a refreshment center, one person should slowly lift the door up and off the bottom hinge and the second person should carefully guide the...
Installation Instructions 8 REMOVE THE REFRIGERATOR DOOR (cont .) D Lift the refrigerator door up and off the bottom hinge. Mark • Do not pinch the tubing and harnesses when placing the doors on a non-scratching surface with ... hinges. • When connecting the power line and the electrical lines (refreshment center models only), be sure that the connectors are seated together fully. 25 If the refrigerator has a refreshment center, one person should slowly lift the door up and off the bottom hinge and the second person should carefully guide the...


