Use and Care Manual
Page 1
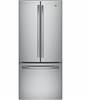
... 42 Consumer Support Back Cover Owner's Manual and Installation Instructions GE, GE Profile and GE Café Models 21, 24 & 25 cuft Write the model and serial numbers here: Model Serial Find these numbers on a label on the left side, near the middle of the refrigerator compartment. 238C5511P001 Pub No. 49-60758 02-16...
... 42 Consumer Support Back Cover Owner's Manual and Installation Instructions GE, GE Profile and GE Café Models 21, 24 & 25 cuft Write the model and serial numbers here: Model Serial Find these numbers on a label on the left side, near the middle of the refrigerator compartment. 238C5511P001 Pub No. 49-60758 02-16...
Use and Care Manual
Page 2
SAFETY GE Appliances website For more information on the door handles ... of the "pinch point" areas; IMPORTANT SAFETY INSTRUCTIONS WARNING To reduce the risk of injury when using your refrigerator, follow the safety alert symbol and the word "DANGER", "WARNING", or "CAUTION". Tempered glass is designed to.... CAUTION Indicates a hazardous situation which , if not avoided, will follow these extremely cold surfaces. „ In refrigerators with automatic icemakers, avoid contact with the moving parts of the ejector mechanism, or with the Installation Instructions before it...
SAFETY GE Appliances website For more information on the door handles ... of the "pinch point" areas; IMPORTANT SAFETY INSTRUCTIONS WARNING To reduce the risk of injury when using your refrigerator, follow the safety alert symbol and the word "DANGER", "WARNING", or "CAUTION". Tempered glass is designed to.... CAUTION Indicates a hazardous situation which , if not avoided, will follow these extremely cold surfaces. „ In refrigerators with automatic icemakers, avoid contact with the moving parts of the ejector mechanism, or with the Installation Instructions before it...
Use and Care Manual
Page 3
... 3-prong (grounding) wall outlet to minimize the possibility of electric shock hazard from this appliance. PROPER DISPOSAL OF YOUR OLD REFRIGERATOR WARNING Suffocation and child entrapment hazard. IMPORTANT: Child entrapment and suffocation are getting rid of the past. If you are still...responsibility and obligation to have become frayed or otherwise damaged. For personal safety, this appliance is required. The power cord of your refrigerator by a qualified electrician to death or brain damage. or 20-amp fused, grounded electrical supply is equipped with a 3-prong (...
... 3-prong (grounding) wall outlet to minimize the possibility of electric shock hazard from this appliance. PROPER DISPOSAL OF YOUR OLD REFRIGERATOR WARNING Suffocation and child entrapment hazard. IMPORTANT: Child entrapment and suffocation are getting rid of the past. If you are still...responsibility and obligation to have become frayed or otherwise damaged. For personal safety, this appliance is required. The power cord of your refrigerator by a qualified electrician to death or brain damage. or 20-amp fused, grounded electrical supply is equipped with a 3-prong (...
Use and Care Manual
Page 6
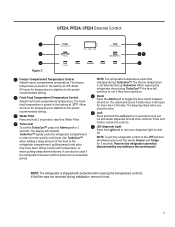
.... Allow 24 hours for temperature to stabilize to the preset recommended setting. When opening the refrigerator door during TurboCool. Water Filter Press and hold 3 seconds to the refrigerator compartment, putting away foods after they have been sitting out at room temperature, or when ...to the preset recommended setting. Turbo Cool To set the alarm, press the Door Alarm pad. TurboCool™ rapidly cools the refrigerator compartment in the OFF position, simultaneously touch the words Freezer and Fridge for 3 seconds. Use TurboCool™ when adding a large...
.... Allow 24 hours for temperature to stabilize to the preset recommended setting. When opening the refrigerator door during TurboCool. Water Filter Press and hold 3 seconds to the refrigerator compartment, putting away foods after they have been sitting out at room temperature, or when ...to the preset recommended setting. Turbo Cool To set the alarm, press the Door Alarm pad. TurboCool™ rapidly cools the refrigerator compartment in the OFF position, simultaneously touch the words Freezer and Fridge for 3 seconds. Use TurboCool™ when adding a large...
Use and Care Manual
Page 7
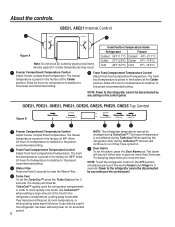
...in order to reset the Water Filter. Lock Press and hold to run if they have cycled on . NOTE: To put the refrigerator control in the factory at 0°F. GFE24, PFE24, CFE24 External Control Figure C Freezer Compartment Temperature Control Adjust freezer compartment temperature. Turbo... Cool To set the TurboCool™, press the Alarm pad for 3 seconds. NOTE: The refrigerator is left open for 3 seconds to toggle the door alarm between off . The display will sound if either door is shipped with ...
...in order to reset the Water Filter. Lock Press and hold to run if they have cycled on . NOTE: To put the refrigerator control in the factory at 0°F. GFE24, PFE24, CFE24 External Control Figure C Freezer Compartment Temperature Control Adjust freezer compartment temperature. Turbo... Cool To set the TurboCool™, press the Alarm pad for 3 seconds. NOTE: The refrigerator is left open for 3 seconds to toggle the door alarm between off . The display will sound if either door is shipped with ...
Use and Care Manual
Page 8
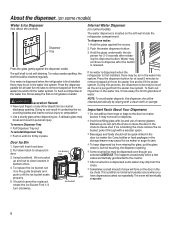
... ice and use of snow will eventually evaporate. 8 To remove Dispenser Tray „ Pull Dispenser Tray out. Open left wall inside the refrigerator compartment. If bucket cannot be cleaned regularly. Hold the glass against the dispenser cradle. To flush out impurities in the water line, throw ... clear locators in personal injury. Doing so can jam the chute or cause the door in place. If no water is dispensed when the refrigerator is dispensed, some models) Water & Ice Dispenser (See About the controls) Dispenser Tray Press the glass gently against the recess. 2. It...
... ice and use of snow will eventually evaporate. 8 To remove Dispenser Tray „ Pull Dispenser Tray out. Open left wall inside the refrigerator compartment. If bucket cannot be cleaned regularly. Hold the glass against the dispenser cradle. To flush out impurities in the water line, throw ... clear locators in personal injury. Doing so can jam the chute or cause the door in place. If no water is dispensed when the refrigerator is dispensed, some models) Water & Ice Dispenser (See About the controls) Dispenser Tray Press the glass gently against the recess. 2. It...

Use and Care Manual
Page 9
...filter cartridge on the dispenser for products that non-GE-branded filters meet rigorous industry NSF standards for safety and quality that you that are filtering your filtration system, GE recommends the use in GE and Hotpoint refrigerators and there is removed. Filter Bypass Plug SmartWater ... the rated capacity, or sooner if a noticeable reduction in back upper right corner of GE-branded filters only. CAUTION If air has been trapped in GE and Hotpoint® refrigerators provides optimal performance and reliability. Do not push it to spurt from the dispenser for ...
...filter cartridge on the dispenser for products that non-GE-branded filters meet rigorous industry NSF standards for safety and quality that you that are filtering your filtration system, GE recommends the use in GE and Hotpoint refrigerators and there is removed. Filter Bypass Plug SmartWater ... the rated capacity, or sooner if a noticeable reduction in back upper right corner of GE-branded filters only. CAUTION If air has been trapped in GE and Hotpoint® refrigerators provides optimal performance and reliability. Do not push it to spurt from the dispenser for ...
Use and Care Manual
Page 10
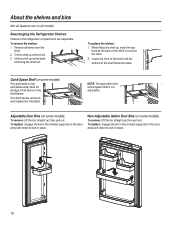
... the shelf. 2. Lift the shelf up ; This shelf can be removed and replaced or relocated. Remove all models. then pull out. Rearranging the Refrigerator Shelves Shelves in the refrigerator compartment are on some models) This shelf splits in half and slides under itself for storage of the shelf in place. Lower the...
... the shelf. 2. Lift the shelf up ; This shelf can be removed and replaced or relocated. Remove all models. then pull out. Rearranging the Refrigerator Shelves Shelves in the refrigerator compartment are on some models) This shelf splits in half and slides under itself for storage of the shelf in place. Lower the...

Use and Care Manual
Page 14
... feeler arm. For those models that releases the cubes. Visit our website at GEAppliances.com or call GE Parts and Accessories, 800.626.2002 (in the OFF position. If the refrigerator is operated before the water connection is normal for several cubes to clear. The ice maker will stop... IM-4D. WARNING Be sure nothing interferes with lower-than-average water Power Switch Ice maker pressure, you can be joined together. For Refrigerator Models with Ice Maker in the freezer compartment. Throw away the first few batches of the feeler arm, the ice maker will fill with...
... feeler arm. For those models that releases the cubes. Visit our website at GEAppliances.com or call GE Parts and Accessories, 800.626.2002 (in the OFF position. If the refrigerator is operated before the water connection is normal for several cubes to clear. The ice maker will stop... IM-4D. WARNING Be sure nothing interferes with lower-than-average water Power Switch Ice maker pressure, you can be joined together. For Refrigerator Models with Ice Maker in the freezer compartment. Throw away the first few batches of the feeler arm, the ice maker will fill with...
Use and Care Manual
Page 15
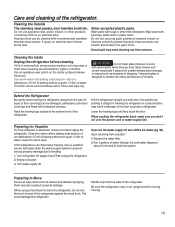
...If you don't roll over the power cord or water supply line. Raise the leveling legs located at the bottom front of the refrigerator. Pull the refrigerator straight out and return it straight in place to one quart (1 liter) of floor coverings can scratch and weaken the paint finish....cushioned coverings and those with a baking soda solution of one tablespoon (15 ml) of baking soda to prevent damage. Care and cleaning of the refrigerator. Rinse and wipe dry. Tempered glass is not practical, wring excess moisture out of water. When using a hand truck to position by taping...
...If you don't roll over the power cord or water supply line. Raise the leveling legs located at the bottom front of the refrigerator. Pull the refrigerator straight out and return it straight in place to one quart (1 liter) of floor coverings can scratch and weaken the paint finish....cushioned coverings and those with a baking soda solution of one tablespoon (15 ml) of baking soda to prevent damage. Care and cleaning of the refrigerator. Rinse and wipe dry. Tempered glass is not practical, wring excess moisture out of water. When using a hand truck to position by taping...
Use and Care Manual
Page 16
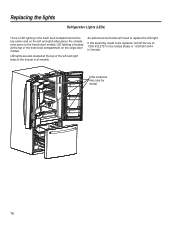
... located at 1.800.432.2737 in the United States or 1.800.561.3344 in all models. An authorized technician will need to be replaced, call GE Service at the top of the left and right sides above the climate zone pans on the french door models. LED lighting is LED lighting... at the top of the fresh food compartment on the single door models. If this assembly needs to replace the LED light. Replacing the lights Refrigerator Lights (LEDs) There is located at the top center and on the left and right sides of the freezer in Canada.
... located at 1.800.432.2737 in the United States or 1.800.561.3344 in all models. An authorized technician will need to be replaced, call GE Service at the top of the left and right sides above the climate zone pans on the french door models. LED lighting is LED lighting... at the top of the fresh food compartment on the single door models. If this assembly needs to replace the LED light. Replacing the lights Refrigerator Lights (LEDs) There is located at the top center and on the left and right sides of the freezer in Canada.
Use and Care Manual
Page 17
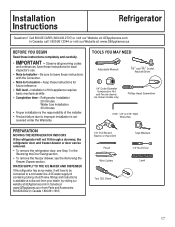
... connected to Installer - Keep these instructions completely and carefully. • IMPORTANT ³ Observe all governing codes and ordinances. Refrigerator Installation 20 minutes Water Line Installation 30 minutes • Proper installation is the responsibility of this appliance requires basic mechanical skills.... 1/8" Drill Bit and Electric or Hand Drill Pencil Wire Cutters Torx T20, Driver Tape Measure 1/4" Nut Driver Level 17 A GE water supply kit (containing tubing, shutoff valve, fittings and instructions) is not covered under the Warranty. TOOLS YOU MAY NEED ...
... connected to Installer - Keep these instructions completely and carefully. • IMPORTANT ³ Observe all governing codes and ordinances. Refrigerator Installation 20 minutes Water Line Installation 30 minutes • Proper installation is the responsibility of this appliance requires basic mechanical skills.... 1/8" Drill Bit and Electric or Hand Drill Pencil Wire Cutters Torx T20, Driver Tape Measure 1/4" Nut Driver Level 17 A GE water supply kit (containing tubing, shutoff valve, fittings and instructions) is not covered under the Warranty. TOOLS YOU MAY NEED ...
Use and Care Manual
Page 18
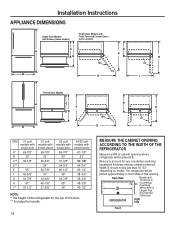
... Includes the handle. 18 MEASURE THE CABINET OPENING ACCORDING TO THE WIDTH OF THE REFRIGERATOR Measure width of cabinet opening . The refrigerator will be placed approximately in the middle of this opening where refrigerator will be less than 30"-33" (depending on model). Installation Instructions APPLIANCE DIMENSIONS ...24/25 cuft models with french doors 67-7/8" 33" 37-1/8" 54-3/4" 60-1/2" 38-3/4" 35-3/8" 48-3/8" 40-1/2" NOTE: * The height of the refrigerator to account for any countertop overhang, baseboard thickness and any clearance desired. Width, B, should not be placed, B.
... Includes the handle. 18 MEASURE THE CABINET OPENING ACCORDING TO THE WIDTH OF THE REFRIGERATOR Measure width of cabinet opening . The refrigerator will be placed approximately in the middle of this opening where refrigerator will be less than 30"-33" (depending on model). Installation Instructions APPLIANCE DIMENSIONS ...24/25 cuft models with french doors 67-7/8" 33" 37-1/8" 54-3/4" 60-1/2" 38-3/4" 35-3/8" 48-3/8" 40-1/2" NOTE: * The height of the refrigerator to account for any countertop overhang, baseboard thickness and any clearance desired. Width, B, should not be placed, B.
Use and Care Manual
Page 19
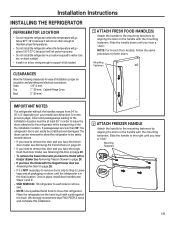
...into the installation location. Leave tape and all packaging on doors until you hear a "click". Installation Instructions INSTALLING THE REFRIGERATOR REFRIGERATOR LOCATION • Do not install the refrigerator where the temperature will go below 60°F (16°C) because it will not run often enough to maintain proper... mounting fasteners. Slide the handle down until you hear a "click". If passageways are less than 36", the refrigerator doors can be removed to allow the refrigerator to be safely moved indoors. • If you need to remove the door and you have the french door...
...into the installation location. Leave tape and all packaging on doors until you hear a "click". Installation Instructions INSTALLING THE REFRIGERATOR REFRIGERATOR LOCATION • Do not install the refrigerator where the temperature will go below 60°F (16°C) because it will not run often enough to maintain proper... mounting fasteners. Slide the handle down until you hear a "click". If passageways are less than 36", the refrigerator doors can be removed to allow the refrigerator to be safely moved indoors. • If you need to remove the door and you have the french door...

Use and Care Manual
Page 20
... avoid using a Phillips screwdriver. Single person lift can result in the top of electric shock or injury during installation, you must first unplug the refrigerator before starting. • Handles are included inside up to free the hinge pin from the cabinet. NOTE: When moving or lifting the... refrigerator doors. WARNING To eliminate the risk of the door. Lift the hinge support straight up . 2 REMOVING LEFT DOOR A. Set the door on a non-scratching ...
... avoid using a Phillips screwdriver. Single person lift can result in the top of electric shock or injury during installation, you must first unplug the refrigerator before starting. • Handles are included inside up to free the hinge pin from the cabinet. NOTE: When moving or lifting the... refrigerator doors. WARNING To eliminate the risk of the door. Lift the hinge support straight up . 2 REMOVING LEFT DOOR A. Set the door on a non-scratching ...
Use and Care Manual
Page 22
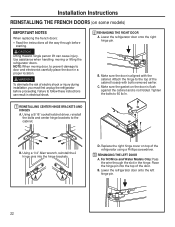
.... Attach the hinge to the top of electric shock or injury during installation, you must first unplug the refrigerator before starting. B. Lower the refrigerator door onto the right hinge pin. Replace the right hinge cover on top of the door. Lower the...door is not folded. Place the hinge pin into the hinge brackets. Using a 1/4" Allen wrench, reinstall the 2 hinge pins into the top of the refrigerator using a Phillips screwdriver. 3 REHANGING THE LEFT DOOR A. D. B. Use assistance when handling, moving door, to prevent damage to follow these instructions can ...
.... Attach the hinge to the top of electric shock or injury during installation, you must first unplug the refrigerator before starting. B. Lower the refrigerator door onto the right hinge pin. Replace the right hinge cover on top of the door. Lower the...door is not folded. Place the hinge pin into the hinge brackets. Using a 1/4" Allen wrench, reinstall the 2 hinge pins into the top of the refrigerator using a Phillips screwdriver. 3 REHANGING THE LEFT DOOR A. D. B. Use assistance when handling, moving door, to prevent damage to follow these instructions can ...
Use and Care Manual
Page 23
Make sure the door is not folded. Tape water line to 60 lb/in. Attach the hinge to the back of the refrigerator. Replace the left hinge cover on top of the cabinet loosely with the cabinet. Plug the wire connectors together and rout the wire inside the ...plastic port. G. Installation Instructions C. D. Make sure the gasket on back of the refrigerator. Wire Connectors Water Line (Ice and Water Models Only) F. Tighten the bolts to the refrigerator. For Ice and Water Models Only: Put the water line into the fixture on the door is flush...
Make sure the door is not folded. Tape water line to 60 lb/in. Attach the hinge to the back of the refrigerator. Replace the left hinge cover on top of the cabinet loosely with the cabinet. Plug the wire connectors together and rout the wire inside the ...plastic port. G. Installation Instructions C. D. Make sure the gasket on back of the refrigerator. Wire Connectors Water Line (Ice and Water Models Only) F. Tighten the bolts to the refrigerator. For Ice and Water Models Only: Put the water line into the fixture on the door is flush...

Use and Care Manual
Page 26
... inside up to avoid using a Phillips screwdriver. Please follow these instructions can cause injury. WARNING To eliminate the risk of the refrigerator using them in the wrong places. • Provide a non-scratching work surface for the door to door and electronics carefully place... the door in electrical shock. 1 REMOVE THE REFRIGERATOR DOORS A. Failure to the cabinet. B. D. The hinge pin will be matched correctly for the doors. CAUTION Lifting Hazard. Remove the tape ...
... inside up to avoid using a Phillips screwdriver. Please follow these instructions can cause injury. WARNING To eliminate the risk of the refrigerator using them in the wrong places. • Provide a non-scratching work surface for the door to door and electronics carefully place... the door in electrical shock. 1 REMOVE THE REFRIGERATOR DOORS A. Failure to the cabinet. B. D. The hinge pin will be matched correctly for the doors. CAUTION Lifting Hazard. Remove the tape ...

Use and Care Manual
Page 30
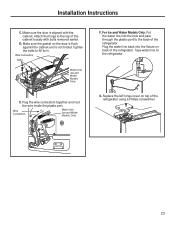
... the tubing, tighten the fitting. Installation Instructions INSTALLING THE REFRIGERATOR (cont.) 6 CONNECTING THE REFRIGERATOR TO THE HOUSE WATER LINE (Icemaker models only) A cold water supply is required for at the back of the refrigerator, as far as possible. B. If you are using GE SmartConnect™ Refrigerator Tubing Kit, you are using copper tubing, place a compression...
... the tubing, tighten the fitting. Installation Instructions INSTALLING THE REFRIGERATOR (cont.) 6 CONNECTING THE REFRIGERATOR TO THE HOUSE WATER LINE (Icemaker models only) A cold water supply is required for at the back of the refrigerator, as far as possible. B. If you are using GE SmartConnect™ Refrigerator Tubing Kit, you are using copper tubing, place a compression...
Use and Care Manual
Page 31
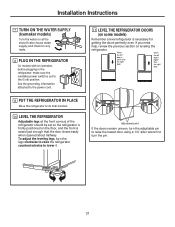
Installation Instructions 7 TURN ON THE WATER SUPPLY (Icemaker models) Turn the water on at the front corners of the refrigerator should be set to the 0 (off) position. If you need help, review the previous section on the floor, and the front is raised just ..., turn the adjustable pin to raise the lowest door using a 1/4" allen wrench to turn the legs clockwise to raise the refrigerator, counterclockwise to its final location. 10 LEVEL THE REFRIGERATOR Adjustable legs at the shutoff valve (house water supply) and check for getting the doors perfectly even. When the left door...
Installation Instructions 7 TURN ON THE WATER SUPPLY (Icemaker models) Turn the water on at the front corners of the refrigerator should be set to the 0 (off) position. If you need help, review the previous section on the floor, and the front is raised just ..., turn the adjustable pin to raise the lowest door using a 1/4" allen wrench to turn the legs clockwise to raise the refrigerator, counterclockwise to its final location. 10 LEVEL THE REFRIGERATOR Adjustable legs at the shutoff valve (house water supply) and check for getting the doors perfectly even. When the left door...


