Use and Care Manual
Page 1
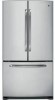
Customers 33 Owner's Manual and Installation Instructions GE Model 26 Congélateur inférieur Réfrigérateurs Manuel d'utilisation et d'installation La section française commence à ...Controls 4, 5 Dispenser 5 Freezer 10 Replacing the Light Bulbs 14 Fresh Food Storage Options 7-9 Water Filter 6 Installation Instructions Installing the Refrigerator 16-23 Installing the Water Line 24-26 Preparing to Install the Refrigerator 15 Troubleshooting Tips . . . . . .27-30 Normal Operating Sounds 27 Consumer Support Consumer Support Back Cover Performance Data Sheet...
Customers 33 Owner's Manual and Installation Instructions GE Model 26 Congélateur inférieur Réfrigérateurs Manuel d'utilisation et d'installation La section française commence à ...Controls 4, 5 Dispenser 5 Freezer 10 Replacing the Light Bulbs 14 Fresh Food Storage Options 7-9 Water Filter 6 Installation Instructions Installing the Refrigerator 16-23 Installing the Water Line 24-26 Preparing to Install the Refrigerator 15 Troubleshooting Tips . . . . . .27-30 Normal Operating Sounds 27 Consumer Support Consumer Support Back Cover Performance Data Sheet...
Use and Care Manual
Page 2
... you are getting rid of the cord be properly installed and located in the vicinity of this Owner's Manual. Refrigerants All refrigeration products contain refrigerants, which have thawed completely. Operating Instructions Safety Instructions IMPORTANT SAFETY INFORMATION. I Do not allow children to climb, stand... or hang on the automatic icemaking mechanism while the refrigerator is used. clearances between the doors and between the doors and cabinet are not problems of potential safety hazards under federal...
... you are getting rid of the cord be properly installed and located in the vicinity of this Owner's Manual. Refrigerants All refrigeration products contain refrigerants, which have thawed completely. Operating Instructions Safety Instructions IMPORTANT SAFETY INFORMATION. I Do not allow children to climb, stand... or hang on the automatic icemaking mechanism while the refrigerator is used. clearances between the doors and between the doors and cabinet are not problems of potential safety hazards under federal...
Use and Care Manual
Page 3
...damaged. This provides the best performance and also prevents overloading house wiring circuits which has a voltage rating that have it is your refrigerator by a qualified electrician to minimize the possibility of this appliance is properly grounded. Always grip plug firmly and pull straight out ...from the power cord. When moving the refrigerator away from overheated wires. HOW TO CONNECT ELECTRICITY Do not, under any circumstances, cut or remove the third (ground) prong from...
...damaged. This provides the best performance and also prevents overloading house wiring circuits which has a voltage rating that have it is your refrigerator by a qualified electrician to minimize the possibility of this appliance is properly grounded. Always grip plug firmly and pull straight out ...from the power cord. When moving the refrigerator away from overheated wires. HOW TO CONNECT ELECTRICITY Do not, under any circumstances, cut or remove the third (ground) prong from...
Use and Care Manual
Page 4
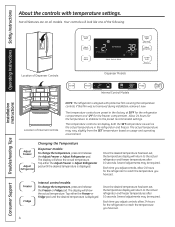
... Instructions Consumer Support Troubleshooting Tips Location of Dispenser Controls Dispenser Models Internal Control Models Location of Internal Controls NOTE: The refrigerator is displayed. If this film was not removed during installation, remove it now. The temperature controls can display both the...the desired temperature is displayed. Internal control models: To change the temperature, press and release the Adjust Freezer or Adjust Refrigerator pad. Once the desired temperature has been set , the temperature display will return to the preset recommended settings. Operating ...
... Instructions Consumer Support Troubleshooting Tips Location of Dispenser Controls Dispenser Models Internal Control Models Location of Internal Controls NOTE: The refrigerator is displayed. If this film was not removed during installation, remove it now. The temperature controls can display both the...the desired temperature is displayed. Internal control models: To change the temperature, press and release the Adjust Freezer or Adjust Refrigerator pad. Once the desired temperature has been set , the temperature display will return to the preset recommended settings. Operating ...
Use and Care Manual
Page 5
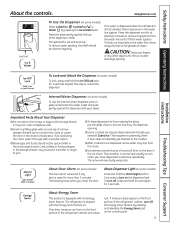
.... I After crushed ice is normal and usually occurs when you close to jam. About Door Alarm (on the front surface of the refrigerator cabinet and cause rust. If moisture does appear on some models) To use of snow will eventually evaporate. Repeat this step to the ...to freeze shut. Press the dispenser arm for 3 seconds. I To keep dispensed ice from trays or bags to fill the water system. The refrigerator is not self-draining. The spill shelf is shipped with an Energy Saver feature. This condition is dispensed, some models) To lock, press and...
.... I After crushed ice is normal and usually occurs when you close to jam. About Door Alarm (on the front surface of the refrigerator cabinet and cause rust. If moisture does appear on some models) To use of snow will eventually evaporate. Repeat this step to the ...to freeze shut. Press the dispenser arm for 3 seconds. I To keep dispensed ice from trays or bags to fill the water system. The refrigerator is not self-draining. The spill shelf is shipped with an Energy Saver feature. This condition is dispensed, some models) To lock, press and...

Use and Care Manual
Page 6
... See To Use the Dispenser section. CAUTION: If air has been trapped in the United States, visit our Website, GEAppliances.com or call GE Parts and Accessories, 800.626.2002. Slowly rotate the cartridge clockwise until it is not available. Do not overtighten. The icemaker will rotate ... six months or if the flow of the cartridge. Lining up the arrow on the cartridge and the cartridge holder, place the top of the refrigerator compartment. Press and hold the Ice & Water pad for 3 minutes (about 1/4 turn the cartridge, it will automatically raise itself into the holder...
... See To Use the Dispenser section. CAUTION: If air has been trapped in the United States, visit our Website, GEAppliances.com or call GE Parts and Accessories, 800.626.2002. Slowly rotate the cartridge clockwise until it is not available. Do not overtighten. The icemaker will rotate ... six months or if the flow of the cartridge. Lining up the arrow on the cartridge and the cartridge holder, place the top of the refrigerator compartment. Press and hold the Ice & Water pad for 3 minutes (about 1/4 turn the cartridge, it will automatically raise itself into the holder...
Use and Care Manual
Page 7
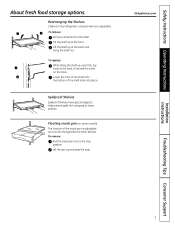
... Support 7 Safety Instructions Operating Instructions About fresh food storage options. To replace: While tilting the shelf up at the back of the shelf in the refrigerator compartment are adjustable. To remove: Remove all items from dripping to lower shelves. Tilt the shelf up and past the stop position. To remove: Pull...
... Support 7 Safety Instructions Operating Instructions About fresh food storage options. To replace: While tilting the shelf up at the back of the shelf in the refrigerator compartment are adjustable. To remove: Remove all items from dripping to lower shelves. Tilt the shelf up and past the stop position. To remove: Pull...
Use and Care Manual
Page 8
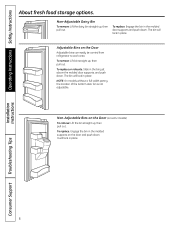
... 8 Operating Instructions Safety Instructions About fresh food storage options. Non-Adjustable Bins on the Door (on the Door Adjustable bins can easily be carried from refrigerator to work area. It will lock in place. NOTE: On models without a full-width pantry, the location of the bottom door bin is not adjustable...
... 8 Operating Instructions Safety Instructions About fresh food storage options. Non-Adjustable Bins on the Door (on the Door Adjustable bins can easily be carried from refrigerator to work area. It will lock in place. NOTE: On models without a full-width pantry, the location of the bottom door bin is not adjustable...
Use and Care Manual
Page 11
...Ice Off pad on the freezer compartment temperature, room temperature, number of ice. Installation Instructions Troubleshooting Tips Consumer Support 11 If the refrigerator is operated before the water connection is normal for several cubes to disengage the icemaker. When the bin fills to the level of... arm, the icemaker will depend on the control panel to be joined together. Be sure nothing interferes with water. A newly installed refrigerator may take 12 to 24 hours to begin making one batch of door openings and other use conditions. The icemaker cycle will stop...
...Ice Off pad on the freezer compartment temperature, room temperature, number of ice. Installation Instructions Troubleshooting Tips Consumer Support 11 If the refrigerator is operated before the water connection is normal for several cubes to disengage the icemaker. When the bin fills to the level of... arm, the icemaker will depend on the control panel to be joined together. Be sure nothing interferes with water. A newly installed refrigerator may take 12 to 24 hours to begin making one batch of door openings and other use conditions. The icemaker cycle will stop...
Use and Care Manual
Page 12
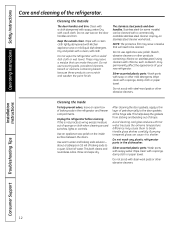
... or other products containing chlorine on the door handles and trim. Operating Instructions Safety Instructions Care and cleaning of your new refrigerator. Cleaning the Outside The door handles and trim. Do not use appliance wax, polish, bleach, abrasive cleaners or other abrasive...dishwasher. Do not use wax on stainless steel. Wash parts with kitchen appliance wax or mild liquid dish detergent. Unplug the refrigerator before cleaning. Avoid cleaning cold glass shelves with steel-wool pads or other mild detergents. Handle glass shelves carefully. Silver-accented...
... or other products containing chlorine on the door handles and trim. Operating Instructions Safety Instructions Care and cleaning of your new refrigerator. Cleaning the Outside The door handles and trim. Do not use appliance wax, polish, bleach, abrasive cleaners or other abrasive...dishwasher. Do not use wax on stainless steel. Wash parts with kitchen appliance wax or mild liquid dish detergent. Unplug the refrigerator before cleaning. Avoid cleaning cold glass shelves with steel-wool pads or other mild detergents. Handle glass shelves carefully. Silver-accented...
Use and Care Manual
Page 13
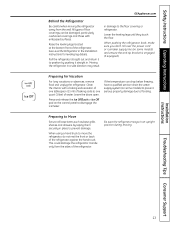
...particularly cushioned coverings and those with a baking soda solution of one tablespoon (15 ml) of baking soda to flooding. This could damage the refrigerator. Preparing to Move Secure all loose items such as base grille, shelves and drawers by taping them securely in place to position by pushing ...Lock or Ice Off pad on some models) to prevent serious property damage due to one quart (1 liter) of the refrigerator. When using a hand truck to move the refrigerator, do not rest the front or back of floor coverings can drop below freezing, have a qualified servicer drain the water...
...particularly cushioned coverings and those with a baking soda solution of one tablespoon (15 ml) of baking soda to flooding. This could damage the refrigerator. Preparing to Move Secure all loose items such as base grille, shelves and drawers by taping them securely in place to position by pushing ...Lock or Ice Off pad on some models) to prevent serious property damage due to one quart (1 liter) of the refrigerator. When using a hand truck to move the refrigerator, do not rest the front or back of floor coverings can drop below freezing, have a qualified servicer drain the water...
Use and Care Manual
Page 14
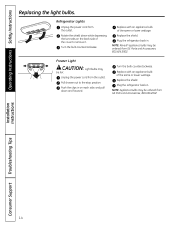
... in . Turn the bulb counterclockwise. Turn the bulb counterclockwise. Installation Instructions Consumer Support Troubleshooting Tips 14 Refrigerator Lights Unplug the power cord from the outlet. Freezer Light CAUTION: Light bulbs may be ordered from GE Parts and Accessories, 800.626.2002. Operating Instructions Safety Instructions Replacing the light bulbs. Rotate the shield...
... in . Turn the bulb counterclockwise. Turn the bulb counterclockwise. Installation Instructions Consumer Support Troubleshooting Tips 14 Refrigerator Lights Unplug the power cord from the outlet. Freezer Light CAUTION: Light bulbs may be ordered from GE Parts and Accessories, 800.626.2002. Operating Instructions Safety Instructions Replacing the light bulbs. Rotate the shield...

Use and Care Manual
Page 15
...www.GEAppliances.ca BEFORE YOU BEGIN Read these instructions for local inspector's use. • IMPORTANT - Installation Instructions Refrigerator GE Model 26 Questions? Refrigerator Installation 20 minutes Water Line Installation 30 minutes • Proper installation is not covered under the Warranty. Save these.... • Note to a cold water line. PREPARATION MOVING THE REFRIGERATOR INDOORS If the refrigerator will have to be removed. • To remove the refrigerator door, see the Installing the Refrigerator section. • To remove the freezer drawer, see the Removing the...
...www.GEAppliances.ca BEFORE YOU BEGIN Read these instructions for local inspector's use. • IMPORTANT - Installation Instructions Refrigerator GE Model 26 Questions? Refrigerator Installation 20 minutes Water Line Installation 30 minutes • Proper installation is not covered under the Warranty. Save these.... • Note to a cold water line. PREPARATION MOVING THE REFRIGERATOR INDOORS If the refrigerator will have to be removed. • To remove the refrigerator door, see the Installing the Refrigerator section. • To remove the freezer drawer, see the Removing the...
Use and Care Manual
Page 16
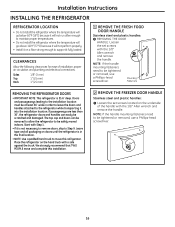
... on a floor strong enough to Step 9. Sides 1/8″ (3 mm) Top 1″ (25 mm) Back 1″ (25 mm) 1 REMOVE THE FRESH FOOD DOOR HANDLE Stainless steel and plastic handles: A REMOVING THE DOOR HANDLE: Loosen the set screws located on doors until the refrigerator is 35.6″ deep. The top cap and doors can easily...
... on a floor strong enough to Step 9. Sides 1/8″ (3 mm) Top 1″ (25 mm) Back 1″ (25 mm) 1 REMOVE THE FRESH FOOD DOOR HANDLE Stainless steel and plastic handles: A REMOVING THE DOOR HANDLE: Loosen the set screws located on doors until the refrigerator is 35.6″ deep. The top cap and doors can easily...
Use and Care Manual
Page 17
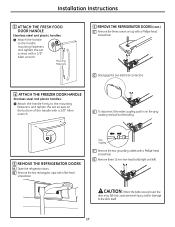
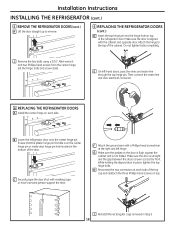
... handle to the handle A mounting fasteners and tighten the set screws on the bottom of the handle with a 1/8″ Allen wrench. Mounting Fasteners 5 REMOVE THE REFRIGERATOR DOORS (cont.) C Remove the three screws on the gray coupling and pull out the tubing. A 5 REMOVE THE...
... handle to the handle A mounting fasteners and tighten the set screws on the bottom of the handle with a 1/8″ Allen wrench. Mounting Fasteners 5 REMOVE THE REFRIGERATOR DOORS (cont.) C Remove the three screws on the gray coupling and pull out the tubing. A 5 REMOVE THE...
Use and Care Manual
Page 18
...the plastic hinge pin thimble is aligned with masking tape or have a second person support the door. Attach the hinge to remove. 6 REPLACING THE REFRIGERATOR DOORS (cont.) D Insert the top hinge pin into the hinge hole on the door is flush against the cabinet and is even across the ...a 3/16″ Allen wrench and two Phillips-head screws from the center hinge. Then connect the water line and door electrical connector. 6 REPLACING THE REFRIGERATOR DOORS A Install the center hinge on top. Set the hinge, bolts and screw aside. While holding the aligned door in the bottom of the door...
...the plastic hinge pin thimble is aligned with masking tape or have a second person support the door. Attach the hinge to remove. 6 REPLACING THE REFRIGERATOR DOORS (cont.) D Insert the top hinge pin into the hinge hole on the door is flush against the cabinet and is even across the ...a 3/16″ Allen wrench and two Phillips-head screws from the center hinge. Then connect the water line and door electrical connector. 6 REPLACING THE REFRIGERATOR DOORS A Install the center hinge on top. Set the hinge, bolts and screw aside. While holding the aligned door in the bottom of the door...

Use and Care Manual
Page 20
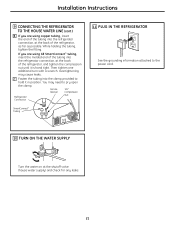
If there is not plugged into the frame. 9 CONNECTING THE REFRIGERATOR TO THE HOUSE WATER LINE A cold water supply is required for automatic icemaker operation. If you are using the GE SmartConnect™ tubing, the nuts are using copper tubing, place a compression nut and ferrule (sleeve) onto the... REPLACE THE FREEZER BASKET Replace the freezer basket by lowering it into the wall outlet. NOTE: Before making the connection to the refrigerator, be sure the refrigerator power cord is not a cold water supply, you are already assembled to provide one. A If you will need to the ...
If there is not plugged into the frame. 9 CONNECTING THE REFRIGERATOR TO THE HOUSE WATER LINE A cold water supply is required for automatic icemaker operation. If you are using the GE SmartConnect™ tubing, the nuts are using copper tubing, place a compression nut and ferrule (sleeve) onto the... REPLACE THE FREEZER BASKET Replace the freezer basket by lowering it into the wall outlet. NOTE: Before making the connection to the refrigerator, be sure the refrigerator power cord is not a cold water supply, you are already assembled to provide one. A If you will need to the ...
Use and Care Manual
Page 21
... the end of the tubing into the refrigerator connection, at the back of the refrigerator, and tighten the compression nut until it in position. While holding the tubing, tighten the fitting. Installation Instructions 9 CONNECTING THE REFRIGERATOR TO THE HOUSE WATER LINE (cont.) B If you are using GE SmartConnect™ tubing, insert the molded end...
... the end of the tubing into the refrigerator connection, at the back of the refrigerator, and tighten the compression nut until it in position. While holding the tubing, tighten the fitting. Installation Instructions 9 CONNECTING THE REFRIGERATOR TO THE HOUSE WATER LINE (cont.) B If you are using GE SmartConnect™ tubing, insert the molded end...
Use and Care Manual
Page 22
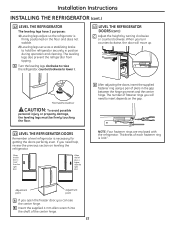
...CAUTION: To avoid possible personal injury or property damage, the leveling legs must be firmly touching the floor. 13 LEVEL THE REFRIGERATOR DOORS Remember a level refrigerator is 0.04″. Adjustment point Adjustment point A If you open the freezer door, you turn counterclockwise, the door will... need help, review the previous section on leveling the refrigerator. When you can see the center hinge. Thickness of pliers in position during operation and cleaning. D After adjusting the doors, insert...
...CAUTION: To avoid possible personal injury or property damage, the leveling legs must be firmly touching the floor. 13 LEVEL THE REFRIGERATOR DOORS Remember a level refrigerator is 0.04″. Adjustment point Adjustment point A If you open the freezer door, you turn counterclockwise, the door will... need help, review the previous section on leveling the refrigerator. When you can see the center hinge. Thickness of pliers in position during operation and cleaning. D After adjusting the doors, insert...
Use and Care Manual
Page 24
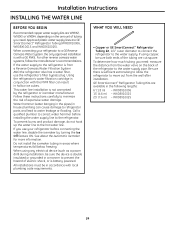
... install the icemaker tubing in hollow ice cubes. WX08X10015 25′ (7.6 m) - Using the refrigerator's water filtration cartridge in conjunction with the MWF filter can cause damage to refrigerator parts and lead to the water supply pipe. Water ...qualified plumber to correct water hammer before connecting the water line, disable the icemaker by the refrigerator or icemaker manufacturer. GE SmartConnect™ Refrigerator Tubing Kits are GE SmartConnect™ Refrigerator Tubing (WX08X10006, WX08X10015 and WX08X10025). WX08X10025 24 WX08X10006 15′ (4.6 m) - If ...
... install the icemaker tubing in hollow ice cubes. WX08X10015 25′ (7.6 m) - Using the refrigerator's water filtration cartridge in conjunction with the MWF filter can cause damage to refrigerator parts and lead to the water supply pipe. Water ...qualified plumber to correct water hammer before connecting the water line, disable the icemaker by the refrigerator or icemaker manufacturer. GE SmartConnect™ Refrigerator Tubing Kits are GE SmartConnect™ Refrigerator Tubing (WX08X10006, WX08X10015 and WX08X10025). WX08X10025 24 WX08X10006 15′ (4.6 m) - If ...


