Use and Care Manual
Page 1
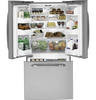
...Consumer Support Consumer Support Back Cover Performance Data Sheet 41, 42 Owner's Registration for U.S. Customers 39 Owner's Manual and Installation Instructions Models 20, 22 and 23 Congélateur inférieur Réfrigérateurs Manuel d'utilisation et d'installation La section franç...Refrigeradores Manual del propietario e instalación La sección en español empieza en la página 85 Write the model and serial numbers here: Model Serial Find these numbers on a label on the right side, near the top of California Water Treatment Device Certificate . . ...
...Consumer Support Consumer Support Back Cover Performance Data Sheet 41, 42 Owner's Registration for U.S. Customers 39 Owner's Manual and Installation Instructions Models 20, 22 and 23 Congélateur inférieur Réfrigérateurs Manuel d'utilisation et d'installation La section franç...Refrigeradores Manual del propietario e instalación La sección en español empieza en la página 85 Write the model and serial numbers here: Model Serial Find these numbers on a label on the right side, near the top of California Water Treatment Device Certificate . . ...
Use and Care Manual
Page 4
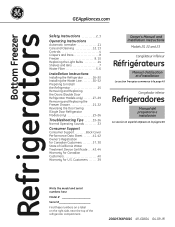
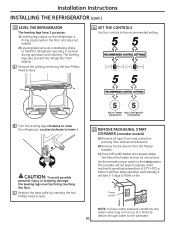
... you have set. Adjust the controls one increment at 5. Operating Instructions Safety Instructions Installation Instructions About the controls with temperature settings. (on some models) (on some models) (on some models) NOTE: The refrigerator is shipped with protective film covering the digital temperature controls. Initially, set the refrigerator control at 5 and the freezer control...
... you have set. Adjust the controls one increment at 5. Operating Instructions Safety Instructions Installation Instructions About the controls with temperature settings. (on some models) (on some models) (on some models) NOTE: The refrigerator is shipped with protective film covering the digital temperature controls. Initially, set the refrigerator control at 5 and the freezer control...
Use and Care Manual
Page 5
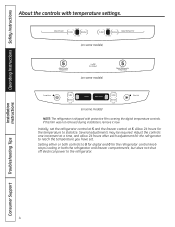
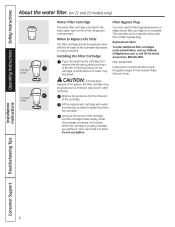
... overtighten. Replacement Filters: To order additional filter cartridges in Canada should be positioned vertically. Filter Model GSWF Customers in the United States, visit our Website, GEAppliances.com, or call GE Parts and Accessories, 800.626.2002. A small amount of the cartridge. Close the cartridge ...rotate the cartridge clockwise until it counterclockwise. Safety Instructions Operating Instructions About the water filter. (on 20 models only) GEAppliances.com Water Filter Cartridge The water filter cartridge is located in the system, the filter cartridge may drip down ....
... overtighten. Replacement Filters: To order additional filter cartridges in Canada should be positioned vertically. Filter Model GSWF Customers in the United States, visit our Website, GEAppliances.com, or call GE Parts and Accessories, 800.626.2002. A small amount of the cartridge. Close the cartridge ...rotate the cartridge clockwise until it counterclockwise. Safety Instructions Operating Instructions About the water filter. (on 20 models only) GEAppliances.com Water Filter Cartridge The water filter cartridge is located in the system, the filter cartridge may drip down ....
Use and Care Manual
Page 6
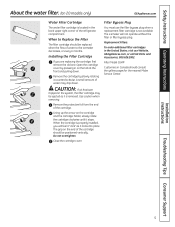
...order additional filter cartridges in Canada should be ejected as it is removed. Operating Instructions Safety Instructions About the water filter. (on 22 and 23 models only) Cartridge Holder Cartridge Holder Water Filter Cartridge The water filter cartridge is not available. Installing the Filter Cartridge If you will not operate without...stops. CAUTION: If air has been trapped in the back upper right corner of the cartridge. When to the icemaker decreases or every 6 months. Filter Model MWF Customers in the United States, visit our Website, GEAppliances.com, or call...
...order additional filter cartridges in Canada should be ejected as it is removed. Operating Instructions Safety Instructions About the water filter. (on 22 and 23 models only) Cartridge Holder Cartridge Holder Water Filter Cartridge The water filter cartridge is not available. Installing the Filter Cartridge If you will not operate without...stops. CAUTION: If air has been trapped in the back upper right corner of the cartridge. When to the icemaker decreases or every 6 months. Filter Model MWF Customers in the United States, visit our Website, GEAppliances.com, or call...

Use and Care Manual
Page 7
... the front. Non-Adjustable Shelves on the Door (on all items from the shelf. Rearranging the Shelves Shelves in the refrigerator compartment are on some models) To remove: Lift the shelf straight up , insert the top hook at the back of the shelf locks into place. To replace: Engage the shelf... front of the shelf until the bottom of the shelf in the same manner. It will lock in the molded supports on the track. Some models have wire shelves that can be adjusted in a slot on the door and push down. Refrigerator Compartment To remove: Remove all...
... the front. Non-Adjustable Shelves on the Door (on all items from the shelf. Rearranging the Shelves Shelves in the refrigerator compartment are on some models) To remove: Lift the shelf straight up , insert the top hook at the back of the shelf locks into place. To replace: Engage the shelf... front of the shelf until the bottom of the shelf in the same manner. It will lock in the molded supports on the track. Some models have wire shelves that can be adjusted in a slot on the door and push down. Refrigerator Compartment To remove: Remove all...
Use and Care Manual
Page 8
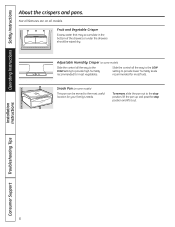
...be moved to the stop position, lift the pan up and past the stop position and lift it out. Adjustable Humidity Crisper (on some models) This pan can be wiped dry. Installation Instructions Consumer Support Troubleshooting Tips 8 Slide the control all the way to the HIGH setting to ...provide lower humidity levels recommended for most vegetables. Not all models. Snack Pan (on all features are on some models) Slide the control all the way to the LOW setting to provide high humidity recommended for most useful location for...
...be moved to the stop position, lift the pan up and past the stop position and lift it out. Adjustable Humidity Crisper (on some models) This pan can be wiped dry. Installation Instructions Consumer Support Troubleshooting Tips 8 Slide the control all the way to the HIGH setting to ...provide lower humidity levels recommended for most vegetables. Not all models. Snack Pan (on all features are on some models) Slide the control all the way to the LOW setting to provide high humidity recommended for most useful location for...
Use and Care Manual
Page 9
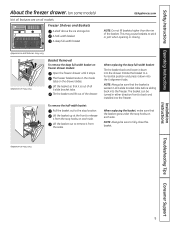
...stick or jam when opening or closing. When replacing the basket, make sure that the basket goes under the stop hooks on all models. NOTE: Always be turned in all 6 slide bracket tabs. This may vary Installation Instructions Troubleshooting Tips Consumer Support 9 The freezer basket... rests on the inside tabs on freezer drawer models: Open the freezer drawer until it from the stop location. Lift the basket so that the basket is out of the drawer. ...
...stick or jam when opening or closing. When replacing the basket, make sure that the basket goes under the stop hooks on all models. NOTE: Always be turned in all 6 slide bracket tabs. This may vary Installation Instructions Troubleshooting Tips Consumer Support 9 The freezer basket... rests on the inside tabs on freezer drawer models: Open the freezer drawer until it from the stop location. Lift the basket so that the basket is out of the drawer. ...

Use and Care Manual
Page 10
.... To replace: Engage the shelf in place. It will lock in the molded supports on door models: Open the basket out to slide. To remove Non-Adjustable Shelf on all models. Lift up ; then pull out. Installation Instructions Consumer Support Troubleshooting Tips To replace 10 To remove... cleaning: Hold the shelf at the front and pull it firmly forward. Operating Instructions Safety Instructions About the freezer compartment. (on some models) Not all features are on Freezer Door To remove: Lift the shelf straight up the front of the basket. When replacing the full...
.... To replace: Engage the shelf in place. It will lock in the molded supports on door models: Open the basket out to slide. To remove Non-Adjustable Shelf on all models. Lift up ; then pull out. Installation Instructions Consumer Support Troubleshooting Tips To replace 10 To remove... cleaning: Hold the shelf at the front and pull it firmly forward. Operating Instructions Safety Instructions About the freezer compartment. (on some models) Not all features are on Freezer Door To remove: Lift the shelf straight up the front of the basket. When replacing the full...
Use and Care Manual
Page 11
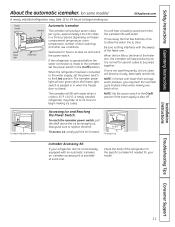
...NOTE: In homes with water. Installation Instructions Troubleshooting Tips Consumer Support 11 Safety Instructions Operating Instructions About the automatic icemaker. (on some models) GEAppliances.com A newly installed refrigerator may take 12 to 24 hours to begin making ice. When the bin fills to the level ... the ice bin straight out. When the refrigerator has been connected to 15°F (-10°C). Icemaker Accessory Kit If your model. Be sure nothing interferes with an automatic icemaker, an icemaker accessory kit is shut off ) position. Shelf Ice Bin To access...
...NOTE: In homes with water. Installation Instructions Troubleshooting Tips Consumer Support 11 Safety Instructions Operating Instructions About the automatic icemaker. (on some models) GEAppliances.com A newly installed refrigerator may take 12 to 24 hours to begin making ice. When the bin fills to the level ... the ice bin straight out. When the refrigerator has been connected to 15°F (-10°C). Icemaker Accessory Kit If your model. Be sure nothing interferes with an automatic icemaker, an icemaker accessory kit is shut off ) position. Shelf Ice Bin To access...
Use and Care Manual
Page 12
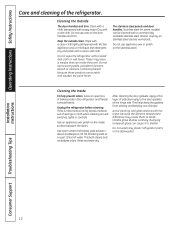
... the refrigerator and freezer compartments. Dry with a clean, soft cloth. Stainless steel (on the stainless steel. Do not use appliance wax or polish on some models) can erode the paint. Handle glass shelves carefully. Cleaning the Inside To help prevent odors, leave an open box of baking soda to break. Unplug...
... the refrigerator and freezer compartments. Dry with a clean, soft cloth. Stainless steel (on the stainless steel. Do not use appliance wax or polish on some models) can erode the paint. Handle glass shelves carefully. Cleaning the Inside To help prevent odors, leave an open box of baking soda to break. Unplug...

Use and Care Manual
Page 13
...prevent damage. When pushing the refrigerator back, make sure you don't roll over the power cord or icemaker supply line (on some models). When using a hand truck to the refrigerator. All types of the refrigerator. Raise the leveling legs located at the bottom front... of floor coverings can drop below freezing, have a qualified servicer drain the water supply system (on some models) to prevent serious property damage due to flooding. Safety Instructions Operating Instructions GEAppliances.com Behind the Refrigerator Be careful when moving . ...
...prevent damage. When pushing the refrigerator back, make sure you don't roll over the power cord or icemaker supply line (on some models). When using a hand truck to the refrigerator. All types of the refrigerator. Raise the leveling legs located at the bottom front... of floor coverings can drop below freezing, have a qualified servicer drain the water supply system (on some models) to prevent serious property damage due to flooding. Safety Instructions Operating Instructions GEAppliances.com Behind the Refrigerator Be careful when moving . ...
Use and Care Manual
Page 15
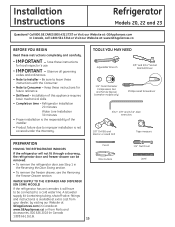
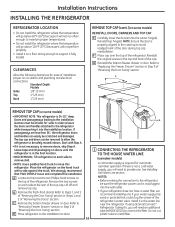
... can be connected to improper installation is the responsibility of this appliance requires basic mechanical skills. • Completion time - A GE water supply kit (containing tubing, shutoff valve, fittings and instructions) is available at extra cost from Parts and Accessories, 800....will have to be removed. • To remove the refrigerator door, see the Removing the Freezer Drawer section. Installation Instructions Refrigerator Models 20, 22 and 23 Questions? Save these instructions completely and carefully. • IMPORTANT - Installation of the installer. • Product...
... can be connected to improper installation is the responsibility of this appliance requires basic mechanical skills. • Completion time - A GE water supply kit (containing tubing, shutoff valve, fittings and instructions) is available at extra cost from Parts and Accessories, 800....will have to be removed. • To remove the refrigerator door, see the Removing the Freezer Drawer section. Installation Instructions Refrigerator Models 20, 22 and 23 Questions? Save these instructions completely and carefully. • IMPORTANT - Installation of the installer. • Product...
Use and Care Manual
Page 16
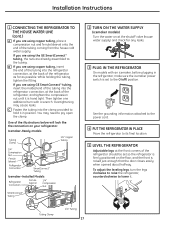
...scratched and damaged. The top cap and doors can easily be safely moved indoors. B Remove the fresh-food door(s). If using GE SmartConnect™ Refrigerator Tubing Kit, you will need an additional tube (WX08X10002) to connect the filter. Installation Instructions INSTALLING THE ...PEOPLE move this installation. D Move refrigerator to the installation location. 16 Top Hinge B 1 CONNECTING THE REFRIGERATOR TO THE HOUSE WATER LINE (icemaker models) A cold water supply is not a cold water supply, you will need to Steps 1 and 3 of "Reversing the Door Swing" section or...
...scratched and damaged. The top cap and doors can easily be safely moved indoors. B Remove the fresh-food door(s). If using GE SmartConnect™ Refrigerator Tubing Kit, you will need an additional tube (WX08X10002) to connect the filter. Installation Instructions INSTALLING THE ...PEOPLE move this installation. D Move refrigerator to the installation location. 16 Top Hinge B 1 CONNECTING THE REFRIGERATOR TO THE HOUSE WATER LINE (icemaker models) A cold water supply is not a cold water supply, you will need to Steps 1 and 3 of "Reversing the Door Swing" section or...
Use and Care Manual
Page 17
...(house water supply) and check for any leaks. 3 PLUG IN THE REFRIGERATOR On models with a wrench. You may cause leaks. B If you are already assembled to hold it . Icemaker-Ready models Tubing Clamp 1/4″ Copper Tubing 1/4″ Compression Nut Ferrule (sleeve) Refrigerator Connection SmartConnect... tubing, tighten the fitting. Overtightening may need to the O (off) position. If you are using the GE SmartConnect™ tubing, the nuts are using GE SmartConnect™ tubing, insert the molded end of the tubing into the refrigerator connection, at the back of ...
...(house water supply) and check for any leaks. 3 PLUG IN THE REFRIGERATOR On models with a wrench. You may cause leaks. B If you are already assembled to hold it . Icemaker-Ready models Tubing Clamp 1/4″ Copper Tubing 1/4″ Compression Nut Ferrule (sleeve) Refrigerator Connection SmartConnect... tubing, tighten the fitting. Overtightening may need to the O (off) position. If you are using the GE SmartConnect™ tubing, the nuts are using GE SmartConnect™ tubing, insert the molded end of the tubing into the refrigerator connection, at the back of ...

Use and Care Manual
Page 18
... may vary) the right side. • Remove the logo badge. • Remove and transfer the plug button to the door. 18 on some B models): • Remove Badge the handle mounting fasteners with A a 3/16″ Allen wrench and transfer Mounting Fasteners the handle mounting fasteners to (appearance may ...: A Loosen the set screws with the 3/32″ A Badge Allen wrench and remove the handle. REVERSING THE DOOR HANDLE (on some models) Stainless steel (on the underside of the handle and slide the handle up and off of the fresh food door. Remove any adhesive on...
... may vary) the right side. • Remove the logo badge. • Remove and transfer the plug button to the door. 18 on some B models): • Remove Badge the handle mounting fasteners with A a 3/16″ Allen wrench and transfer Mounting Fasteners the handle mounting fasteners to (appearance may ...: A Loosen the set screws with the 3/32″ A Badge Allen wrench and remove the handle. REVERSING THE DOOR HANDLE (on some models) Stainless steel (on the underside of the handle and slide the handle up and off of the fresh food door. Remove any adhesive on...
Use and Care Manual
Page 19
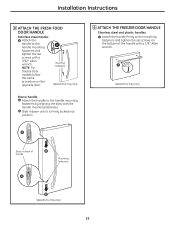
... and plastic handles: A Attach the handle firmly to the mounting fasteners and tighten the set screws with the handle mounting fasteners. NOTE: For Double Door models follow the same procedure on the opposite door. Installation Instructions 8 ATTACH THE FRESH FOOD DOOR HANDLE Stainless steel handle: A Attach the handle to the handle...
... and plastic handles: A Attach the handle firmly to the mounting fasteners and tighten the set screws with the handle mounting fasteners. NOTE: For Double Door models follow the same procedure on the opposite door. Installation Instructions 8 ATTACH THE FRESH FOOD DOOR HANDLE Stainless steel handle: A Attach the handle to the handle...
Use and Care Manual
Page 20
... adjust so the refrigerator is firmly positioned on ) position. A Remove the grille by inserting the two Phillips head screws. 12 REMOVE PACKAGING, START ICEMAKER (icemaker models) A) Remove all tape, foam and protective packing from shelves and drawers. B) Remove the tie downs from tipping. C Replace the base grille by removing the two...
... adjust so the refrigerator is firmly positioned on ) position. A Remove the grille by inserting the two Phillips head screws. 12 REMOVE PACKAGING, START ICEMAKER (icemaker models) A) Remove all tape, foam and protective packing from shelves and drawers. B) Remove the tie downs from tipping. C Replace the base grille by removing the two...

Use and Care Manual
Page 21
... of the freezer drawer handle to fit through a doorway, the base grille can be removed. Screw 21 Installation Instructions REMOVING THE FREEZER DRAWER (on some models) The freezer drawer can be removed, if needed ) If, after removing the freezer drawer and refrigerator door, the refrigerator will still not fit through tight...
... of the freezer drawer handle to fit through a doorway, the base grille can be removed. Screw 21 Installation Instructions REMOVING THE FREEZER DRAWER (on some models) The freezer drawer can be removed, if needed ) If, after removing the freezer drawer and refrigerator door, the refrigerator will still not fit through tight...

Use and Care Manual
Page 22
... assemblies. Slot 2 REPLACE THE FREEZER BASKET Replace the lower freezer basket by lowering it into the frame. Installation Instructions REPLACING THE FREEZER DRAWER (on some models) Two people may be required to complete this procedure. 1 ATTACH AND SECURE THE DRAWER FRONT TO THE SLIDES A Pull out the rail assemblies to the...
... assemblies. Slot 2 REPLACE THE FREEZER BASKET Replace the lower freezer basket by lowering it into the frame. Installation Instructions REPLACING THE FREEZER DRAWER (on some models) Two people may be required to complete this procedure. 1 ATTACH AND SECURE THE DRAWER FRONT TO THE SLIDES A Pull out the rail assemblies to the...
Use and Care Manual
Page 23
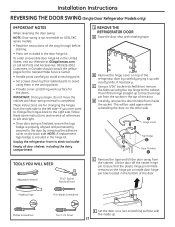
... shut with the inside the socket. Installation Instructions REVERSING THE DOOR SWING (Single Door Refrigerator Models only) IMPORTANT NOTES When reversing the door swing: NOTE: Door swing is not reversible on GDSL3KC series models. • Read the instructions all the way through before starting. • Parts are...up to free the hinge pin from its electrical outlet. Customers in the United States, visit our Website at GEAppliances.com or call GE Parts and Accessories, 800.626.2002. Ensure that the plastic hinge pin thimble remains on the other side. Empty all references to left...
... shut with the inside the socket. Installation Instructions REVERSING THE DOOR SWING (Single Door Refrigerator Models only) IMPORTANT NOTES When reversing the door swing: NOTE: Door swing is not reversible on GDSL3KC series models. • Read the instructions all the way through before starting. • Parts are...up to free the hinge pin from its electrical outlet. Customers in the United States, visit our Website at GEAppliances.com or call GE Parts and Accessories, 800.626.2002. Ensure that the plastic hinge pin thimble remains on the other side. Empty all references to left...


