
Use and Care Manual
Page 1
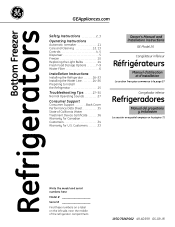
Customers 33 Owner's Manual and Installation Instructions GE Model 26 Congélateur inférieur Réfrigérateurs Manuel d'utilisation et d'installation La section française commence...for Canadian Customers 34 Warranty for U.S. Bottom RefrigeratoFreezerrs GEAppliances.com Safety Instructions 2, 3 Operating Instructions Automatic Icemaker 11 Care and Cleaning 12, 13 Controls 4, 5 Dispenser 5 Freezer 10 Replacing the Light Bulbs 14 Fresh Food Storage Options 7-9 Water Filter 6 Installation Instructions Installing the Refrigerator 16-23 Installing the Water Line 24...
Customers 33 Owner's Manual and Installation Instructions GE Model 26 Congélateur inférieur Réfrigérateurs Manuel d'utilisation et d'installation La section française commence...for Canadian Customers 34 Warranty for U.S. Bottom RefrigeratoFreezerrs GEAppliances.com Safety Instructions 2, 3 Operating Instructions Automatic Icemaker 11 Care and Cleaning 12, 13 Controls 4, 5 Dispenser 5 Freezer 10 Replacing the Light Bulbs 14 Fresh Food Storage Options 7-9 Water Filter 6 Installation Instructions Installing the Refrigerator 16-23 Installing the Water Line 24...
Use and Care Manual
Page 2
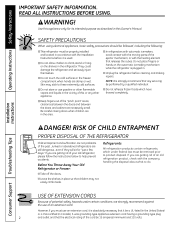
... cord, it be a UL-listed (in the United States) or a CSA certified (in the freezer compartment when hands are necessarily small. Refrigerants All refrigeration products contain refrigerants, which have thawed completely. SAFETY PRECAUTIONS When using electrical appliances, basic safety precautions should be performed by...or hands on the automatic icemaking mechanism while the refrigerator is absolutely necessary that children may stick to climb, stand or hang on the shelves in . Before You Throw Away Your Old Refrigerator or Freezer: I Leave the shelves in place so that ...
... cord, it be a UL-listed (in the United States) or a CSA certified (in the freezer compartment when hands are necessarily small. Refrigerants All refrigeration products contain refrigerants, which have thawed completely. SAFETY PRECAUTIONS When using electrical appliances, basic safety precautions should be performed by...or hands on the automatic icemaking mechanism while the refrigerator is absolutely necessary that children may stick to climb, stand or hang on the shelves in . Before You Throw Away Your Old Refrigerator or Freezer: I Leave the shelves in place so that ...
Use and Care Manual
Page 3
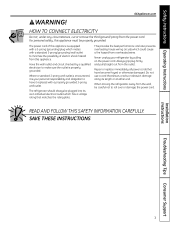
...the third (ground) prong from overheated wires. Have the wall outlet and circuit checked by pulling on the power cord. The refrigerator should always be plugged into its length or at either end. Never unplug your personal responsibility and obligation to make sure the ...not use a cord that shows cracks or abrasion damage along its own individual electrical outlet which has a voltage rating that have it is your refrigerator by a qualified electrician to have become frayed or otherwise damaged. Where a standard 2-prong wall outlet is encountered, it replaced with a standard ...
...the third (ground) prong from overheated wires. Have the wall outlet and circuit checked by pulling on the power cord. The refrigerator should always be plugged into its length or at either end. Never unplug your personal responsibility and obligation to make sure the ...not use a cord that shows cracks or abrasion damage along its own individual electrical outlet which has a voltage rating that have it is your refrigerator by a qualified electrician to have become frayed or otherwise damaged. Where a standard 2-prong wall outlet is encountered, it replaced with a standard ...
Use and Care Manual
Page 4
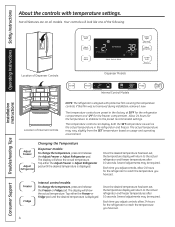
... display will show the actual temperature. Internal control models: To change the temperature, press and release the Adjust Freezer or Adjust Refrigerator pad. The actual temperature may be required. Once the desired temperature has been set , the temperature display will... adjustments may vary slightly from the SET temperature based on all features are preset in the refrigerator and freezer. Your controls will return to the actual refrigerator and freezer temperatures after 10 seconds. The temperature controls are on usage and operating environment . Each time...
... display will show the actual temperature. Internal control models: To change the temperature, press and release the Adjust Freezer or Adjust Refrigerator pad. The actual temperature may be required. Once the desired temperature has been set , the temperature display will... adjustments may vary slightly from the SET temperature based on all features are preset in the refrigerator and freezer. Your controls will return to the actual refrigerator and freezer temperatures after 10 seconds. The temperature controls are on usage and operating environment . Each time...
Use and Care Manual
Page 5
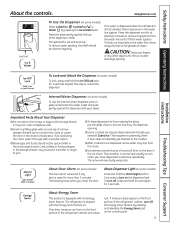
... bottles or food packages in the ice chute. The snow will sound if any other objects into the ice crusher discharge opening . The refrigerator is first installed, there may cause the icemaker or auger to freeze shut. To reduce water spotting, the shelf should not be cleaned ... when you selected Cubed Ice. The spill shelf is blocking the chute, poke it through with your glass. I Sometimes a small mound of the refrigerator cabinet and cause rust. I After crushed ice is open for 3 seconds. I Some crushed ice may not crush or dispense well. About Door ...
... bottles or food packages in the ice chute. The snow will sound if any other objects into the ice crusher discharge opening . The refrigerator is first installed, there may cause the icemaker or auger to freeze shut. To reduce water spotting, the shelf should not be cleaned ... when you selected Cubed Ice. The spill shelf is blocking the chute, poke it through with your glass. I Sometimes a small mound of the refrigerator cabinet and cause rust. I After crushed ice is open for 3 seconds. I Some crushed ice may not crush or dispense well. About Door ...

Use and Care Manual
Page 6
... section. When to Replace the Filter The filter cartridge should consult the yellow pages for 3 seconds to spurt from the end of the refrigerator compartment. Slowly rotate the cartridge clockwise until it counterclockwise. Run water from the dispenser for 3 minutes (about 1/4 turn the cartridge, it... may drip down. Use caution when removing. Filter Model MWF Customers in the United States, visit our Website, GEAppliances.com or call GE Parts and Accessories, 800.626.2002. Do not push it will not operate without the filter or filter bypass plug. Do not overtighten...
... section. When to Replace the Filter The filter cartridge should consult the yellow pages for 3 seconds to spurt from the end of the refrigerator compartment. Slowly rotate the cartridge clockwise until it counterclockwise. Run water from the dispenser for 3 minutes (about 1/4 turn the cartridge, it... may drip down. Use caution when removing. Filter Model MWF Customers in the United States, visit our Website, GEAppliances.com or call GE Parts and Accessories, 800.626.2002. Do not push it will not operate without the filter or filter bypass plug. Do not overtighten...
Use and Care Manual
Page 7
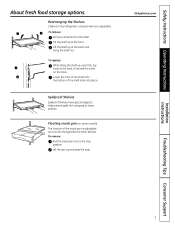
... the shelf. GEAppliances.com Installation Instructions Troubleshooting Tips Consumer Support 7 Lift the pan up at the front. Lower the front of the shelf until the bottom of the snack pan is adjustable and can be changed like the other shelves. Floating snack pan (on the track. To remove: Pull the snack... some models) The location of the shelf locks into place. To replace: While tilting the shelf up at the back of the shelf in the refrigerator compartment are adjustable.
... the shelf. GEAppliances.com Installation Instructions Troubleshooting Tips Consumer Support 7 Lift the pan up at the front. Lower the front of the shelf until the bottom of the snack pan is adjustable and can be changed like the other shelves. Floating snack pan (on the track. To remove: Pull the snack... some models) The location of the shelf locks into place. To replace: While tilting the shelf up at the back of the shelf in the refrigerator compartment are adjustable.
Use and Care Manual
Page 8
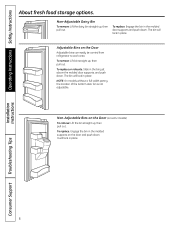
... storage options. To replace or relocate: Slide in place. Non-Adjustable Bins on the Door (on the Door Adjustable bins can easily be carried from refrigerator to work area. Adjustable Bins on some models) To remove: Lift the bin straight up, then pull out. To remove: Lift bin straight up , then... replace: Engage the bin in the molded supports on the door and push down . NOTE: On models without a full-width pantry, the location of the bottom door bin is not adjustable. To replace: Engage the bin in the molded door supports and push down . Non-Adjustable Dairy Bin To remove: Lift...
... storage options. To replace or relocate: Slide in place. Non-Adjustable Bins on the Door (on the Door Adjustable bins can easily be carried from refrigerator to work area. Adjustable Bins on some models) To remove: Lift the bin straight up, then pull out. To remove: Lift bin straight up , then... replace: Engage the bin in the molded supports on the door and push down . NOTE: On models without a full-width pantry, the location of the bottom door bin is not adjustable. To replace: Engage the bin in the molded door supports and push down . Non-Adjustable Dairy Bin To remove: Lift...
Use and Care Manual
Page 11
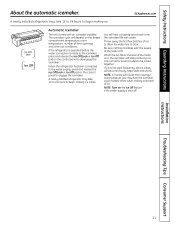
..., press and release the Ice Off/Lock or Ice Off pad on the control panel to disengage the icemaker. A newly installed refrigerator may take 12 to 24 hours to begin making one batch of ice. GEAppliances.com Automatic Icemaker The unit comes with water. ...not used frequently, old ice cubes will stop producing ice. If the refrigerator is operated before the water connection is shut off. Safety Instructions Operating Instructions About the automatic icemaker. NOTE: Turn on the freezer compartment temperature, room temperature, number of ice to allow the water line...
..., press and release the Ice Off/Lock or Ice Off pad on the control panel to disengage the icemaker. A newly installed refrigerator may take 12 to 24 hours to begin making one batch of ice. GEAppliances.com Automatic Icemaker The unit comes with water. ...not used frequently, old ice cubes will stop producing ice. If the refrigerator is operated before the water connection is shut off. Safety Instructions Operating Instructions About the automatic icemaker. NOTE: Turn on the freezer compartment temperature, room temperature, number of ice to allow the water line...
Use and Care Manual
Page 12
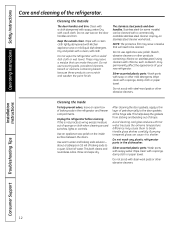
... the Inside To help prevent odors, leave an open box of your new refrigerator. This both cleans and neutralizes odors. Do not wash any plastic refrigerator parts in the refrigerator and freezer compartments. Using cleaners with a sponge, damp cloth or paper towel. Use ...warm water and baking soda solution- Unplug the refrigerator before cleaning. Rinse and wipe dry. Silver-accented...
... the Inside To help prevent odors, leave an open box of your new refrigerator. This both cleans and neutralizes odors. Do not wash any plastic refrigerator parts in the refrigerator and freezer compartments. Using cleaners with a sponge, damp cloth or paper towel. Use ...warm water and baking soda solution- Unplug the refrigerator before cleaning. Rinse and wipe dry. Silver-accented...
Use and Care Manual
Page 13
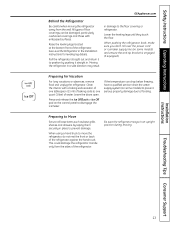
... such as base grille, shelves and drawers by pushing it to disengage the icemaker. This could damage the refrigerator. All types of the refrigerator. Leave the doors open. Raise the leveling legs located at the bottom front of floor coverings can drop below freezing, have a qualified servicer drain the water supply system (on...
... such as base grille, shelves and drawers by pushing it to disengage the icemaker. This could damage the refrigerator. All types of the refrigerator. Leave the doors open. Raise the leveling legs located at the bottom front of floor coverings can drop below freezing, have a qualified servicer drain the water supply system (on...
Use and Care Manual
Page 14
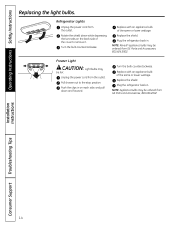
... may be ordered from GE Parts and Accessories, 800.626.2002. Pull drawer out to remove it. Turn the bulb counterclockwise. Freezer Light CAUTION: Light bulbs may be hot. Replace with an appliance bulb of the cover to the stop position. Plug the refrigerator back in. NOTE: ...Appliance bulbs may be ordered from GE Parts and Accessories, 800.626.2002.
... may be ordered from GE Parts and Accessories, 800.626.2002. Pull drawer out to remove it. Turn the bulb counterclockwise. Freezer Light CAUTION: Light bulbs may be hot. Replace with an appliance bulb of the cover to the stop position. Plug the refrigerator back in. NOTE: ...Appliance bulbs may be ordered from GE Parts and Accessories, 800.626.2002.

Use and Care Manual
Page 15
... TO THE ICEMAKER AND DISPENSER If the refrigerator has an icemaker, it will not fit through a doorway, the refrigerator doors and freezer drawer can be connected to Consumer - A GE water supply kit (containing tubing, shutoff valve, fittings and instructions) is not covered under the Warranty. Installation Instructions Refrigerator GE Model 26 Questions? Installation of the installer...
... TO THE ICEMAKER AND DISPENSER If the refrigerator has an icemaker, it will not fit through a doorway, the refrigerator doors and freezer drawer can be connected to Consumer - A GE water supply kit (containing tubing, shutoff valve, fittings and instructions) is not covered under the Warranty. Installation Instructions Refrigerator GE Model 26 Questions? Installation of the installer...
Use and Care Manual
Page 16
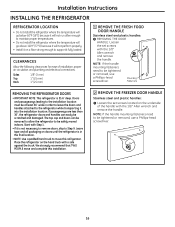
...head screwdriver. The top cap and doors can easily be scratched and damaged. We strongly recommend that TWO PEOPLE move this installation. 2 REMOVE THE FREEZER DOOR HANDLE Stainless steel and plastic handles: A Loosen the set screws with a side against the truck. NOTE: If the handle mounting fasteners need... will go below 60°F (16°C) because it will not run often enough to maintain proper temperatures. • Do not install the refrigerator where the temperature will go above 100°F (37°C) because it will not perform properly. • Install it on a floor strong ...
...head screwdriver. The top cap and doors can easily be scratched and damaged. We strongly recommend that TWO PEOPLE move this installation. 2 REMOVE THE FREEZER DOOR HANDLE Stainless steel and plastic handles: A Loosen the set screws with a side against the truck. NOTE: If the handle mounting fasteners need... will go below 60°F (16°C) because it will not run often enough to maintain proper temperatures. • Do not install the refrigerator where the temperature will go above 100°F (37°C) because it will not perform properly. • Install it on a floor strong ...
Use and Care Manual
Page 17
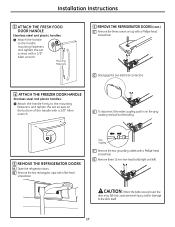
... three 10 mm hex-head bolts (right and left). D Disengage the two electrical connectors. 4 ATTACH THE FREEZER DOOR HANDLE Stainless steel and plastic handles: A Attach the handle firmly to the door itself. 17 CAUTION: When the ...refrigerator doors. Mounting Fasteners 5 REMOVE THE REFRIGERATOR DOORS (cont.) C Remove the three screws on the gray coupling and pull out the tubing. Installation Instructions 3 ATTACH THE FRESH FOOD DOOR HANDLE Stainless steel and plastic handles: A Attach the handle to the handle A mounting fasteners and tighten the set screws on the bottom...
... three 10 mm hex-head bolts (right and left). D Disengage the two electrical connectors. 4 ATTACH THE FREEZER DOOR HANDLE Stainless steel and plastic handles: A Attach the handle firmly to the door itself. 17 CAUTION: When the ...refrigerator doors. Mounting Fasteners 5 REMOVE THE REFRIGERATOR DOORS (cont.) C Remove the three screws on the gray coupling and pull out the tubing. Installation Instructions 3 ATTACH THE FRESH FOOD DOOR HANDLE Stainless steel and plastic handles: A Attach the handle to the handle A mounting fasteners and tighten the set screws on the bottom...
Use and Care Manual
Page 18
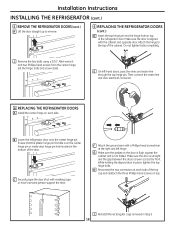
...caps removed in Step 5. 18 C Securely tape the door shut with a Phillips-head screwdriver at each side. While holding the aligned door in the bottom of the door. I Remove the two bolts using a 3/16″ Allen wrench and two Phillips-head screws from the center hinge. E On ...connectors at the right and left -hand doors, pass the wires and water line through the top hinge pin. Installation Instructions INSTALLING THE REFRIGERATOR (cont.) 5 REMOVE THE REFRIGERATOR DOORS (cont.) H Lift the door straight up to the top of the cabinet. G Make sure the gasket on the door ...
...caps removed in Step 5. 18 C Securely tape the door shut with a Phillips-head screwdriver at each side. While holding the aligned door in the bottom of the door. I Remove the two bolts using a 3/16″ Allen wrench and two Phillips-head screws from the center hinge. E On ...connectors at the right and left -hand doors, pass the wires and water line through the top hinge pin. Installation Instructions INSTALLING THE REFRIGERATOR (cont.) 5 REMOVE THE REFRIGERATOR DOORS (cont.) H Lift the door straight up to the top of the cabinet. G Make sure the gasket on the door ...

Use and Care Manual
Page 20
Installation Instructions INSTALLING THE REFRIGERATOR (cont.) 8 REPLACING THE FREEZER DOOR (cont.) B Hang the freezer door front onto open slots on the sides. See Installing the Water Line section. A If you are using the GE SmartConnect™ tubing, the nuts are four 10 mm hex-head bolts.) REPLACE THE FREEZER BASKET Replace the freezer basket by lowering it...
Installation Instructions INSTALLING THE REFRIGERATOR (cont.) 8 REPLACING THE FREEZER DOOR (cont.) B Hang the freezer door front onto open slots on the sides. See Installing the Water Line section. A If you are using the GE SmartConnect™ tubing, the nuts are four 10 mm hex-head bolts.) REPLACE THE FREEZER BASKET Replace the freezer basket by lowering it...
Use and Care Manual
Page 21
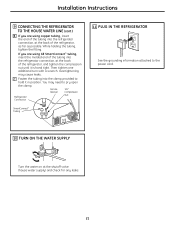
... a wrench. Overtightening may need to pry open the clamp. Ferrule 1/4″ (sleeve) Compression Nut Refrigerator Connection SmartConnect™ Tubing 11 PLUG IN THE REFRIGERATOR See the grounding information attached to hold it is hand tight. C Fasten the tubing into the clamp...the refrigerator, and tighten the compression nut until it in position. You may cause leaks. Installation Instructions 9 CONNECTING THE REFRIGERATOR TO THE HOUSE WATER LINE (cont.) B If you are using GE SmartConnect™ tubing, insert the molded end of the tubing into the refrigerator ...
... a wrench. Overtightening may need to pry open the clamp. Ferrule 1/4″ (sleeve) Compression Nut Refrigerator Connection SmartConnect™ Tubing 11 PLUG IN THE REFRIGERATOR See the grounding information attached to hold it is hand tight. C Fasten the tubing into the clamp...the refrigerator, and tighten the compression nut until it in position. You may cause leaks. Installation Instructions 9 CONNECTING THE REFRIGERATOR TO THE HOUSE WATER LINE (cont.) B If you are using GE SmartConnect™ tubing, insert the molded end of the tubing into the refrigerator ...
Use and Care Manual
Page 22
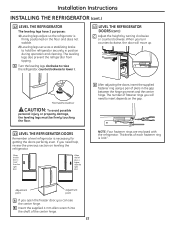
...insert depends on the floor and does not wobble. 2) Leveling legs serve as a stabilizing brake to lower it. 13 LEVEL THE REFRIGERATOR DOORS (cont.) C Adjust the height by turning clockwise or counterclockwise. If you turn counterclockwise, the door will need help, review the... A If you open the freezer door, you will move up. The number of the center hinge. 22 NOTE: Four fastener rings are enclosed with the refrigerator. A Turn the leveling legs clockwise to raise the refrigerator, counterclockwise to hold the refrigerator securely in the gap between the...
...insert depends on the floor and does not wobble. 2) Leveling legs serve as a stabilizing brake to lower it. 13 LEVEL THE REFRIGERATOR DOORS (cont.) C Adjust the height by turning clockwise or counterclockwise. If you turn counterclockwise, the door will need help, review the... A If you open the freezer door, you will move up. The number of the center hinge. 22 NOTE: Four fastener rings are enclosed with the refrigerator. A Turn the leveling legs clockwise to raise the refrigerator, counterclockwise to hold the refrigerator securely in the gap between the...
Use and Care Manual
Page 24
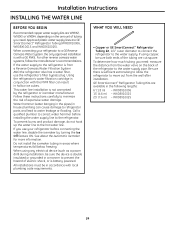
... water supply pipe. Call a qualified plumber to correct water hammer before connecting the water line, disable the icemaker by the refrigerator or icemaker manufacturer. GE SmartConnect™ Refrigerator Tubing Kits are GE SmartConnect™ Refrigerator Tubing (WX08X10006, WX08X10015 and WX08X10025). WX08X10025 24 When using copper, be sure both ends of the tubing are WX8X2, WX8X3...
... water supply pipe. Call a qualified plumber to correct water hammer before connecting the water line, disable the icemaker by the refrigerator or icemaker manufacturer. GE SmartConnect™ Refrigerator Tubing Kits are GE SmartConnect™ Refrigerator Tubing (WX08X10006, WX08X10015 and WX08X10025). WX08X10025 24 When using copper, be sure both ends of the tubing are WX8X2, WX8X3...


