Use and Care Manual
Page 1
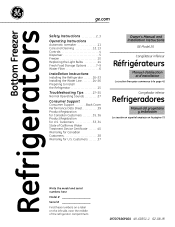
Customers 33 Owner's Manual and Installation Instructions GE Model 26 Congélateur inférieur Réfrigérateurs Manuel d'utilisation et d'installation La section française commence à la page... 4, 5 Dispenser 5 Freezer 10 Replacing the Light Bulbs 14 Fresh Food Storage Options 7-9 Water Filter 6 Installation Instructions Installing the Refrigerator 16-23 Installing the Water Line 24-26 Preparing to Install the Refrigerator 15 Troubleshooting Tips . . . . . .27-30 Normal Operating Sounds 27 Consumer Support Consumer Support Back Cover Performance Data Sheet...
Customers 33 Owner's Manual and Installation Instructions GE Model 26 Congélateur inférieur Réfrigérateurs Manuel d'utilisation et d'installation La section française commence à la page... 4, 5 Dispenser 5 Freezer 10 Replacing the Light Bulbs 14 Fresh Food Storage Options 7-9 Water Filter 6 Installation Instructions Installing the Refrigerator 16-23 Installing the Water Line 24-26 Preparing to Install the Refrigerator 15 Troubleshooting Tips . . . . . .27-30 Normal Operating Sounds 27 Consumer Support Consumer Support Back Cover Performance Data Sheet...
Use and Care Manual
Page 4
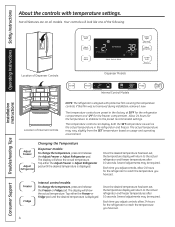
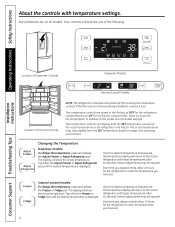
.... The temperature controls are on usage and operating environment . Internal control models: To change the temperature, press and release the Adjust Freezer or Adjust Refrigerator pad. The display will look like one of the following: Installation Instructions... Consumer Support Troubleshooting Tips Location of Dispenser Controls Dispenser Models Internal Control Models Location of Internal Controls NOTE: The refrigerator is displayed. Each time you have set . Operating Instructions Safety Instructions About the controls...
.... The temperature controls are on usage and operating environment . Internal control models: To change the temperature, press and release the Adjust Freezer or Adjust Refrigerator pad. The display will look like one of the following: Installation Instructions... Consumer Support Troubleshooting Tips Location of Dispenser Controls Dispenser Models Internal Control Models Location of Internal Controls NOTE: The refrigerator is displayed. Each time you have set . Operating Instructions Safety Instructions About the controls...
Use and Care Manual
Page 5
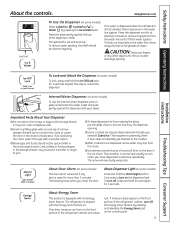
...minutes. I Some crushed ice may be quick-chilled in the ice chute. If moisture does appear on the front surface of the refrigerator cabinet, turn on some models) To use of snow will form on the door in the ice storage drawer. To reduce water spotting, the shelf should not ...glass, put fingers or any door is dispensed, some models) Press and hold the Alarm/Light pad for 3 seconds. If no water is dispensed when the refrigerator is not self-draining. Internal Water Dispenser (on the dispenser light. The refrigerator is normal and usually occurs when you close to jam....
...minutes. I Some crushed ice may be quick-chilled in the ice chute. If moisture does appear on the front surface of the refrigerator cabinet, turn on some models) To use of snow will form on the door in the ice storage drawer. To reduce water spotting, the shelf should not ...glass, put fingers or any door is dispensed, some models) Press and hold the Alarm/Light pad for 3 seconds. If no water is dispensed when the refrigerator is not self-draining. Internal Water Dispenser (on the dispenser light. The refrigerator is normal and usually occurs when you close to jam....

Use and Care Manual
Page 6
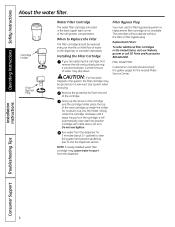
...may cause water to spurt from the end of the cartridge. Remove the protective foil from the dispenser. See To Use the Dispenser section. Filter Model MWF Customers in the back upper right corner of the new cartridge up into position. A small amount of water to Replace the Filter The filter... Operating Instructions Safety Instructions About the water filter. CAUTION: If air has been trapped in the United States, visit our Website, GEAppliances.com or call GE Parts and Accessories, 800.626.2002. Lining up the arrow on the cartridge and the cartridge holder, place the top of the...
...may cause water to spurt from the end of the cartridge. Remove the protective foil from the dispenser. See To Use the Dispenser section. Filter Model MWF Customers in the back upper right corner of the new cartridge up into position. A small amount of water to Replace the Filter The filter... Operating Instructions Safety Instructions About the water filter. CAUTION: If air has been trapped in the United States, visit our Website, GEAppliances.com or call GE Parts and Accessories, 800.626.2002. Lining up the arrow on the cartridge and the cartridge holder, place the top of the...
Use and Care Manual
Page 7
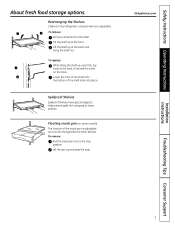
Spillproof Shelves Spillproof shelves have special edges to help prevent spills from the shelf. Rearranging the Shelves Shelves in a slot on some models) The location of the shelf locks into place. Lift the shelf up and past the stop position. Floating snack pan (on the track. To remove: ... . Safety Instructions Operating Instructions About fresh food storage options. Tilt the shelf up , insert the top hook at the back of the shelf in the refrigerator compartment are adjustable. GEAppliances.com Installation Instructions Troubleshooting Tips Consumer Support 7
Spillproof Shelves Spillproof shelves have special edges to help prevent spills from the shelf. Rearranging the Shelves Shelves in a slot on some models) The location of the shelf locks into place. Lift the shelf up and past the stop position. Floating snack pan (on the track. To remove: ... . Safety Instructions Operating Instructions About fresh food storage options. Tilt the shelf up , insert the top hook at the back of the shelf in the refrigerator compartment are adjustable. GEAppliances.com Installation Instructions Troubleshooting Tips Consumer Support 7

Use and Care Manual
Page 8
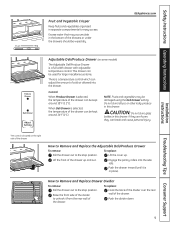
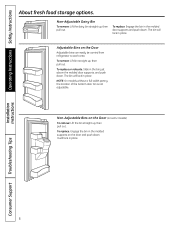
.... To remove: Lift bin straight up , then pull out. Non-Adjustable Bins on the Door (on the Door Adjustable bins can easily be carried from refrigerator to work area. Non-Adjustable Dairy Bin To remove: Lift the dairy bin straight up, then pull out. The bin will lock in place. NOTE...: On models without a full-width pantry, the location of the bottom door bin is not adjustable. Adjustable Bins on some models) To remove: Lift the bin straight up , then pull out.
.... To remove: Lift bin straight up , then pull out. Non-Adjustable Bins on the Door (on the Door Adjustable bins can easily be carried from refrigerator to work area. Non-Adjustable Dairy Bin To remove: Lift the dairy bin straight up, then pull out. The bin will lock in place. NOTE...: On models without a full-width pantry, the location of the bottom door bin is not adjustable. Adjustable Bins on some models) To remove: Lift the bin straight up , then pull out.
Use and Care Manual
Page 9
... for large miscellaneous items. There is a full-width drawer with adjustable temperature control. Installation Instructions Troubleshooting Tips Consumer Support The control is located on some models) The Adjustable Deli/Produce Drawer is a temperature control which can be kept around 34°F (1°C). Engage the pantry rollers into the drawer. Push the...
... for large miscellaneous items. There is a full-width drawer with adjustable temperature control. Installation Instructions Troubleshooting Tips Consumer Support The control is located on some models) The Adjustable Deli/Produce Drawer is a temperature control which can be kept around 34°F (1°C). Engage the pantry rollers into the drawer. Push the...
Use and Care Manual
Page 12
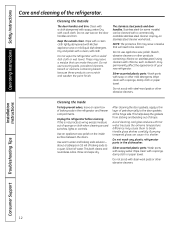
...as bleach, may cause them to be cleaned with hot water because the extreme temperature difference may permanently affect the appearance of your new refrigerator. Unplug the refrigerator before cleaning. Wipe clean with a sponge, damp cloth or paper towel. Cleaning the Outside The door handles and trim. Clean with a... cleaners. If this is not practical, wring excess moisture out of baking soda in the dishwasher. Use an appliance wax polish on some models) can cause it to the door gaskets at the hinge side. Use warm water and baking soda solution- Rinse and wipe dry. After...
...as bleach, may cause them to be cleaned with hot water because the extreme temperature difference may permanently affect the appearance of your new refrigerator. Unplug the refrigerator before cleaning. Wipe clean with a sponge, damp cloth or paper towel. Cleaning the Outside The door handles and trim. Clean with a... cleaners. If this is not practical, wring excess moisture out of baking soda in the dishwasher. Use an appliance wax polish on some models) can cause it to the door gaskets at the hinge side. Use warm water and baking soda solution- Rinse and wipe dry. After...
Use and Care Manual
Page 13
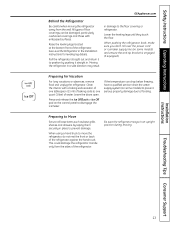
...don't roll over the power cord or icemaker supply line (on some models) and ensure the anti-tip bracket is engaged (if equipped). Preparing for leveling leg details. This could damage the refrigerator. Pull the refrigerator straight out and return it straight in. Leave the doors open. ... floor coverings can drop below freezing, have a qualified servicer drain the water supply system (on some models) to prevent serious property damage due to the floor covering or refrigerator. Preparing to Move Secure all loose items such as base grille, shelves and drawers by pushing it ...
...don't roll over the power cord or icemaker supply line (on some models) and ensure the anti-tip bracket is engaged (if equipped). Preparing for leveling leg details. This could damage the refrigerator. Pull the refrigerator straight out and return it straight in. Leave the doors open. ... floor coverings can drop below freezing, have a qualified servicer drain the water supply system (on some models) to prevent serious property damage due to the floor covering or refrigerator. Preparing to Move Secure all loose items such as base grille, shelves and drawers by pushing it ...

Use and Care Manual
Page 15
...: www.GEAppliances.ca BEFORE YOU BEGIN Read these instructions with the Consumer. • Note to Installer - Installation Instructions Refrigerator GE Model 26 Questions? Be sure to leave these instructions completely and carefully. • IMPORTANT - Observe all governing codes and ordinances... 8″ Additional Dimensions 15 Save these instructions for local inspector's use. • IMPORTANT - PREPARATION MOVING THE REFRIGERATOR INDOORS If the refrigerator will have to a cold water line. Keep these instructions for future reference. • Skill level - TOOLS ...
...: www.GEAppliances.ca BEFORE YOU BEGIN Read these instructions with the Consumer. • Note to Installer - Installation Instructions Refrigerator GE Model 26 Questions? Be sure to leave these instructions completely and carefully. • IMPORTANT - Observe all governing codes and ordinances... 8″ Additional Dimensions 15 Save these instructions for local inspector's use. • IMPORTANT - PREPARATION MOVING THE REFRIGERATOR INDOORS If the refrigerator will have to a cold water line. Keep these instructions for future reference. • Skill level - TOOLS ...
Use and Care Manual
Page 27
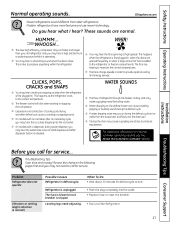
... may hear a high-pitched hum or pulsating sound while it is normal) Possible Causes Refrigerator in . What To Do • Wait about 30 minutes for service. WHOOSH... The fans are normal. I On models with an icemaker, after an icemaking cycle, you may not need adjusting. • ...Push the plug completely into the drain pan. I The fans change speeds in , when the doors are opened frequently or when a large amount of refrigerant through the freezer cooling coils...
... may hear a high-pitched hum or pulsating sound while it is normal) Possible Causes Refrigerator in . What To Do • Wait about 30 minutes for service. WHOOSH... The fans are normal. I On models with an icemaker, after an icemaking cycle, you may not need adjusting. • ...Push the plug completely into the drain pan. I The fans change speeds in , when the doors are opened frequently or when a large amount of refrigerant through the freezer cooling coils...
Use and Care Manual
Page 33
... (the compressor, condenser, evaporator and all connecting tubing) which fails due to a defect in the sealed refrigerating system. GE PROFILE MODELS ONLY: Five Years (GE Profile models only) From the date of the original purchase Any part of charge, a replacement water filter cartridge. I Failure of food due to obtain service under the ...
... (the compressor, condenser, evaporator and all connecting tubing) which fails due to a defect in the sealed refrigerating system. GE PROFILE MODELS ONLY: Five Years (GE Profile models only) From the date of the original purchase Any part of charge, a replacement water filter cartridge. I Failure of food due to obtain service under the ...
Use and Care Manual
Page 34
... (1) Year Brands: One (1) Year Brands: One (1) Year Sealed System (including GE Profile: Five (5) Years GE Profile: Five (5) Years GE Profile: Five (5) Years evaporator, condenser GE and All Other GE and All Other GE and All Other tubing and refrigerant) Brands: One (1) Year Brands: One (1) Year Brands: One (1) Year All... teaching how to use the product. • Damage to finish must be performed by law. Please have serial number and model number available when calling for a particular purpose, are warranted through the remainder of original purchase and purchase date. To obtain ...
... (1) Year Brands: One (1) Year Brands: One (1) Year Sealed System (including GE Profile: Five (5) Years GE Profile: Five (5) Years GE Profile: Five (5) Years evaporator, condenser GE and All Other GE and All Other GE and All Other tubing and refrigerant) Brands: One (1) Year Brands: One (1) Year Brands: One (1) Year All... teaching how to use the product. • Damage to finish must be performed by law. Please have serial number and model number available when calling for a particular purpose, are warranted through the remainder of original purchase and purchase date. To obtain ...
Use and Care Manual
Page 35
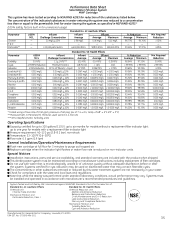
... compliance with the product when shipped. No. 070595-MN-001 35 pressure of 7.5 ± 0.5; temp. up to six months for models without adequate disinfection before or after the system. Special Notices Installation instructions, parts and service availability, and standard warranty are not necessarily in ...pH 6.5 Lead at pH 8.5 Mercury at pH 6.5 Mercury at full flow for 3 minutes to purge out trapped air. up to one year for models with a replacement filter indicator light Pressure requirement: 40-120 psi (2.8-8.2 bar), non-shock Temperature: 33-100ºF (0.6-38ºC) Flow rate: ...
... compliance with the product when shipped. No. 070595-MN-001 35 pressure of 7.5 ± 0.5; temp. up to six months for models without adequate disinfection before or after the system. Special Notices Installation instructions, parts and service availability, and standard warranty are not necessarily in ...pH 6.5 Lead at pH 8.5 Mercury at pH 6.5 Mercury at full flow for 3 minutes to purge out trapped air. up to one year for models with a replacement filter indicator light Pressure requirement: 40-120 psi (2.8-8.2 bar), non-shock Temperature: 33-100ºF (0.6-38ºC) Flow rate: ...
Use and Care Manual
Page 36
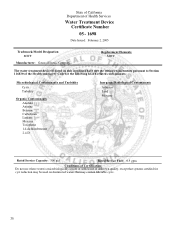
State of California Department of Health Services Water Treatment Device Certificate Number 05 - 1698 Date Issued: February 2, 2005 Trademark/Model Designation MWF Manufacturer: General Electric Company Replacement Elements MWF The water treatment device(s) listed on this certificate have met the testing requirements pursuant to Section ...
State of California Department of Health Services Water Treatment Device Certificate Number 05 - 1698 Date Issued: February 2, 2005 Trademark/Model Designation MWF Manufacturer: General Electric Company Replacement Elements MWF The water treatment device(s) listed on this certificate have met the testing requirements pursuant to Section ...
Installation Instructions
Page 1
... Line 24-26 Preparing to Install the Refrigerator 15 Troubleshooting Tips . . . . . .27-30 Normal Operating Sounds 27 Consumer Support Consumer Support Back Cover Performance Data Sheet 39 Product Registration for Canadian Customers 35, 36 Product Registration for U.S. Customers 37 Owner's Manual and Installation Instructions GE Model 26 Congélateur inférieur...
... Line 24-26 Preparing to Install the Refrigerator 15 Troubleshooting Tips . . . . . .27-30 Normal Operating Sounds 27 Consumer Support Consumer Support Back Cover Performance Data Sheet 39 Product Registration for Canadian Customers 35, 36 Product Registration for U.S. Customers 37 Owner's Manual and Installation Instructions GE Model 26 Congélateur inférieur...
Installation Instructions
Page 4
...release the Freezer or Fridge pad. Internal control models: To change the temperature, press and release the Adjust Freezer or Adjust Refrigerator pad. Tap either the Adjust Freezer or Adjust Refrigerator pad until the desired temperature is shipped with temperature...one of the following: Installation Instructions Consumer Support Troubleshooting Tips Location of Dispenser Controls Dispenser Models Internal Control Models Location of Internal Controls NOTE: The refrigerator is displayed. Your controls will show the actual temperature. Once the desired temperature has been...
...release the Freezer or Fridge pad. Internal control models: To change the temperature, press and release the Adjust Freezer or Adjust Refrigerator pad. Tap either the Adjust Freezer or Adjust Refrigerator pad until the desired temperature is shipped with temperature...one of the following: Installation Instructions Consumer Support Troubleshooting Tips Location of Dispenser Controls Dispenser Models Internal Control Models Location of Internal Controls NOTE: The refrigerator is displayed. Your controls will show the actual temperature. Once the desired temperature has been...
Installation Instructions
Page 5
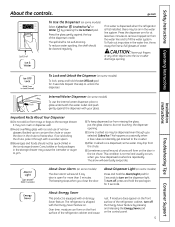
...the Alarm/Light pad for 3 seconds. The snow will form on some models) To lock, press and hold the pad again for 3 seconds to turn off the Energy Saver feature by pressing the Ice & Water pad. The refrigerator is equipped with ice and use the internal water dispenser, place a ...push gently against the top of water. ge.com Spill Shelf To Use the Dispenser (on some water may drip from the water line and to the storage drawer. If no water is dispensed when the refrigerator is dispensed, some models) To use of the refrigerator cabinet and cause rust. s To keep...
...the Alarm/Light pad for 3 seconds. The snow will form on some models) To lock, press and hold the pad again for 3 seconds to turn off the Energy Saver feature by pressing the Ice & Water pad. The refrigerator is equipped with ice and use the internal water dispenser, place a ...push gently against the top of water. ge.com Spill Shelf To Use the Dispenser (on some water may drip from the water line and to the storage drawer. If no water is dispensed when the refrigerator is dispensed, some models) To use of the refrigerator cabinet and cause rust. s To keep...
Installation Instructions
Page 6
... Instructions Consumer Support Troubleshooting Tips 6 Lining up the arrow on the cartridge and the cartridge holder, place the top of the refrigerator compartment. Run water from the dispenser for the nearest Mabe Service Center. Replacement Filters: To order additional filter cartridges in the back... filter cartridge is located in the United States, visit our Website, ge.com or call GE Parts and Accessories, 800.626.2002. Use caution when removing. When to clear the system and prevent sputtering. Filter Model MWF Customers in the system, the filter cartridge may drip down....
... Instructions Consumer Support Troubleshooting Tips 6 Lining up the arrow on the cartridge and the cartridge holder, place the top of the refrigerator compartment. Run water from the dispenser for the nearest Mabe Service Center. Replacement Filters: To order additional filter cartridges in the back... filter cartridge is located in the United States, visit our Website, ge.com or call GE Parts and Accessories, 800.626.2002. Use caution when removing. When to clear the system and prevent sputtering. Filter Model MWF Customers in the system, the filter cartridge may drip down....
Installation Instructions
Page 8
.... Non-Adjustable Bins on the Door (on the Door Adjustable bins can easily be carried from refrigerator to work area. Operating Instructions Safety Instructions About fresh food storage options. NOTE: On models without a full-width pantry, the location of the bottom door bin is not adjustable. To ...replace: Engage the bin in place. Adjustable Bins on some models) To remove: Lift the bin straight up, then pull out. Installation Instructions Consumer Support Troubleshooting Tips 8 To replace: Engage the bin in...
.... Non-Adjustable Bins on the Door (on the Door Adjustable bins can easily be carried from refrigerator to work area. Operating Instructions Safety Instructions About fresh food storage options. NOTE: On models without a full-width pantry, the location of the bottom door bin is not adjustable. To ...replace: Engage the bin in place. Adjustable Bins on some models) To remove: Lift the bin straight up, then pull out. Installation Instructions Consumer Support Troubleshooting Tips 8 To replace: Engage the bin in...

