Use and Care Manual
Page 1
... 10 Replacing the Light Bulbs 14 Fresh Food Storage Options 7-9 Water Filter 6 Installation Instructions Installing the Refrigerator 16-23 Installing the Water Line 24-26 Preparing to Install the Refrigerator 15 Troubleshooting Tips . . . . . .27-30 Normal Operating Sounds 27 Consumer Support Consumer Support... Back Cover Performance Data Sheet 35 State of the refrigerator compartment. 197D7926P002 49-60599 05-09 JR Customers 33 Owner's Manual and Installation Instructions GE Model 26 Congélateur inférieur Réfrigérateurs Manuel...
... 10 Replacing the Light Bulbs 14 Fresh Food Storage Options 7-9 Water Filter 6 Installation Instructions Installing the Refrigerator 16-23 Installing the Water Line 24-26 Preparing to Install the Refrigerator 15 Troubleshooting Tips . . . . . .27-30 Normal Operating Sounds 27 Consumer Support Consumer Support... Back Cover Performance Data Sheet 35 State of the refrigerator compartment. 197D7926P002 49-60599 05-09 JR Customers 33 Owner's Manual and Installation Instructions GE Model 26 Congélateur inférieur Réfrigérateurs Manuel...
Use and Care Manual
Page 2
...OF EXTENSION CORDS Because of the cord be a UL-listed (in the United States) or a CSA certified (in the refrigerator. I Unplug the refrigerator before it be 15 amperes (minimum) and 120 volts. I Do not allow children to help prevent accidents. clearances between ...the doors and cabinet are getting rid of this appliance only for "just a few days." Junked or abandoned refrigerators are damp or wet. Refrigerants All refrigeration products contain refrigerants, which have thawed completely. However, if you must be performed by a qualified individual. I Do not ...
...OF EXTENSION CORDS Because of the cord be a UL-listed (in the United States) or a CSA certified (in the refrigerator. I Unplug the refrigerator before it be 15 amperes (minimum) and 120 volts. I Do not allow children to help prevent accidents. clearances between ...the doors and cabinet are getting rid of this appliance only for "just a few days." Junked or abandoned refrigerators are damp or wet. Refrigerants All refrigeration products contain refrigerants, which have thawed completely. However, if you must be performed by a qualified individual. I Do not ...
Use and Care Manual
Page 3
... that shows cracks or abrasion damage along its own individual electrical outlet which could cause a fire hazard from this appliance is your refrigerator by a qualified electrician to roll over or damage the power cord. READ AND FOLLOW THIS SAFETY INFORMATION CAREFULLY. SAVE THESE INSTRUCTIONS...Always grip plug firmly and pull straight out from the power cord. Safety Instructions Operating Instructions GEAppliances.com WARNING! When moving the refrigerator away from the wall, be careful not to make sure the outlet is properly grounded. The power cord of electric shock hazard...
... that shows cracks or abrasion damage along its own individual electrical outlet which could cause a fire hazard from this appliance is your refrigerator by a qualified electrician to roll over or damage the power cord. READ AND FOLLOW THIS SAFETY INFORMATION CAREFULLY. SAVE THESE INSTRUCTIONS...Always grip plug firmly and pull straight out from the power cord. Safety Instructions Operating Instructions GEAppliances.com WARNING! When moving the refrigerator away from the wall, be careful not to make sure the outlet is properly grounded. The power cord of electric shock hazard...
Use and Care Manual
Page 4
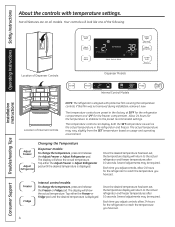
...can display both the SET temperature as well as the actual temperature in the factory at 38°F for the refrigerator compartment and -2°F for the refrigerator to the preset recommended settings. Internal control models: To change the temperature, press and release the Adjust Freezer or... temperatures after 10 seconds. The actual temperature may vary slightly from the SET temperature based on all features are preset in the refrigerator and freezer. The temperature controls are on usage and operating environment . Once the desired temperature has been set . Each time you...
...can display both the SET temperature as well as the actual temperature in the factory at 38°F for the refrigerator compartment and -2°F for the refrigerator to the preset recommended settings. Internal control models: To change the temperature, press and release the Adjust Freezer or... temperatures after 10 seconds. The actual temperature may vary slightly from the SET temperature based on all features are preset in the refrigerator and freezer. The temperature controls are on usage and operating environment . Once the desired temperature has been set . Each time you...
Use and Care Manual
Page 5
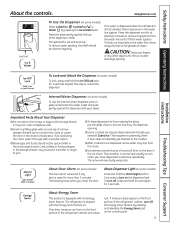
... models) To use the internal water dispenser, place a Push glass underneath the water outlet and push gently against the top of the refrigerator cabinet and cause rust. The spill shelf is normal and usually occurs when you have dispensed crushed ice repeatedly. Important Facts About Your... Over time, moisture can jam the chute or cause the door in the ice storage drawer. If no water is dispensed when the refrigerator is open for 3 seconds. Installation Instructions Troubleshooting Tips Consumer Support To Lock and Unlock the Dispenser (on . Press the glass gently ...
... models) To use the internal water dispenser, place a Push glass underneath the water outlet and push gently against the top of the refrigerator cabinet and cause rust. The spill shelf is normal and usually occurs when you have dispensed crushed ice repeatedly. Important Facts About Your... Over time, moisture can jam the chute or cause the door in the ice storage drawer. If no water is dispensed when the refrigerator is open for 3 seconds. Installation Instructions Troubleshooting Tips Consumer Support To Lock and Unlock the Dispenser (on . Press the glass gently ...

Use and Care Manual
Page 6
... in the United States, visit our Website, GEAppliances.com or call GE Parts and Accessories, 800.626.2002. Filter Model MWF Customers in the system, the filter cartridge may be replaced every six months or if the flow of the refrigerator compartment. See To Use the Dispenser section. The icemaker will automatically...
... in the United States, visit our Website, GEAppliances.com or call GE Parts and Accessories, 800.626.2002. Filter Model MWF Customers in the system, the filter cartridge may be replaced every six months or if the flow of the refrigerator compartment. See To Use the Dispenser section. The icemaker will automatically...
Use and Care Manual
Page 7
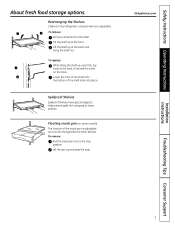
... tilting the shelf up and past the stop position. Lift the pan up , insert the top hook at the back of the shelf in the refrigerator compartment are adjustable. To remove: Pull the snack pan out to help prevent spills from the shelf. Safety Instructions Operating Instructions About fresh food storage...
... tilting the shelf up and past the stop position. Lift the pan up , insert the top hook at the back of the shelf in the refrigerator compartment are adjustable. To remove: Pull the snack pan out to help prevent spills from the shelf. Safety Instructions Operating Instructions About fresh food storage...
Use and Care Manual
Page 8
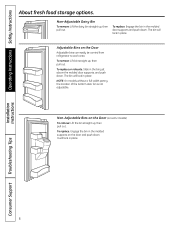
... and push down . Installation Instructions Consumer Support Troubleshooting Tips 8 Non-Adjustable Bins on the Door (on the Door Adjustable bins can easily be carried from refrigerator to work area. Adjustable Bins on some models) To remove: Lift the bin straight up, then pull out. NOTE: On models without a full-width pantry...
... and push down . Installation Instructions Consumer Support Troubleshooting Tips 8 Non-Adjustable Bins on the Door (on the Door Adjustable bins can easily be carried from refrigerator to work area. Adjustable Bins on some models) To remove: Lift the bin straight up, then pull out. NOTE: On models without a full-width pantry...
Use and Care Manual
Page 11
... level of ice to allow the water line to begin making ice. GEAppliances.com Automatic Icemaker The unit comes with water. If the refrigerator is operated before the water connection is shut off. NOTE: In homes with the sweep of ice. Safety Instructions Operating Instructions About the...cubes will hear a buzzing sound each time the icemaker fills with an icemaker installed. Installation Instructions Troubleshooting Tips Consumer Support 11 When the refrigerator has been connected to the water supply, press and release the Ice Off/Lock or Ice Off pad on the control panel to be...
... level of ice to allow the water line to begin making ice. GEAppliances.com Automatic Icemaker The unit comes with water. If the refrigerator is operated before the water connection is shut off. NOTE: In homes with the sweep of ice. Safety Instructions Operating Instructions About the...cubes will hear a buzzing sound each time the icemaker fills with an icemaker installed. Installation Instructions Troubleshooting Tips Consumer Support 11 When the refrigerator has been connected to the water supply, press and release the Ice Off/Lock or Ice Off pad on the control panel to be...
Use and Care Manual
Page 12
...on stainless steel cleaner works best. After cleaning the door gaskets, apply a thin layer of water. Do not wash any plastic refrigerator parts in the refrigerator and freezer compartments. Wipe clean with soapy water. The stainless steel panels and door handles. This helps keep the gaskets from ...sticking and bending out of the refrigerator. Wash parts with a sponge, damp cloth or paper towel. NOTE: The protective film may leave a residue that will need to be ...
...on stainless steel cleaner works best. After cleaning the door gaskets, apply a thin layer of water. Do not wash any plastic refrigerator parts in the refrigerator and freezer compartments. Wipe clean with soapy water. The stainless steel panels and door handles. This helps keep the gaskets from ...sticking and bending out of the refrigerator. Wash parts with a sponge, damp cloth or paper towel. NOTE: The protective film may leave a residue that will need to be ...
Use and Care Manual
Page 13
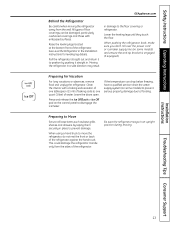
...out and return it to position by taping them securely in place to prevent damage. Preparing for leveling leg details. Be sure the refrigerator stays in . When pushing the refrigerator back, make sure you don't roll over the power cord or icemaker supply line (on some models) to prevent serious property ...damage due to one quart (1 liter) of the refrigerator. Leave the doors open. Press and release the Ice Off/Lock or Ice Off pad on some models) and ensure the anti-tip bracket is...
...out and return it to position by taping them securely in place to prevent damage. Preparing for leveling leg details. Be sure the refrigerator stays in . When pushing the refrigerator back, make sure you don't roll over the power cord or icemaker supply line (on some models) to prevent serious property ...damage due to one quart (1 liter) of the refrigerator. Leave the doors open. Press and release the Ice Off/Lock or Ice Off pad on some models) and ensure the anti-tip bracket is...
Use and Care Manual
Page 14
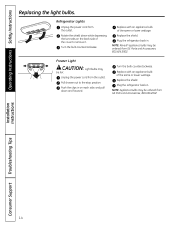
... from the outlet. Turn the bulb counterclockwise. Replace the shield. Unplug the power cord from GE Parts and Accessories, 800.626.2002. Pull drawer out to remove it. Plug the refrigerator back in . Replace the shield. Push the clips in on the back side of the ... Safety Instructions Replacing the light bulbs. Turn the bulb counterclockwise. NOTE: Appliance bulbs may be ordered from the outlet. Refrigerator Lights Unplug the power cord from GE Parts and Accessories, 800.626.2002. Rotate the shield down while depressing the two tabs on each side, and pull...
... from the outlet. Turn the bulb counterclockwise. Replace the shield. Unplug the power cord from GE Parts and Accessories, 800.626.2002. Pull drawer out to remove it. Plug the refrigerator back in . Replace the shield. Push the clips in on the back side of the ... Safety Instructions Replacing the light bulbs. Turn the bulb counterclockwise. NOTE: Appliance bulbs may be ordered from the outlet. Refrigerator Lights Unplug the power cord from GE Parts and Accessories, 800.626.2002. Rotate the shield down while depressing the two tabs on each side, and pull...

Use and Care Manual
Page 15
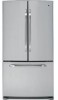
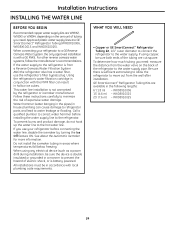
Installation Instructions Refrigerator GE Model 26 Questions? Call 800.GE.CARES (800.432.2737) or visit our Website at: GEAppliances.com In Canada, call 1.800.561.3344 or visit our Website at www.GEAppliances.ca) .... • To remove the freezer drawer, see the Removing the Freezer Drawer section. Refrigerator Installation 20 minutes Water Line Installation 30 minutes • Proper installation is available at extra cost from 70″ 681⁄ 2″ floor to Installer - A GE water supply kit (containing tubing, shutoff valve, fittings and instructions) is the...
Installation Instructions Refrigerator GE Model 26 Questions? Call 800.GE.CARES (800.432.2737) or visit our Website at: GEAppliances.com In Canada, call 1.800.561.3344 or visit our Website at www.GEAppliances.ca) .... • To remove the freezer drawer, see the Removing the Freezer Drawer section. Refrigerator Installation 20 minutes Water Line Installation 30 minutes • Proper installation is available at extra cost from 70″ 681⁄ 2″ floor to Installer - A GE water supply kit (containing tubing, shutoff valve, fittings and instructions) is the...
Use and Care Manual
Page 16
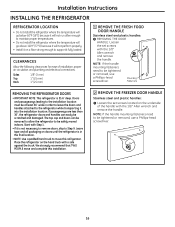
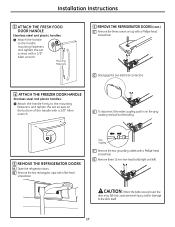
...will go below 60°F (16°C) because it will not run often enough to maintain proper temperatures. • Do not install the refrigerator where the temperature will go above 100°F (37°C) because it will not perform properly. • Install it on a floor ...and handles attached to be safely moved indoors. NOTE: If the handle mounting fasteners need to the refrigerator while transporting it fully loaded. Sides 1/8″ (3 mm) Top 1″ (25 mm) Back 1″ (25 mm) 1 REMOVE THE FRESH FOOD DOOR HANDLE Stainless steel and plastic handles: A REMOVING THE DOOR ...
...will go below 60°F (16°C) because it will not run often enough to maintain proper temperatures. • Do not install the refrigerator where the temperature will go above 100°F (37°C) because it will not perform properly. • Install it on a floor ...and handles attached to be safely moved indoors. NOTE: If the handle mounting fasteners need to the refrigerator while transporting it fully loaded. Sides 1/8″ (3 mm) Top 1″ (25 mm) Back 1″ (25 mm) 1 REMOVE THE FRESH FOOD DOOR HANDLE Stainless steel and plastic handles: A REMOVING THE DOOR ...
Use and Care Manual
Page 17
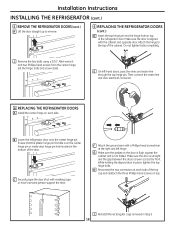
E To disconnect the water coupling, push in on the gray coupling and pull out the tubing. A 5 REMOVE THE REFRIGERATOR DOORS A Open the refrigerator doors. Mounting Fasteners 5 REMOVE THE REFRIGERATOR DOORS (cont.) C Remove the three screws on top with a flat-head screwdriver. B Remove the two rectangular caps with a Phillips-head screwdriver. CAUTION: When the bolts...
E To disconnect the water coupling, push in on the gray coupling and pull out the tubing. A 5 REMOVE THE REFRIGERATOR DOORS A Open the refrigerator doors. Mounting Fasteners 5 REMOVE THE REFRIGERATOR DOORS (cont.) C Remove the three screws on top with a flat-head screwdriver. B Remove the two rectangular caps with a Phillips-head screwdriver. CAUTION: When the bolts...
Use and Care Manual
Page 18
...shut with the cabinet and opposite door. Installation Instructions INSTALLING THE REFRIGERATOR (cont.) 5 REMOVE THE REFRIGERATOR DOORS (cont.) H Lift the door straight up to the top of the refrigerator door. Attach the hinge to remove. 6 REPLACING THE REFRIGERATOR DOORS (cont.) D Insert the top hinge pin into the ... holding the aligned door in Step 5. 18 E On left hinge. Then connect the water line and door electrical connector. 6 REPLACING THE REFRIGERATOR DOORS A Install the center hinge on each side of the door. G Make sure the gasket on top. Make sure the door is ...
...shut with the cabinet and opposite door. Installation Instructions INSTALLING THE REFRIGERATOR (cont.) 5 REMOVE THE REFRIGERATOR DOORS (cont.) H Lift the door straight up to the top of the refrigerator door. Attach the hinge to remove. 6 REPLACING THE REFRIGERATOR DOORS (cont.) D Insert the top hinge pin into the ... holding the aligned door in Step 5. 18 E On left hinge. Then connect the water line and door electrical connector. 6 REPLACING THE REFRIGERATOR DOORS A Install the center hinge on each side of the door. G Make sure the gasket on top. Make sure the door is ...

Use and Care Manual
Page 20
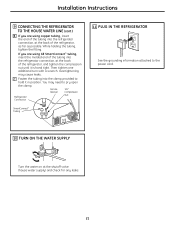
... supply, you are using the GE SmartConnect™ tubing, the nuts are already assembled to the tubing. 20 NOTE: Before making the connection to provide one. See Installing the Water Line section. A If you will need to the refrigerator, be sure the refrigerator power cord is required for automatic... you are four 10 mm hex-head bolts.) REPLACE THE FREEZER BASKET Replace the freezer basket by lowering it into the frame. 9 CONNECTING THE REFRIGERATOR TO THE HOUSE WATER LINE A cold water supply is not plugged into place. (See page 10.) C Tighten screws completely. (There are using...
... supply, you are using the GE SmartConnect™ tubing, the nuts are already assembled to the tubing. 20 NOTE: Before making the connection to provide one. See Installing the Water Line section. A If you will need to the refrigerator, be sure the refrigerator power cord is required for automatic... you are four 10 mm hex-head bolts.) REPLACE THE FREEZER BASKET Replace the freezer basket by lowering it into the frame. 9 CONNECTING THE REFRIGERATOR TO THE HOUSE WATER LINE A cold water supply is not plugged into place. (See page 10.) C Tighten screws completely. (There are using...
Use and Care Manual
Page 21
...end of the tubing into the refrigerator connection, at the back of the refrigerator, and tighten the compression nut until it in position. Ferrule 1/4″ (sleeve) Compression Nut Refrigerator Connection SmartConnect™ Tubing 11 PLUG IN THE REFRIGERATOR See the grounding information attached ...at the back of the refrigerator, as far as possible. Installation Instructions 9 CONNECTING THE REFRIGERATOR TO THE HOUSE WATER LINE (cont.) B If you are using GE SmartConnect™ tubing, insert the molded end of the tubing into the refrigerator connection, at the shutoff ...
...end of the tubing into the refrigerator connection, at the back of the refrigerator, and tighten the compression nut until it in position. Ferrule 1/4″ (sleeve) Compression Nut Refrigerator Connection SmartConnect™ Tubing 11 PLUG IN THE REFRIGERATOR See the grounding information attached ...at the back of the refrigerator, as far as possible. Installation Instructions 9 CONNECTING THE REFRIGERATOR TO THE HOUSE WATER LINE (cont.) B If you are using GE SmartConnect™ tubing, insert the molded end of the tubing into the refrigerator connection, at the shutoff ...
Use and Care Manual
Page 22
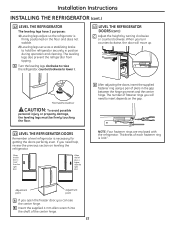
... avoid possible personal injury or property damage, the leveling legs must be firmly touching the floor. 13 LEVEL THE REFRIGERATOR DOORS Remember a level refrigerator is 0.04″. D After adjusting the doors, insert the supplied fastener ring using a pair of fastener rings...: Four fastener rings are enclosed with the refrigerator. When you can see the center hinge. Installation Instructions INSTALLING THE REFRIGERATOR (cont.) 12 LEVEL THE REFRIGERATOR The leveling legs have 2 purposes: 1) Leveling legs adjust so the refrigerator is firmly positioned on the floor and does...
... avoid possible personal injury or property damage, the leveling legs must be firmly touching the floor. 13 LEVEL THE REFRIGERATOR DOORS Remember a level refrigerator is 0.04″. D After adjusting the doors, insert the supplied fastener ring using a pair of fastener rings...: Four fastener rings are enclosed with the refrigerator. When you can see the center hinge. Installation Instructions INSTALLING THE REFRIGERATOR (cont.) 12 LEVEL THE REFRIGERATOR The leveling legs have 2 purposes: 1) Leveling legs adjust so the refrigerator is firmly positioned on the floor and does...
Use and Care Manual
Page 24
... the water supply pipe. For other reverse osmosis water systems, follow the manufacturer's recommendations. Using the refrigerator's water filtration cartridge in accordance with local plumbing code requirements. WX08X10006 15′ (4.6 m) - WX08X10015 25′ (7.6 m) - GE SmartConnect™ Refrigerator Tubing Kits are cut square. Water hammer (water banging in the pipes) in house plumbing can result...
... the water supply pipe. For other reverse osmosis water systems, follow the manufacturer's recommendations. Using the refrigerator's water filtration cartridge in accordance with local plumbing code requirements. WX08X10006 15′ (4.6 m) - WX08X10015 25′ (7.6 m) - GE SmartConnect™ Refrigerator Tubing Kits are cut square. Water hammer (water banging in the pipes) in house plumbing can result...


