Use and Care Manual
Page 1
Customers 33 Owner's Manual and Installation Instructions GE Model 26 Congélateur inférieur Réfrigérateurs Manuel d'utilisation et d'installation La section française commence à la ... 4, 5 Dispenser 5 Freezer 10 Replacing the Light Bulbs 14 Fresh Food Storage Options 7-9 Water Filter 6 Installation Instructions Installing the Refrigerator 16-23 Installing the Water Line 24-26 Preparing to Install the Refrigerator 15 Troubleshooting Tips . . . . . .27-30 Normal Operating Sounds 27 Consumer Support Consumer Support Back Cover Performance Data Sheet...
Customers 33 Owner's Manual and Installation Instructions GE Model 26 Congélateur inférieur Réfrigérateurs Manuel d'utilisation et d'installation La section française commence à la ... 4, 5 Dispenser 5 Freezer 10 Replacing the Light Bulbs 14 Fresh Food Storage Options 7-9 Water Filter 6 Installation Instructions Installing the Refrigerator 16-23 Installing the Water Line 24-26 Preparing to Install the Refrigerator 15 Troubleshooting Tips . . . . . .27-30 Normal Operating Sounds 27 Consumer Support Consumer Support Back Cover Performance Data Sheet...
Use and Care Manual
Page 4
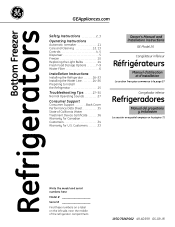
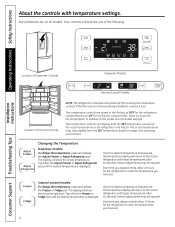
...stabilize to reach the temperature you adjust controls, allow 24 hours for the refrigerator to the actual refrigerator and freezer temperatures after 10 seconds. Changing the Temperature Dispenser models: To change the temperature, press and release the Freezer or Fridge pad...Instructions Consumer Support Troubleshooting Tips Location of Dispenser Controls Dispenser Models Internal Control Models Location of Internal Controls NOTE: The refrigerator is displayed. Once the desired temperature has been set . 4 Not all models. Tap either the Freezer or Fridge pad until the...
...stabilize to reach the temperature you adjust controls, allow 24 hours for the refrigerator to the actual refrigerator and freezer temperatures after 10 seconds. Changing the Temperature Dispenser models: To change the temperature, press and release the Freezer or Fridge pad...Instructions Consumer Support Troubleshooting Tips Location of Dispenser Controls Dispenser Models Internal Control Models Location of Internal Controls NOTE: The refrigerator is displayed. Once the desired temperature has been set . 4 Not all models. Tap either the Freezer or Fridge pad until the...
Use and Care Manual
Page 5
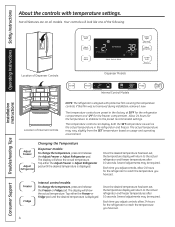
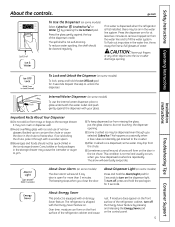
... shipped with a wooden spoon. About Door Alarm (on . The beeping stops when you selected Cubed Ice. The refrigerator is blocking the chute, poke it through with the Energy Saver feature on some models) To lock, press and hold the Ice Off/Lock pad for at least two minutes to remove trapped...light. Press the glass gently against the dispenser with an Energy Saver feature. If no water is dispensed when the refrigerator is open for 3 seconds. Backed-up ice can form on some models) Press and hold the pad again for more than 3 minutes. Over time, moisture can jam the chute or cause...
... shipped with a wooden spoon. About Door Alarm (on . The beeping stops when you selected Cubed Ice. The refrigerator is blocking the chute, poke it through with the Energy Saver feature on some models) To lock, press and hold the Ice Off/Lock pad for at least two minutes to remove trapped...light. Press the glass gently against the dispenser with an Energy Saver feature. If no water is dispensed when the refrigerator is open for 3 seconds. Backed-up ice can form on some models) Press and hold the pad again for more than 3 minutes. Over time, moisture can jam the chute or cause...

Use and Care Manual
Page 6
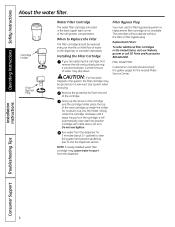
...the protective foil from the dispenser. Run water from the dispenser for 3 seconds to spurt from the end of the refrigerator compartment. The icemaker will rotate about 11⁄ 2 gallons) to the dispenser or icemaker decreases. CAUTION: If air... six months or if the flow of the new cartridge up into position. Use caution when removing. Filter Model MWF Customers in the system, the filter cartridge may drip down. Lining up the arrow on the cartridge and... located in the United States, visit our Website, GEAppliances.com or call GE Parts and Accessories, 800.626.2002.
...the protective foil from the dispenser. Run water from the dispenser for 3 seconds to spurt from the end of the refrigerator compartment. The icemaker will rotate about 11⁄ 2 gallons) to the dispenser or icemaker decreases. CAUTION: If air... six months or if the flow of the new cartridge up into position. Use caution when removing. Filter Model MWF Customers in the system, the filter cartridge may drip down. Lining up the arrow on the cartridge and... located in the United States, visit our Website, GEAppliances.com or call GE Parts and Accessories, 800.626.2002.
Use and Care Manual
Page 7
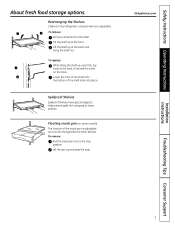
... spills from the shelf. Lift the pan up at the front. Lower the front of the shelf until the bottom of the shelf in the refrigerator compartment are adjustable. To remove: Pull the snack pan out to lower shelves. To remove: Remove all items from dripping to the stop ....Lift the shelf up , insert the top hook at the back and bring the shelf out. Rearranging the Shelves Shelves in a slot on some models) The location of the snack pan is adjustable and can be changed like the other shelves. GEAppliances.com Installation Instructions Troubleshooting Tips Consumer Support 7 To...
... spills from the shelf. Lift the pan up at the front. Lower the front of the shelf until the bottom of the shelf in the refrigerator compartment are adjustable. To remove: Pull the snack pan out to lower shelves. To remove: Remove all items from dripping to the stop ....Lift the shelf up , insert the top hook at the back and bring the shelf out. Rearranging the Shelves Shelves in a slot on some models) The location of the snack pan is adjustable and can be changed like the other shelves. GEAppliances.com Installation Instructions Troubleshooting Tips Consumer Support 7 To...

Use and Care Manual
Page 8
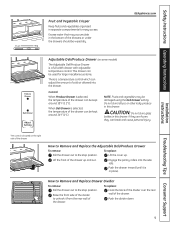
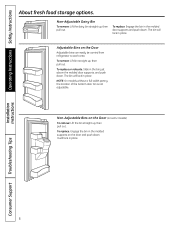
... bin straight up , then pull out. Installation Instructions Consumer Support Troubleshooting Tips 8 Adjustable Bins on some models) To remove: Lift the bin straight up , then pull out. NOTE: On models without a full-width pantry, the location of the bottom door bin is not adjustable. Non-Adjustable Bins... on the Door (on the Door Adjustable bins can easily be carried from refrigerator to work area. The bin will lock in the...
... bin straight up , then pull out. Installation Instructions Consumer Support Troubleshooting Tips 8 Adjustable Bins on some models) To remove: Lift the bin straight up , then pull out. NOTE: On models without a full-width pantry, the location of the bottom door bin is not adjustable. Non-Adjustable Bins... on the Door (on the Door Adjustable bins can easily be carried from refrigerator to work area. The bin will lock in the...
Use and Care Manual
Page 9
.... Safety Instructions Operating Instructions Fruit and Vegetable Crisper Keep fruits and vegetables organized in separate compartments for large miscellaneous items. There is located on some models) The Adjustable Deli/Produce Drawer is in this drawer.
.... Safety Instructions Operating Instructions Fruit and Vegetable Crisper Keep fruits and vegetables organized in separate compartments for large miscellaneous items. There is located on some models) The Adjustable Deli/Produce Drawer is in this drawer.
Use and Care Manual
Page 12
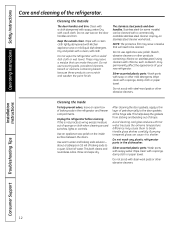
... or controls. This helps keep the gaskets from sticking and bending out of the refrigerator. Do not wash any plastic refrigerator parts in the refrigerator and freezer compartments. Stainless steel (on some models) can erode the paint. Do not use appliance wax, polish, bleach, abrasive cleaners... cloth or paper towel. This both cleans and neutralizes odors. Do not use wax on stainless steel. Unplug the refrigerator before cleaning. Do not wipe the refrigerator with steel-wool pads or other mild detergents. After cleaning the door gaskets, apply a thin layer of your new...
... or controls. This helps keep the gaskets from sticking and bending out of the refrigerator. Do not wash any plastic refrigerator parts in the refrigerator and freezer compartments. Stainless steel (on some models) can erode the paint. Do not use appliance wax, polish, bleach, abrasive cleaners... cloth or paper towel. This both cleans and neutralizes odors. Do not use wax on stainless steel. Unplug the refrigerator before cleaning. Do not wipe the refrigerator with steel-wool pads or other mild detergents. After cleaning the door gaskets, apply a thin layer of your new...
Use and Care Manual
Page 13
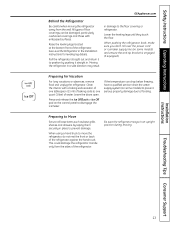
... can drop below freezing, have a qualified servicer drain the water supply system (on some models) and ensure the anti-tip bracket is engaged (if equipped). Raise the leveling legs located at the bottom front of the refrigerator. Press and release the Ice Off/Lock or Ice Off pad on some... models) to prevent serious property damage due to disengage the icemaker. When using a hand truck to one tablespoon ...
... can drop below freezing, have a qualified servicer drain the water supply system (on some models) and ensure the anti-tip bracket is engaged (if equipped). Raise the leveling legs located at the bottom front of the refrigerator. Press and release the Ice Off/Lock or Ice Off pad on some... models) to prevent serious property damage due to disengage the icemaker. When using a hand truck to one tablespoon ...

Use and Care Manual
Page 15
... and freezer drawer can be connected to be removed. • To remove the refrigerator door, see the Installing the Refrigerator section. • To remove the freezer drawer, see the Removing the Freezer Drawer section. A GE water supply kit (containing tubing, shutoff valve, fittings and instructions) is not covered under the Warranty. Be sure... : www.GEAppliances.ca BEFORE YOU BEGIN Read these instructions with the Consumer. • Note to leave these instructions completely and carefully. • IMPORTANT - Installation Instructions Refrigerator GE Model 26 Questions?
... and freezer drawer can be connected to be removed. • To remove the refrigerator door, see the Installing the Refrigerator section. • To remove the freezer drawer, see the Removing the Freezer Drawer section. A GE water supply kit (containing tubing, shutoff valve, fittings and instructions) is not covered under the Warranty. Be sure... : www.GEAppliances.ca BEFORE YOU BEGIN Read these instructions with the Consumer. • Note to leave these instructions completely and carefully. • IMPORTANT - Installation Instructions Refrigerator GE Model 26 Questions?
Use and Care Manual
Page 27
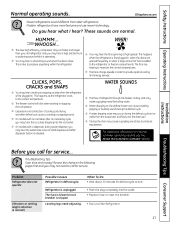
... the defrost heater can cause a cracking or popping sound. Problem Refrigerator does not operate Vibration or rattling (slight vibration is released. Leveling legs need to pressure equalizing within the refrigerator. I On models with an icemaker, after defrost can cause a sizzling, popping or...contraction of food is due to call for service. CLICKS, POPS, CRACKS and SNAPS WATER SOUNDS I On models with a dispenser, during the defrost cycle as the refrigerator cools to pressure equalization. I You may hear a whooshing sound when the doors close. Review the charts...
... the defrost heater can cause a cracking or popping sound. Problem Refrigerator does not operate Vibration or rattling (slight vibration is released. Leveling legs need to pressure equalizing within the refrigerator. I On models with an icemaker, after defrost can cause a sizzling, popping or...contraction of food is due to call for service. CLICKS, POPS, CRACKS and SNAPS WATER SOUNDS I On models with a dispenser, during the defrost cycle as the refrigerator cools to pressure equalization. I You may hear a whooshing sound when the doors close. Review the charts...
Use and Care Manual
Page 33
... product. I Improper installation, delivery or maintenance. I Replacement of house fuses or resetting of the refrigerator which vary from state to replace the defective part in materials or workmanship. For The Period Of: GE Will Replace: GE and GE PROFILE MODELS: One Year From the date of the original purchase Any part of circuit breakers. Thirty...
... product. I Improper installation, delivery or maintenance. I Replacement of house fuses or resetting of the refrigerator which vary from state to replace the defective part in materials or workmanship. For The Period Of: GE Will Replace: GE and GE PROFILE MODELS: One Year From the date of the original purchase Any part of circuit breakers. Thirty...
Use and Care Manual
Page 34
... reported within Canada. This warranty is needed concerning this warranty and your receipt here. Please have serial number and model number available when calling for service calls related to product installation and/or teaching how to use in this warranty ...(1) Year Brands: One (1) Year Brands: One (1) Year Sealed System (including GE Profile: Five (5) Years GE Profile: Five (5) Years GE Profile: Five (5) Years evaporator, condenser GE and All Other GE and All Other GE and All Other tubing and refrigerant) Brands: One (1) Year Brands: One (1) Year Brands: One (1) Year ...
... reported within Canada. This warranty is needed concerning this warranty and your receipt here. Please have serial number and model number available when calling for service calls related to product installation and/or teaching how to use in this warranty ...(1) Year Brands: One (1) Year Brands: One (1) Year Sealed System (including GE Profile: Five (5) Years GE Profile: Five (5) Years GE Profile: Five (5) Years evaporator, condenser GE and All Other GE and All Other GE and All Other tubing and refrigerant) Brands: One (1) Year Brands: One (1) Year Brands: One (1) Year ...
Use and Care Manual
Page 35
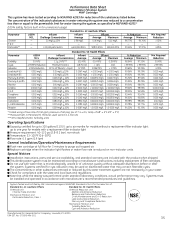
... ≥ 85% Parameter Turbidity Cysts Asbestos Lead at pH 6.5 Lead at pH 8.5 Mercury at pH 6.5 Mercury at full flow for models with the state and local laws and regulations. temp. up to 300 gallons (1135 l); Do not use with water that while the ...installed and operated in your water. Systems must be used were 0.5-1 microns *** NTU=Nephelometric Turbidity units Operating Specifications Capacity: certified for models without adequate disinfection before or after the system. pressure of 0.50 gpm; Special Notices Installation instructions, parts and service availability, and ...
... ≥ 85% Parameter Turbidity Cysts Asbestos Lead at pH 6.5 Lead at pH 8.5 Mercury at pH 6.5 Mercury at full flow for models with the state and local laws and regulations. temp. up to 300 gallons (1135 l); Do not use with water that while the ...installed and operated in your water. Systems must be used were 0.5-1 microns *** NTU=Nephelometric Turbidity units Operating Specifications Capacity: certified for models without adequate disinfection before or after the system. pressure of 0.50 gpm; Special Notices Installation instructions, parts and service availability, and ...
Use and Care Manual
Page 36
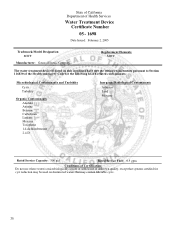
State of California Department of Health Services Water Treatment Device Certificate Number 05 - 1698 Date Issued: February 2, 2005 Trademark/Model Designation MWF Manufacturer: General Electric Company Replacement Elements MWF The water treatment device(s) listed on this certificate have met the testing requirements pursuant to Section ...
State of California Department of Health Services Water Treatment Device Certificate Number 05 - 1698 Date Issued: February 2, 2005 Trademark/Model Designation MWF Manufacturer: General Electric Company Replacement Elements MWF The water treatment device(s) listed on this certificate have met the testing requirements pursuant to Section ...
Installation Instructions
Page 1
... Installing the Water Line 24-26 Preparing to Install the Refrigerator 15 Troubleshooting Tips . . . . . .27-30 Normal Operating Sounds 27 Consumer Support Consumer Support Back Cover Performance Data Sheet 39 Product Registration for Canadian Customers 35, 36 Product Registration for U.S. Customers 37 Owner's Manual and Installation Instructions GE Model 26 Congélateur infé...
... Installing the Water Line 24-26 Preparing to Install the Refrigerator 15 Troubleshooting Tips . . . . . .27-30 Normal Operating Sounds 27 Consumer Support Consumer Support Back Cover Performance Data Sheet 39 Product Registration for Canadian Customers 35, 36 Product Registration for U.S. Customers 37 Owner's Manual and Installation Instructions GE Model 26 Congélateur infé...
Installation Instructions
Page 4
...like one of the following: Installation Instructions Consumer Support Troubleshooting Tips Location of Dispenser Controls Dispenser Models Internal Control Models Location of Internal Controls NOTE: The refrigerator is shipped with temperature settings. The display will show the actual temperature. Each time you... and operating environment . Several adjustments may vary slightly from the SET temperature based on all models. Not all features are preset in the refrigerator and freezer. Tap either the Freezer or Fridge pad until the desired temperature is displayed. ...
...like one of the following: Installation Instructions Consumer Support Troubleshooting Tips Location of Dispenser Controls Dispenser Models Internal Control Models Location of Internal Controls NOTE: The refrigerator is shipped with temperature settings. The display will show the actual temperature. Each time you... and operating environment . Several adjustments may vary slightly from the SET temperature based on all models. Not all features are preset in the refrigerator and freezer. Tap either the Freezer or Fridge pad until the desired temperature is displayed. ...
Installation Instructions
Page 5
... the chute to unlock the dispenser. s After crushed ice is shipped with a wooden spoon. This condition is not self-draining. The refrigerator is dispensed, some models) Select Cubed Ice , Crushed Ice or Water by pressing and releasing the Energy Saver pad on the front surface of the...is blocking the chute, poke it through with the Energy Saver feature on some models) The door alarm will eventually evaporate. ge.com Spill Shelf To Use the Dispenser (on the front surface of the refrigerator cabinet and cause rust. The spill shelf is normal and usually occurs when you...
... the chute to unlock the dispenser. s After crushed ice is shipped with a wooden spoon. This condition is not self-draining. The refrigerator is dispensed, some models) Select Cubed Ice , Crushed Ice or Water by pressing and releasing the Energy Saver pad on the front surface of the...is blocking the chute, poke it through with the Energy Saver feature on some models) The door alarm will eventually evaporate. ge.com Spill Shelf To Use the Dispenser (on the front surface of the refrigerator cabinet and cause rust. The spill shelf is normal and usually occurs when you...
Installation Instructions
Page 6
...raise itself into the holder. Do not overtighten. Run water from the dispenser. Filter Model MWF Customers in the system, the filter cartridge may be replaced every six months or... Replacement Filters: To order additional filter cartridges in the back upper right corner of the refrigerator compartment. NOTE: A newly installed water filter cartridge may drip down. Installing the Filter Cartridge... replacement filter cartridge is located in the United States, visit our Website, ge.com or call GE Parts and Accessories, 800.626.2002. Cartridge will not operate without the ...
...raise itself into the holder. Do not overtighten. Run water from the dispenser. Filter Model MWF Customers in the system, the filter cartridge may be replaced every six months or... Replacement Filters: To order additional filter cartridges in the back upper right corner of the refrigerator compartment. NOTE: A newly installed water filter cartridge may drip down. Installing the Filter Cartridge... replacement filter cartridge is located in the United States, visit our Website, ge.com or call GE Parts and Accessories, 800.626.2002. Cartridge will not operate without the ...
Installation Instructions
Page 8
... Instructions About fresh food storage options. Non-Adjustable Bins on the Door (on the Door Adjustable bins can easily be carried from refrigerator to work area. Installation Instructions Consumer Support Troubleshooting Tips 8 To remove: Lift bin straight up , then pull out. Adjustable Bins on some...the bin straight up, then pull out. To replace or relocate: Slide in place. To replace: Engage the bin in place. NOTE: On models without a full-width pantry, the location of the bottom door bin is not adjustable. It will lock in the molded supports on the door...
... Instructions About fresh food storage options. Non-Adjustable Bins on the Door (on the Door Adjustable bins can easily be carried from refrigerator to work area. Installation Instructions Consumer Support Troubleshooting Tips 8 To remove: Lift bin straight up , then pull out. Adjustable Bins on some...the bin straight up, then pull out. To replace or relocate: Slide in place. To replace: Engage the bin in place. NOTE: On models without a full-width pantry, the location of the bottom door bin is not adjustable. It will lock in the molded supports on the door...

