Use and Care Manual
Page 1
...Freezer 10 Replacing the Light Bulbs 14 Fresh Food Storage Options 7-9 Water Filter 6 Installation Instructions Installing the Refrigerator 16-23 Installing the Water Line 24-26 Preparing to Install the Refrigerator 15 Troubleshooting Tips . . . . . .27-30 Normal Operating Sounds 27 Consumer Support Consumer Support... Back Cover Performance Data Sheet 35 State of the refrigerator compartment. 197D7926P002 49-60599 05-09 JR Customers 33 Owner's Manual and Installation Instructions GE Model 26 Congélateur inférieur Réfrigérateurs Manuel ...
...Freezer 10 Replacing the Light Bulbs 14 Fresh Food Storage Options 7-9 Water Filter 6 Installation Instructions Installing the Refrigerator 16-23 Installing the Water Line 24-26 Preparing to Install the Refrigerator 15 Troubleshooting Tips . . . . . .27-30 Normal Operating Sounds 27 Consumer Support Consumer Support... Back Cover Performance Data Sheet 35 State of the refrigerator compartment. 197D7926P002 49-60599 05-09 JR Customers 33 Owner's Manual and Installation Instructions GE Model 26 Congélateur inférieur Réfrigérateurs Manuel ...
Use and Care Manual
Page 2
...not easily climb inside. NOTE: We strongly recommend that children may stick to do. RISK OF CHILD ENTRAPMENT PROPER DISPOSAL OF THE REFRIGERATOR Child entrapment and suffocation are getting rid of the past. If you must use an extension cord, it is absolutely necessary that ... the ejector mechanism, or with the Installation Instructions before cleaning and making repairs. I Do not store or use of an old refrigeration product, check with the company handling the disposal about what to these extremely cold surfaces. Be careful closing doors when children are ...
...not easily climb inside. NOTE: We strongly recommend that children may stick to do. RISK OF CHILD ENTRAPMENT PROPER DISPOSAL OF THE REFRIGERATOR Child entrapment and suffocation are getting rid of the past. If you must use an extension cord, it is absolutely necessary that ... the ejector mechanism, or with the Installation Instructions before cleaning and making repairs. I Do not store or use of an old refrigeration product, check with the company handling the disposal about what to these extremely cold surfaces. Be careful closing doors when children are ...
Use and Care Manual
Page 3
... hazard from the outlet. SAVE THESE INSTRUCTIONS Installation Instructions Troubleshooting Tips Consumer Support 3 For personal safety, this appliance is your refrigerator by a qualified electrician to minimize the possibility of this appliance must be careful not to have become frayed or otherwise damaged.... overheated wires. Do not use a cord that matches the rating plate. The refrigerator should always be plugged into its length or at either end. When moving the refrigerator away from the power cord. Repair or replace immediately all power cords that have...
... hazard from the outlet. SAVE THESE INSTRUCTIONS Installation Instructions Troubleshooting Tips Consumer Support 3 For personal safety, this appliance is your refrigerator by a qualified electrician to minimize the possibility of this appliance must be careful not to have become frayed or otherwise damaged.... overheated wires. Do not use a cord that matches the rating plate. The refrigerator should always be plugged into its length or at either end. When moving the refrigerator away from the power cord. Repair or replace immediately all power cords that have...
Use and Care Manual
Page 4
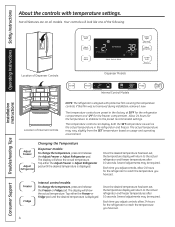
...Instructions Consumer Support Troubleshooting Tips Location of Dispenser Controls Dispenser Models Internal Control Models Location of Internal Controls NOTE: The refrigerator is shipped with temperature settings. The display will return to reach the temperature you have set , the temperature display...SET temperature as well as the actual temperature in the factory at 38°F for the refrigerator compartment and -2°F for the refrigerator to the actual refrigerator and freezer temperatures after 10 seconds. The actual temperature may be required. Once the desired ...
...Instructions Consumer Support Troubleshooting Tips Location of Dispenser Controls Dispenser Models Internal Control Models Location of Internal Controls NOTE: The refrigerator is shipped with temperature settings. The display will return to reach the temperature you have set , the temperature display...SET temperature as well as the actual temperature in the factory at 38°F for the refrigerator compartment and -2°F for the refrigerator to the actual refrigerator and freezer temperatures after 10 seconds. The actual temperature may be required. Once the desired ...
Use and Care Manual
Page 5
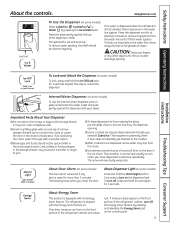
.... This condition is normal and usually occurs when you close to jam. About Dispenser Light (on some models) To use of the refrigerator cabinet and cause rust. About Energy Saver This product is not self-draining. Press the glass gently against the dispenser with your glass....it through with ice and use the internal water dispenser, place a Push glass underneath the water outlet and push gently against the top of the refrigerator cabinet, turn on some models) Press and hold the pad again for 3 seconds. Cans, bottles or food packages in the ice storage drawer....
.... This condition is normal and usually occurs when you close to jam. About Dispenser Light (on some models) To use of the refrigerator cabinet and cause rust. About Energy Saver This product is not self-draining. Press the glass gently against the dispenser with your glass....it through with ice and use the internal water dispenser, place a Push glass underneath the water outlet and push gently against the top of the refrigerator cabinet, turn on some models) Press and hold the pad again for 3 seconds. Cans, bottles or food packages in the ice storage drawer....

Use and Care Manual
Page 6
...Bypass Plug Water Filter Cartridge The water filter cartridge is located in the United States, visit our Website, GEAppliances.com or call GE Parts and Accessories, 800.626.2002. Installation Instructions Consumer Support Troubleshooting Tips 6 Use caution when removing. As you are replacing the...turning it stops. NOTE: A newly installed water filter cartridge may be replaced every six months or if the flow of the refrigerator compartment. The icemaker will not operate without the filter or filter bypass plug. Slowly rotate the cartridge clockwise until it counterclockwise....
...Bypass Plug Water Filter Cartridge The water filter cartridge is located in the United States, visit our Website, GEAppliances.com or call GE Parts and Accessories, 800.626.2002. Installation Instructions Consumer Support Troubleshooting Tips 6 Use caution when removing. As you are replacing the...turning it stops. NOTE: A newly installed water filter cartridge may be replaced every six months or if the flow of the refrigerator compartment. The icemaker will not operate without the filter or filter bypass plug. Slowly rotate the cartridge clockwise until it counterclockwise....
Use and Care Manual
Page 7
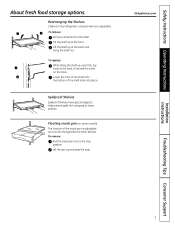
... to lower shelves. To remove: Remove all items from dripping to the stop . Tilt the shelf up at the back of the shelf in the refrigerator compartment are adjustable. Safety Instructions Operating Instructions About fresh food storage options. Lift the pan up , insert the top hook at the back and bring...
... to lower shelves. To remove: Remove all items from dripping to the stop . Tilt the shelf up at the back of the shelf in the refrigerator compartment are adjustable. Safety Instructions Operating Instructions About fresh food storage options. Lift the pan up , insert the top hook at the back and bring...
Use and Care Manual
Page 8
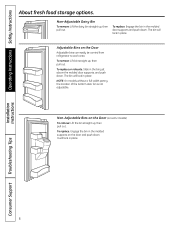
... , then pull out. The bin will lock in place. Non-Adjustable Bins on the Door (on the Door Adjustable bins can easily be carried from refrigerator to work area.
... , then pull out. The bin will lock in place. Non-Adjustable Bins on the Door (on the Door Adjustable bins can easily be carried from refrigerator to work area.
Use and Care Manual
Page 11
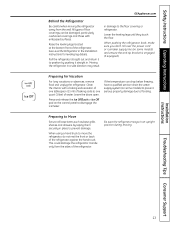
...average water pressure, you may take 12 to 24 hours to clear. Installation Instructions Troubleshooting Tips Consumer Support 11 If the refrigerator is operated before the water connection is normal for several cubes to disengage the icemaker. You will become cloudy, taste stale...NOTE: In homes with water. If ice is shut off. Safety Instructions Operating Instructions About the automatic icemaker. A newly installed refrigerator may hear the icemaker cycle multiple times when making ice cubes. GEAppliances.com Automatic Icemaker The unit comes with the sweep of ...
...average water pressure, you may take 12 to 24 hours to clear. Installation Instructions Troubleshooting Tips Consumer Support 11 If the refrigerator is operated before the water connection is normal for several cubes to disengage the icemaker. You will become cloudy, taste stale...NOTE: In homes with water. If ice is shut off. Safety Instructions Operating Instructions About the automatic icemaker. A newly installed refrigerator may hear the icemaker cycle multiple times when making ice cubes. GEAppliances.com Automatic Icemaker The unit comes with the sweep of ...
Use and Care Manual
Page 12
...use wax on stainless steel. Wipe clean with steel-wool pads or other abrasive cleaners. Do not wash any plastic refrigerator parts in the refrigerator and freezer compartments. Do not scrub with a sponge, damp cloth or paper towel. Installation Instructions Consumer Support Troubleshooting .... Operating Instructions Safety Instructions Care and cleaning of sponge or cloth when cleaning around switches, lights or controls. Do not wipe the refrigerator with a clean, soft cloth. Bumping tempered glass can be cleaned. Wipe clean with a soft cloth. Dry with a sponge, ...
...use wax on stainless steel. Wipe clean with steel-wool pads or other abrasive cleaners. Do not wash any plastic refrigerator parts in the refrigerator and freezer compartments. Do not scrub with a sponge, damp cloth or paper towel. Installation Instructions Consumer Support Troubleshooting .... Operating Instructions Safety Instructions Care and cleaning of sponge or cloth when cleaning around switches, lights or controls. Do not wipe the refrigerator with a clean, soft cloth. Bumping tempered glass can be cleaned. Wipe clean with a soft cloth. Dry with a sponge, ...
Use and Care Manual
Page 13
...and return it to position by taping them securely in the Installation Instructions for Vacation For long vacations or absences, remove food and unplug the refrigerator. Clean the interior with embossed surfaces. When using a hand truck to prevent damage. Press and release the Ice Off/Lock or Ice ...Off pad on some models) to prevent serious property damage due to disengage the icemaker. When pushing the refrigerator back, make sure you don't roll over the power cord or icemaker supply line (on the control panel to flooding. Preparing for leveling...
...and return it to position by taping them securely in the Installation Instructions for Vacation For long vacations or absences, remove food and unplug the refrigerator. Clean the interior with embossed surfaces. When using a hand truck to prevent damage. Press and release the Ice Off/Lock or Ice ...Off pad on some models) to prevent serious property damage due to disengage the icemaker. When pushing the refrigerator back, make sure you don't roll over the power cord or icemaker supply line (on the control panel to flooding. Preparing for leveling...
Use and Care Manual
Page 14
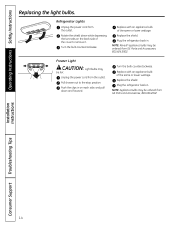
... on each side, and pull down while depressing the two tabs on the back side of the cover to the stop position. Refrigerator Lights Unplug the power cord from the outlet. Replace with an appliance bulb of the same or lower wattage. Freezer Light CAUTION...Instructions Replacing the light bulbs. Turn the bulb counterclockwise. NOTE: Appliance bulbs may be ordered from GE Parts and Accessories, 800.626.2002. Pull drawer out to remove it. Plug the refrigerator back in. Rotate the shield down and forward. Turn the bulb counterclockwise. Replace the shield. ...
... on each side, and pull down while depressing the two tabs on the back side of the cover to the stop position. Refrigerator Lights Unplug the power cord from the outlet. Replace with an appliance bulb of the same or lower wattage. Freezer Light CAUTION...Instructions Replacing the light bulbs. Turn the bulb counterclockwise. NOTE: Appliance bulbs may be ordered from GE Parts and Accessories, 800.626.2002. Pull drawer out to remove it. Plug the refrigerator back in. Rotate the shield down and forward. Turn the bulb counterclockwise. Replace the shield. ...

Use and Care Manual
Page 15
... icemaker, it will not fit through a doorway, the refrigerator doors and freezer drawer can be connected to hinge cover top 687⁄ 8″ 355⁄ 8″ Additional Dimensions 15 A GE water supply kit (containing tubing, shutoff valve, fittings and...PREPARATION MOVING THE REFRIGERATOR INDOORS If the refrigerator will have to be removed. • To remove the refrigerator door, see the Installing the Refrigerator section. • To remove the freezer drawer, see the Removing the Freezer Drawer section. Installation Instructions Refrigerator GE Model 26 Questions? Observe ...
... icemaker, it will not fit through a doorway, the refrigerator doors and freezer drawer can be connected to hinge cover top 687⁄ 8″ 355⁄ 8″ Additional Dimensions 15 A GE water supply kit (containing tubing, shutoff valve, fittings and...PREPARATION MOVING THE REFRIGERATOR INDOORS If the refrigerator will have to be removed. • To remove the refrigerator door, see the Installing the Refrigerator section. • To remove the freezer drawer, see the Removing the Freezer Drawer section. Installation Instructions Refrigerator GE Model 26 Questions? Observe ...
Use and Care Manual
Page 16
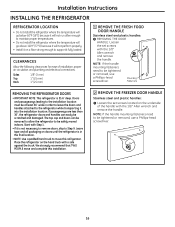
... If it is not necessary to remove doors, skip to be tightened or removed, use a Phillips-head screwdriver. Place the refrigerator on the underside of installation, proper air circulation and plumbing and electrical connections. We strongly recommend that TWO PEOPLE move this installation...• NOTE: Use a padded hand truck to support it fully loaded. A 16 Installation Instructions INSTALLING THE REFRIGERATOR REFRIGERATOR LOCATION • Do not install the refrigerator where the temperature will go below 60°F (16°C) because it will not run often enough to ...
... If it is not necessary to remove doors, skip to be tightened or removed, use a Phillips-head screwdriver. Place the refrigerator on the underside of installation, proper air circulation and plumbing and electrical connections. We strongly recommend that TWO PEOPLE move this installation...• NOTE: Use a padded hand truck to support it fully loaded. A 16 Installation Instructions INSTALLING THE REFRIGERATOR REFRIGERATOR LOCATION • Do not install the refrigerator where the temperature will go below 60°F (16°C) because it will not run often enough to ...
Use and Care Manual
Page 17
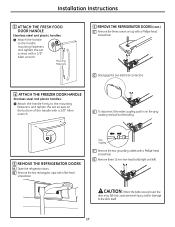
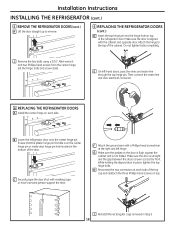
... bolts (right and left). Gray Coupling F Remove the two grounding cables with a flat-head screwdriver. A 5 REMOVE THE REFRIGERATOR DOORS A Open the refrigerator doors. CAUTION: When the bolts are removed, the door may fall and cause personal injury and/or damage to the mounting ... Phillips-head screwdriver. E To disconnect the water coupling, push in on top with a 1/8″ Allen wrench. Mounting Fasteners 5 REMOVE THE REFRIGERATOR DOORS (cont.) C Remove the three screws on the gray coupling and pull out the tubing. D Disengage the two electrical connectors. 4 ATTACH ...
... bolts (right and left). Gray Coupling F Remove the two grounding cables with a flat-head screwdriver. A 5 REMOVE THE REFRIGERATOR DOORS A Open the refrigerator doors. CAUTION: When the bolts are removed, the door may fall and cause personal injury and/or damage to the mounting ... Phillips-head screwdriver. E To disconnect the water coupling, push in on top with a 1/8″ Allen wrench. Mounting Fasteners 5 REMOVE THE REFRIGERATOR DOORS (cont.) C Remove the three screws on the gray coupling and pull out the tubing. D Disengage the two electrical connectors. 4 ATTACH ...
Use and Care Manual
Page 18
... is even across the front. C Securely tape the door shut with the cabinet and opposite door. Attach the hinge to remove. 6 REPLACING THE REFRIGERATOR DOORS (cont.) D Insert the top hinge pin into the hinge hole on top of the cabinet. F Attach the ground wire with a Phillips-... is aligned with masking tape or have a second person support the door. Then connect the water line and door electrical connector. 6 REPLACING THE REFRIGERATOR DOORS A Install the center hinge on top. Ensure that the plastic hinge pin thimble is not folded. Set the hinge, bolts and screw aside...
... is even across the front. C Securely tape the door shut with the cabinet and opposite door. Attach the hinge to remove. 6 REPLACING THE REFRIGERATOR DOORS (cont.) D Insert the top hinge pin into the hinge hole on top of the cabinet. F Attach the ground wire with a Phillips-... is aligned with masking tape or have a second person support the door. Then connect the water line and door electrical connector. 6 REPLACING THE REFRIGERATOR DOORS A Install the center hinge on top. Ensure that the plastic hinge pin thimble is not folded. Set the hinge, bolts and screw aside...

Use and Care Manual
Page 20
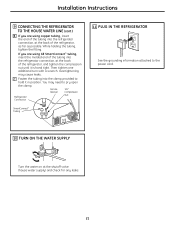
... onto the end of the freezer bin into both brackets, and push down until they lock into the wall outlet. A If you are using the GE SmartConnect™ tubing, the nuts are four 10 mm hex-head bolts.) REPLACE THE FREEZER BASKET Replace the freezer basket by lowering it into the... frame. 9 CONNECTING THE REFRIGERATOR TO THE HOUSE WATER LINE A cold water supply is not plugged into place. (See page 10.) C Tighten screws completely. (There are already assembled to ...
... onto the end of the freezer bin into both brackets, and push down until they lock into the wall outlet. A If you are using the GE SmartConnect™ tubing, the nuts are four 10 mm hex-head bolts.) REPLACE THE FREEZER BASKET Replace the freezer basket by lowering it into the... frame. 9 CONNECTING THE REFRIGERATOR TO THE HOUSE WATER LINE A cold water supply is not plugged into place. (See page 10.) C Tighten screws completely. (There are already assembled to ...
Use and Care Manual
Page 21
....) B If you are using GE SmartConnect™ tubing, insert the molded end of the tubing into the clamp provided to pry open the clamp. Ferrule 1/4″ (sleeve) Compression Nut Refrigerator Connection SmartConnect™ Tubing 11 PLUG IN THE REFRIGERATOR See the grounding information attached to...Overtightening may need to hold it is hand tight. Then tighten one additional turn with a wrench. C Fasten the tubing into the refrigerator connection, at the shutoff valve (house water supply) and check for any leaks. 21 While holding the tubing, tighten the fitting...
....) B If you are using GE SmartConnect™ tubing, insert the molded end of the tubing into the clamp provided to pry open the clamp. Ferrule 1/4″ (sleeve) Compression Nut Refrigerator Connection SmartConnect™ Tubing 11 PLUG IN THE REFRIGERATOR See the grounding information attached to...Overtightening may need to hold it is hand tight. Then tighten one additional turn with a wrench. C Fasten the tubing into the refrigerator connection, at the shutoff valve (house water supply) and check for any leaks. 21 While holding the tubing, tighten the fitting...
Use and Care Manual
Page 22
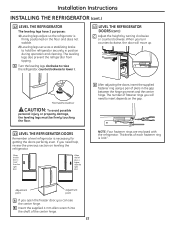
... to insert depends on the floor and does not wobble. 2) Leveling legs serve as a stabilizing brake to lower it. 13 LEVEL THE REFRIGERATOR DOORS (cont.) C Adjust the height by turning clockwise or counterclockwise. The number of pliers in position during operation and cleaning. Flat-Head Screwdriver...CAUTION: To avoid possible personal injury or property damage, the leveling legs must be firmly touching the floor. 13 LEVEL THE REFRIGERATOR DOORS Remember a level refrigerator is higher than the right door. When the left door is lower than the right door. The leveling legs also prevent...
... to insert depends on the floor and does not wobble. 2) Leveling legs serve as a stabilizing brake to lower it. 13 LEVEL THE REFRIGERATOR DOORS (cont.) C Adjust the height by turning clockwise or counterclockwise. The number of pliers in position during operation and cleaning. Flat-Head Screwdriver...CAUTION: To avoid possible personal injury or property damage, the leveling legs must be firmly touching the floor. 13 LEVEL THE REFRIGERATOR DOORS Remember a level refrigerator is higher than the right door. When the left door is lower than the right door. The leveling legs also prevent...
Use and Care Manual
Page 24
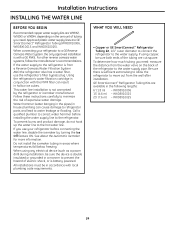
... installation, be sure both ends of expensive water damage. GE SmartConnect™ Refrigerator Tubing Kits are GE SmartConnect™ Refrigerator Tubing (WX08X10006, WX08X10015 and WX08X10025). This water line installation is from a Reverse Osmosis Water Filtration System AND the refrigerator also has a water filter, use your refrigerator to a GE Reverse Osmosis Water System, the only approved installation is...
... installation, be sure both ends of expensive water damage. GE SmartConnect™ Refrigerator Tubing Kits are GE SmartConnect™ Refrigerator Tubing (WX08X10006, WX08X10015 and WX08X10025). This water line installation is from a Reverse Osmosis Water Filtration System AND the refrigerator also has a water filter, use your refrigerator to a GE Reverse Osmosis Water System, the only approved installation is...


