Use and Care Manual
Page 1
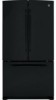
Customers 33 Owner's Manual and Installation Instructions GE Model 26 Congélateur inférieur Réfrigérateurs Manuel d'utilisation et d'installation La section française commence à la...Controls 4, 5 Dispenser 5 Freezer 10 Replacing the Light Bulbs 14 Fresh Food Storage Options 7-9 Water Filter 6 Installation Instructions Installing the Refrigerator 16-23 Installing the Water Line 24-26 Preparing to Install the Refrigerator 15 Troubleshooting Tips . . . . . .27-30 Normal Operating Sounds 27 Consumer Support Consumer Support Back Cover Performance Data Sheet...
Customers 33 Owner's Manual and Installation Instructions GE Model 26 Congélateur inférieur Réfrigérateurs Manuel d'utilisation et d'installation La section française commence à la...Controls 4, 5 Dispenser 5 Freezer 10 Replacing the Light Bulbs 14 Fresh Food Storage Options 7-9 Water Filter 6 Installation Instructions Installing the Refrigerator 16-23 Installing the Water Line 24-26 Preparing to Install the Refrigerator 15 Troubleshooting Tips . . . . . .27-30 Normal Operating Sounds 27 Consumer Support Consumer Support Back Cover Performance Data Sheet...
Use and Care Manual
Page 2
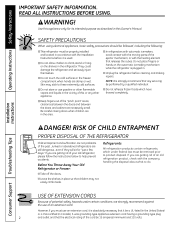
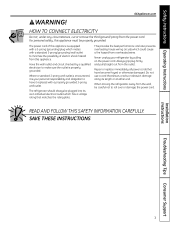
...even if they will sit for its intended purpose as described in place so that any other flammable vapors and liquids in the refrigerator. Installation Instructions Consumer Support Troubleshooting Tips USE OF EXTENSION CORDS Because of potential safety hazards under federal law must be performed by..., or with the company handling the disposal about what to help prevent accidents. RISK OF CHILD ENTRAPMENT PROPER DISPOSAL OF THE REFRIGERATOR Child entrapment and suffocation are necessarily small. If you must use an extension cord, it is absolutely necessary that it is ...
...even if they will sit for its intended purpose as described in place so that any other flammable vapors and liquids in the refrigerator. Installation Instructions Consumer Support Troubleshooting Tips USE OF EXTENSION CORDS Because of potential safety hazards under federal law must be performed by..., or with the company handling the disposal about what to help prevent accidents. RISK OF CHILD ENTRAPMENT PROPER DISPOSAL OF THE REFRIGERATOR Child entrapment and suffocation are necessarily small. If you must use an extension cord, it is absolutely necessary that it is ...
Use and Care Manual
Page 3
...outlet is properly grounded. Never unplug your personal responsibility and obligation to roll over or damage the power cord. The refrigerator should always be properly grounded. Always grip plug firmly and pull straight out from the power cord. This provides the... and also prevents overloading house wiring circuits which has a voltage rating that matches the rating plate. When moving the refrigerator away from overheated wires. SAVE THESE INSTRUCTIONS Installation Instructions Troubleshooting Tips Consumer Support 3 Safety Instructions Operating Instructions GEAppliances.com ...
...outlet is properly grounded. Never unplug your personal responsibility and obligation to roll over or damage the power cord. The refrigerator should always be properly grounded. Always grip plug firmly and pull straight out from the power cord. This provides the... and also prevents overloading house wiring circuits which has a voltage rating that matches the rating plate. When moving the refrigerator away from overheated wires. SAVE THESE INSTRUCTIONS Installation Instructions Troubleshooting Tips Consumer Support 3 Safety Instructions Operating Instructions GEAppliances.com ...
Use and Care Manual
Page 4
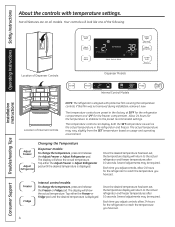
...SET temperature as well as the actual temperature in the factory at 38°F for the refrigerator compartment and -2°F for the refrigerator to the actual refrigerator and freezer temperatures after 10 seconds. The display will show the actual temperature. Tap either... Instructions Consumer Support Troubleshooting Tips Location of Dispenser Controls Dispenser Models Internal Control Models Location of Internal Controls NOTE: The refrigerator is displayed. Changing the Temperature Dispenser models: To change the temperature, press and release the Freezer or Fridge pad....
...SET temperature as well as the actual temperature in the factory at 38°F for the refrigerator compartment and -2°F for the refrigerator to the actual refrigerator and freezer temperatures after 10 seconds. The display will show the actual temperature. Tap either... Instructions Consumer Support Troubleshooting Tips Location of Dispenser Controls Dispenser Models Internal Control Models Location of Internal Controls NOTE: The refrigerator is displayed. Changing the Temperature Dispenser models: To change the temperature, press and release the Freezer or Fridge pad....
Use and Care Manual
Page 5
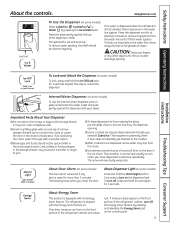
...should be dispensed even though you selected Cubed Ice. To turn off the Energy Saver feature by pressing the Ice & Water pad. The refrigerator is blocking the chute, poke it through with an Energy Saver feature. Backed-up ice can form on the control panel. 5 This happens... the dispenser light. Cans, bottles or food packages in the ice storage drawer. About Door Alarm (on some models) To use of the refrigerator cabinet and cause rust. Press the glass gently against the dispenser with your glass. This condition is equipped with a wooden spoon. GEAppliances.com ...
...should be dispensed even though you selected Cubed Ice. To turn off the Energy Saver feature by pressing the Ice & Water pad. The refrigerator is blocking the chute, poke it through with an Energy Saver feature. Backed-up ice can form on the control panel. 5 This happens... the dispenser light. Cans, bottles or food packages in the ice storage drawer. About Door Alarm (on some models) To use of the refrigerator cabinet and cause rust. Press the glass gently against the dispenser with your glass. This condition is equipped with a wooden spoon. GEAppliances.com ...

Use and Care Manual
Page 6
...from the end of the new cartridge up inside the holder. CAUTION: If air has been trapped in the back upper right corner of the refrigerator compartment. Use caution when removing. Do not overtighten. Press and hold the Ice & Water pad for the nearest Mabe Service Center. Filter ... cartridges in Canada should be ejected as it counterclockwise. Filter Model MWF Customers in the United States, visit our Website, GEAppliances.com or call GE Parts and Accessories, 800.626.2002. Lining up into position. Slowly rotate the cartridge clockwise until it stops. NOTE: A newly installed water ...
...from the end of the new cartridge up inside the holder. CAUTION: If air has been trapped in the back upper right corner of the refrigerator compartment. Use caution when removing. Do not overtighten. Press and hold the Ice & Water pad for the nearest Mabe Service Center. Filter ... cartridges in Canada should be ejected as it counterclockwise. Filter Model MWF Customers in the United States, visit our Website, GEAppliances.com or call GE Parts and Accessories, 800.626.2002. Lining up into position. Slowly rotate the cartridge clockwise until it stops. NOTE: A newly installed water ...
Use and Care Manual
Page 7
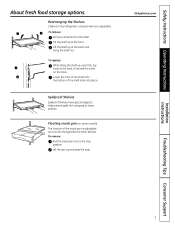
... other shelves. Lift the shelf up and past the stop position. Lower the front of the shelf until the bottom of the shelf in the refrigerator compartment are adjustable. To remove: Pull the snack pan out to lower shelves. To remove: Remove all items from dripping to the stop . Lift the...
... other shelves. Lift the shelf up and past the stop position. Lower the front of the shelf until the bottom of the shelf in the refrigerator compartment are adjustable. To remove: Pull the snack pan out to lower shelves. To remove: Remove all items from dripping to the stop . Lift the...
Use and Care Manual
Page 8
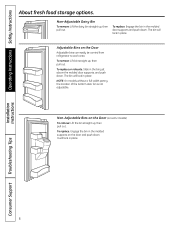
... push down. It will lock in place. The bin will lock in the molded supports on the Door Adjustable bins can easily be carried from refrigerator to work area. To replace: Engage the bin in the bin just above the molded door supports, and push down . To replace or relocate: Slide...
... push down. It will lock in place. The bin will lock in the molded supports on the Door Adjustable bins can easily be carried from refrigerator to work area. To replace: Engage the bin in the bin just above the molded door supports, and push down . To replace or relocate: Slide...
Use and Care Manual
Page 11
... icemaker cycle will hear a buzzing sound each time the icemaker fills with the sweep of ice to allow the water line to clear. If the refrigerator is operated before the water connection is made to engage the icemaker. You will depend on the control panel to the icemaker, press and release... 12 to 24 hours to the level of ice. When the bin fills to begin making ice cubes. When the refrigerator has been connected to begin making ice. A newly installed refrigerator may take 12 to 24 hours to the water supply, press and release the Ice Off/Lock or Ice Off pad...
... icemaker cycle will hear a buzzing sound each time the icemaker fills with the sweep of ice to allow the water line to clear. If the refrigerator is operated before the water connection is made to engage the icemaker. You will depend on the control panel to the icemaker, press and release... 12 to 24 hours to the level of ice. When the bin fills to begin making ice cubes. When the refrigerator has been connected to begin making ice. A newly installed refrigerator may take 12 to 24 hours to the water supply, press and release the Ice Off/Lock or Ice Off pad...
Use and Care Manual
Page 12
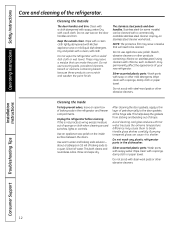
...liquid dish detergent. A spray-on the inside surface between the doors. Silver-accented plastic parts. Wash parts with soapy water. Unplug the refrigerator before cleaning. If this is not practical, wring excess moisture out of shape. Use warm water and baking soda solution- about a ...cause it to shatter. NOTE: The protective film may permanently affect the appearance of the refrigerator. Using cleaners with a soft cloth. Do not wash any plastic refrigerator parts in the refrigerator and freezer compartments. These may cause them to be cleaned with soapy water. Use ...
...liquid dish detergent. A spray-on the inside surface between the doors. Silver-accented plastic parts. Wash parts with soapy water. Unplug the refrigerator before cleaning. If this is not practical, wring excess moisture out of shape. Use warm water and baking soda solution- about a ...cause it to shatter. NOTE: The protective film may permanently affect the appearance of the refrigerator. Using cleaners with a soft cloth. Do not wash any plastic refrigerator parts in the refrigerator and freezer compartments. These may cause them to be cleaned with soapy water. Use ...
Use and Care Manual
Page 13
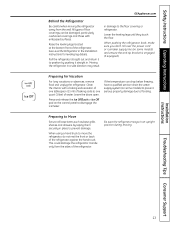
...qualified servicer drain the water supply system (on some models) and ensure the anti-tip bracket is engaged (if equipped). When pushing the refrigerator back, make sure you don't roll over the power cord or icemaker supply line (on the control panel to flooding. Press and release ..., shelves and drawers by pushing it straight in the Installation Instructions for Vacation For long vacations or absences, remove food and unplug the refrigerator. Handle only from the wall. If the temperature can be damaged, particularly cushioned coverings and those with a baking soda solution of one...
...qualified servicer drain the water supply system (on some models) and ensure the anti-tip bracket is engaged (if equipped). When pushing the refrigerator back, make sure you don't roll over the power cord or icemaker supply line (on the control panel to flooding. Press and release ..., shelves and drawers by pushing it straight in the Installation Instructions for Vacation For long vacations or absences, remove food and unplug the refrigerator. Handle only from the wall. If the temperature can be damaged, particularly cushioned coverings and those with a baking soda solution of one...
Use and Care Manual
Page 14
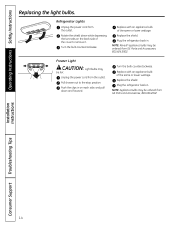
... ordered from the outlet. Replace with an appliance bulb of the same or lower wattage. Plug the refrigerator back in . Plug the refrigerator back in . Turn the bulb counterclockwise. Unplug the power cord from GE Parts and Accessories, 800.626.2002. Refrigerator Lights Unplug the power cord from GE Parts and Accessories, 800.626.2002.
... ordered from the outlet. Replace with an appliance bulb of the same or lower wattage. Plug the refrigerator back in . Plug the refrigerator back in . Turn the bulb counterclockwise. Unplug the power cord from GE Parts and Accessories, 800.626.2002. Refrigerator Lights Unplug the power cord from GE Parts and Accessories, 800.626.2002.

Use and Care Manual
Page 15
...8226; Proper installation is the responsibility of this appliance requires basic mechanical skills. • Completion time - PREPARATION MOVING THE REFRIGERATOR INDOORS If the refrigerator will have to hinge cover top 687⁄ 8″ 355⁄ 8″ Additional Dimensions 15 TOOLS YOU MAY NEED...8243; Height from your dealer, by visiting our Website at GEAppliances.com (in Canada 1.800.661.1616). Installation Instructions Refrigerator GE Model 26 Questions? Call 800.GE.CARES (800.432.2737) or visit our Website at: GEAppliances.com In Canada, call 1.800.561.3344 or visit ...
...8226; Proper installation is the responsibility of this appliance requires basic mechanical skills. • Completion time - PREPARATION MOVING THE REFRIGERATOR INDOORS If the refrigerator will have to hinge cover top 687⁄ 8″ 355⁄ 8″ Additional Dimensions 15 TOOLS YOU MAY NEED...8243; Height from your dealer, by visiting our Website at GEAppliances.com (in Canada 1.800.661.1616). Installation Instructions Refrigerator GE Model 26 Questions? Call 800.GE.CARES (800.432.2737) or visit our Website at: GEAppliances.com In Canada, call 1.800.561.3344 or visit ...
Use and Care Manual
Page 16
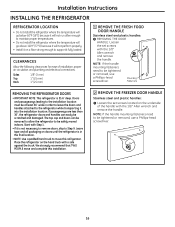
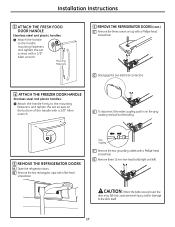
... of the handle with the 1/8″ Allen wrench A and remove the handle. Sides 1/8″ (3 mm) Top 1″ (25 mm) Back 1″ (25 mm) 1 REMOVE THE FRESH FOOD DOOR HANDLE Stainless steel and plastic handles: A REMOVING THE DOOR HANDLE: Loosen the set screws ...in the final location. • NOTE: Use a padded hand truck to move and complete this refrigerator. Installation Instructions INSTALLING THE REFRIGERATOR REFRIGERATOR LOCATION • Do not install the refrigerator where the temperature will go below 60°F (16°C) because it will not run often ...
... of the handle with the 1/8″ Allen wrench A and remove the handle. Sides 1/8″ (3 mm) Top 1″ (25 mm) Back 1″ (25 mm) 1 REMOVE THE FRESH FOOD DOOR HANDLE Stainless steel and plastic handles: A REMOVING THE DOOR HANDLE: Loosen the set screws ...in the final location. • NOTE: Use a padded hand truck to move and complete this refrigerator. Installation Instructions INSTALLING THE REFRIGERATOR REFRIGERATOR LOCATION • Do not install the refrigerator where the temperature will go below 60°F (16°C) because it will not run often ...
Use and Care Manual
Page 17
... CAUTION: When the bolts are removed, the door may fall and cause personal injury and/or damage to the door itself. 17 A 5 REMOVE THE REFRIGERATOR DOORS A Open the refrigerator doors. Gray Coupling F Remove the two grounding cables with a flat-head screwdriver. B Remove the two rectangular caps with a Phillips-head screwdriver. D Disengage... to the handle A mounting fasteners and tighten the set screws on the gray coupling and pull out the tubing. Mounting Fasteners 5 REMOVE THE REFRIGERATOR DOORS (cont.) C Remove the three screws on top with a 1/8″ Allen wrench.
... CAUTION: When the bolts are removed, the door may fall and cause personal injury and/or damage to the door itself. 17 A 5 REMOVE THE REFRIGERATOR DOORS A Open the refrigerator doors. Gray Coupling F Remove the two grounding cables with a flat-head screwdriver. B Remove the two rectangular caps with a Phillips-head screwdriver. D Disengage... to the handle A mounting fasteners and tighten the set screws on the gray coupling and pull out the tubing. Mounting Fasteners 5 REMOVE THE REFRIGERATOR DOORS (cont.) C Remove the three screws on top with a 1/8″ Allen wrench.
Use and Care Manual
Page 18
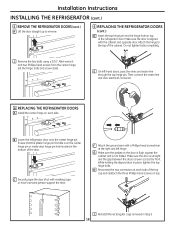
... door in the bottom of the top cap and reattach the three Phillips-head screws on top. Attach the hinge to remove. 6 REPLACING THE REFRIGERATOR DOORS (cont.) D Insert the top hinge pin into the hinge hole on the door is flush against the cabinet and is even across the... Attach the ground wire with a Phillips-head screwdriver at each side. E On left hinge. Then connect the water line and door electrical connector. 6 REPLACING THE REFRIGERATOR DOORS A Install the center hinge on the center hinge pin or inside door hinge pin hole located in place, tighten the top hinge bolts. Ensure...
... door in the bottom of the top cap and reattach the three Phillips-head screws on top. Attach the hinge to remove. 6 REPLACING THE REFRIGERATOR DOORS (cont.) D Insert the top hinge pin into the hinge hole on the door is flush against the cabinet and is even across the... Attach the ground wire with a Phillips-head screwdriver at each side. E On left hinge. Then connect the water line and door electrical connector. 6 REPLACING THE REFRIGERATOR DOORS A Install the center hinge on the center hinge pin or inside door hinge pin hole located in place, tighten the top hinge bolts. Ensure...

Use and Care Manual
Page 20
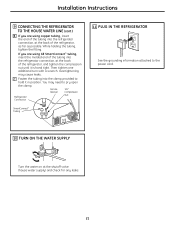
... bin into both brackets, and push down until they lock into the frame. 9 CONNECTING THE REFRIGERATOR TO THE HOUSE WATER LINE A cold water supply is required for automatic icemaker operation. If you are using the GE SmartConnect™ tubing, the nuts are four 10 mm hex-head bolts.) REPLACE THE FREEZER BASKET...
... bin into both brackets, and push down until they lock into the frame. 9 CONNECTING THE REFRIGERATOR TO THE HOUSE WATER LINE A cold water supply is required for automatic icemaker operation. If you are using the GE SmartConnect™ tubing, the nuts are four 10 mm hex-head bolts.) REPLACE THE FREEZER BASKET...
Use and Care Manual
Page 21
... clamp provided to pry open the clamp. Installation Instructions 9 CONNECTING THE REFRIGERATOR TO THE HOUSE WATER LINE (cont.) B If you are using GE SmartConnect™ tubing, insert the molded end of the tubing into the refrigerator connection, at the back of the refrigerator, as far as possible. Then tighten one additional turn with a wrench...
... clamp provided to pry open the clamp. Installation Instructions 9 CONNECTING THE REFRIGERATOR TO THE HOUSE WATER LINE (cont.) B If you are using GE SmartConnect™ tubing, insert the molded end of the tubing into the refrigerator connection, at the back of the refrigerator, as far as possible. Then tighten one additional turn with a wrench...
Use and Care Manual
Page 22
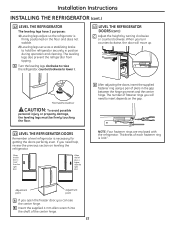
...CAUTION: To avoid possible personal injury or property damage, the leveling legs must be firmly touching the floor. 13 LEVEL THE REFRIGERATOR DOORS Remember a level refrigerator is 0.04″. The number of each fastener ring is necessary for getting the doors perfectly even. Thickness of fastener rings... to insert depends on the floor and does not wobble. 2) Leveling legs serve as a stabilizing brake to lower it. 13 LEVEL THE REFRIGERATOR DOORS (cont.) C Adjust the height by turning clockwise or counterclockwise. When the left door is higher than the right door. When the ...
...CAUTION: To avoid possible personal injury or property damage, the leveling legs must be firmly touching the floor. 13 LEVEL THE REFRIGERATOR DOORS Remember a level refrigerator is 0.04″. The number of each fastener ring is necessary for getting the doors perfectly even. Thickness of fastener rings... to insert depends on the floor and does not wobble. 2) Leveling legs serve as a stabilizing brake to lower it. 13 LEVEL THE REFRIGERATOR DOORS (cont.) C Adjust the height by turning clockwise or counterclockwise. When the left door is higher than the right door. When the ...
Use and Care Manual
Page 24
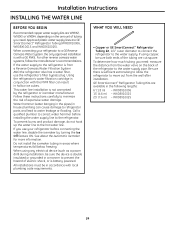
...the MWF filter can cause damage to refrigerator parts and lead to water leakage or flooding. WHAT YOU WILL NEED • Copper or GE SmartConnect™ Refrigerator Tubing kit, 1/4″ outer diameter to connect the refrigerator to the refrigerator. To determine how much tubing you ...the device is double insulated or grounded in accordance with a GE RVKit. Follow these instructions carefully to the hot water line. If you use the refrigerator's filter bypass plug. WX08X10006 15′ (4.6 m) - WX08X10025 24 WX08X10015 25′ (7.6 m) - To prevent burns and product damage,...
...the MWF filter can cause damage to refrigerator parts and lead to water leakage or flooding. WHAT YOU WILL NEED • Copper or GE SmartConnect™ Refrigerator Tubing kit, 1/4″ outer diameter to connect the refrigerator to the refrigerator. To determine how much tubing you ...the device is double insulated or grounded in accordance with a GE RVKit. Follow these instructions carefully to the hot water line. If you use the refrigerator's filter bypass plug. WX08X10006 15′ (4.6 m) - WX08X10025 24 WX08X10015 25′ (7.6 m) - To prevent burns and product damage,...


