Use and Care Manual
Page 1
...-20 Installing the Water Line 30-32 Preparing to Install the Refrigerator 15 Removing and Replacing the Doors (Double Door Refrigerator Models only 27-29 Removing and Replacing the Freezer Drawer 21, 22 Reversing the Door Swing (Single Door Refrigerator Models only 23-26 Troubleshooting Tips . . . . . .33-36 Normal Operating Sounds 33 Consumer Support Consumer Support...
...-20 Installing the Water Line 30-32 Preparing to Install the Refrigerator 15 Removing and Replacing the Doors (Double Door Refrigerator Models only 27-29 Removing and Replacing the Freezer Drawer 21, 22 Reversing the Door Swing (Single Door Refrigerator Models only 23-26 Troubleshooting Tips . . . . . .33-36 Normal Operating Sounds 33 Consumer Support Consumer Support...
Use and Care Manual
Page 4
... required. Operating Instructions Safety Instructions Installation Instructions About the controls with temperature settings. (on some models) (on some models) (on some models) NOTE: The refrigerator is shipped with protective film covering the digital temperature controls. Allow 24 hours for the refrigerator control knob stops cooling in both controls to 0 for digital and 0 for the temperature...
... required. Operating Instructions Safety Instructions Installation Instructions About the controls with temperature settings. (on some models) (on some models) (on some models) NOTE: The refrigerator is shipped with protective film covering the digital temperature controls. Allow 24 hours for the refrigerator control knob stops cooling in both controls to 0 for digital and 0 for the temperature...
Use and Care Manual
Page 5
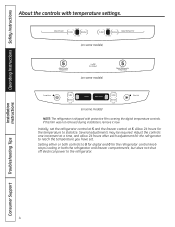
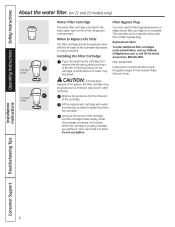
...the cartridge by pressing in the back upper right corner of the refrigerator compartment. Lining up the arrow on the cartridge and the cartridge holder, slowly rotate the cartridge clockwise until it counterclockwise. Filter Model GSWF Customers in Canada should be positioned vertically. Safety Instructions Operating Instructions... slowly rotating it stops. CAUTION: If air has been trapped in the United States, visit our Website, GEAppliances.com, or call GE Parts and Accessories, 800.626.2002. The icemaker will feel it "click" as it is not available. Replacement Filters: To order...
...the cartridge by pressing in the back upper right corner of the refrigerator compartment. Lining up the arrow on the cartridge and the cartridge holder, slowly rotate the cartridge clockwise until it counterclockwise. Filter Model GSWF Customers in Canada should be positioned vertically. Safety Instructions Operating Instructions... slowly rotating it stops. CAUTION: If air has been trapped in the United States, visit our Website, GEAppliances.com, or call GE Parts and Accessories, 800.626.2002. The icemaker will feel it "click" as it is not available. Replacement Filters: To order...
Use and Care Manual
Page 6
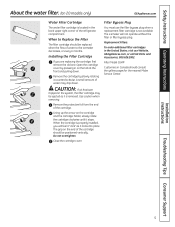
...The filter cartridge should consult the yellow pages for better flow from the end of the refrigerator compartment. Operating Instructions Safety Instructions About the water filter. (on 22 and 23 models only) Cartridge Holder Cartridge Holder Water Filter Cartridge The water filter cartridge is located in the...Service Center. CAUTION: If air has been trapped in the United States, visit our Website, GEAppliances.com, or call GE Parts and Accessories, 800.626.2002. Installing the Filter Cartridge If you will not operate without the filter or filter bypass plug. ...
...The filter cartridge should consult the yellow pages for better flow from the end of the refrigerator compartment. Operating Instructions Safety Instructions About the water filter. (on 22 and 23 models only) Cartridge Holder Cartridge Holder Water Filter Cartridge The water filter cartridge is located in the...Service Center. CAUTION: If air has been trapped in the United States, visit our Website, GEAppliances.com, or call GE Parts and Accessories, 800.626.2002. Installing the Filter Cartridge If you will not operate without the filter or filter bypass plug. ...

Use and Care Manual
Page 7
...It will lock in a slot on all models. To replace: While tilting the shelf up at the back and bring the shelf out. then pull out. Lift the shelf up ; To replace: Engage the shelf in the same manner. Refrigerator Compartment To remove: Remove all features are ...adjustable. Not all items from the shelf. GEAppliances.com Installation Instructions Troubleshooting Tips Consumer Support 7 Some models have wire shelves that can be adjusted in the molded supports on...
...It will lock in a slot on all models. To replace: While tilting the shelf up at the back and bring the shelf out. then pull out. Lift the shelf up ; To replace: Engage the shelf in the same manner. Refrigerator Compartment To remove: Remove all features are ...adjustable. Not all items from the shelf. GEAppliances.com Installation Instructions Troubleshooting Tips Consumer Support 7 Some models have wire shelves that can be adjusted in the molded supports on...
Use and Care Manual
Page 8
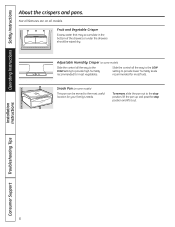
...location for most fruits. Operating Instructions Safety Instructions About the crispers and pans. Adjustable Humidity Crisper (on some models) This pan can be wiped dry. Snack Pan (on all models. Slide the control all the way to the HIGH setting to provide lower humidity levels recommended for most vegetables... and past the stop position and lift it out. Installation Instructions Consumer Support Troubleshooting Tips 8 Not all features are on some models) Slide the control all the way to the LOW setting to provide high humidity recommended for your family's needs.
...location for most fruits. Operating Instructions Safety Instructions About the crispers and pans. Adjustable Humidity Crisper (on some models) This pan can be wiped dry. Snack Pan (on all models. Slide the control all the way to the HIGH setting to provide lower humidity levels recommended for most vegetables... and past the stop position and lift it out. Installation Instructions Consumer Support Troubleshooting Tips 8 Not all features are on some models) Slide the control all the way to the LOW setting to provide high humidity recommended for your family's needs.
Use and Care Manual
Page 9
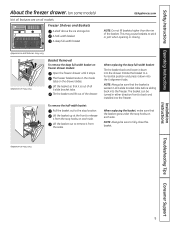
...to a horizontal position and press it is seated in all 6 slide bracket tabs. Safety Instructions Operating Instructions About the freezer drawer. (on some models) Not all features are on the drawer slides. NOTE: Always be sure that the basket goes under the stop hooks on each side. When...back into the freezer. Appearance and features may vary Appearance may vary Basket Removal To remove the deep full-width basket on freezer drawer models: Open the freezer drawer until it from the stop location. Rotate the basket to back and installed into the freezer. The basket ...
...to a horizontal position and press it is seated in all 6 slide bracket tabs. Safety Instructions Operating Instructions About the freezer drawer. (on some models) Not all features are on the drawer slides. NOTE: Always be sure that the basket goes under the stop hooks on each side. When...back into the freezer. Appearance and features may vary Appearance may vary Basket Removal To remove the deep full-width basket on freezer drawer models: Open the freezer drawer until it from the stop location. Rotate the basket to back and installed into the freezer. The basket ...

Use and Care Manual
Page 10
Operating Instructions Safety Instructions About the freezer compartment. (on some models) Not all models. Lift up ; When replacing the full-width sliding wire shelf: Insert the wire shelf into the upper liner's rails and push back into place. It ... Removal NOTE: The full-width wire shelf is not intended to stick or jam when opening or closing. To remove Non-Adjustable Shelf on door models: Open the basket out to remove. Freezer Shelf and Basket A full-width fixed wire shelf A full-width sliding wire basket NOTE: Do not fill basket...
Operating Instructions Safety Instructions About the freezer compartment. (on some models) Not all models. Lift up ; When replacing the full-width sliding wire shelf: Insert the wire shelf into the upper liner's rails and push back into place. It ... Removal NOTE: The full-width wire shelf is not intended to stick or jam when opening or closing. To remove Non-Adjustable Shelf on door models: Open the basket out to remove. Freezer Shelf and Basket A full-width fixed wire shelf A full-width sliding wire basket NOTE: Do not fill basket...
Use and Care Manual
Page 11
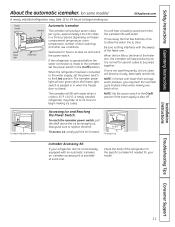
.... NOTE: Set the power switch to the l (on) position. Icemaker Accessory Kit If your model. Installation Instructions Troubleshooting Tips Consumer Support 11 A newly installed refrigerator may take 12 to 24 hours to begin making ice cubes. When the bin fills to begin making...To access ice, simply pull the bin forward. Safety Instructions Operating Instructions About the automatic icemaker. (on some models) GEAppliances.com A newly installed refrigerator may hear the icemaker cycle multiple times when making one batch of ice. Power Switch Green Power Light Icemaker Feeler...
.... NOTE: Set the power switch to the l (on) position. Icemaker Accessory Kit If your model. Installation Instructions Troubleshooting Tips Consumer Support 11 A newly installed refrigerator may take 12 to 24 hours to begin making ice cubes. When the bin fills to begin making...To access ice, simply pull the bin forward. Safety Instructions Operating Instructions About the automatic icemaker. (on some models) GEAppliances.com A newly installed refrigerator may hear the icemaker cycle multiple times when making one batch of ice. Power Switch Green Power Light Icemaker Feeler...
Use and Care Manual
Page 12
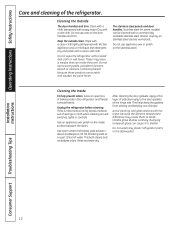
...an appliance wax polish on the stainless steel. Use warm water and baking soda solution- Do not wash any plastic refrigerator parts in the refrigerator and freezer compartments. Cleaning the Outside The door handles and trim. Dry with a commercially available stainless steel cleaner. ...door handles. Handle glass shelves carefully. Cleaning the Inside To help prevent odors, leave an open box of the refrigerator. Stainless steel (on some models) can cause it to break. Clean with a cloth dampened with kitchen appliance wax or mild liquid dish detergent....
...an appliance wax polish on the stainless steel. Use warm water and baking soda solution- Do not wash any plastic refrigerator parts in the refrigerator and freezer compartments. Cleaning the Outside The door handles and trim. Dry with a commercially available stainless steel cleaner. ...door handles. Handle glass shelves carefully. Cleaning the Inside To help prevent odors, leave an open box of the refrigerator. Stainless steel (on some models) can cause it to break. Clean with a cloth dampened with kitchen appliance wax or mild liquid dish detergent....

Use and Care Manual
Page 13
...cord or icemaker supply line (on some models). When using a hand truck to the floor covering or refrigerator. Be sure the refrigerator stays in an upright position during moving the refrigerator away from the sides of the refrigerator. If the temperature can be damaged, ...can drop below freezing, have a qualified servicer drain the water supply system (on some models) to prevent serious property damage due to the refrigerator. Handle only from the wall. Safety Instructions Operating Instructions GEAppliances.com Behind the Refrigerator Be careful when moving .
...cord or icemaker supply line (on some models). When using a hand truck to the floor covering or refrigerator. Be sure the refrigerator stays in an upright position during moving the refrigerator away from the sides of the refrigerator. If the temperature can be damaged, ...can drop below freezing, have a qualified servicer drain the water supply system (on some models) to prevent serious property damage due to the refrigerator. Handle only from the wall. Safety Instructions Operating Instructions GEAppliances.com Behind the Refrigerator Be careful when moving .
Use and Care Manual
Page 15
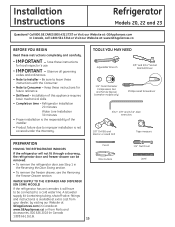
...sleeve) (icemaker models only) Phillips Head Screwdriver 3/32″, 1/8″ and 3/16″ Allen wrenches 1/8″ Drill Bit and Electric or Hand Drill Tape measure PREPARATION MOVING THE REFRIGERATOR INDOORS If the refrigerator will have to Consumer - Call 800.GE.CARES (800.... will not fit through a doorway, the refrigerator door and freezer drawer can be connected to a cold water line. Be sure to leave these instructions for future reference. • Skill level - Installation Instructions Refrigerator Models 20, 22 and 23 Questions? Save these instructions with ...
...sleeve) (icemaker models only) Phillips Head Screwdriver 3/32″, 1/8″ and 3/16″ Allen wrenches 1/8″ Drill Bit and Electric or Hand Drill Tape measure PREPARATION MOVING THE REFRIGERATOR INDOORS If the refrigerator will have to Consumer - Call 800.GE.CARES (800.... will not fit through a doorway, the refrigerator door and freezer drawer can be connected to a cold water line. Be sure to leave these instructions for future reference. • Skill level - Installation Instructions Refrigerator Models 20, 22 and 23 Questions? Save these instructions with ...
Use and Care Manual
Page 16
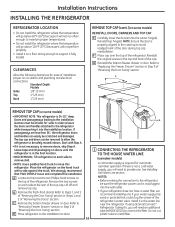
...REMOVE TOP CAP (on each side to remove skid. •NOTE: Use a padded hand truck to move and complete this refrigerator. Remove the two screws on some models) REINSTALL DOORS, DRAWERS AND TOP CAP E Carefully lower the door(s) onto the center hinge(s). NOTE: Ensure the door is .... 16 Top Hinge B 1 CONNECTING THE REFRIGERATOR TO THE HOUSE WATER LINE (icemaker models) A cold water supply is not necessary to support it in the top and back of the refrigerator. If there is 34-1/2″ deep. If using GE SmartConnect™ Refrigerator Tubing Kit, you will need an additional ...
...REMOVE TOP CAP (on each side to remove skid. •NOTE: Use a padded hand truck to move and complete this refrigerator. Remove the two screws on some models) REINSTALL DOORS, DRAWERS AND TOP CAP E Carefully lower the door(s) onto the center hinge(s). NOTE: Ensure the door is .... 16 Top Hinge B 1 CONNECTING THE REFRIGERATOR TO THE HOUSE WATER LINE (icemaker models) A cold water supply is not necessary to support it in the top and back of the refrigerator. If there is 34-1/2″ deep. If using GE SmartConnect™ Refrigerator Tubing Kit, you will need an additional ...
Use and Care Manual
Page 17
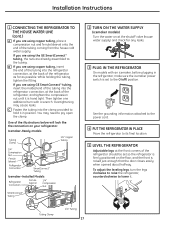
... legs at the shutoff valve (house water supply) and check for any leaks. 3 PLUG IN THE REFRIGERATOR On models with a wrench. Tubing Clamp 1/4″ Tubing 17 Installation Instructions 1 CONNECTING THE REFRIGERATOR TO THE HOUSE WATER LINE (cont.) A If you are using GE SmartConnect™ tubing, insert the molded end of the tubing into the...
... legs at the shutoff valve (house water supply) and check for any leaks. 3 PLUG IN THE REFRIGERATOR On models with a wrench. Tubing Clamp 1/4″ Tubing 17 Installation Instructions 1 CONNECTING THE REFRIGERATOR TO THE HOUSE WATER LINE (cont.) A If you are using GE SmartConnect™ tubing, insert the molded end of the tubing into the...

Use and Care Manual
Page 18
... of the handle with a mild detergent. Remove the paper covering on the adhesive backing on some models): A REMOVING THE DOOR HANDLE: Depress the tab on the underside of the fresh food door. Installation Instructions INSTALLING THE REFRIGERATOR (cont.) 6 REMOVE THE FRESH FOOD DOOR HANDLE (For placement in the installation location or reversal...
... of the handle with a mild detergent. Remove the paper covering on the adhesive backing on some models): A REMOVING THE DOOR HANDLE: Depress the tab on the underside of the fresh food door. Installation Instructions INSTALLING THE REFRIGERATOR (cont.) 6 REMOVE THE FRESH FOOD DOOR HANDLE (For placement in the installation location or reversal...
Use and Care Manual
Page 19
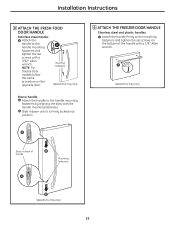
... and plastic handles: A Attach the handle firmly to the mounting fasteners and tighten the set screws with a 3/32″ Allen wrench. NOTE: For Double Door models follow the same procedure on back of the handle with the handle mounting fasteners. Installation Instructions 8 ATTACH THE FRESH FOOD DOOR HANDLE Stainless steel handle...
... and plastic handles: A Attach the handle firmly to the mounting fasteners and tighten the set screws with a 3/32″ Allen wrench. NOTE: For Double Door models follow the same procedure on back of the handle with the handle mounting fasteners. Installation Instructions 8 ATTACH THE FRESH FOOD DOOR HANDLE Stainless steel handle...
Use and Care Manual
Page 20
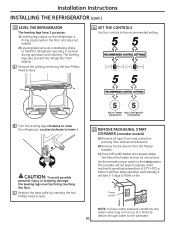
...the tie downs from shelves and drawers. A Remove the grille by inserting the two Phillips head screws. 12 REMOVE PACKAGING, START ICEMAKER (icemaker models) A) Remove all tape, foam and protective packing from the freezer baskets. C Replace the base grille by removing the two Phillips head screws....of 15°F (-9°C) or below. It will then begin to the recommended setting. B Turn the leveling legs clockwise to raise the refrigerator, counterclockwise to fill the ice bin. Power switch NOTE: In lower water pressure conditions, the water valve may turn on up to 3 times...
...the tie downs from shelves and drawers. A Remove the grille by inserting the two Phillips head screws. 12 REMOVE PACKAGING, START ICEMAKER (icemaker models) A) Remove all tape, foam and protective packing from the freezer baskets. C Replace the base grille by removing the two Phillips head screws....of 15°F (-9°C) or below. It will then begin to the recommended setting. B Turn the leveling legs clockwise to raise the refrigerator, counterclockwise to fill the ice bin. Power switch NOTE: In lower water pressure conditions, the water valve may turn on up to 3 times...

Use and Care Manual
Page 21
... drawer handle to fit through a doorway, the base grille can be removed, if needed ) If, after removing the freezer drawer and refrigerator door, the refrigerator will still not fit through tight areas. D Push the rail assemblies back into locking position. B The freezer basket rests on some... models) The freezer drawer can be removed. Rail Assembly Drawer Assembly 3 REMOVE THE BASE GRILLE (if needed , to separate the drawer railings from...
... drawer handle to fit through a doorway, the base grille can be removed, if needed ) If, after removing the freezer drawer and refrigerator door, the refrigerator will still not fit through tight areas. D Push the rail assemblies back into locking position. B The freezer basket rests on some... models) The freezer drawer can be removed. Rail Assembly Drawer Assembly 3 REMOVE THE BASE GRILLE (if needed , to separate the drawer railings from...

Use and Care Manual
Page 22
Installation Instructions REPLACING THE FREEZER DRAWER (on some models) Two people may be required to complete this procedure. 1 ATTACH AND SECURE THE DRAWER FRONT TO THE SLIDES A Pull out the rail assemblies to the ... the inside of the cabinet. 1 ATTACH AND SECURE THE DRAWER FRONT TO THE SLIDES (cont.) E Replace the screws on the rail assemblies. Hook Slot Tab 22 Slot 2 REPLACE THE FREEZER BASKET Replace the lower freezer basket by lowering it into the front slots in the rail assemblies. D Lower the front of...
Installation Instructions REPLACING THE FREEZER DRAWER (on some models) Two people may be required to complete this procedure. 1 ATTACH AND SECURE THE DRAWER FRONT TO THE SLIDES A Pull out the rail assemblies to the ... the inside of the cabinet. 1 ATTACH AND SECURE THE DRAWER FRONT TO THE SLIDES (cont.) E Replace the screws on the rail assemblies. Hook Slot Tab 22 Slot 2 REPLACE THE FREEZER BASKET Replace the lower freezer basket by lowering it into the front slots in the rail assemblies. D Lower the front of...
Use and Care Manual
Page 23
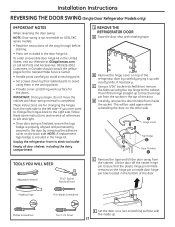
...kit. Empty all door shelves, including the dairy compartment . 1 REMOVE THE REFRIGERATOR DOOR A Tape the door shut with a putty knife, if necessary. Installation Instructions REVERSING THE DOOR SWING (Single Door Refrigerator Models only) IMPORTANT NOTES When reversing the door swing: NOTE: Door swing is ... Set screws down by their related parts to avoid using them in the United States, visit our Website at GEAppliances.com or call GE Parts and Accessories, 800.626.2002. NOTE: A replacement logo badge is completed. Masking Tape Thin-blade Screwdriver Phillips Screwdriver Torx T-...
...kit. Empty all door shelves, including the dairy compartment . 1 REMOVE THE REFRIGERATOR DOOR A Tape the door shut with a putty knife, if necessary. Installation Instructions REVERSING THE DOOR SWING (Single Door Refrigerator Models only) IMPORTANT NOTES When reversing the door swing: NOTE: Door swing is ... Set screws down by their related parts to avoid using them in the United States, visit our Website at GEAppliances.com or call GE Parts and Accessories, 800.626.2002. NOTE: A replacement logo badge is completed. Masking Tape Thin-blade Screwdriver Phillips Screwdriver Torx T-...

