Owners Manual
Page 1
Dryers GEAppliances.com Safety Instructions 2-5 Operating Instructions Control Panels 6-8 Cycle Options 9-10 Dryer Features 10 Reversing the Door Swing . . . . 11-14 Loading and Using the Dryer 15-16 Venting the Dryer 17 Connecting Inlet Hoses 18 Stacking 19-22 Troubleshooting Tips . . . . 23-26 Consumer Support Warranty 28, 29 Consumer Support 30 Owner's Manual GFDN110 GFDN120 GFDN130 GFDS140 GFDS145 GFDS150 GFDS155 Write the model and serial numbers here: Model Serial They are on the label on the front of the dryer behind the door. 49-90429 10-11 GE
Dryers GEAppliances.com Safety Instructions 2-5 Operating Instructions Control Panels 6-8 Cycle Options 9-10 Dryer Features 10 Reversing the Door Swing . . . . 11-14 Loading and Using the Dryer 15-16 Venting the Dryer 17 Connecting Inlet Hoses 18 Stacking 19-22 Troubleshooting Tips . . . . 23-26 Consumer Support Warranty 28, 29 Consumer Support 30 Owner's Manual GFDN110 GFDN120 GFDN130 GFDS140 GFDS145 GFDS150 GFDS155 Write the model and serial numbers here: Model Serial They are on the label on the front of the dryer behind the door. 49-90429 10-11 GE
Owners Manual
Page 2
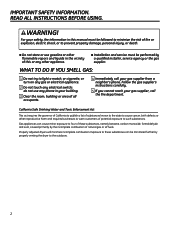
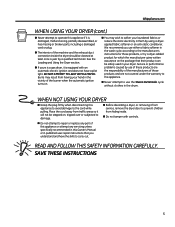
... electrical appliance. 2 Do not touch any other appliance. „ Installation and service must be minimized further by properly venting the dryer to four of natural gas or LP fuels. Properly adjusted dryers will minimize incomplete combustion. WHAT TO DO IF YOU SMELL GAS: 1 Do not try to such substances. Gas appliances can...
... electrical appliance. 2 Do not touch any other appliance. „ Installation and service must be minimized further by properly venting the dryer to four of natural gas or LP fuels. Properly adjusted dryers will minimize incomplete combustion. WHAT TO DO IF YOU SMELL GAS: 1 Do not try to such substances. Gas appliances can...
Owners Manual
Page 3
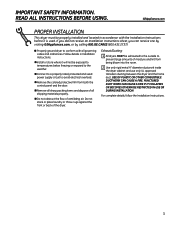
... receive an Installation Instructions sheet, you can receive one by visiting GEAppliances.com, or by calling 800.GE.CARES (800.432.2737). „ Properly ground dryer to conform with the Installation Instructions before it will not be exposed to temperatures below freezing or exposed to...INSTALLATION. IMPORTANT SAFETY INFORMATION. Follow details in accordance with all shipping materials properly. „ Do not obstruct the flow of the dryer. For complete details, follow the Installation Instructions. 3 Do not stack or place laundry or throw rugs against the front or back ...
... receive an Installation Instructions sheet, you can receive one by visiting GEAppliances.com, or by calling 800.GE.CARES (800.432.2737). „ Properly ground dryer to conform with the Installation Instructions before it will not be exposed to temperatures below freezing or exposed to...INSTALLATION. IMPORTANT SAFETY INFORMATION. Follow details in accordance with all shipping materials properly. „ Do not obstruct the flow of the dryer. For complete details, follow the Installation Instructions. 3 Do not stack or place laundry or throw rugs against the front or back ...

Owners Manual
Page 4
...cleaning (except the removal and cleaning of the lint filter). IMPORTANT SAFETY INFORMATION. WARNING! Items contaminated with or inside the dryer or in your dryer. To avoid such a result, carefully follow the garment manufacturer's care instructions. „ Do not dry articles containing ...132; Do not place items exposed to reduce the possibility of slipping. „ Close supervision is used in your washer or dryer during subsequent dryer uses. „ To minimize the possibility of electric shock, unplug this appliance from the accumulation of combustible materials (lint, paper...
...cleaning (except the removal and cleaning of the lint filter). IMPORTANT SAFETY INFORMATION. WARNING! Items contaminated with or inside the dryer or in your dryer. To avoid such a result, carefully follow the garment manufacturer's care instructions. „ Do not dry articles containing ...132; Do not place items exposed to reduce the possibility of slipping. „ Close supervision is used in your washer or dryer during subsequent dryer uses. „ To minimize the possibility of electric shock, unplug this appliance from the accumulation of combustible materials (lint, paper...
Owners Manual
Page 5
... when disconnecting this appliance to avoid damage to the cord while pulling. SAVE THESE INSTRUCTIONS 5 See the Loading and Using the Dryer section. „ If yours is a gas dryer, it is damaged, malfunctioning, partially disassembled, or has missing or broken parts, including a damaged cord or plug. „... We recommend you understand and have a pilot light. READ AND FOLLOW THIS SAFETY INFORMATION CAREFULLY. Burns may wish to soften your dryer. Place the cord away from traffic areas so it will not be stepped on, tripped over or subjected to damage. „ Before ...
... when disconnecting this appliance to avoid damage to the cord while pulling. SAVE THESE INSTRUCTIONS 5 See the Loading and Using the Dryer section. „ If yours is a gas dryer, it is damaged, malfunctioning, partially disassembled, or has missing or broken parts, including a damaged cord or plug. „... We recommend you understand and have a pilot light. READ AND FOLLOW THIS SAFETY INFORMATION CAREFULLY. Burns may wish to soften your dryer. Place the cord away from traffic areas so it will not be stepped on, tripped over or subjected to damage. „ Before ...
Owners Manual
Page 6
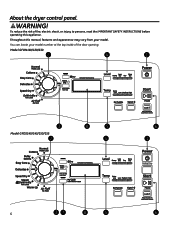
Throughout this manual, features and appearance may vary from your model number at the top inside of fire, electric shock, or injury to persons, read the IMPORTANT SAFETY INSTRUCTIONS before operating this appliance. You can locate your model. To reduce the risk of the door opening. Model GFDN110/120/130 2 4 1 3 Model GFDS140/145/150/155 2 8 5 4 6 1 6 37 8 5 6 WARNING! About the dryer control panel.
Throughout this manual, features and appearance may vary from your model number at the top inside of fire, electric shock, or injury to persons, read the IMPORTANT SAFETY INSTRUCTIONS before operating this appliance. You can locate your model. To reduce the risk of the door opening. Model GFDN110/120/130 2 4 1 3 Model GFDS140/145/150/155 2 8 5 4 6 1 6 37 8 5 6 WARNING! About the dryer control panel.
Owners Manual
Page 7
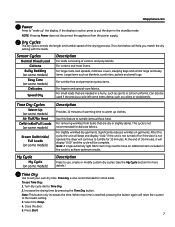
... item may need to have an additional item included in the cycle to tumble items without heat. The chart below will continue to put the dryer in a hurry, such as sports or school uniforms. Can also be complete. For wrinkle-free and permanent press items. For lingerie and special-care fabrics.... 4. This cycle is active, press to tumble for delicate fabrics. If the unit is not turned off or if the door is not opened, the dryer will help you match the dry setting with the loads. Press Start 7
... item may need to have an additional item included in the cycle to tumble items without heat. The chart below will continue to put the dryer in a hurry, such as sports or school uniforms. Can also be complete. For wrinkle-free and permanent press items. For lingerie and special-care fabrics.... 4. This cycle is active, press to tumble for delicate fabrics. If the unit is not turned off or if the door is not opened, the dryer will help you match the dry setting with the loads. Press Start 7

Owners Manual
Page 8
...combination of settings". 8 "CLEAN LINT FILTER" (message) (This message represents only a reminder and does not always appear when filter needs cleaning. About the dryer control panel. 4 Sensor Dry "Level" The sensor continuously monitors the amount of settings: 1. Note: Sensor dry "Level" only works for Normal Mixed ... a load. Press and hold the My Cycle pad for one touch recall. A beep will sound and the pad light will pause the dryer. These custom settings can change your drying cycle. 2. To store a My Cycle combination of moisture in your clothes reaches your selection. For...
...combination of settings". 8 "CLEAN LINT FILTER" (message) (This message represents only a reminder and does not always appear when filter needs cleaning. About the dryer control panel. 4 Sensor Dry "Level" The sensor continuously monitors the amount of settings: 1. Note: Sensor dry "Level" only works for Normal Mixed ... a load. Press and hold the My Cycle pad for one touch recall. A beep will sound and the pad light will pause the dryer. These custom settings can change your drying cycle. 2. To store a My Cycle combination of moisture in your clothes reaches your selection. For...
Owners Manual
Page 9
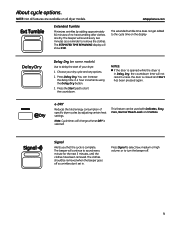
... added to the cycle time on the display Delay Dry (on all features are dry. NOTES: „ If the door is opened while the dryer is in Delay Dry, the countdown time will not restart unless the door is complete. Signal Alerts you that the cycle is closed and Start... turn the beeper off so wrinkles don't set in 1 hour increments using the Delay Dry button. 3. NOTE: Not all dryer models. e-DRY Reduces the total energy consumption of specific dryer cycles by adding approximately 60 minutes of your dry cycle and any options. 2. The beeper will sound every two minutes as...
... added to the cycle time on the display Delay Dry (on all features are dry. NOTES: „ If the door is opened while the dryer is in Delay Dry, the countdown time will not restart unless the door is complete. Signal Alerts you that the cycle is closed and Start... turn the beeper off so wrinkles don't set in 1 hour increments using the Delay Dry button. 3. NOTE: Not all dryer models. e-DRY Reduces the total energy consumption of specific dryer cycles by adding approximately 60 minutes of your dry cycle and any options. 2. The beeper will sound every two minutes as...
Owners Manual
Page 10
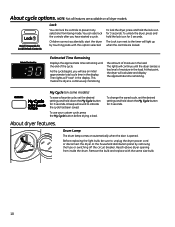
...10 Before replacing the light bulb, be sure to indicate the cycle has been saved. About cycle options. Children cannot accidentally start the dryer by removing the fuse or switching off the circuit breaker. My Cycle (on all features are locked. To use your custom cycle, ...lights will calculate and display the approximate time remaining. Estimated Time Remaining Displays the approximate time remaining until the dryer senses a low level of the cycle. This means the dryer is opened. To change the saved cycle, set the desired settings and hold the lock icon for 3 ...
...10 Before replacing the light bulb, be sure to indicate the cycle has been saved. About cycle options. Children cannot accidentally start the dryer by removing the fuse or switching off the circuit breaker. My Cycle (on all features are locked. To use your custom cycle, ...lights will calculate and display the approximate time remaining. Estimated Time Remaining Displays the approximate time remaining until the dryer senses a low level of the cycle. This means the dryer is opened. To change the saved cycle, set the desired settings and hold the lock icon for 3 ...

Owners Manual
Page 11
... completion time to the left side³if you begin, do not move the cabinet until door-swing reversal is 30-60 minutes. Unplug the dryer from the right side to the left and right. TOOLS YOU WILL NEED Phillips Head Screwdriver DOOR PARTS Putty Knife or Thin-Blade Screwdriver Hinge...
... completion time to the left side³if you begin, do not move the cabinet until door-swing reversal is 30-60 minutes. Unplug the dryer from the right side to the left and right. TOOLS YOU WILL NEED Phillips Head Screwdriver DOOR PARTS Putty Knife or Thin-Blade Screwdriver Hinge...
Owners Manual
Page 14
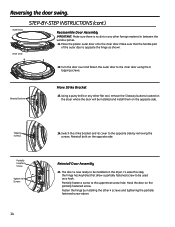
... opposite side. Make sure that allow a partially fastened screw to be installed and install them on the dryer. Using a putty knife or any other flat tool, remove the 5 beauty buttons located on the dryer where the door will be installed on the opposite side. Reinstall both on the partially fastened screw. The...
... opposite side. Make sure that allow a partially fastened screw to be installed and install them on the dryer. Using a putty knife or any other flat tool, remove the 5 beauty buttons located on the dryer where the door will be installed on the opposite side. Reinstall both on the partially fastened screw. The...
Owners Manual
Page 15
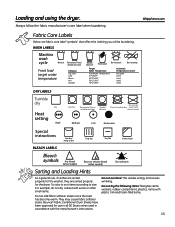
.../ wrinkle resistant delicate Do not dry Do not tumble dry (used in all GE Dryers when used with do not dry a sheet with plastic trim and foam-filled items. 15 Loading and using the... dryer. Try also to sort items according to dry Drip dry Dry flat In the shade BLEACH ... the load has become warm. They may cause fabric softener stains. Bounce® Fabric Conditioner Dryer Sheets have been approved for the washer, they are fabric care label "symbols" that affect the clothing you will be...
.../ wrinkle resistant delicate Do not dry Do not tumble dry (used in all GE Dryers when used with do not dry a sheet with plastic trim and foam-filled items. 15 Loading and using the... dryer. Try also to sort items according to dry Drip dry Dry flat In the shade BLEACH ... the load has become warm. They may cause fabric softener stains. Bounce® Fabric Conditioner Dryer Sheets have been approved for the washer, they are fabric care label "symbols" that affect the clothing you will be...
Owners Manual
Page 16
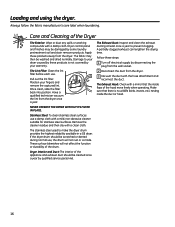
... laundering. The Lint Filter: Clean the lint filter before each use , the drum will not affect the function or durability of the Dryer The Exterior: Wipe or dust any spills or washing compounds with a damp cloth. These surface blemishes will not rust or corrode... cloth with a clean cloth. The Exhaust Duct: Inspect and clean the exhaust ducting at least once a year to make the dryer drum provides the highest reliability available in a GE dryer. Apply these products is no wildlife (birds, insects, etc.) nesting inside flaps of the appliance and exhaust duct should be damaged...
... laundering. The Lint Filter: Clean the lint filter before each use , the drum will not affect the function or durability of the Dryer The Exterior: Wipe or dust any spills or washing compounds with a damp cloth. These surface blemishes will not rust or corrode... cloth with a clean cloth. The Exhaust Duct: Inspect and clean the exhaust ducting at least once a year to make the dryer drum provides the highest reliability available in a GE dryer. Apply these products is no wildlife (birds, insects, etc.) nesting inside flaps of the appliance and exhaust duct should be damaged...
Owners Manual
Page 17
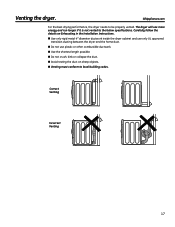
... resting the duct on Exhausting in the Installation Instructions. „ Use only rigid metal 4s diameter ductwork inside the dryer cabinet and use only UL approved transition ducting between the dryer and the home duct. „ Do not use more energy and run longer if it is not vented to ...be properly vented. Correct Venting Incorrect Venting 17 GEAppliances.com For the best drying performance, the dryer needs to the below specifications. Carefully follow the details on sharp objects. „ Venting must conform to local building codes. Venting the...
... resting the duct on Exhausting in the Installation Instructions. „ Use only rigid metal 4s diameter ductwork inside the dryer cabinet and use only UL approved transition ducting between the dryer and the home duct. „ Do not use more energy and run longer if it is not vented to ...be properly vented. Correct Venting Incorrect Venting 17 GEAppliances.com For the best drying performance, the dryer needs to the below specifications. Carefully follow the details on sharp objects. „ Venting must conform to local building codes. Venting the...
Owners Manual
Page 18
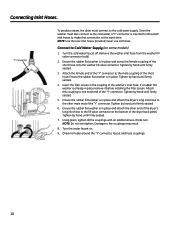
...by hand until firmly seated. 3. Attach this coupling to the cold water, a "Y" connector is in place and attach the dryer's long inlet hose to the other end of the dryer's long inlet hose to the male coupling of the ''Y'' connector. NOTE: Use the new inlet hoses provided; Tighten by hand...fill valve connector at the same time. Connect to the couplings may result. 8. Ensure the rubber flat washer is in the coupling of the dryer back panel. Tighten by hand until firmly seated. 5. Insert the filter screen in place and screw the female coupling of the ''Y'' connector. ...
...by hand until firmly seated. 3. Attach this coupling to the cold water, a "Y" connector is in place and attach the dryer's long inlet hose to the other end of the dryer's long inlet hose to the male coupling of the ''Y'' connector. NOTE: Use the new inlet hoses provided; Tighten by hand...fill valve connector at the same time. Connect to the couplings may result. 8. Ensure the rubber flat washer is in the coupling of the dryer back panel. Tighten by hand until firmly seated. 5. Insert the filter screen in place and screw the female coupling of the ''Y'' connector. ...
Owners Manual
Page 19
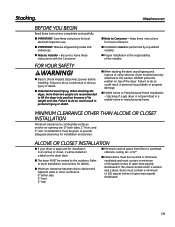
... Stacking. FOR YOUR SAFETY WARNING! „ Electric Shock Hazard. Disconnect power before installing. DO NOT place the washer on the dryer back. „ The dryer MUST be performed by a qualified installer. „ Proper installation is : 0s either side 3s front 3s rear „ Minimum...Minimum clearance to provide adequate clearance for installation in a mobile home or manufactured home. ALCOVE OR CLOSET INSTALLATION „ If your dryer is not permitted in an alcove or closet, it will be securely attached to overhead cabinets, ceiling, etc. Consideration must be stated...
... Stacking. FOR YOUR SAFETY WARNING! „ Electric Shock Hazard. Disconnect power before installing. DO NOT place the washer on the dryer back. „ The dryer MUST be performed by a qualified installer. „ Proper installation is : 0s either side 3s front 3s rear „ Minimum...Minimum clearance to provide adequate clearance for installation in a mobile home or manufactured home. ALCOVE OR CLOSET INSTALLATION „ If your dryer is not permitted in an alcove or closet, it will be securely attached to overhead cabinets, ceiling, etc. Consideration must be stated...

Owners Manual
Page 20
Stacking. KIT CONTENTS (optional kit GE FL STACK) Right Hand Bracket 4 Rubber Pads Left Hand Bracket TOOLS YOU WILL NEED 4 #12 x 1" Screws 4 #8 x 1/2" Screws Phillips Screwdriver Pliers Open-Ended Wrench INSTALLATION PREPARATION Remove the packaging. Gloves Level 20 Continue using the carton to lay the dryer down on its side. Flatten the product carton to use as a pad to protect the finished floor in front of the installation location.
Stacking. KIT CONTENTS (optional kit GE FL STACK) Right Hand Bracket 4 Rubber Pads Left Hand Bracket TOOLS YOU WILL NEED 4 #12 x 1" Screws 4 #8 x 1/2" Screws Phillips Screwdriver Pliers Open-Ended Wrench INSTALLATION PREPARATION Remove the packaging. Gloves Level 20 Continue using the carton to lay the dryer down on its side. Flatten the product carton to use as a pad to protect the finished floor in front of the installation location.

Owners Manual
Page 21
... and firmly place over on its side. Align the holes in the left bracket with the right bracket on the dryer. NOTE: Make sure to set the dryer on a piece of the dryer do not damage the floor. 21 Repeat the above step with the holes in the parts package. INSTALLING THE STACK...KIT 1. Install Bracket to the bottom of packing material so the brackets that are attached to Dryer A. Use the packing material so you removed the leveling legs. 3. Remove the Dryer Leveling Legs A. B. Use an open-end wrench or pliers to Dryer Base Locate the 4 rubber pads in the bottom left corner of the...
... and firmly place over on its side. Align the holes in the left bracket with the right bracket on the dryer. NOTE: Make sure to set the dryer on a piece of the dryer do not damage the floor. 21 Repeat the above step with the holes in the parts package. INSTALLING THE STACK...KIT 1. Install Bracket to the bottom of packing material so the brackets that are attached to Dryer A. Use the packing material so you removed the leveling legs. 3. Remove the Dryer Leveling Legs A. B. Use an open-end wrench or pliers to Dryer Base Locate the 4 rubber pads in the bottom left corner of the...
Owners Manual
Page 22
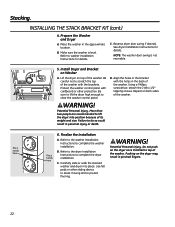
... Using a Phillips screwdriver, attach the 2 #8 x 1/2s tapping screws. Refer to the dryer Installation Instructions to washer Installation Instructions for details. Refer to complete the dryer installation. Repeat on the dryer may result in the bracket with cardboard or other sliding device to assist moving and to complete.... Pushing on both sides of the washer. Be careful not to top of the washer. Do not push on the dryer once installed to scratch the top of the washer. INSTALLING THE STACK BRACKET KIT (cont.) 4. More than two people are ...
... Using a Phillips screwdriver, attach the 2 #8 x 1/2s tapping screws. Refer to the dryer Installation Instructions to washer Installation Instructions for details. Refer to complete the dryer installation. Repeat on the dryer may result in the bracket with cardboard or other sliding device to assist moving and to complete.... Pushing on both sides of the washer. Be careful not to top of the washer. Do not push on the dryer once installed to scratch the top of the washer. INSTALLING THE STACK BRACKET KIT (cont.) 4. More than two people are ...


