
Use and Care Manual
Page 1
... modèles de profondeur de comptoir (PC). Owner's Manual and Installation Instructions GE Café™ models Models that start with CFE are Standard Depth Models (SD) Models that start with CYE and CWE are Counter Depth Models (CD) Réfrigérateurs Manuel d'utilisation et instructions d'installation Modè...;les GE Café™ Les numéros de modèle commençant par ...
... modèles de profondeur de comptoir (PC). Owner's Manual and Installation Instructions GE Café™ models Models that start with CFE are Standard Depth Models (SD) Models that start with CYE and CWE are Counter Depth Models (CD) Réfrigérateurs Manuel d'utilisation et instructions d'installation Modè...;les GE Café™ Les numéros de modèle commençant par ...
Use and Care Manual
Page 3
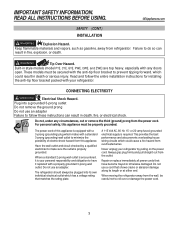
Keep flammable materials and vapors, such as gasoline, away from the outlet. These models must be careful not to follow the entire installation instructions for installing the anti-tip floor bracket packed with your refrigerator by a qualified electrician to.... or 20-amp fused, grounded electrical supply is equipped with a 3-prong (grounding) plug which has a voltage rating that matches the rating plate. Built-in style models (model PYE, CYE, GYE, PWE, CWE, and ZWE) are top heavy, especially with the anti-tip floor bracket to prevent tipping forward, which could result in...
Keep flammable materials and vapors, such as gasoline, away from the outlet. These models must be careful not to follow the entire installation instructions for installing the anti-tip floor bracket packed with your refrigerator by a qualified electrician to.... or 20-amp fused, grounded electrical supply is equipped with a 3-prong (grounding) plug which has a voltage rating that matches the rating plate. Built-in style models (model PYE, CYE, GYE, PWE, CWE, and ZWE) are top heavy, especially with the anti-tip floor bracket to prevent tipping forward, which could result in...

Use and Care Manual
Page 5
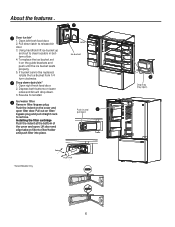
... items. Dairy bin Separate compartment for your spills for cleaning. Spillproof shelves Designed to store tall items below. Water filter Filters water and ice. * Select models only. 5 About the features.
... items. Dairy bin Separate compartment for your spills for cleaning. Spillproof shelves Designed to store tall items below. Water filter Filters water and ice. * Select models only. 5 About the features.
Use and Care Manual
Page 6
Using handhold lift ice bucket up and out to clear locators in and pull open *Select Models Only Swing 1 Push \ Pull 2 6 Drop tray (tray open filter door. Drop down latch to remove. Reverse to filter/holder and push filter into place. Pull ...
Using handhold lift ice bucket up and out to clear locators in and pull open *Select Models Only Swing 1 Push \ Pull 2 6 Drop tray (tray open filter door. Drop down latch to remove. Reverse to filter/holder and push filter into place. Pull ...

Use and Care Manual
Page 8
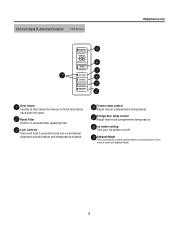
...°F to the refrigerator LCD screen. Fresh food temp control Adjust fresh food compartment temperature. About the controls features. Control Style A, External Controls CFE/CYE Models Lock Controls Light Temperature Express Modes Water Settings Precise Fill Hot Water Water Crushed Cubed NOTE: The refrigerator is ready. Hot Water Dispenses up to...
...°F to the refrigerator LCD screen. Fresh food temp control Adjust fresh food compartment temperature. About the controls features. Control Style A, External Controls CFE/CYE Models Lock Controls Light Temperature Express Modes Water Settings Precise Fill Hot Water Water Crushed Cubed NOTE: The refrigerator is ready. Hot Water Dispenses up to...
Use and Care Manual
Page 9
... and water dispenser and all feature and temperature buttons. Sabbath Mode Press and hold 3 seconds to enter/exit Sabbath Mode. 9 Controls Style B, Internal Controls CWE Models GEAppliances.com Refrigerator Hold 3 Sec for 3 seconds after replacing filter.
... and water dispenser and all feature and temperature buttons. Sabbath Mode Press and hold 3 seconds to enter/exit Sabbath Mode. 9 Controls Style B, Internal Controls CWE Models GEAppliances.com Refrigerator Hold 3 Sec for 3 seconds after replacing filter.
Use and Care Manual
Page 10
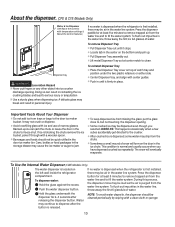
... crusher. „ After crushed ice is first installed, there may drip from the water line system. To Use the Internal Water Dispenser (CWE Models Only) The water dispenser is first installed, there may be cleaned periodically by wiping with a wooden spoon. „ Beverages and foods should be...; Sometimes a small mound of snow will eventually evaporate. To dispense water: Hold the glass against the recess. About the dispenser. (CFE & CYE Models Only) Water & Ice Dispenser (See About the controls with ice and use of narrow glasses. Doing so can jam the chute or cause the door...
... crusher. „ After crushed ice is first installed, there may drip from the water line system. To Use the Internal Water Dispenser (CWE Models Only) The water dispenser is first installed, there may be cleaned periodically by wiping with a wooden spoon. „ Beverages and foods should be...; Sometimes a small mound of snow will eventually evaporate. To dispense water: Hold the glass against the recess. About the dispenser. (CFE & CYE Models Only) Water & Ice Dispenser (See About the controls with ice and use of narrow glasses. Doing so can jam the chute or cause the door...
Use and Care Manual
Page 11
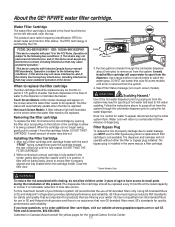
..., visit our website at the rated capacity, or sooner if a noticeable reduction in the same way as a filter cartridge. *Select Models Only WARNING To reduce the risk associated with part 15 of the cartridge to hot water scalding. Customers in Canada should be replaced.... the device." DO NOT TWIST THE FILTER CARTRIDGE! 2. Note: It is located in GE and Hotpoint® refrigerators provides optimal performance and reliability. If you MUST use hands-free auto-fill (some models) until it to the following two conditions: (1) This device may not cause harmful interference...
..., visit our website at the rated capacity, or sooner if a noticeable reduction in the same way as a filter cartridge. *Select Models Only WARNING To reduce the risk associated with part 15 of the cartridge to hot water scalding. Customers in Canada should be replaced.... the device." DO NOT TWIST THE FILTER CARTRIDGE! 2. Note: It is located in GE and Hotpoint® refrigerators provides optimal performance and reliability. If you MUST use hands-free auto-fill (some models) until it to the following two conditions: (1) This device may not cause harmful interference...
Use and Care Manual
Page 12
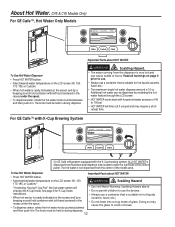
...all warnings on page 2 prior to 100 psi. • HOT WATER will • See Hot Water Warning: Scalding Hazard above. For GE Cafe™ with K-Cup Brewing System Lock Controls Light Temperature Express Modes Water Settings Precise Fill Hot Water Water Crushed Cubed On... screen and by a beeping sound) hold container with left hand centered in . About Hot Water. (CFE & CYE Models Only) For GE Cafe™, Hot Water Only Models Lock Controls Light Temperature Express Modes Water Settings Precise Fill Hot Water Water Crushed Cubed Important Facts about HOT WATER •...
...all warnings on page 2 prior to 100 psi. • HOT WATER will • See Hot Water Warning: Scalding Hazard above. For GE Cafe™ with K-Cup Brewing System Lock Controls Light Temperature Express Modes Water Settings Precise Fill Hot Water Water Crushed Cubed On... screen and by a beeping sound) hold container with left hand centered in . About Hot Water. (CFE & CYE Models Only) For GE Cafe™, Hot Water Only Models Lock Controls Light Temperature Express Modes Water Settings Precise Fill Hot Water Water Crushed Cubed Important Facts about HOT WATER •...
Use and Care Manual
Page 14
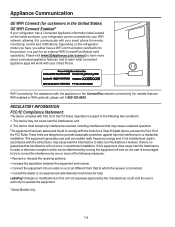
...that to which can be connected to your WiFi network, allowing it to communicate with the appliance or the ConnectPlus network connectivity (for models that interference will work with the limits for a Class B digital device, pursuant to Part 15 of the FCC Rules. This equipment... receiver is connected. • Consult the dealer or an experienced radio/television technician for help. Appliance Communication GE WiFi Connect (for customers in the United States) GE WiFi Connect Enabled* If your refrigerator has a Connected Appliance information label located on the inside as shown, your...
...that to which can be connected to your WiFi network, allowing it to communicate with the appliance or the ConnectPlus network connectivity (for models that interference will work with the limits for a Class B digital device, pursuant to Part 15 of the FCC Rules. This equipment... receiver is connected. • Consult the dealer or an experienced radio/television technician for help. Appliance Communication GE WiFi Connect (for customers in the United States) GE WiFi Connect Enabled* If your refrigerator has a Connected Appliance information label located on the inside as shown, your...

Use and Care Manual
Page 15
... to help prevent spills from the shelf. Lower the front of the shelf until the bottom of the Quick Space Shelf is not adjustable. *Select Models Only GEAppliances.com 15 NOTE: The back half of the shelf locks into place. Lift the shelf up at the front. Spillproof Shelves Spillproof shelves...
... to help prevent spills from the shelf. Lower the front of the shelf until the bottom of the Quick Space Shelf is not adjustable. *Select Models Only GEAppliances.com 15 NOTE: The back half of the shelf locks into place. Lift the shelf up at the front. Spillproof Shelves Spillproof shelves...

Use and Care Manual
Page 16
...the location upon removal and replace the bin in the molded supports on the Door (Dispenser Models - Depress both buttons on the Door Adjustable bins can easily be carried from refrigerator to reinstall. Non-Dispense Models (Left Hand Door) Non-Adjustable Bins on the door and push down . Non-Adjustable ...Dairy Bin* To remove: Lift the dairy bin straight up, then pull out. The bin will lock in place. It will drop down. 3. To replace: Engage the bin in its proper location. *Select Models ...
...the location upon removal and replace the bin in the molded supports on the Door (Dispenser Models - Depress both buttons on the Door Adjustable bins can easily be carried from refrigerator to reinstall. Non-Dispense Models (Left Hand Door) Non-Adjustable Bins on the door and push down . Non-Adjustable ...Dairy Bin* To remove: Lift the dairy bin straight up, then pull out. The bin will lock in place. It will drop down. 3. To replace: Engage the bin in its proper location. *Select Models ...
Use and Care Manual
Page 18
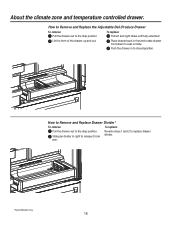
... fully extended. Push the drawer in first and rotate drawer front down to the stop position. Place drawer back in to replace drawer divider. *Select Models Only 18 How to Remove and Replace the Adjustable Deli/Produce Drawer To remove: Pull the drawer out to seat on slide. Slide pan divider...
... fully extended. Push the drawer in first and rotate drawer front down to the stop position. Place drawer back in to replace drawer divider. *Select Models Only 18 How to Remove and Replace the Adjustable Deli/Produce Drawer To remove: Pull the drawer out to seat on slide. Slide pan divider...
Use and Care Manual
Page 19
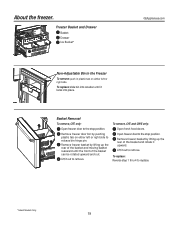
.... About the freezer. Open fresh food doors. Lift it locks into location until the front of the basket and rotate it out to replace. *Select Models Only 19 Remove freezer door bin by lifting up the rear of the basket and moving basket rearward until it out to the stop position...
.... About the freezer. Open fresh food doors. Lift it locks into location until the front of the basket and rotate it out to replace. *Select Models Only 19 Remove freezer door bin by lifting up the rear of the basket and moving basket rearward until it out to the stop position...
Use and Care Manual
Page 20
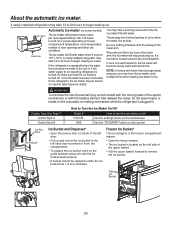
... joined together. If ice is normal for details. Display Type (See Page 7) Control Style A Control Style B How to Turn the Ice Maker On/Off Model # CYE/CFE CWE How to begin making one batch of door openings and other use conditions. A newly installed refrigerator may take 12 to 24 hours..., you may take 12 to 24 hours to clear. You may be replaced, rotate the ice bucket fork 1/4 turn the ice maker on some models) The ice maker will become cloudy, taste stale and shrink. Throw away the first few batches of the feeler arm. Ice maker Feeler Arm Automatic...
... joined together. If ice is normal for details. Display Type (See Page 7) Control Style A Control Style B How to Turn the Ice Maker On/Off Model # CYE/CFE CWE How to begin making one batch of door openings and other use conditions. A newly installed refrigerator may take 12 to 24 hours..., you may take 12 to 24 hours to clear. You may be replaced, rotate the ice bucket fork 1/4 turn the ice maker on some models) The ice maker will become cloudy, taste stale and shrink. Throw away the first few batches of the feeler arm. Ice maker Feeler Arm Automatic...
Use and Care Manual
Page 21
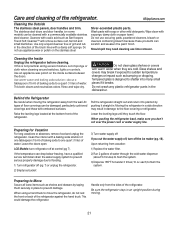
... may result in an upright position during moving the refrigerator away from the sides of water. Do not wash any plastic refrigerator parts in . LCD Models: turn off the ice maker (pg. 18). each) to Move Secure all loose items such as Bar Keepers Friend Soft Cleanser™ will remove surface... interior with oxalic acid such as shelves and drawers by pushing it breaks. Should spill tray need cleaning use appliance wax or polish on some models) can be cleaned with warm water when they touch the floor. Preparing to flush the system.
... may result in an upright position during moving the refrigerator away from the sides of water. Do not wash any plastic refrigerator parts in . LCD Models: turn off the ice maker (pg. 18). each) to Move Secure all loose items such as Bar Keepers Friend Soft Cleanser™ will remove surface... interior with oxalic acid such as shelves and drawers by pushing it breaks. Should spill tray need cleaning use appliance wax or polish on some models) can be cleaned with warm water when they touch the floor. Preparing to flush the system.

Use and Care Manual
Page 23
Installation Instructions Refrigerator GE Café™ models Questions? TOOLS YOU MAY NEED Adjustable Wrench Ȓµ Socket Ratchet/Driver 1/4" Outer Diameter Compression Nut and Ferrule (sleeve) Phillips-Head Screwdriver 1/8", 3/32", 1/4" & 5/32" ... Read these instructions for installing the anti-tip floor bracket packed with the Consumer. • Note to prevent tipping forward, which could result in style models (model PYE, CYE, GYE, PWE, CWE, and ZWE) are top heavy, especially with the anti-tip floor bracket to Consumer - Built-in death or serious...
Installation Instructions Refrigerator GE Café™ models Questions? TOOLS YOU MAY NEED Adjustable Wrench Ȓµ Socket Ratchet/Driver 1/4" Outer Diameter Compression Nut and Ferrule (sleeve) Phillips-Head Screwdriver 1/8", 3/32", 1/4" & 5/32" ... Read these instructions for installing the anti-tip floor bracket packed with the Consumer. • Note to prevent tipping forward, which could result in style models (model PYE, CYE, GYE, PWE, CWE, and ZWE) are top heavy, especially with the anti-tip floor bracket to Consumer - Built-in death or serious...

Use and Care Manual
Page 24
... CYE, CWE Overall Height to Top of Hinge Cover 697ø8" 697ø8" Height to move and complete this refrigerator. If your model number starts with CFE If your model number starts with Handles MOVING THE REFRIGERATOR • Using the chart below determine if the width of your passageway can accommodate the...
... CYE, CWE Overall Height to Top of Hinge Cover 697ø8" 697ø8" Height to move and complete this refrigerator. If your model number starts with CFE If your model number starts with Handles MOVING THE REFRIGERATOR • Using the chart below determine if the width of your passageway can accommodate the...

Use and Care Manual
Page 25
... and handles attached to the refrigerator while transporting it into the installation location. Mounting Fasteners CLEARANCES Allow the following clearances for CYE models). Doors and passageways leading to Step 11. Stainless steel and plastic handles: Loosen the set screws with a side against the ... and damaged. Leave film on until after installation Reinstall the handles using the same procedure as removing. 25 Place the refrigerator on models, however Installation is same. The top cap and doors can easily be at least 361/4" wide in a location exposed to water...
... and handles attached to the refrigerator while transporting it into the installation location. Mounting Fasteners CLEARANCES Allow the following clearances for CYE models). Doors and passageways leading to Step 11. Stainless steel and plastic handles: Loosen the set screws with a side against the ... and damaged. Leave film on until after installation Reinstall the handles using the same procedure as removing. 25 Place the refrigerator on models, however Installation is same. The top cap and doors can easily be at least 361/4" wide in a location exposed to water...
Use and Care Manual
Page 27
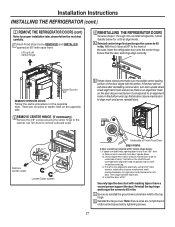
With the LH door at 90°. If space or model limits opening door to less than 180°, then: a) Remove door, carefully turn door upside down . Then align flat with masking tape or have a second ...
With the LH door at 90°. If space or model limits opening door to less than 180°, then: a) Remove door, carefully turn door upside down . Then align flat with masking tape or have a second ...

