Use and Care Manual
Page 1
...38, 39 Normal Operating Conditions 37 Service - Owner's Manual and Installation Instructions GE Café™ models Models that start with CFE are Standard Depth Models (SD) Models that start with CYE and CWE are Counter Depth Models (CD) Réfrigérateurs Manuel d'utilisation et instructions d'installation Mod...èles GE Café™ La section française commence à la page 47 ...
...38, 39 Normal Operating Conditions 37 Service - Owner's Manual and Installation Instructions GE Café™ models Models that start with CFE are Standard Depth Models (SD) Models that start with CYE and CWE are Counter Depth Models (CD) Réfrigérateurs Manuel d'utilisation et instructions d'installation Mod...èles GE Café™ La section française commence à la page 47 ...
Use and Care Manual
Page 3
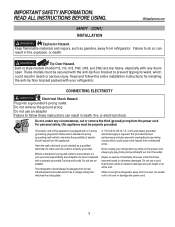
...use an adapter. IMPORTANT SAFETY INFORMATION. When moving the refrigerator away from the power cord. Built-in death, fire, or electrical shock. These models must be plugged into a grounded 3-prong outlet Do not remove the ground prong Do not use an adapter Failure to make sure the outlet ... of this appliance is required. Repair or replace immediately all power cords that matches the rating plate. Failure to do so can result in style models (model PYE, CYE, GYE, PWE, CWE, and ZWE) are top heavy, especially with any circumstances, cut or remove the third (ground) prong from ...
...use an adapter. IMPORTANT SAFETY INFORMATION. When moving the refrigerator away from the power cord. Built-in death, fire, or electrical shock. These models must be plugged into a grounded 3-prong outlet Do not remove the ground prong Do not use an adapter Failure to make sure the outlet ... of this appliance is required. Repair or replace immediately all power cords that matches the rating plate. Failure to do so can result in style models (model PYE, CYE, GYE, PWE, CWE, and ZWE) are top heavy, especially with any circumstances, cut or remove the third (ground) prong from ...

Use and Care Manual
Page 5
... usable storage space. Spillproof shelves Designed to light the freezer when opened and is easily removable for cleaning. Water filter Filters water and ice. * Select models only. 5 About the features. QuickSpace™ shelf* Functions as a normal full-sized shelf when needed and easily slides back to spotlight areas in the refrigerator...
... usable storage space. Spillproof shelves Designed to light the freezer when opened and is easily removable for cleaning. Water filter Filters water and ice. * Select models only. 5 About the features. QuickSpace™ shelf* Functions as a normal full-sized shelf when needed and easily slides back to spotlight areas in the refrigerator...

Use and Care Manual
Page 6
About the features . Using handhold lift ice bucket up and out to clear locators in and pull open *Select Models Only Swing 1 Push \ Pull 2 6 Drop tray (tray open filter door. Depress both buttons on lower sides and bin will drop down dairy bin* 1. To replace ...
About the features . Using handhold lift ice bucket up and out to clear locators in and pull open *Select Models Only Swing 1 Push \ Pull 2 6 Drop tray (tray open filter door. Depress both buttons on lower sides and bin will drop down dairy bin* 1. To replace ...

Use and Care Manual
Page 8
.../Off • Metric/English units Additional Modes • Sabbath Mode Press and hold 3 seconds to load and view slideshow. Control Style A, External Controls CFE/CYE Models Lock Controls Light Temperature Express Modes Water Settings Precise Fill Hot Water Water Crushed Cubed NOTE: The refrigerator is ready. Fresh food temp control Adjust...
.../Off • Metric/English units Additional Modes • Sabbath Mode Press and hold 3 seconds to load and view slideshow. Control Style A, External Controls CFE/CYE Models Lock Controls Light Temperature Express Modes Water Settings Precise Fill Hot Water Water Crushed Cubed NOTE: The refrigerator is ready. Fresh food temp control Adjust...

Use and Care Manual
Page 9
.../off. 9 Lock Controls Press and hold 3 seconds to alert when the freezer or fresh food doors have been left open. Controls Style B, Internal Controls CWE Models GEAppliances.com Refrigerator Hold 3 Sec for 3 seconds after replacing filter. Reset Filter Hold for °F/°C Recommended: 37 °F Actual Set F Energy Smart Recommended: 0°...
.../off. 9 Lock Controls Press and hold 3 seconds to alert when the freezer or fresh food doors have been left open. Controls Style B, Internal Controls CWE Models GEAppliances.com Refrigerator Hold 3 Sec for 3 seconds after replacing filter. Reset Filter Hold for °F/°C Recommended: 37 °F Actual Set F Energy Smart Recommended: 0°...
Use and Care Manual
Page 10
.... „ Some crushed ice may be dispensed even though you have dispensed crushed ice repeatedly. To Use the Internal Water Dispenser (CWE Models Only) The water dispenser is released. To dispense water: Hold the glass against the recess. Push the water dispenser button. Hold the glass...dispenser for at least 5 minutes to remove trapped air from trays or bags to fill the water system. About the dispenser. (CFE & CYE Models Only) Water & Ice Dispenser (See About the controls with temperature settings & About the control features) Dispenser tray WARNING Laceration Hazard „ Never...
.... „ Some crushed ice may be dispensed even though you have dispensed crushed ice repeatedly. To Use the Internal Water Dispenser (CWE Models Only) The water dispenser is released. To dispense water: Hold the glass against the recess. Push the water dispenser button. Hold the glass...dispenser for at least 5 minutes to remove trapped air from trays or bags to fill the water system. About the dispenser. (CFE & CYE Models Only) Water & Ice Dispenser (See About the controls with temperature settings & About the control features) Dispenser tray WARNING Laceration Hazard „ Never...

Use and Care Manual
Page 11
... warnings prior to 100 psi. • HOT WATER will time out if unused and may require a short reheat time. 11 About Hot Water. (CFE & CYE Models Only) Lock Controls Light Temperature Express Modes Water Settings Precise Fill Hot Water Water Crushed Cubed GEAppliances.com To Use Hot Water Dispenser • Press...
... warnings prior to 100 psi. • HOT WATER will time out if unused and may require a short reheat time. 11 About Hot Water. (CFE & CYE Models Only) Lock Controls Light Temperature Express Modes Water Settings Precise Fill Hot Water Water Crushed Cubed GEAppliances.com To Use Hot Water Dispenser • Press...
Use and Care Manual
Page 12
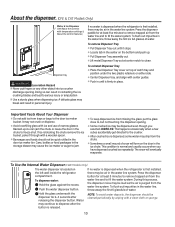
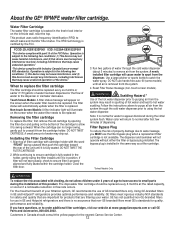
...on the screen when the water filter needs to remove air from the system may cause undesired operation of GE-branded filters only. Reset Filter Status message (non-touch screen models). Removing the filter cartridge To replace the filter, first remove the old cartridge by the FCC. Installing the... is certified by opening the filter door and pulling on the left side wall, near the top. GE has not qualified non-GE-branded filters for use hands-free auto-fill (some models) until it from the system. 4. Water Filter Cartridge The water filter cartridge is no longer swing,...
...on the screen when the water filter needs to remove air from the system may cause undesired operation of GE-branded filters only. Reset Filter Status message (non-touch screen models). Removing the filter cartridge To replace the filter, first remove the old cartridge by the FCC. Installing the... is certified by opening the filter door and pulling on the left side wall, near the top. GE has not qualified non-GE-branded filters for use hands-free auto-fill (some models) until it from the system. 4. Water Filter Cartridge The water filter cartridge is no longer swing,...

Use and Care Manual
Page 13
... splits in the refrigerator compartment are adjustable. Lower the front of the shelf until the bottom of the Quick Space Shelf is not adjustable. *Select Models Only GEAppliances.com 13 NOTE: The back half of the shelf locks into place. This shelf can be removed and replaced or relocated (just like...
... splits in the refrigerator compartment are adjustable. Lower the front of the shelf until the bottom of the Quick Space Shelf is not adjustable. *Select Models Only GEAppliances.com 13 NOTE: The back half of the shelf locks into place. This shelf can be removed and replaced or relocated (just like...

Use and Care Manual
Page 14
...1. See page 33. Drop down . 3. Depress both buttons on the door and push down . To replace: Engage the bin in its proper location. *Select Models Only 14 The ice maker door bins are not interchangeable, note the location upon removal and replace the bin in the molded supports on lower... bin and bin will lock in place (see page 33). Adjustable Bins on the Door (Dispenser Models - Left Hand Door) To remove: Lift the bin straight up , then pull out. Non-Dispense Models (Left Hand Door) Non-Adjustable Bins on the Door Adjustable bins can easily be carried from refrigerator...
...1. See page 33. Drop down . 3. Depress both buttons on the door and push down . To replace: Engage the bin in its proper location. *Select Models Only 14 The ice maker door bins are not interchangeable, note the location upon removal and replace the bin in the molded supports on lower... bin and bin will lock in place (see page 33). Adjustable Bins on the Door (Dispenser Models - Left Hand Door) To remove: Lift the bin straight up , then pull out. Non-Dispense Models (Left Hand Door) Non-Adjustable Bins on the Door Adjustable bins can easily be carried from refrigerator...

Use and Care Manual
Page 16
... the Adjustable Deli/Produce Drawer To remove: Pull the drawer out to the stop position. Slide pan divider to right to replace drawer divider. *Select Models Only 16 About the climate zone and temperature controlled drawer. How to Remove and Replace Drawer Divider* To remove: To replace: Pull the drawer out...
... the Adjustable Deli/Produce Drawer To remove: Pull the drawer out to the stop position. Slide pan divider to right to replace drawer divider. *Select Models Only 16 About the climate zone and temperature controlled drawer. How to Remove and Replace Drawer Divider* To remove: To replace: Pull the drawer out...

Use and Care Manual
Page 17
... Ice Bucket* GEAppliances.com Non-Adjustable Bin in the Freezer To remove: push in plastic tab on either left or right side to replace. *Select Models Only 17 Remove freezer basket by lifting up the rear of the basket can be rotated upward and out. Remove freezer door bin by pushing...
... Ice Bucket* GEAppliances.com Non-Adjustable Bin in the Freezer To remove: push in plastic tab on either left or right side to replace. *Select Models Only 17 Remove freezer basket by lifting up the rear of the basket can be rotated upward and out. Remove freezer door bin by pushing...

Use and Care Manual
Page 18
... 1/4 turn the ice maker on the ice bucket in . Display Type (See Page 7) Control Style A Control Style B How to Turn the Ice Maker On/Off Model # CYE/CFE CWE How to turn clockwise. Be sure nothing interferes with the moving parts of the left door. • Pull up and out on... hear the ice maker cycle multiple times when making ice cubes. A newly installed refrigerator may take 12 to 24 hours to be turned on some models) The ice maker will become cloudy, taste stale and shrink.
... 1/4 turn the ice maker on the ice bucket in . Display Type (See Page 7) Control Style A Control Style B How to Turn the Ice Maker On/Off Model # CYE/CFE CWE How to turn clockwise. Be sure nothing interferes with the moving parts of the left door. • Pull up and out on... hear the ice maker cycle multiple times when making ice cubes. A newly installed refrigerator may take 12 to 24 hours to be turned on some models) The ice maker will become cloudy, taste stale and shrink.
Use and Care Manual
Page 19
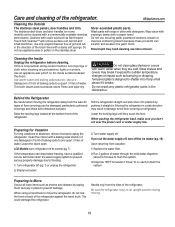
...This could damage the refrigerator. If this is designed to move the refrigerator, do not rest the front or back of the refrigerator. LCD Models: turn off the ice maker (pg. 18). GEAppliances.com Cleaning the Outside The stainless steel panels, door handles and trim. Should spill...; will remove surface rust, tarnish and small blemishes. Cleaning the Inside Unplug the refrigerator before cleaning. Use an appliance wax polish on some models) can be cleaned with a baking soda solution of one tablespoon (15 ml) of baking soda to prevent damage. This both cleans and ...
...This could damage the refrigerator. If this is designed to move the refrigerator, do not rest the front or back of the refrigerator. LCD Models: turn off the ice maker (pg. 18). GEAppliances.com Cleaning the Outside The stainless steel panels, door handles and trim. Should spill...; will remove surface rust, tarnish and small blemishes. Cleaning the Inside Unplug the refrigerator before cleaning. Use an appliance wax polish on some models) can be cleaned with a baking soda solution of one tablespoon (15 ml) of baking soda to prevent damage. This both cleans and ...
Use and Care Manual
Page 21
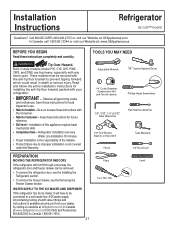
.... Be sure to leave these instructions for local inspector's use. • Note to prevent tipping forward, which could result in style models (model PYE, CYE, GYE, PWE, CWE, and ZWE) are top heavy, especially with your dealer, by visiting our website at GEAppliances..... • IMPORTANT ³ Observe all governing codes and ordinances. Keep these instructions completely and carefully. Installation Instructions Refrigerator GE Café™ models Questions? Built-in death or serious injury. Refrigerator Installation can be secured with the Consumer. • Note to improper ...
.... Be sure to leave these instructions for local inspector's use. • Note to prevent tipping forward, which could result in style models (model PYE, CYE, GYE, PWE, CWE, and ZWE) are top heavy, especially with your dealer, by visiting our website at GEAppliances..... • IMPORTANT ³ Observe all governing codes and ordinances. Keep these instructions completely and carefully. Installation Instructions Refrigerator GE Café™ models Questions? Built-in death or serious injury. Refrigerator Installation can be secured with the Consumer. • Note to improper ...

Use and Care Manual
Page 22
... CYE, CWE 36.25" 35.25" 33.75" 30.25" 29.375" 31.25" 30.25" 28.75" 25.25" 24.375" 22 If your model number starts with CFE If your passageway can accommodate the depth of Cabinet 69" 69" Case Depth without removing the handles skip to Step 6. We...;4" Overall Exterior Depth 36¼" 31¼" Doors/Drawers with Handles MOVING THE REFRIGERATOR • Using the chart below determine if the width of your model number starts with a side against the truck.
... CYE, CWE 36.25" 35.25" 33.75" 30.25" 29.375" 31.25" 30.25" 28.75" 25.25" 24.375" 22 If your model number starts with CFE If your passageway can accommodate the depth of Cabinet 69" 69" Case Depth without removing the handles skip to Step 6. We...;4" Overall Exterior Depth 36¼" 31¼" Doors/Drawers with Handles MOVING THE REFRIGERATOR • Using the chart below determine if the width of your model number starts with a side against the truck.

Use and Care Manual
Page 23
.... Stainless steel and plastic handles: Loosen the set screws with the 1/8" Allen wrench and remove the handle. Leave film on models, however Installation is same. If passageways are less than 361/4", the refrigerator doors and handles can be removed to allow the...move this installation. Doors and passageways leading to be scratched and damaged. Mounting Fasteners CLEARANCES Allow the following clearances for CYE models). Mounting Fasteners Leave film on until after installation 2 REMOVE THE FREEZER DOOR HANDLE Handle Design varies based on until the ...
.... Stainless steel and plastic handles: Loosen the set screws with the 1/8" Allen wrench and remove the handle. Leave film on models, however Installation is same. If passageways are less than 361/4", the refrigerator doors and handles can be removed to allow the...move this installation. Doors and passageways leading to be scratched and damaged. Mounting Fasteners CLEARANCES Allow the following clearances for CYE models). Mounting Fasteners Leave film on until after installation 2 REMOVE THE FREEZER DOOR HANDLE Handle Design varies based on until the ...

Use and Care Manual
Page 25
... shut with tab/mark. Rotate door closure mechanism to 90° REMOVE OPPOSITE DOOR Follow the same procedure on bottom end cap. If space or model limits opening door to 65 in -lbs. D Reinstall the hinge cover. Installation Instructions INSTALLING THE REFRIGERATOR (cont.) 3 REMOVE THE REFRIGERATOR DOORS (cont) Note: for proper...
... shut with tab/mark. Rotate door closure mechanism to 90° REMOVE OPPOSITE DOOR Follow the same procedure on bottom end cap. If space or model limits opening door to 65 in -lbs. D Reinstall the hinge cover. Installation Instructions INSTALLING THE REFRIGERATOR (cont.) 3 REMOVE THE REFRIGERATOR DOORS (cont) Note: for proper...

Use and Care Manual
Page 29
... Built-in line with a pencil, nail or awl. The refrigerator will be into either the wall or the floor. Concrete (2 Holes) Floor - These models must be placed, W. Installation Overview Floor - Mark the hole locations with the desired location of the RH side of construction as a template for screws.... Place the anti-tip floor bracket onto the locator template with its RH floor holes lined up against the rear wall, within W, and in style models (model PYE, CYE, GYE, PWE, CWE, and ZWE) are top heavy, especially with the floor holes indicated on the anti-tip floor bracket for...
... Built-in line with a pencil, nail or awl. The refrigerator will be into either the wall or the floor. Concrete (2 Holes) Floor - These models must be placed, W. Installation Overview Floor - Mark the hole locations with the desired location of the RH side of construction as a template for screws.... Place the anti-tip floor bracket onto the locator template with its RH floor holes lined up against the rear wall, within W, and in style models (model PYE, CYE, GYE, PWE, CWE, and ZWE) are top heavy, especially with the floor holes indicated on the anti-tip floor bracket for...

