Use and Care Manual
Page 1
...Assembly 32, 33 Burner Grates 34 Control Panel and Knobs . . . . . .35 Cooktop 35 Door Removal 37 Drawer 38 Griddle 34 Oven Bottom 37 Oven Light Replacement . . . . . .38 Oven Vents 35 Racks 37 Self-Cleaning 30, 31 Stainless Steel Surfaces 36 Installation Instructions 39-50... Air Adjustment 49 Anti-Tip Device 42, 50 Assemble Surface Burners . . . . .47 Checking Burner Ignition 48 Connecting the Range to Gas 43-45 Dimensions and...
...Assembly 32, 33 Burner Grates 34 Control Panel and Knobs . . . . . .35 Cooktop 35 Door Removal 37 Drawer 38 Griddle 34 Oven Bottom 37 Oven Light Replacement . . . . . .38 Oven Vents 35 Racks 37 Self-Cleaning 30, 31 Stainless Steel Surfaces 36 Installation Instructions 39-50... Air Adjustment 49 Anti-Tip Device 42, 50 Assemble Surface Burners . . . . .47 Checking Burner Ignition 48 Connecting the Range to Gas 43-45 Dimensions and...
Use and Care Manual
Page 29
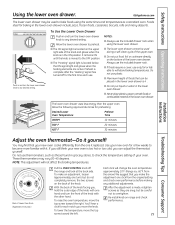
...change the oven temperature approximately 10°F. (Range is too hot or too cold, you , hold the outer edge of the knob facing you can be careful not to the OFF position. With the back of the knob with one it replaced. Each click will not affect the broiling... Temperature Preheat Time WARM 10 minutes 350° F 20 minutes 425° F 30 minutes Installation Instructions Troubleshooting Tips Consumer Support Adjust the oven thermostat-Do it . To lower the temperature, move the knob. These thermometers may find that you move the top screw toward the right. s ...
...change the oven temperature approximately 10°F. (Range is too hot or too cold, you , hold the outer edge of the knob facing you can be careful not to the OFF position. With the back of the knob with one it replaced. Each click will not affect the broiling... Temperature Preheat Time WARM 10 minutes 350° F 20 minutes 425° F 30 minutes Installation Instructions Troubleshooting Tips Consumer Support Adjust the oven thermostat-Do it . To lower the temperature, move the knob. These thermometers may find that you move the top screw toward the right. s ...
Use and Care Manual
Page 35
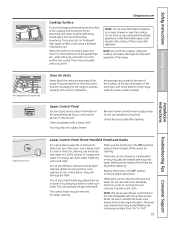
... rear of the cooktop, at the top and bottom of the oven door, and at the bottom of the range, under the lower cooking drawer. NOTE: The lower oven drawer control knob is not interchangeable with warm soapy water. When the surface has cooled, wash and rinse. Unlock the touch pads... Use a damp cloth to the original location. Do not use clean water. Then rinse and polish with a soft cloth. Lifting the cooktop can damage the gas valve shaft. Polish dry with a dry cloth. Replace the knobs in an oven, drawer or near the cooktop. Be sure to reinstall the lower oven drawer...
... rear of the cooktop, at the top and bottom of the oven door, and at the bottom of the range, under the lower cooking drawer. NOTE: The lower oven drawer control knob is not interchangeable with warm soapy water. When the surface has cooled, wash and rinse. Unlock the touch pads... Use a damp cloth to the original location. Do not use clean water. Then rinse and polish with a soft cloth. Lifting the cooktop can damage the gas valve shaft. Polish dry with a dry cloth. Replace the knobs in an oven, drawer or near the cooktop. Be sure to reinstall the lower oven drawer...


