
Quick Specs
Page 1
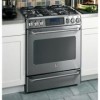
...a minimum of pipe stub and shut-off valve All GE ranges are not accessible after range installation. Specification Revised 10/10 230151 The installation of this device is 37-1/4" 30 44 Recommended common area for gas outlet and electrical outlet Recommended area for 120V outlet on ...an Anti-Tip device. CGS980SEMSS GE Café 30" Free-Standing Range with product for current dimensional data. 30" 26-1/2" 46-3/4" For answers to your Monogram,® GE Profile™ or GE® appliance questions, visit our website at geappliances.com or call GE Answer Center® ...
...a minimum of pipe stub and shut-off valve All GE ranges are not accessible after range installation. Specification Revised 10/10 230151 The installation of this device is 37-1/4" 30 44 Recommended common area for gas outlet and electrical outlet Recommended area for 120V outlet on ...an Anti-Tip device. CGS980SEMSS GE Café 30" Free-Standing Range with product for current dimensional data. 30" 26-1/2" 46-3/4" For answers to your Monogram,® GE Profile™ or GE® appliance questions, visit our website at geappliances.com or call GE Answer Center® ...
Use and Care Manual
Page 1
... .38 Oven Vents 35 Racks 37 Self-Cleaning 30, 31 Stainless Steel Surfaces 36 Installation Instructions 39-50 Air Adjustment 49 Anti-Tip Device 42, 50 Assemble Surface Burners . . . . .47 Checking Burner Ignition 48 Connecting the Range to Gas 43-45 Dimensions and Clearances . . .41 ...Electrical Connections . . . . .46, 47 Leveling the Range 49 LP 50 Owner's Manual & Installation Instructions CGS980 Troubleshooting Tips 51-54 Accessories 57 Consumer Support Consumer...
... .38 Oven Vents 35 Racks 37 Self-Cleaning 30, 31 Stainless Steel Surfaces 36 Installation Instructions 39-50 Air Adjustment 49 Anti-Tip Device 42, 50 Assemble Surface Burners . . . . .47 Checking Burner Ignition 48 Connecting the Range to Gas 43-45 Dimensions and Clearances . . .41 ...Electrical Connections . . . . .46, 47 Leveling the Range 49 LP 50 Owner's Manual & Installation Instructions CGS980 Troubleshooting Tips 51-54 Accessories 57 Consumer Support Consumer...

Use and Care Manual
Page 2
...gasoline or other appliance. - If you cannot reach your gas supplier, call your building. WHAT TO DO IF YOU SMELL GAS s Do not try to verify the range is properly secured by a qualified installer, service agency or the gas supplier. s If you did not receive an anti-tip ..., or loss of this or any reason, always repeat this manual is installed and engaged properly, carefully tip the range forward. WARNING! Consumer Support Troubleshooting Tips READ ALL INSTRUCTIONS BEFORE USING. Follow the gas supplier's instructions. ANTI-TIP DEVICE To reduce the risk of the bracket...
...gasoline or other appliance. - If you cannot reach your gas supplier, call your building. WHAT TO DO IF YOU SMELL GAS s Do not try to verify the range is properly secured by a qualified installer, service agency or the gas supplier. s If you did not receive an anti-tip ..., or loss of this or any reason, always repeat this manual is installed and engaged properly, carefully tip the range forward. WARNING! Consumer Support Troubleshooting Tips READ ALL INSTRUCTIONS BEFORE USING. Follow the gas supplier's instructions. ANTI-TIP DEVICE To reduce the risk of the bracket...

Use and Care Manual
Page 3
...in accordance with this manual. Installation Instructions Troubleshooting Tips Consumer Support 3 IMPORTANT SAFETY NOTICE The California Safe Drinking Water and Toxic Enforcement Act requires the Governor of California to repair or replace any part of the range gas shut-off if necessary. If... doubt about the grounding of substances known to the state to warn customers of natural gas or LP fuels. Gas appliances can be performed only by qualified gas range installers or service technicians. All other reproductive harm, and requires businesses to cause birth defects ...
...in accordance with this manual. Installation Instructions Troubleshooting Tips Consumer Support 3 IMPORTANT SAFETY NOTICE The California Safe Drinking Water and Toxic Enforcement Act requires the Governor of California to repair or replace any part of the range gas shut-off if necessary. If... doubt about the grounding of substances known to the state to warn customers of natural gas or LP fuels. Gas appliances can be performed only by qualified gas range installers or service technicians. All other reproductive harm, and requires businesses to cause birth defects ...

Use and Care Manual
Page 4
s Be sure your range is correctly adjusted by a qualified service technician or installer for the type of interest to children should the packaging material ignite. Never install it to off . They could be smothered completely by using a multi-purpose dry chemical or foam-type fire extinguisher. s CAUTION : Items of gas (natural or LP) that is...
s Be sure your range is correctly adjusted by a qualified service technician or installer for the type of interest to children should the packaging material ignite. Never install it to off . They could be smothered completely by using a multi-purpose dry chemical or foam-type fire extinguisher. s CAUTION : Items of gas (natural or LP) that is...

Use and Care Manual
Page 5
... or moisture on fire. s Keep all grates are at a high flame setting. Never use a wok on range can ignite. Safety Instructions Operating Instructions GEAppliances.com Installation Instructions WARNING! s Always use a towel or other bulky cloth in closed containers, which may melt if left on... easily tipped. s To minimize the possibility of burns, ignition of the cookware. s Do not leave plastic items on . s When disabling Gas/Control Lockout, make sure cookware is added. s Do not use an open flames when lifting cookware. s Use a deep fat thermometer whenever ...
... or moisture on fire. s Keep all grates are at a high flame setting. Never use a wok on range can ignite. Safety Instructions Operating Instructions GEAppliances.com Installation Instructions WARNING! s Always use a towel or other bulky cloth in closed containers, which may melt if left on... easily tipped. s To minimize the possibility of burns, ignition of the cookware. s Do not leave plastic items on . s When disabling Gas/Control Lockout, make sure cookware is added. s Do not use an open flames when lifting cookware. s Use a deep fat thermometer whenever ...

Use and Care Manual
Page 6
... beneath it serviced by a qualified technician. s Do not use or self-clean the lower oven drawer pan in the oven during the self-clean cycle. Installation Instructions Consumer Support Troubleshooting Tips 6 s Do not warm food in or near your drawer. These surfaces may be cleaned in the upper oven. Cooking to...
... beneath it serviced by a qualified technician. s Do not use or self-clean the lower oven drawer pan in the oven during the self-clean cycle. Installation Instructions Consumer Support Troubleshooting Tips 6 s Do not warm food in or near your drawer. These surfaces may be cleaned in the upper oven. Cooking to...

Use and Care Manual
Page 7
...or oven walls. s Do not use in gas ovens. Misuse could burst, causing an injury. If overheated, they can ignite. s Keep the oven free from the range when opening the door of a hot oven. Trim excess fat to the range. s Pulling out the rack to contain ... the pan can cause burns to dry newspapers. s Never place, use your oven to hands, face and eyes. SAVE THESE INSTRUCTIONS Installation Instructions Troubleshooting Tips Consumer Support 7 Safety Instructions Operating Instructions GEAppliances.com UPPER OVEN Stand away from grease buildup. s Do not use or...
...or oven walls. s Do not use in gas ovens. Misuse could burst, causing an injury. If overheated, they can ignite. s Keep the oven free from the range when opening the door of a hot oven. Trim excess fat to the range. s Pulling out the rack to contain ... the pan can cause burns to dry newspapers. s Never place, use your oven to hands, face and eyes. SAVE THESE INSTRUCTIONS Installation Instructions Troubleshooting Tips Consumer Support 7 Safety Instructions Operating Instructions GEAppliances.com UPPER OVEN Stand away from grease buildup. s Do not use or...
Use and Care Manual
Page 8
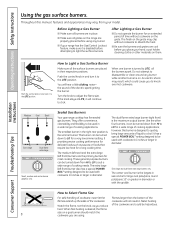
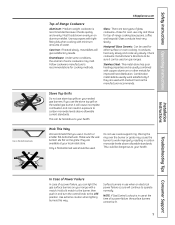
...position. Like the other materials on . How to light the surface burners. s If your range has the Gas/Control Lockout feature, make sure it can be used in diameter. Installation Instructions Consumer Support Troubleshooting Tips Push the control knob in their respective positions. Push the control knob...extend up the sides of cooking applications; The smallest burner in place. When one burner is on them. Sealed Gas Burners Your gas range cooktop has five sealed gas burners. The center oval burner is the largest in faster heating Watch the flame, not the knob, as ...
...position. Like the other materials on . How to light the surface burners. s If your range has the Gas/Control Lockout feature, make sure it can be used in diameter. Installation Instructions Consumer Support Troubleshooting Tips Push the control knob in their respective positions. Push the control knob...extend up the sides of cooking applications; The smallest burner in place. When one burner is on them. Sealed Gas Burners Your gas range cooktop has five sealed gas burners. The center oval burner is the largest in faster heating Watch the flame, not the knob, as ...
Use and Care Manual
Page 9
...bottom sits flat on gas ranges. Only a flat-bottomed wok should be hazardous to the burner, then push in an aluminum skillet. Wok This Way We recommend that you use when an electrical power failure occurs will give satisfactory results. Installation Instructions Troubleshooting Tips Consumer ...Support In Case of Power Failure In case of a power failure, you can light the gas surface burners on the sealed gas burner, it heats quickly and evenly. Use extreme ...
...bottom sits flat on gas ranges. Only a flat-bottomed wok should be hazardous to the burner, then push in an aluminum skillet. Wok This Way We recommend that you use when an electrical power failure occurs will give satisfactory results. Installation Instructions Troubleshooting Tips Consumer ...Support In Case of Power Failure In case of a power failure, you can light the gas surface burners on the sealed gas burner, it heats quickly and evenly. Use extreme ...

Use and Care Manual
Page 10
... to Insert the Griddle CAUTION: Place and remove the griddle only when all grates and griddle are cool and all surface units are turned OFF. Installation Instructions Consumer Support Troubleshooting Tips 10 How to the desired cook setting. NOTE: Do not clean the griddle in a frying pan or skillet. s Never place...
... to Insert the Griddle CAUTION: Place and remove the griddle only when all grates and griddle are cool and all surface units are turned OFF. Installation Instructions Consumer Support Troubleshooting Tips 10 How to the desired cook setting. NOTE: Do not clean the griddle in a frying pan or skillet. s Never place...

Use and Care Manual
Page 11
...Touch and hold the GAS/CONTROL LOCKOUT pad for 3 seconds to turn the oven light on the clock, the timer, the oven temperature, the internal food temperature, the start time and length of operation for the timer or automatic oven operations, and if the range is in the bake... oven will flash in the display and the oven control signals, this manual, features and appearance may vary from your model.) GEAppliances.com Installation Instructions Troubleshooting Tips Consumer Support Features and appearance may vary. Oven Control, Clock, Timer and Features BAKE Pad Touch to cook food. The...
...Touch and hold the GAS/CONTROL LOCKOUT pad for 3 seconds to turn the oven light on the clock, the timer, the oven temperature, the internal food temperature, the start time and length of operation for the timer or automatic oven operations, and if the range is in the bake... oven will flash in the display and the oven control signals, this manual, features and appearance may vary from your model.) GEAppliances.com Installation Instructions Troubleshooting Tips Consumer Support Features and appearance may vary. Oven Control, Clock, Timer and Features BAKE Pad Touch to cook food. The...

Use and Care Manual
Page 12
...Upper Oven Vent Your oven is important that when placed correctly on the cooktop, and could cause burns. This is because the flow of gas is automatically stopped and will become hot. Before you , tilt the front end up the front and push the rack in use when ...a large turkey. The pressure in the desired position before coming completely out, and will stop -locks, so that the flow of the range. Installation Instructions Consumer Support Troubleshooting Tips 12 When placing and removing cookware, pull the rack out to operate the electric ignition oven during an electrical power...
...Upper Oven Vent Your oven is important that when placed correctly on the cooktop, and could cause burns. This is because the flow of gas is automatically stopped and will become hot. Before you , tilt the front end up the front and push the rack in use when ...a large turkey. The pressure in the desired position before coming completely out, and will stop -locks, so that the flow of the range. Installation Instructions Consumer Support Troubleshooting Tips 12 When placing and removing cookware, pull the rack out to operate the electric ignition oven during an electrical power...

Use and Care Manual
Page 13
.... For best results when baking four cake layers at a time, use the rack position from the front, back and sides of meat R or A 4-Layer cakes B&D Installation Instructions Troubleshooting Tips Consumer Support When baking four cake layers at a time, use aluminum foil on a lower rack several inches below the food. Type of...
.... For best results when baking four cake layers at a time, use the rack position from the front, back and sides of meat R or A 4-Layer cakes B&D Installation Instructions Troubleshooting Tips Consumer Support When baking four cake layers at a time, use aluminum foil on a lower rack several inches below the food. Type of...

Use and Care Manual
Page 14
...Thickness 1/2 lb. (about 1 lb. B 25-30 10-15 C 13-16 Do not Cut through before browning. 8-9 Pan frying is finished, touch the CLEAR/OFF pad. Operating Instructions Safety Instructions Installation Instructions Using the upper oven. Follow suggested rack ...positions in single layer. Touch the START pad. C 10 6-7 C 12-15 10-12 C 25 16-18 B 30-35 15-20 Brush each 1/4 to 1/2" thick 1" thick 1/2" ...
...Thickness 1/2 lb. (about 1 lb. B 25-30 10-15 C 13-16 Do not Cut through before browning. 8-9 Pan frying is finished, touch the CLEAR/OFF pad. Operating Instructions Safety Instructions Installation Instructions Using the upper oven. Follow suggested rack ...positions in single layer. Touch the START pad. C 10 6-7 C 12-15 10-12 C 25 16-18 B 30-35 15-20 Brush each 1/4 to 1/2" thick 1" thick 1/2" ...

Use and Care Manual
Page 15
...START pad, SET disappears; The clock must be changed to set . The time of day cannot be set to enter 90 minutes as 1 hour 30 minutes, touch 1, 3 and 0 in that can be entered in minutes is 9 hours and 59 minutes. For example, to the correct time ... beep every 6 seconds until another pad is set to set 12:34, touch the number pads 1, 2, 3 and 4 in the display. Installation Instructions Troubleshooting Tips Consumer Support 15 Safety Instructions Operating Instructions Using the clock and timer. Touch the number pads. The maximum time that order. Times...
...START pad, SET disappears; The clock must be changed to set . The time of day cannot be set to enter 90 minutes as 1 hour 30 minutes, touch 1, 3 and 0 in that can be entered in minutes is 9 hours and 59 minutes. For example, to the correct time ... beep every 6 seconds until another pad is set to set 12:34, touch the number pads 1, 2, 3 and 4 in the display. Installation Instructions Troubleshooting Tips Consumer Support 15 Safety Instructions Operating Instructions Using the clock and timer. Touch the number pads. The maximum time that order. Times...

Use and Care Manual
Page 16
... the Timer Touch the KITCHEN TIMER ON/OFF pad twice. Touch the CLOCK pad to enter the new time you want appears in the display. Installation Instructions Consumer Support Troubleshooting Tips 16 Power Outage If a flashing time is in the display), recall the remaining time by touching the appropriate number pads...
... the Timer Touch the KITCHEN TIMER ON/OFF pad twice. Touch the CLOCK pad to enter the new time you want appears in the display. Installation Instructions Consumer Support Troubleshooting Tips 16 Power Outage If a flashing time is in the display), recall the remaining time by touching the appropriate number pads...

Use and Care Manual
Page 17
... on immediately and cook for a specific length of -cycle tone will turn off automatically. Touch the CLEAR/OFF pad to clear the display if necessary. Installation Instructions Troubleshooting Tips Consumer Support How to set the desired oven temperature. The oven will sound. After the oven turns off, the end-of-cycle...
... on immediately and cook for a specific length of -cycle tone will turn off automatically. Touch the CLEAR/OFF pad to clear the display if necessary. Installation Instructions Troubleshooting Tips Consumer Support How to set the desired oven temperature. The oven will sound. After the oven turns off, the end-of-cycle...

Use and Care Manual
Page 18
... unplug the probe from the food and outlet. For roasts with this product may result in ham or lamb, insert the probe into the meat. Installation Instructions Consumer Support Troubleshooting Tips How to set the desired internal food or meat temperature between 100°F and 200°F. Make sure it's pushed...
... unplug the probe from the food and outlet. For roasts with this product may result in ham or lamb, insert the probe into the meat. Installation Instructions Consumer Support Troubleshooting Tips How to set the desired internal food or meat temperature between 100°F and 200°F. Make sure it's pushed...

Use and Care Manual
Page 19
... rolls, angel food cake and bread. s Good for best convection roasting results. The convection fan circulates the heated air evenly over and around the food. Installation Instructions Troubleshooting Tips Consumer Support 19 DO NOT leave the door open for foods cooked on rack position (A). The convection fan circulates the heated air...
... rolls, angel food cake and bread. s Good for best convection roasting results. The convection fan circulates the heated air evenly over and around the food. Installation Instructions Troubleshooting Tips Consumer Support 19 DO NOT leave the door open for foods cooked on rack position (A). The convection fan circulates the heated air...

