Use and Care Manual
Page 1
... que comienzan con las letras CYE y CWE son Modelos con Profundidad de Mesada (CD) 239D3389P008 Pub No. 49-60713-3 12-14 GE GEAppliances.com Bottom Freezer Refrigerators Safety Instructions 2-4 Operating Instructions Features 5, 6 Controls 7, 8 Odor Remover 9 Dispenser 10 Hot Water 11 Water Filter 12 Fresh Food...the Anti-Tip Bracket. . . 29, 30 Installing the Refrigerator 23-33 Installing the Water Line 34-35 Troubleshooting Tips 38, 39 Normal Operating Conditions 37 Service - Owner's Manual and Installation Instructions GE Café™ models Models that start with CFE are...
... que comienzan con las letras CYE y CWE son Modelos con Profundidad de Mesada (CD) 239D3389P008 Pub No. 49-60713-3 12-14 GE GEAppliances.com Bottom Freezer Refrigerators Safety Instructions 2-4 Operating Instructions Features 5, 6 Controls 7, 8 Odor Remover 9 Dispenser 10 Hot Water 11 Water Filter 12 Fresh Food...the Anti-Tip Bracket. . . 29, 30 Installing the Refrigerator 23-33 Installing the Water Line 34-35 Troubleshooting Tips 38, 39 Normal Operating Conditions 37 Service - Owner's Manual and Installation Instructions GE Café™ models Models that start with CFE are...
Use and Care Manual
Page 2
.... „ Keep fingers out of this or any setting on your refrigerator follow the safety alert symbol and the word "DANGER", "WARNING", or "CAUTION". IMPORTANT SAFETY INSTRUCTIONS CAUTION To reduce the risk of an extension cord. IMPORTANT SAFETY INFORMATION. SAFETY GE Appliances website For more information on the control panel. All safety...
.... „ Keep fingers out of this or any setting on your refrigerator follow the safety alert symbol and the word "DANGER", "WARNING", or "CAUTION". IMPORTANT SAFETY INSTRUCTIONS CAUTION To reduce the risk of an extension cord. IMPORTANT SAFETY INFORMATION. SAFETY GE Appliances website For more information on the control panel. All safety...
Use and Care Manual
Page 3
... materials and vapors, such as gasoline, away from the power cord. Do not, under any doors open. When moving the refrigerator away from the outlet. Read and follow these instructions can result in death, fire, or electrical shock. CONNECTING ELECTRICITY WARNING Electrical...INFORMATION. READ ALL INSTRUCTIONS BEFORE USING. These models must be secured with any circumstances, cut or remove the third (ground) prong from refrigerator. Where a standard 2-prong wall outlet is encountered, it replaced with a standard 3-prong (grounding) wall outlet to prevent tipping forward,...
... materials and vapors, such as gasoline, away from the power cord. Do not, under any doors open. When moving the refrigerator away from the outlet. Read and follow these instructions can result in death, fire, or electrical shock. CONNECTING ELECTRICITY WARNING Electrical...INFORMATION. READ ALL INSTRUCTIONS BEFORE USING. These models must be secured with any circumstances, cut or remove the third (ground) prong from refrigerator. Where a standard 2-prong wall outlet is encountered, it replaced with a standard 3-prong (grounding) wall outlet to prevent tipping forward,...
Use and Care Manual
Page 4
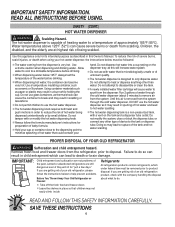
...help prevent accidents. Run 2 gallons of being dispensed unintentionally or by small children. PROPER DISPOSAL OF YOUR OLD REFRIGERATOR WARNING Suffocation and child entrapment hazard. READ AND FOLLOW THIS SAFETY INFORMATION CAREFULLY. Use extreme caution when dispensing and ...cartridge will sit for its intended purpose as ceramic or Styrofoam. Junked or abandoned refrigerators are not problems of approximately 185°F (85°C). Refrigerants All refrigeration products contain refrigerants, which can cause severe burns or death from the system. The hot water ...
...help prevent accidents. Run 2 gallons of being dispensed unintentionally or by small children. PROPER DISPOSAL OF YOUR OLD REFRIGERATOR WARNING Suffocation and child entrapment hazard. READ AND FOLLOW THIS SAFETY INFORMATION CAREFULLY. Use extreme caution when dispensing and ...cartridge will sit for its intended purpose as ceramic or Styrofoam. Junked or abandoned refrigerators are not problems of approximately 185°F (85°C). Refrigerants All refrigeration products contain refrigerants, which can cause severe burns or death from the system. The hot water ...

Use and Care Manual
Page 5
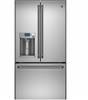
... the door opening. GEAppliances.com Space-saving ice maker* Ice maker and bin are located under the fresh food door to spotlight areas in the refrigerator. Removable door bin Can be removed for those with ice storage bins. Showcase LED lighting LED lighting is easily removable for easier clean up. Water...
... the door opening. GEAppliances.com Space-saving ice maker* Ice maker and bin are located under the fresh food door to spotlight areas in the refrigerator. Removable door bin Can be removed for those with ice storage bins. Showcase LED lighting LED lighting is easily removable for easier clean up. Water...
Use and Care Manual
Page 7
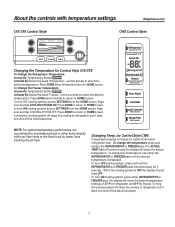
... flow. Page over and tap COOLING SYSTEM OFF. Page over and tap COOLING SYSTEM ON. Turning the cooling system off stops the cooling to refrigerator, but it does not shut off the electrical power. 7 To Change the Freezer Temperature: Access By: Temperature Button Temperature Activate By: Below the... word "Freezer", use the arrows to HOME screen. To turn ON cooling system, press either the REFRIGERATOR or FREEZER pad until the desired temperature is OFF the display should read OFF. To change the temperature, press and release the...
... flow. Page over and tap COOLING SYSTEM OFF. Page over and tap COOLING SYSTEM ON. Turning the cooling system off stops the cooling to refrigerator, but it does not shut off the electrical power. 7 To Change the Freezer Temperature: Access By: Temperature Button Temperature Activate By: Below the... word "Freezer", use the arrows to HOME screen. To turn ON cooling system, press either the REFRIGERATOR or FREEZER pad until the desired temperature is OFF the display should read OFF. To change the temperature, press and release the...

Use and Care Manual
Page 8
... Reset filter • Ice maker on usage and operating environment. Precise Fill Precisely dispenses filtered water in accurate measurements in the refrigerator and freezer. TurboFreeze™ setting Activate TurboFreeze to turn off to lock out ice and water dispenser and all feature and temperature... temperature controls are in the root directory in the factory at 37°F for the refrigerator compartment and 0°F for the temperature to stabilize to the refrigerator LCD screen. Humidity setting Humidity setting can be turned on/off interior lights, temperature control...
... Reset filter • Ice maker on usage and operating environment. Precise Fill Precisely dispenses filtered water in accurate measurements in the refrigerator and freezer. TurboFreeze™ setting Activate TurboFreeze to turn off to lock out ice and water dispenser and all feature and temperature... temperature controls are in the root directory in the factory at 37°F for the refrigerator compartment and 0°F for the temperature to stabilize to the refrigerator LCD screen. Humidity setting Humidity setting can be turned on/off interior lights, temperature control...

Use and Care Manual
Page 9
... 3 Sec for 3 seconds after replacing filter. Freezer temp control Adjust freezer compartment temperature Refrigerator temp control Adjust fresh food compartment temperature Ice maker setting Turn your ice makers on/off. 9 Lock Controls Press and hold 3 seconds to alert when ...
... 3 Sec for 3 seconds after replacing filter. Freezer temp control Adjust freezer compartment temperature Refrigerator temp control Adjust fresh food compartment temperature Ice maker setting Turn your ice makers on/off. 9 Lock Controls Press and hold 3 seconds to alert when ...
Use and Care Manual
Page 10
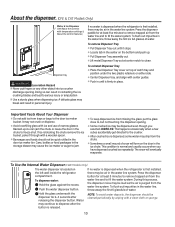
If no water is dispensed when the refrigerator is first installed, there may be quick-chilled in the water line system. Important Facts About Your Dispenser „ Do ...up ice can result in the water line, throw away the first six full glasses of water. If no water is dispensed when the refrigerator is first installed, there may be cleaned periodically by wiping with a clean cloth or sponge. 10 To remove Dispenser Tray „ Pull...overfilling glass with ice and use of catch tray and position under the two plastic retainers on the left wall inside the refrigerator compartment .
If no water is dispensed when the refrigerator is first installed, there may be quick-chilled in the water line system. Important Facts About Your Dispenser „ Do ...up ice can result in the water line, throw away the first six full glasses of water. If no water is dispensed when the refrigerator is first installed, there may be cleaned periodically by wiping with a clean cloth or sponge. 10 To remove Dispenser Tray „ Pull...overfilling glass with ice and use of catch tray and position under the two plastic retainers on the left wall inside the refrigerator compartment .
Use and Care Manual
Page 12
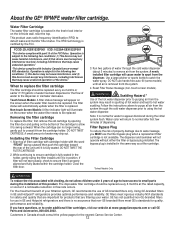
...occurs. When the cartridge can no assurance that non-GE-branded filters meet rigorous industry NSF standards for safety and quality that are filtering your filtration system, GE recommends the use in GE and Hotpoint® refrigerators provides optimal performance and reliability. While continuing to ...filter cartridge is installed in Canada should be replaced. Reset Filter Status message (non-touch screen models). Using GE-branded filters in GE and Hotpoint refrigerators and there is subject to hot water scalding. Use a large pitcher or sports bottle to normal after ...
...occurs. When the cartridge can no assurance that non-GE-branded filters meet rigorous industry NSF standards for safety and quality that are filtering your filtration system, GE recommends the use in GE and Hotpoint® refrigerators provides optimal performance and reliability. While continuing to ...filter cartridge is installed in Canada should be replaced. Reset Filter Status message (non-touch screen models). Using GE-branded filters in GE and Hotpoint refrigerators and there is subject to hot water scalding. Use a large pitcher or sports bottle to normal after ...

Use and Care Manual
Page 13
... shelf up at the front. To remove: Remove all items from dripping to help prevent spills from the shelf. Rearranging the Shelves Shelves in the refrigerator compartment are adjustable.
... shelf up at the front. To remove: Remove all items from dripping to help prevent spills from the shelf. Rearranging the Shelves Shelves in the refrigerator compartment are adjustable.

Use and Care Manual
Page 14
... 33. Open right fresh food door 2. Non-Dispense Models (Left Hand Door) Non-Adjustable Bins on the Door Adjustable bins can easily be carried from refrigerator to reinstall. Non-Adjustable Dairy Bin* To remove: Lift the dairy bin straight up , then pull out. Adjustable Bins on the Door (Dispenser Models - It...
... 33. Open right fresh food door 2. Non-Dispense Models (Left Hand Door) Non-Adjustable Bins on the Door Adjustable bins can easily be carried from refrigerator to reinstall. Non-Adjustable Dairy Bin* To remove: Lift the dairy bin straight up , then pull out. Adjustable Bins on the Door (Dispenser Models - It...

Use and Care Manual
Page 18
... the ice maker is made to the unit or if the water supply to begin making ice cubes. About the automatic ice maker. If the refrigerator is operated before the water line connection is turned off Use the settings menu on the touchscreen Use the "ICE MAKER" button on the control... Maker On/Off Model # CYE/CFE CWE How to remove it from the compartment. • To replace the ice bucket, set it cools to the refrigerator, the ice maker may hear a buzzing sound each time the ice maker fills with water when it on the guide brackets and push until the...
... the ice maker is made to the unit or if the water supply to begin making ice cubes. About the automatic ice maker. If the refrigerator is operated before the water line connection is turned off Use the settings menu on the touchscreen Use the "ICE MAKER" button on the control... Maker On/Off Model # CYE/CFE CWE How to remove it from the compartment. • To replace the ice bucket, set it cools to the refrigerator, the ice maker may hear a buzzing sound each time the ice maker fills with water when it on the guide brackets and push until the...
Use and Care Manual
Page 19
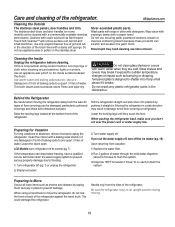
... all loose items such as Bar Keepers Friend Soft Cleanser™ will remove surface rust, tarnish and small blemishes. Be sure the refrigerator stays in . Do not use scouring pads, powdered cleaners, bleach or cleaners containing bleach because these products can drop below freezing, ...Raise the leveling legs located at control (pg 7) . Upon returning from vacation: 1) Replace the water filter. 2) Run 2 gallons of the refrigerator. The stainless steel doors and door handles (on the stainless steel. Should spill tray need cleaning use appliance wax or polish on some models)...
... all loose items such as Bar Keepers Friend Soft Cleanser™ will remove surface rust, tarnish and small blemishes. Be sure the refrigerator stays in . Do not use scouring pads, powdered cleaners, bleach or cleaners containing bleach because these products can drop below freezing, ...Raise the leveling legs located at control (pg 7) . Upon returning from vacation: 1) Replace the water filter. 2) Run 2 gallons of the refrigerator. The stainless steel doors and door handles (on the stainless steel. Should spill tray need cleaning use appliance wax or polish on some models)...

Use and Care Manual
Page 20
If this assembly needs to be replaced, call GE Service at 1.800.432.2737 in the United States or 1.800.561.3344 in fresh food compartment and on the bottom of the fresh food doors to replace the LED light. Replacing the lights Refrigerator Lights (LEDs) There is LED lighting in Canada. 20 An authorized technician will need to light the freezer compartment.
If this assembly needs to be replaced, call GE Service at 1.800.432.2737 in the United States or 1.800.561.3344 in fresh food compartment and on the bottom of the fresh food doors to replace the LED light. Replacing the lights Refrigerator Lights (LEDs) There is LED lighting in Canada. 20 An authorized technician will need to light the freezer compartment.
Use and Care Manual
Page 21
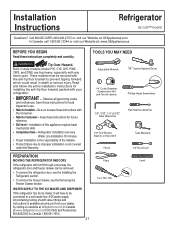
... instructions for installing the anti-tip floor bracket packed with the Consumer. • Note to Consumer - Installation Instructions Refrigerator GE Café™ models Questions? WARNING Tip Over Hazard. Be sure to be removed. • To remove the... refrigerator door, see the Installing the Refrigerator section. • To remove the freezer drawer, see the Removing the Freezer Drawer section. A GE water supply kit (containing tubing, shutoff valve, fittings and instructions) is not ...
... instructions for installing the anti-tip floor bracket packed with the Consumer. • Note to Consumer - Installation Instructions Refrigerator GE Café™ models Questions? WARNING Tip Over Hazard. Be sure to be removed. • To remove the... refrigerator door, see the Installing the Refrigerator section. • To remove the freezer drawer, see the Removing the Freezer Drawer section. A GE water supply kit (containing tubing, shutoff valve, fittings and instructions) is not ...

Use and Care Manual
Page 22
... of Hinge Cover 697ø8" 697ø8" Height to the final location. • If passageways are given with Handles MOVING THE REFRIGERATOR • Using the chart below determine if the width of your model number starts with a side against the truck. We strongly ...recommend that two people move this installation. Installation Instructions DIMENSIONS All measurements are large enough to accommodate the refrigerator without Doors 293ø8" 243ø8 Overall Exterior Case Width 353ø4" 353ø4" Overall Exterior Depth 36¼" 31¼"...
... of Hinge Cover 697ø8" 697ø8" Height to the final location. • If passageways are given with Handles MOVING THE REFRIGERATOR • Using the chart below determine if the width of your model number starts with a side against the truck. We strongly ...recommend that two people move this installation. Installation Instructions DIMENSIONS All measurements are large enough to accommodate the refrigerator without Doors 293ø8" 243ø8 Overall Exterior Case Width 353ø4" 353ø4" Overall Exterior Depth 36¼" 31¼"...

Use and Care Manual
Page 23
...models, however Installation is 361/4" deep (311/4" for ease of installation, proper air circulation and plumbing and electrical connections. Place the refrigerator on the hand truck with the 1/8" Allen wrench and remove the handle. The top cap and doors can easily be scratched and... move this installation. Sides 1/8" (3 mm) Top 1" (25 mm) Cabinet/Hinge Cover Back 2" (50 mm) REMOVING THE REFRIGERATOR DOORS • IMPORTANT NOTE: This refrigerator is same. Stainless steel and plastic handles: Loosen the set screws with a side against the truck. NOTE: If the handle mounting...
...models, however Installation is 361/4" deep (311/4" for ease of installation, proper air circulation and plumbing and electrical connections. Place the refrigerator on the hand truck with the 1/8" Allen wrench and remove the handle. The top cap and doors can easily be scratched and... move this installation. Sides 1/8" (3 mm) Top 1" (25 mm) Cabinet/Hinge Cover Back 2" (50 mm) REMOVING THE REFRIGERATOR DOORS • IMPORTANT NOTE: This refrigerator is same. Stainless steel and plastic handles: Loosen the set screws with a side against the truck. NOTE: If the handle mounting...

Use and Care Manual
Page 24
... electronics, carefully place the door in the top of the door. Single person lift could cause injury. Installation Instructions INSTALLING THE REFRIGERATOR (cont.) 3 REMOVE THE REFRIGERATOR DOORS A Securely tape the door shut with left-hand door first: Remove the hinge cover on top of the left...in a proper location. Remove the 1/4" hex head screw to free the line for door removal. Use assistance when handling, moving or lifting the refrigerator doors. Note: The lower door hinge pin and hinge are keyed and must be taped to self close properly. Please follow the directions carefully....
... electronics, carefully place the door in the top of the door. Single person lift could cause injury. Installation Instructions INSTALLING THE REFRIGERATOR (cont.) 3 REMOVE THE REFRIGERATOR DOORS A Securely tape the door shut with left-hand door first: Remove the hinge cover on top of the left...in a proper location. Remove the 1/4" hex head screw to free the line for door removal. Use assistance when handling, moving or lifting the refrigerator doors. Note: The lower door hinge pin and hinge are keyed and must be taped to self close properly. Please follow the directions carefully....

Use and Care Manual
Page 25
...door closure mechanism shaft on the opposite door. Rotate door closure mechanism to 65 in -lbs. b) Check alignment of the case, lower the refrigerator door onto the center hinge. Then align flat with the striker. d) Install the door at 90º to remove outboard screw B Rotate ... through 4 to less than 180°, then: a) Remove door, carefully turn door upside down . If space or model limits opening door to reinstall refrigerator, follow details below : 1. Open Door to be installed at 90° with masking tape or have a second person support the door. Remove center ...
...door closure mechanism shaft on the opposite door. Rotate door closure mechanism to 65 in -lbs. b) Check alignment of the case, lower the refrigerator door onto the center hinge. Then align flat with the striker. d) Install the door at 90º to remove outboard screw B Rotate ... through 4 to less than 180°, then: a) Remove door, carefully turn door upside down . If space or model limits opening door to reinstall refrigerator, follow details below : 1. Open Door to be installed at 90° with masking tape or have a second person support the door. Remove center ...


