
User Guide
Page 7
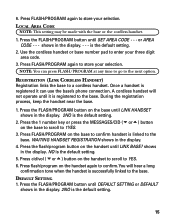
...stop (button) erase (button) *TONE/cancel (button) chan/delete (button) mem/conferenec (button) BASE LAYOUT skip (button) #PAUSE (button) flash/program (button) intercom (button) ringer (switch) CHARGE charge indicator FORMAT (button) ANSWERER ON/OFF (button) ANNOUNCE (button) Hook switch new message display (... HANDSET VOLUME (button) SPKR/VOL (button) *TONE/EXIT (button) MUTE indicator MEMORY/ CONFERENCE (button) FLASH/PROGRAM (button) REDIAL (button) PAGE/INTERCOM (button) HOLD indicator HOLD (button) MUTE (button) SPEAKER/CALLBACK SPEAKER/CALLBACK Microphone (button) (indicator) 7
...stop (button) erase (button) *TONE/cancel (button) chan/delete (button) mem/conferenec (button) BASE LAYOUT skip (button) #PAUSE (button) flash/program (button) intercom (button) ringer (switch) CHARGE charge indicator FORMAT (button) ANSWERER ON/OFF (button) ANNOUNCE (button) Hook switch new message display (... HANDSET VOLUME (button) SPKR/VOL (button) *TONE/EXIT (button) MUTE indicator MEMORY/ CONFERENCE (button) FLASH/PROGRAM (button) REDIAL (button) PAGE/INTERCOM (button) HOLD indicator HOLD (button) MUTE (button) SPEAKER/CALLBACK SPEAKER/CALLBACK Microphone (button) (indicator) 7

User Guide
Page 11
...supply cord together, fasten with the base or the cordless handset. 1. FRA stands for SPANISH. 2. You need to do this so the corded handset doesn't fall out of the base and the other end into a modular phone jack. 5. Press the FLASH/PROGRAM button until SET LANGUAGE 1ENG 2FRA 3ESP or 1ENG ...the pedestal to allow the unit to Answer, Security Code, Ringer Level, Ringer Tone,Tone/Pulse, Set Day, Set Time, Local Area Code, Link Cordless Handset, and Default Setting. Feed the telephone line cord and power supply cord through the grooves on the back of the base. 8. TELEPHONE SET UP...
...supply cord together, fasten with the base or the cordless handset. 1. FRA stands for SPANISH. 2. You need to do this so the corded handset doesn't fall out of the base and the other end into a modular phone jack. 5. Press the FLASH/PROGRAM button until SET LANGUAGE 1ENG 2FRA 3ESP or 1ENG ...the pedestal to allow the unit to Answer, Security Code, Ringer Level, Ringer Tone,Tone/Pulse, Set Day, Set Time, Local Area Code, Link Cordless Handset, and Default Setting. Feed the telephone line cord and power supply cord through the grooves on the back of the base. 8. TELEPHONE SET UP...
User Guide
Page 12
... time to go to the next option. You may only change the security code at any tone dialing telephone in the display. Press FLASH/PROGRAM again to ring before the answering system answers a call when accessing your selection. 3. SECURITY CODE NOTE: This setting may only be made ...with the base. Press the FLASH/PROGRAM button until SET CONTRAST shows in another phone. 1. Press the FLASH/PROGRAM button until SECURITY CODE shows in the display. If you have no new messages, the unit answers after ...
... time to go to the next option. You may only change the security code at any tone dialing telephone in the display. Press FLASH/PROGRAM again to ring before the answering system answers a call when accessing your selection. 3. SECURITY CODE NOTE: This setting may only be made ...with the base. Press the FLASH/PROGRAM button until SET CONTRAST shows in another phone. 1. Press the FLASH/PROGRAM button until SECURITY CODE shows in the display. If you have no new messages, the unit answers after ...
User Guide
Page 13
..." shows in the base display. You will hear a confirmation tone. 13 RINGER TONE NOTE: This setting may be made with the base. 1. Press the FLASH/PROGRAM button until SET RING LEVEL shows in the display. Use the touch-tone pad to select 1, 2, 3 or use the MESSAGES/CID ( or ) button to ... to store your selection. The default ringer tone is 123. Press 1, 2 or 3 on the base touch-tone pad to enter your selection. 3. Press FLASH/PROGRAM again to your selection, or use the MESSAGES/CID ( or ) button on the base unit or cid/vol ( or ) button on the display. RINGER LEVEL...
..." shows in the base display. You will hear a confirmation tone. 13 RINGER TONE NOTE: This setting may be made with the base. 1. Press the FLASH/PROGRAM button until SET RING LEVEL shows in the display. Use the touch-tone pad to select 1, 2, 3 or use the MESSAGES/CID ( or ) button to ... to store your selection. The default ringer tone is 123. Press 1, 2 or 3 on the base touch-tone pad to enter your selection. 3. Press FLASH/PROGRAM again to your selection, or use the MESSAGES/CID ( or ) button on the base unit or cid/vol ( or ) button on the display. RINGER LEVEL...
User Guide
Page 14
..., you can set automatically when you are subscribed to select the current day. 3. Monday is set the time manually. Depending on your selection. Press FLASH/PROGRAM again to enter the first digit of the hour, then enter the second digit of the hour, the first digit of the minute, and the... local phone company as follows: 1. Use the MESSAGES/CID ( or ) button to Caller ID service, the current time is the default setting. 2. Press the FLASH/PROGRAM button until SET DAY shows in the display. TONE/PULSE NOTE: This setting may only be made with the base.
..., you can set automatically when you are subscribed to select the current day. 3. Monday is set the time manually. Depending on your selection. Press FLASH/PROGRAM again to enter the first digit of the hour, then enter the second digit of the hour, the first digit of the minute, and the... local phone company as follows: 1. Use the MESSAGES/CID ( or ) button to Caller ID service, the current time is the default setting. 2. Press the FLASH/PROGRAM button until SET DAY shows in the display. TONE/PULSE NOTE: This setting may only be made with the base.
User Guide
Page 15
...default setting. 5. Press the FLASH/PROGRAM button until LINK BASE? Use the cordless handset or base number pad to the base. Press FLASH/PROGRAM on the handset to scroll to 1YES. 3. Press flash/program on the base to scroll to YES. 6. A cordless handset will hear a long confirmation... display. 2NO is registered it is linked to the base. shows in the display. 6. or AREA CODE - - - Press FLASH/PROGRAM again to a cordless handset. NOTE: You can use the base's phone connection. Once a handset is the default setting. 2. During the registration process, keep...
...default setting. 5. Press the FLASH/PROGRAM button until LINK BASE? Use the cordless handset or base number pad to the base. Press FLASH/PROGRAM on the handset to scroll to 1YES. 3. Press flash/program on the base to scroll to YES. 6. A cordless handset will hear a long confirmation... display. 2NO is registered it is linked to the base. shows in the display. 6. or AREA CODE - - - Press FLASH/PROGRAM again to a cordless handset. NOTE: You can use the base's phone connection. Once a handset is the default setting. 2. During the registration process, keep...
User Guide
Page 16
... then press the TALK/callback button. 3. When finished, press TALK/callback to factory defaults except day and time. 3. MAKING A CALL CORDLESS HANDSET 1. Press FLASH/PROGRAM again to see who is calling. BASE SPEAKERPHONE 1. Press the TALK/callback button. BASIC OPERATION ANSWERING A CALL Check the display to store your selection. NOTE: For more information...
... then press the TALK/callback button. 3. When finished, press TALK/callback to factory defaults except day and time. 3. MAKING A CALL CORDLESS HANDSET 1. Press FLASH/PROGRAM again to see who is calling. BASE SPEAKERPHONE 1. Press the TALK/callback button. BASIC OPERATION ANSWERING A CALL Check the display to store your selection. NOTE: For more information...
User Guide
Page 18
...the phone. Press the redial button. Press TALK/callback button. 2. CORDED HANDSET 1. Lift the corded handset. 2. If you dialed: BASE SPEAKERPHONE 1. CORDLESS HANDSET 1. BASE UNIT The base ringer volume is set through your local phone company. Press the redial button first, then press the SPEAKER/...CALLBACK button. Press the SPEAKER/CALLBACK button. 2. Press the redial button. 18 FLASH Use the FLASH/PROGRAM buttons on the base and cordless handset to Telephone Set Up for more information. LAST NUMBER REDIAL To quickly redial the last number you get a ...
...the phone. Press the redial button. Press TALK/callback button. 2. CORDED HANDSET 1. Lift the corded handset. 2. If you dialed: BASE SPEAKERPHONE 1. CORDLESS HANDSET 1. BASE UNIT The base ringer volume is set through your local phone company. Press the redial button first, then press the SPEAKER/...CALLBACK button. Press the SPEAKER/CALLBACK button. 2. Press the redial button. 18 FLASH Use the FLASH/PROGRAM buttons on the base and cordless handset to Telephone Set Up for more information. LAST NUMBER REDIAL To quickly redial the last number you get a ...
User Guide
Page 30
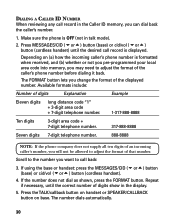
... The number dials automatically. 30 If using the base or handset: press the MESSAGES/CID ( or ) button (base) or cid/vol ( or ) button (cordless handset). 4. Scroll to the number you may need to call back: 3. Press the TALK/callback button on handset or SPEAKER/CALLBACK button on (a) how the...CALLER ID NUMBER When reviewing any call record in the display. 5. Make sure the phone is formatted when received, and (b) whether or not you pre-programmed your local area code into memory, you want to adjust the format of the displayed number. Press MESSAGES/CID ( or ) button (base) or ...
... The number dials automatically. 30 If using the base or handset: press the MESSAGES/CID ( or ) button (base) or cid/vol ( or ) button (cordless handset). 4. Scroll to the number you may need to call back: 3. Press the TALK/callback button on handset or SPEAKER/CALLBACK button on (a) how the...CALLER ID NUMBER When reviewing any call record in the display. 5. Make sure the phone is formatted when received, and (b) whether or not you pre-programmed your local area code into memory, you want to adjust the format of the displayed number. Press MESSAGES/CID ( or ) button (base) or ...

User Guide
Page 31
... confirming the deletion. Use the MESSAGES/CID ( or )button (base) or cid/vol ( or ) button (cordless handset) to erase all the Caller ID records in memory: 1. Press and hold flash/program until SET AREA CODE appears, then enter 000. The display asks DELETE ALL? If the number is corrupted..., such as a number in a name or an alphabetical character in the display: 1. The display asks DELETE CALL ID? Press DELETE (base) or chan/delete (cordless handset) again, ...
... confirming the deletion. Use the MESSAGES/CID ( or )button (base) or cid/vol ( or ) button (cordless handset) to erase all the Caller ID records in memory: 1. Press and hold flash/program until SET AREA CODE appears, then enter 000. The display asks DELETE ALL? If the number is corrupted..., such as a number in a name or an alphabetical character in the display: 1. The display asks DELETE CALL ID? Press DELETE (base) or chan/delete (cordless handset) again, ...
User Guide
Page 32
... current call on hold and answer the incoming call. Before you begin the setup, you must subscribe to Call Waiting Caller ID Service. Press FLASH/PROGRAM to the first call waiting tone in the display after you hear the tone. To know who is calling while you are on the phone...
... current call on hold and answer the incoming call. Before you begin the setup, you must subscribe to Call Waiting Caller ID Service. Press FLASH/PROGRAM to the first call waiting tone in the display after you hear the tone. To know who is calling while you are on the phone...
User Guide
Page 37
... cradle to Telephone Set Up for more information. CHANGING THE SECURITY CODE The default security code for 12 hours) when you first set through the programming menu. Put the battery compartment cover back on the touch-tone pad while the announcement is playing. TIP: You can enter your security code to...
... cradle to Telephone Set Up for more information. CHANGING THE SECURITY CODE The default security code for 12 hours) when you first set through the programming menu. Put the battery compartment cover back on the touch-tone pad while the announcement is playing. TIP: You can enter your security code to...
User Guide
Page 41
... handset ringer switch is turned on and the base ringer is programmed to the base. • You may be out of range. You experience static, noise, or fading in charge cradle for dial tone. Move closer to HI. • The cordless handset may have too many extension phones on previous page. &#...8226; Replace the battery. 41 If no dial tone is OK, but can't dial out • Make sure the TONE/PULSE setting on cordless handset and charge cradle with another household appliance. • Charge the battery. Unit beeps • Place the handset in the cradle for "No dial tone...
... handset ringer switch is turned on and the base ringer is programmed to the base. • You may be out of range. You experience static, noise, or fading in charge cradle for dial tone. Move closer to HI. • The cordless handset may have too many extension phones on previous page. &#...8226; Replace the battery. 41 If no dial tone is OK, but can't dial out • Make sure the TONE/PULSE setting on cordless handset and charge cradle with another household appliance. • Charge the battery. Unit beeps • Place the handset in the cradle for "No dial tone...
User Guide
Page 42
Memory Dialing doesn't work • Did you program the memory location keys correctly? • Did you must subscribe to the standard name/number Caller ID service from your local telephone company. Disconnect the ... 42 This message indicates the presence of the following problems, even after the first ring. Unit locks up and no communication between the base and cordless handset • Unplug the AC power supply from the base and reconnect it detects anything other than valid Caller ID information during the silent period...
Memory Dialing doesn't work • Did you program the memory location keys correctly? • Did you must subscribe to the standard name/number Caller ID service from your local telephone company. Disconnect the ... 42 This message indicates the presence of the following problems, even after the first ring. Unit locks up and no communication between the base and cordless handset • Unplug the AC power supply from the base and reconnect it detects anything other than valid Caller ID information during the silent period...


