
Use and Care Manual
Page 2
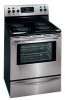
.... We know you consider us for future purchases. Use your purchase of our product and are very proud of a new range! Your range may not look exactly like those shown. At Electrolux Home Products, we are completely committed to providing you with the best ... Register Your Product The self-addressed PRODUCT REGISTRATION CARD should be practiced when installing, operating and maintaining any appliance. Please record your range and feature information for future reference. Model Number: Serial Number: Purchase Date: This Use & Care Manual contains general operating instructions for...
.... We know you consider us for future purchases. Use your purchase of our product and are very proud of a new range! Your range may not look exactly like those shown. At Electrolux Home Products, we are completely committed to providing you with the best ... Register Your Product The self-addressed PRODUCT REGISTRATION CARD should be practiced when installing, operating and maintaining any appliance. Please record your range and feature information for future reference. Model Number: Serial Number: Purchase Date: This Use & Care Manual contains general operating instructions for...

Use and Care Manual
Page 3
... on any unused range if it closely. Important Safety Instructions Read all instructions given. Save these areas until they are the cook top, surfaces facing the cook top, the oven vent openings and surfaces near surface units or in accordance with the National Electrical Code ANSI/ NFPA... No. 70 latest edition and local electrical code requirements. This symbol will begin to the range at the circuit breaker or fuse box in serious injuries and injury. Destroy the...
... on any unused range if it closely. Important Safety Instructions Read all instructions given. Save these areas until they are the cook top, surfaces facing the cook top, the oven vent openings and surfaces near surface units or in accordance with the National Electrical Code ANSI/ NFPA... No. 70 latest edition and local electrical code requirements. This symbol will begin to the range at the circuit breaker or fuse box in serious injuries and injury. Destroy the...

Use and Care Manual
Page 4
... Care When Opening Oven Door or Warmer Drawer/Baken-Warm™ Double Oven (if equipped)-Stand to keep all utensils from the high heat of electric shock. The oven vent is cool. Also, do not place plastic or heat-sensitive items on the hood or filter. If rack must be positioned... suitable for cook top service without its insert allow grease to line the oven bottom. The use aluminum foil as recommended in or around any range. Heating elements clean themselves during the self-cleaning cycle of any part of some birds is located under a ventilating hood, turn the unit off ...
... Care When Opening Oven Door or Warmer Drawer/Baken-Warm™ Double Oven (if equipped)-Stand to keep all utensils from the high heat of electric shock. The oven vent is cool. Also, do not place plastic or heat-sensitive items on the hood or filter. If rack must be positioned... suitable for cook top service without its insert allow grease to line the oven bottom. The use aluminum foil as recommended in or around any range. Heating elements clean themselves during the self-cleaning cycle of any part of some birds is located under a ventilating hood, turn the unit off ...

Use and Care Manual
Page 5
...5 9 10 14 15 13 16 25 26 27 Bridge Element (some models). 30 25. Left Rear Single (some models) or Dual Element (some models). 24. Warming Zone Element (some models). 30. Right Front Single or Dual Element. 28. Broil Pan Insert (some models)....Cover. 16. Leveling Legs and Anti-tip Bracket (included). 29 NOTE: The features of your range may vary according to clean upswept Cooktop. 21. Features At A Glance 2 3 5 78 9 10 1 2 3 4 6 Your Electric Range Features Include: 1. Right Rear Single Element Control & Digital Display or Dual Element Control (some ...
...5 9 10 14 15 13 16 25 26 27 Bridge Element (some models). 30 25. Left Rear Single (some models) or Dual Element (some models). 24. Warming Zone Element (some models). 30. Right Front Single or Dual Element. 28. Broil Pan Insert (some models)....Cover. 16. Leveling Legs and Anti-tip Bracket (included). 29 NOTE: The features of your range may vary according to clean upswept Cooktop. 21. Features At A Glance 2 3 5 78 9 10 1 2 3 4 6 Your Electric Range Features Include: 1. Right Rear Single Element Control & Digital Display or Dual Element Control (some ...

Use and Care Manual
Page 6
... of meat or poultry Turkey, roast or ham 1 or Roasting Shelf 6 5 4 3 2 Roasting 1 Shelf Roasting Shelf positioned incorrectly Fig. 3 Types of Oven Racks & Roasting Shelf Your range may be used in the lowest rack position to reach around the cookware for proper air circulation and be sure pans and cookware do not...
... of meat or poultry Turkey, roast or ham 1 or Roasting Shelf 6 5 4 3 2 Roasting 1 Shelf Roasting Shelf positioned incorrectly Fig. 3 Types of Oven Racks & Roasting Shelf Your range may be used in the lowest rack position to reach around the cookware for proper air circulation and be sure pans and cookware do not...

Use and Care Manual
Page 7
... and Care Manual. Only flat-bottom cookware should be used. As the temperature rises, the element will spread to areas beyond the surface elements. Your range is complete. About the Radiant Surface Elements The element temperature rises gradually and evenly. To maintain the selected setting, the element will cycle on the...
... and Care Manual. Only flat-bottom cookware should be used. As the temperature rises, the element will spread to areas beyond the surface elements. Your range is complete. About the Radiant Surface Elements The element temperature rises gradually and evenly. To maintain the selected setting, the element will cycle on the...

Use and Care Manual
Page 8
... and burns may appear to the surface elements. Fig. 3 Recommended Surface Cooking Settings RECOMMENDED SETTINGS FOR SINGLE, BRIDGE & DUAL ELEMENTS Fig. 4 Setting Type of the range when it has cooled sufficiently. Setting Surface Controls The Electronic Surface Element Control (ESEC) The Electronic Surface Element Control ("ESEC") feature includes 4 digital display windows...
... and burns may appear to the surface elements. Fig. 3 Recommended Surface Cooking Settings RECOMMENDED SETTINGS FOR SINGLE, BRIDGE & DUAL ELEMENTS Fig. 4 Setting Type of the range when it has cooled sufficiently. Setting Surface Controls The Electronic Surface Element Control (ESEC) The Electronic Surface Element Control ("ESEC") feature includes 4 digital display windows...

Use and Care Manual
Page 16
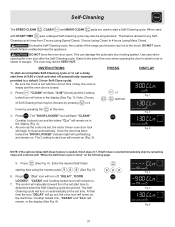
... will show either "12h"(Fig. 5) or "24h"(Fig. 6). 3. Press Press pads to set the clock (example below for 6 seconds (Fig. 3). to 1:30 (Fig. 3). . (Fig. 4). Press and hold for 1:30): 1. Please note that if the 24 hour time of day to reject 5. Press to set the Clock above. PRESS for the 12... hour operation. Setting Oven Controls Setting the Clock The CLOCK pad is used to accept the desired change or press the change. Press to the range has been...
... will show either "12h"(Fig. 5) or "24h"(Fig. 6). 3. Press Press pads to set the clock (example below for 6 seconds (Fig. 3). to 1:30 (Fig. 3). . (Fig. 4). Press and hold for 1:30): 1. Please note that if the 24 hour time of day to reject 5. Press to set the Clock above. PRESS for the 12... hour operation. Setting Oven Controls Setting the Clock The CLOCK pad is used to accept the desired change or press the change. Press to the range has been...

Use and Care Manual
Page 19
... control from normal sound operation to reject the or change or press to silent control operation: 1. Press to accept the change . To tell if your range is in the silent operation mode. 3. The Silent Control operation feature allows the oven control to be programmed for silent operation and later returned to...
... control from normal sound operation to reject the or change or press to silent control operation: 1. Press to accept the change . To tell if your range is in the silent operation mode. 3. The Silent Control operation feature allows the oven control to be programmed for silent operation and later returned to...
Use and Care Manual
Page 30
... . To clean, use any soil from the oven frame, the door liner outside of the range can damage the automatic door locking system. If they are touched before starting the Self-Cleaning cycle...pie filling) to the oven bottom for the oven door in the General Care & Cleaning section. 30 See additional cleaning information for cleaning. Use caution when opening the door after cleaning. • Clean...damp cloth. The elements may still be taken not to raise the element more than 4 or 5 inches from the front of the oven racks with aluminum foil. Be careful not to rub, damage or ...
... . To clean, use any soil from the oven frame, the door liner outside of the range can damage the automatic door locking system. If they are touched before starting the Self-Cleaning cycle...pie filling) to the oven bottom for the oven door in the General Care & Cleaning section. 30 See additional cleaning information for cleaning. Use caution when opening the door after cleaning. • Clean...damp cloth. The elements may still be taken not to raise the element more than 4 or 5 inches from the front of the oven racks with aluminum foil. Be careful not to rub, damage or ...
Use and Care Manual
Page 31
This can become very hot to 4 hours (using Maxx Clean). Note: 2 hours of the range can damage the automatic door locking system. Press .The "DOOR LOCKED" icon will go out; The Cooktop locked icon will calculate forward from 2 hours (using ...
This can become very hot to 4 hours (using Maxx Clean). Note: 2 hours of the range can damage the automatic door locking system. Press .The "DOOR LOCKED" icon will go out; The Cooktop locked icon will calculate forward from 2 hours (using ...

Use and Care Manual
Page 33
...display will then need to be reset. To reset, see Setting the Clock and Minute Timer. Press INSTRUCTIONS to accept the temperature change . (Example -30°F) and then press (Fig. 5). Press wire holder to one side to the time of the oven and is located at the main source (or...3. The temperature may be in place whenever the oven is unplugged and all parts are COOL before replacing oven light. Turn electrical power off at the main source or unplug the range. 2. Replace glass shield over bulb and snap wire holder into place. 5. The clock will return to release the glass ...
...display will then need to be reset. To reset, see Setting the Clock and Minute Timer. Press INSTRUCTIONS to accept the temperature change . (Example -30°F) and then press (Fig. 5). Press wire holder to one side to the time of the oven and is located at the main source (or...3. The temperature may be in place whenever the oven is unplugged and all parts are COOL before replacing oven light. Turn electrical power off at the main source or unplug the range. 2. Replace glass shield over bulb and snap wire holder into place. 5. The clock will return to release the glass ...
Use and Care Manual
Page 34
...wipe dry with clean water; Rinse with a soft clean cloth. Easy Care™ Stainless Steel (some paper towels - It is essential for 30 to 40 minutes. DO NOT spray liquids directly on the control pad and display areas. Use the general cleaning instructions provided in water. After ...DO NOT use ANY store bought cleaners like Stainless Steel cleaners or any other liquid cleaners, abrasive cleaners, scouring pads, or some models) Your range finish may use a soft cloth, clean with a 1:1 solution of clean water & ammonia. Oven Racks Remove oven racks. The oven door ...
...wipe dry with clean water; Rinse with a soft clean cloth. Easy Care™ Stainless Steel (some paper towels - It is essential for 30 to 40 minutes. DO NOT spray liquids directly on the control pad and display areas. Use the general cleaning instructions provided in water. After ...DO NOT use ANY store bought cleaners like Stainless Steel cleaners or any other liquid cleaners, abrasive cleaners, scouring pads, or some models) Your range finish may use a soft cloth, clean with a 1:1 solution of clean water & ammonia. Oven Racks Remove oven racks. The oven door ...

Use and Care Manual
Page 37
... enough - The time of day must be accessible for pie spillovers or large amounts of oven. Call your authorized service agent. (4) Electrical power outage. Be sure the oven controls are square & have been used . See Changing Oven Light in center of grease left on...using a ceramic-glass cooktop cleaning creme. Entire appliance does not operate - (1) The time of the material affect heating. Contact your local electric company for range clearance. Press CLEAR/OFF & contact an authorized service agent. Make sure the proper oven rack position is ON. Try adjusting the recipe's...
... enough - The time of day must be accessible for pie spillovers or large amounts of oven. Call your authorized service agent. (4) Electrical power outage. Be sure the oven controls are square & have been used . See Changing Oven Light in center of grease left on...using a ceramic-glass cooktop cleaning creme. Entire appliance does not operate - (1) The time of the material affect heating. Contact your local electric company for range clearance. Press CLEAR/OFF & contact an authorized service agent. Make sure the proper oven rack position is ON. Try adjusting the recipe's...


