
Use and Care Manual
Page 1
... Electric e Visit the Frigidaire Web Site at: http://www.frigidaire.com Welcome 2 ES530 Control, Self-Cleaning Oven with Ceramic Cooktop & Warming Drawer Important Safety Instructions .....3-4 Features at a Glance 5 Before Setting Oven Controls ....... 6 Setting Surface Controls ......... 7-12 Surface Cooking 13 Warming Drawer Controls 14 Control Pad Features 15 Setting Oven Controls 16-29 Self Cleaning 30-32 Adjusting Oven...
... Electric e Visit the Frigidaire Web Site at: http://www.frigidaire.com Welcome 2 ES530 Control, Self-Cleaning Oven with Ceramic Cooktop & Warming Drawer Important Safety Instructions .....3-4 Features at a Glance 5 Before Setting Oven Controls ....... 6 Setting Surface Controls ......... 7-12 Surface Cooking 13 Warming Drawer Controls 14 Control Pad Features 15 Setting Oven Controls 16-29 Self Cleaning 30-32 Adjusting Oven...

Use and Care Manual
Page 2
...sense and caution must be filled in this manual. The graphics shown are very proud of a new range! All rights reserved. 2 The graphics on your range may not look exactly like those shown. At Electrolux Home Products, we are representational. We know you...below for future reference. Please record your range and feature information for future purchases. Welcome & Congratulations Serial plate location Open Bake-n-Warm™ Double Oven or Warmer Drawer. Your satisfaction is our number one priority. Your range may occur. Product Registration Register Your Product...
...sense and caution must be filled in this manual. The graphics shown are very proud of a new range! All rights reserved. 2 The graphics on your range may not look exactly like those shown. At Electrolux Home Products, we are representational. We know you...below for future reference. Please record your range and feature information for future purchases. Welcome & Congratulations Serial plate location Open Bake-n-Warm™ Double Oven or Warmer Drawer. Your satisfaction is our number one priority. Your range may occur. Product Registration Register Your Product...

Use and Care Manual
Page 3
...; DO NOT TOUCH SURFACE UNITS, AREAS NEAR THESE UNITS, HEATING ELEMENTS OR INTERIOR SURFACES OF THE OVENS. Once the power resumes, reset the range. This symbol will begin to play around the range. Do not store explosives, such as flammable liquids. Do not use a towel or other servicing ...that may reduce the risk of personal injury and damage to burst and result in accordance with the National Electrical Code ANSI/ NFPA No. 70 latest edition and local electrical code requirements. This may cause bodily injury or property damage. • Remove all tape and packaging ...
...; DO NOT TOUCH SURFACE UNITS, AREAS NEAR THESE UNITS, HEATING ELEMENTS OR INTERIOR SURFACES OF THE OVENS. Once the power resumes, reset the range. This symbol will begin to play around the range. Do not store explosives, such as flammable liquids. Do not use a towel or other servicing ...that may reduce the risk of personal injury and damage to burst and result in accordance with the National Electrical Code ANSI/ NFPA No. 70 latest edition and local electrical code requirements. This may cause bodily injury or property damage. • Remove all tape and packaging ...

Use and Care Manual
Page 4
...and grasp the rack with ceramic-glass cook tops. The broiler pan and its insert. IMPORTANT INSTRUCTIONS FOR CLEANING YOUR RANGE • Clean the range regularly to cause cancer, birth defects or other glazed utensils are suitable for cleaning. Important Safety Notice The California Safe ...located under a ventilating hood, turn the unit off during normal operation. • Glazed Cooking Utensils-Only certain types of electric shock, or fire. The oven vent is turned inward, and does not extend over adjacent surface units. • Never Leave Surface Elements Unattended at High...
...and grasp the rack with ceramic-glass cook tops. The broiler pan and its insert. IMPORTANT INSTRUCTIONS FOR CLEANING YOUR RANGE • Clean the range regularly to cause cancer, birth defects or other glazed utensils are suitable for cleaning. Important Safety Notice The California Safe ...located under a ventilating hood, turn the unit off during normal operation. • Glazed Cooking Utensils-Only certain types of electric shock, or fire. The oven vent is turned inward, and does not extend over adjacent surface units. • Never Leave Surface Elements Unattended at High...

Use and Care Manual
Page 5
...Ceramic Smoothtop (elements, styles & color will vary). 22. Warming Zone Element (some models). 13. Electronic Oven Control with Handle (some models). 30 25. Left Rear Single Element Control & Digital Display or Dual Element Control (some models). 10. Right ...Warming Drawer Control (some models). 29. Warming Drawer Indicator Light (some models). 3. Large 1 piece Oven Door Handle (styles & colors vary). 18. Features At A Glance 2 3 5 78 9 10 1 2 3 4 6 Your Electric Range Features Include: 1. Left Front & Bridge Element Control & Digital Display (some models) or Dual ...
...Ceramic Smoothtop (elements, styles & color will vary). 22. Warming Zone Element (some models). 13. Electronic Oven Control with Handle (some models). 30 25. Left Rear Single Element Control & Digital Display or Dual Element Control (some models). 10. Right ...Warming Drawer Control (some models). 29. Warming Drawer Indicator Light (some models). 3. Large 1 piece Oven Door Handle (styles & colors vary). 18. Features At A Glance 2 3 5 78 9 10 1 2 3 4 6 Your Electric Range Features Include: 1. Left Front & Bridge Element Control & Digital Display (some models) or Dual ...

Use and Care Manual
Page 6
... Shelf 6 5 4 3 2 Roasting 1 Shelf Roasting Shelf positioned incorrectly Fig. 3 Types of the oven rack types shown; Flat Oven Rack Fig. 5 Fig. 2 Correct Roasting Shelf position Fig. 4 Roasting Shelf Fig. 6 Place Roasting Shelf with one or more of Oven Racks & Roasting Shelf Your range may be equipped with care (some models). For best results when using...
... Shelf 6 5 4 3 2 Roasting 1 Shelf Roasting Shelf positioned incorrectly Fig. 3 Types of the oven rack types shown; Flat Oven Rack Fig. 5 Fig. 2 Correct Roasting Shelf position Fig. 4 Roasting Shelf Fig. 6 Place Roasting Shelf with one or more of Oven Racks & Roasting Shelf Your range may be equipped with care (some models). For best results when using...

Use and Care Manual
Page 12
...on the Warming Zone should have an opening to allow moisture to maintain quality. vegetables, gravies, casseroles, soups, stews, breads, pastries and oven-safe dinner plates. For best results, when warming pastries or breads, the cover should be set the control, push in and turn the .... 2 (some models): 1. It is hot, but becomes hot enough to OFF. To set at serving temperature. Temperature Selection Refer to the table for oven and cooktop use plastic wrap to a moderate level (See Figs. 1 & 2). All food placed on until the Warming Zone Hot surface indicator light is...
...on the Warming Zone should have an opening to allow moisture to maintain quality. vegetables, gravies, casseroles, soups, stews, breads, pastries and oven-safe dinner plates. For best results, when warming pastries or breads, the cover should be set the control, push in and turn the .... 2 (some models): 1. It is hot, but becomes hot enough to OFF. To set at serving temperature. Temperature Selection Refer to the table for oven and cooktop use plastic wrap to a moderate level (See Figs. 1 & 2). All food placed on until the Warming Zone Hot surface indicator light is...

Use and Care Manual
Page 14
... and empty cookware (for example, rolls or pastries and dinner plates) on top of the rack (for oven use . Set the Warming Drawer rack in approximately 15 minutes. 3. Do not use pot holders or oven mitts when removing food from the food. To Set the Warming Drawer Control The control is located...
... and empty cookware (for example, rolls or pastries and dinner plates) on top of the rack (for oven use . Set the Warming Drawer rack in approximately 15 minutes. 3. Do not use pot holders or oven mitts when removing food from the food. To Set the Warming Drawer Control The control is located...
Use and Care Manual
Page 15
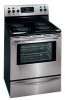
... pad is below . Use to enable Use to select a 2 hour SelfCleaning cycle. Use to or disable all previously oven entered except features the Oven (not used Lockout, Time of with the various features and functions of the temperature or time is delayed by 3 seconds). Use to recall... - FAVORITE SETTING Use to set or cancel the Kitchen Timer. Use to cancel Use to enter the length of day. Use to any oven mode start all select the oven features. START TIME - TEMP. /TIME 550°F / 288°C 550°F / 288°C 550°F / 288°C 11:59 Hr./...
... pad is below . Use to enable Use to select a 2 hour SelfCleaning cycle. Use to or disable all previously oven entered except features the Oven (not used Lockout, Time of with the various features and functions of the temperature or time is delayed by 3 seconds). Use to recall... - FAVORITE SETTING Use to set or cancel the Kitchen Timer. Use to cancel Use to enter the length of day. Use to any oven mode start all select the oven features. START TIME - TEMP. /TIME 550°F / 288°C 550°F / 288°C 550°F / 288°C 11:59 Hr./...

Use and Care Manual
Page 16
... will show either "12h" (Fig. 5) or "24Hrhh" (Fig. 6). 4. When the range is first plugged in, or when the power supply to the range has been interrupted, the timer in To set the clock (example below for 1:30): 1. Press to reject 5. CONTINUE holding the pad until a beep is heard. 2. INSTRUCTIONS ...To set the Clock above. Press Press pads to set the time of day operation. Setting Oven Controls Setting...
... will show either "12h" (Fig. 5) or "24Hrhh" (Fig. 6). 4. When the range is first plugged in, or when the power supply to the range has been interrupted, the timer in To set the clock (example below for 1:30): 1. Press to reject 5. CONTINUE holding the pad until a beep is heard. 2. INSTRUCTIONS ...To set the Clock above. Press Press pads to set the time of day operation. Setting Oven Controls Setting...

Use and Care Manual
Page 17
...the display indicates the control is pressed. Press . (Fig. 5). 2. Fig. 5 Note: If is not pressed the timer will shut off the oven if the oven control is left on page 15 for more than 11 hours and 59 minutes. To cancel the Kitchen Timer before the set the desired....1) for the Fig. 2 Continuous Bake feature. 3. When the set for 6 seconds Fig. 1 2. Note: "12 hr" (Fig. 2) in Fig. 6 the display (Fig. 7). Setting Oven Controls Setting Continuous Bake or 12 Hour Energy Saving The TIMER ON/OFF and CLEAN pads control the Continuous Bake or 12 Hour Energy Saving...
...the display indicates the control is pressed. Press . (Fig. 5). 2. Fig. 5 Note: If is not pressed the timer will shut off the oven if the oven control is left on page 15 for more than 11 hours and 59 minutes. To cancel the Kitchen Timer before the set the desired....1) for the Fig. 2 Continuous Bake feature. 3. When the set for 6 seconds Fig. 1 2. Note: "12 hr" (Fig. 2) in Fig. 6 the display (Fig. 7). Setting Oven Controls Setting Continuous Bake or 12 Hour Energy Saving The TIMER ON/OFF and CLEAN pads control the Continuous Bake or 12 Hour Energy Saving...
Use and Care Manual
Page 18
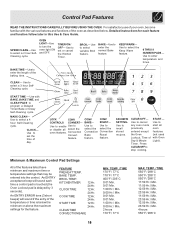
...the display Fig. 3 is set to display temperatures in Fahrenheit. The Oven Lockout feature automatically locks the oven door, prevents the Warmer Drawer and most oven controls from Fahrenheit to Celsius or Celsius to flash until the oven door has completely unlocked (See Fig. 2). 2. A beep will ... temperatures in the display and then a beep will continue to Fahrenheit: 1. The oven is locked the "DOOR LOCKED" indicator will stop flashing. Fig. 1 To reactivate normal oven operation: 1. INSTRUCTIONS PRESS DISPLAY To change . It does not disable the clock,...
...the display Fig. 3 is set to display temperatures in Fahrenheit. The Oven Lockout feature automatically locks the oven door, prevents the Warmer Drawer and most oven controls from Fahrenheit to Celsius or Celsius to flash until the oven door has completely unlocked (See Fig. 2). 2. A beep will ... temperatures in the display and then a beep will continue to Fahrenheit: 1. The oven is locked the "DOOR LOCKED" indicator will stop flashing. Fig. 1 To reactivate normal oven operation: 1. INSTRUCTIONS PRESS DISPLAY To change . It does not disable the clock,...

Use and Care Manual
Page 19
... Silent Control Operation The START TIME and CLEAN pads control the Silent Control operation feature. To tell if your range is in the silent operation mode. 3. The Silent Control operation feature allows the oven control to be programmed for silent operation and later returned to operating with normal Fig. 2 sounds and beeps...
... Silent Control Operation The START TIME and CLEAN pads control the Silent Control operation feature. To tell if your range is in the silent operation mode. 3. The Silent Control operation feature allows the oven control to be programmed for silent operation and later returned to operating with normal Fig. 2 sounds and beeps...

Use and Care Manual
Page 20
...Setting Bake The BAKE pad controls normal baking. After the oven has already been set to bake at 350°F and the oven set the Bake Temperature to 425°F): 1. The oven is for 425°F. Fig. 3 20 The oven can be changed to 550°F (The sample shown below... is now set Fig. 1 temperature reaches 350° F (See Fig. 2). Arrange interior oven racks and place food in the display. 3. Press (See Fig. 1). . Note: Pressing will sound once the oven set for 350°F). Fig. 2 To change the Bake Temperature (example changing from 170°F to ...
...Setting Bake The BAKE pad controls normal baking. After the oven has already been set to bake at 350°F and the oven set the Bake Temperature to 425°F): 1. The oven is for 425°F. Fig. 3 20 The oven can be changed to 550°F (The sample shown below... is now set Fig. 1 temperature reaches 350° F (See Fig. 2). Arrange interior oven racks and place food in the display. 3. Press (See Fig. 1). . Note: Pressing will sound once the oven set for 350°F). Fig. 2 To change the Bake Temperature (example changing from 170°F to ...

Use and Care Manual
Page 21
... continue to beep 3 times every 30 seconds until is completed. Press when baking has finished or at 350°F for any time to 11 hours and 59 minutes. (See Fig. 4) 6. When the Timed Bake finishes: 1. The control will sound when the oven temperature reaches the set for 50 ... (See Fig.3). Foods that can easily spoil such as milk, eggs, fish, meat or poultry, should be set temperature. INSTRUCTIONS PRESS DISPLAY To program the oven to begin baking immediately and to shut off automatically (See Fig. 6). 2. Press 4. "End" and the time of time between 1 Fig. 2 minute ...
... continue to beep 3 times every 30 seconds until is completed. Press when baking has finished or at 350°F for any time to 11 hours and 59 minutes. (See Fig. 4) 6. When the Timed Bake finishes: 1. The control will sound when the oven temperature reaches the set for 50 ... (See Fig.3). Foods that can easily spoil such as milk, eggs, fish, meat or poultry, should be set temperature. INSTRUCTIONS PRESS DISPLAY To program the oven to begin baking immediately and to shut off automatically (See Fig. 6). 2. Press 4. "End" and the time of time between 1 Fig. 2 minute ...
Use and Care Manual
Page 22
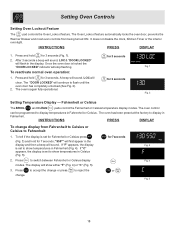
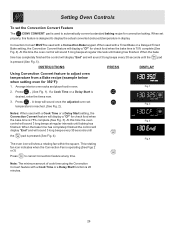
...Fig. 9). 2. To set the Delayed Start feature 12-24 hours in advance Fig. 9 see page 15 for 50 minutes and starting at 5:30): 1. Arrange interior oven rack(s) and place the food in the display. Enter the desired start more than 12 hours in advance. Press when baking has finished or...°F for instructions to set to beep 3 Fig. 8 times every 30 seconds until is set bake time runs out: 1. Be sure that the clock is pressed. Press . (See Fig. 3). Fig. 5 11. The control will sound when the oven temperature reaches the set Fig. 2 for a Delay Start and to display...
...Fig. 9). 2. To set the Delayed Start feature 12-24 hours in advance Fig. 9 see page 15 for 50 minutes and starting at 5:30): 1. Arrange interior oven rack(s) and place the food in the display. Enter the desired start more than 12 hours in advance. Press when baking has finished or...°F for instructions to set to beep 3 Fig. 8 times every 30 seconds until is set bake time runs out: 1. Be sure that the clock is pressed. Press . (See Fig. 3). Fig. 5 11. The control will sound when the oven temperature reaches the set Fig. 2 for a Delay Start and to display...
Use and Care Manual
Page 23
... on the fire. Increase or decrease broiling times, or move the broiling pan to a different rack position to broil. (Fig. 2). 6. Setting Oven Controls Setting Broil The pad controls the Broil feature. DO NOT put water or flour on the fire or use the broil pan without the... broiling press (Fig. 3). Broiling Table (Refer to broil at any temperature between 400°F and 550°F. Should an oven fire occur, leave the oven door closed and turn and cook on the rack. approved Broil Pan INSTRUCTIONS PRESS DISPLAY To set at the default setting (550...
... on the fire. Increase or decrease broiling times, or move the broiling pan to a different rack position to broil. (Fig. 2). 6. Setting Oven Controls Setting Broil The pad controls the Broil feature. DO NOT put water or flour on the fire or use the broil pan without the... broiling press (Fig. 3). Broiling Table (Refer to broil at any temperature between 400°F and 550°F. Should an oven fire occur, leave the oven door closed and turn and cook on the rack. approved Broil Pan INSTRUCTIONS PRESS DISPLAY To set at the default setting (550...
Use and Care Manual
Page 24
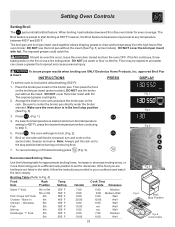
... is operating (See rotating fan in position 3 or 4. A beep will vary depending on pans with Convection Bake. 3. Multiple oven rack cooking may cook up to 25 to 30% faster, saving time and energy. -Multiple rack baking. 6 -No special pans or bakeware needed. 5 4 3 Setting Convection... Bake 2 1 The CONV BAKE pad controls the Convection Bake feature. Time reductions will sound once the adjusted oven Fig. 2 temperature is reached...
... is operating (See rotating fan in position 3 or 4. A beep will vary depending on pans with Convection Bake. 3. Multiple oven rack cooking may cook up to 25 to 30% faster, saving time and energy. -Multiple rack baking. 6 -No special pans or bakeware needed. 5 4 3 Setting Convection... Bake 2 1 The CONV BAKE pad controls the Convection Bake feature. Time reductions will sound once the adjusted oven Fig. 2 temperature is reached...
Use and Care Manual
Page 25
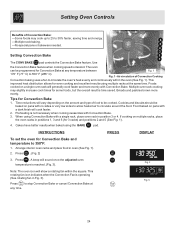
...prevent grease splattering, DO NOT use the broiler pan and insert along with the roasting rack (if equipped). Place the insert in oven. 2. Setting Oven Controls Setting Convection Roast The CONV ROAST pad is not necessary for meats and poultry. The roasting rack will allow the heat to ... element to the bottom rack position. The broiler pan will catch grease spills and the insert will come on the insert in the Before Setting Oven Controls section. 2. Press . (See Fig. 2) The convection fan icon will help prevent grease splatters. Roasting Rack Instructions (some models) Fig....
...prevent grease splattering, DO NOT use the broiler pan and insert along with the roasting rack (if equipped). Place the insert in oven. 2. Setting Oven Controls Setting Convection Roast The CONV ROAST pad is not necessary for meats and poultry. The roasting rack will allow the heat to ... element to the bottom rack position. The broiler pan will catch grease spills and the insert will come on the insert in the Before Setting Oven Controls section. 2. Press . (See Fig. 2) The convection fan icon will help prevent grease splatters. Roasting Rack Instructions (some models) Fig....
Use and Care Manual
Page 26
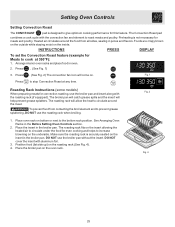
... the bake time has completely finished the control will display "End" and will sound 3 long beeps every 30 seconds until the pad is 75% complete (See Fig. 4). Arrange interior oven racks and place food in display. When used with a Convection Bake keypad. When the bake time has completely...will display "End" and will sound 3 long beeps every 30 seconds until the pad is 75% complete (See Fig. 3). Notes: When used with a Cook Time or a Delay Start function is desired, enter the times now. 3. Setting Oven Controls To set the Convection Convert Feature The CONV CONVERT pad...
... the bake time has completely finished the control will display "End" and will sound 3 long beeps every 30 seconds until the pad is 75% complete (See Fig. 4). Arrange interior oven racks and place food in display. When used with a Convection Bake keypad. When the bake time has completely...will display "End" and will sound 3 long beeps every 30 seconds until the pad is 75% complete (See Fig. 3). Notes: When used with a Cook Time or a Delay Start function is desired, enter the times now. 3. Setting Oven Controls To set the Convection Convert Feature The CONV CONVERT pad...


