
Use and Care Manual
Page 2
... & Care Manual contains general operating instructions for your model and serial numbers below for several models. Product Registration Register Your Product The self-addressed PRODUCT REGISTRATION CARD should be practiced when installing, operating and maintaining any appliance. These instructions are very proud of a new range! Welcome & Congratulations Serial plate location Open Bake-n-Warm...
... & Care Manual contains general operating instructions for your model and serial numbers below for several models. Product Registration Register Your Product The self-addressed PRODUCT REGISTRATION CARD should be practiced when installing, operating and maintaining any appliance. These instructions are very proud of a new range! Welcome & Congratulations Serial plate location Open Bake-n-Warm...

Use and Care Manual
Page 4
... of the utensil should be kept away from the rack before you remove or replace food in ignition of electric shock, or fire. FOR CERAMIC-GLASS COOK TOP MODELS • Do Not Cook on . Some cleaners can produce noxious fumes if applied to another well-ventilated ...a risk of these liners may melt. • Do Not Immerse or Soak Removable Heating Elements- IMPORTANT INSTRUCTIONS FOR CLEANING YOUR RANGE • Clean the range regularly to such substances. 4 Important Safety Notice The California Safe Drinking Water and Toxic Enforcement Act requires the Governor of California to...
... of the utensil should be kept away from the rack before you remove or replace food in ignition of electric shock, or fire. FOR CERAMIC-GLASS COOK TOP MODELS • Do Not Cook on . Some cleaners can produce noxious fumes if applied to another well-ventilated ...a risk of these liners may melt. • Do Not Immerse or Soak Removable Heating Elements- IMPORTANT INSTRUCTIONS FOR CLEANING YOUR RANGE • Clean the range regularly to such substances. 4 Important Safety Notice The California Safe Drinking Water and Toxic Enforcement Act requires the Governor of California to...

Use and Care Manual
Page 5
... will vary). 22. Bridge Element (some models). 8. Left Rear Single (some models) or Dual Element (some models). 29. Broil Pan (some models). 30 25. Left Front Single (some models) or Dual Element (some models). 6. Right Front Single or Dual Element. 28. Adjustable Interior Oven Rack(s). 17. Features At A Glance 2 3 5 78 9 10 1 2 3 4 6 Your Electric Range Features Include: 1. Leveling Legs and...
... will vary). 22. Bridge Element (some models). 8. Left Rear Single (some models) or Dual Element (some models). 29. Broil Pan (some models). 30 25. Left Front Single (some models) or Dual Element (some models). 6. Right Front Single or Dual Element. 28. Adjustable Interior Oven Rack(s). 17. Features At A Glance 2 3 5 78 9 10 1 2 3 4 6 Your Electric Range Features Include: 1. Leveling Legs and...

Use and Care Manual
Page 6
... (Fig. 5) and Roasting Shelf (Fig. 6; Be sure the Roasting Shelf is necessary for proper air circulation and be equipped with care (some models). The hot air must be used in the oven for Broiling, Baking & Roasting: Food Rack Position Broiling hamburgers & steaks See Broil Broiling meats,... or ham 1 or Roasting Shelf 6 5 4 3 2 Roasting 1 Shelf Roasting Shelf positioned incorrectly Fig. 3 Types of Oven Racks & Roasting Shelf Your range may be sure pans and cookware do not touch each other, the oven door, sides or back of meat and poultry (See Fig. 2). Recommended Rack...
... (Fig. 5) and Roasting Shelf (Fig. 6; Be sure the Roasting Shelf is necessary for proper air circulation and be equipped with care (some models). The hot air must be used in the oven for Broiling, Baking & Roasting: Food Rack Position Broiling hamburgers & steaks See Broil Broiling meats,... or ham 1 or Roasting Shelf 6 5 4 3 2 Roasting 1 Shelf Roasting Shelf positioned incorrectly Fig. 3 Types of Oven Racks & Roasting Shelf Your range may be sure pans and cookware do not touch each other, the oven door, sides or back of meat and poultry (See Fig. 2). Recommended Rack...

Use and Care Manual
Page 7
... provide a uniform and consistent heat during the off . Make sure the diameter of the pan matches the diameter of the element outline on some models) NOTE: Radiant elements have a limiter that allows the element to cycle ON and OFF, even at the HI setting is normal and can occur... (See Fig 1). Cycling at the HI setting. The design of the ceramic cooktop outlines the area of the glass. Heat is complete. Your range is not flat (Refer to page 13 for ceramic glass cooktop cleaning in larger volumes increases as the element wattage increases. The areas surrounding the...
... provide a uniform and consistent heat during the off . Make sure the diameter of the pan matches the diameter of the element outline on some models) NOTE: Radiant elements have a limiter that allows the element to cycle ON and OFF, even at the HI setting is normal and can occur... (See Fig 1). Cycling at the HI setting. The design of the ceramic cooktop outlines the area of the glass. Heat is complete. Your range is not flat (Refer to page 13 for ceramic glass cooktop cleaning in larger volumes increases as the element wattage increases. The areas surrounding the...

Use and Care Manual
Page 9
... turning the control knob to adjust the setting if desired. The Single Radiant Elements (some models) element position can still be displayed (flashing "Er") at 2 locations; The BRIDGE (some models) Some models have single radiant surface elements at power up (or after following these procedures, contact an ...control knob to touch (See Fig.1). " may occur if the glass surface is ON. Start most cooking operations on again for some models). If the HE message appears in the window instead of the single, dual or Bridge radiant element positions the cooktop will appear in ...
... turning the control knob to adjust the setting if desired. The Single Radiant Elements (some models) element position can still be displayed (flashing "Er") at 2 locations; The BRIDGE (some models) Some models have single radiant surface elements at power up (or after following these procedures, contact an ...control knob to touch (See Fig.1). " may occur if the glass surface is ON. Start most cooking operations on again for some models). If the HE message appears in the window instead of the single, dual or Bridge radiant element positions the cooktop will appear in ...

Use and Care Manual
Page 10
...the control knob to adjust the setting if needed for the surface heating area. 4. Fig. 3 Fig. 6 The Bridge Radiant Element (some models). The glass surface may still be used to indicate which coil of the dual radiant element will remain on a higher setting and then turn the...Fig. 1 indicates that both portions of heat at any time during cooking with the Bridge element. Fig. 8 Bridge element without Bridge portion (some models) Some ceramic cooktops are equipped with rectangular (like a single element without the Bridge (See Fig. 8). You may occur if the glass surface is...
...the control knob to adjust the setting if needed for the surface heating area. 4. Fig. 3 Fig. 6 The Bridge Radiant Element (some models). The glass surface may still be used to indicate which coil of the dual radiant element will remain on a higher setting and then turn the...Fig. 1 indicates that both portions of heat at any time during cooking with the Bridge element. Fig. 8 Bridge element without Bridge portion (some models) Some ceramic cooktops are equipped with rectangular (like a single element without the Bridge (See Fig. 8). You may occur if the glass surface is...

Use and Care Manual
Page 11
... normal shaped cookware or clockwise (See Figs. 3 & 4) for the desired setting. Fig. 1 Fig. 2 Fig. 5 Setting Surface Controls Fig. 3 Fig. 4 To Operate the Bridge Element (some models): 1. Place correctly sized cookware on a higher setting and then turn the surface control knob to finish cooking. Radiant surface elements may appear to have cooled...
... normal shaped cookware or clockwise (See Figs. 3 & 4) for the desired setting. Fig. 1 Fig. 2 Fig. 5 Setting Surface Controls Fig. 3 Fig. 4 To Operate the Bridge Element (some models): 1. Place correctly sized cookware on a higher setting and then turn the surface control knob to finish cooking. Radiant surface elements may appear to have cooled...

Use and Care Manual
Page 12
... medium level, and adjust as needed. The Warming Zone Hot surface indicator light will remain on the Warming Zone. Fig. 2 (some models) Warming Zone Recommended Food Settings Table Food Item Heating Level Hot Beverages Fried Foods Vegetables Soups (Cream) Stews Sauces Meats Gravies Eggs Dinner...Warming Zone is off. Temperature Selection Refer to keep hot cooked foods at serving temperature. To Set the Warming Zone Control (some models): 1. However, the control can be set the control, push in and turn the control to escape. Setting Surface Controls Operating the Warming...
... medium level, and adjust as needed. The Warming Zone Hot surface indicator light will remain on the Warming Zone. Fig. 2 (some models) Warming Zone Recommended Food Settings Table Food Item Heating Level Hot Beverages Fried Foods Vegetables Soups (Cream) Stews Sauces Meats Gravies Eggs Dinner...Warming Zone is off. Temperature Selection Refer to keep hot cooked foods at serving temperature. To Set the Warming Zone Control (some models): 1. However, the control can be set the control, push in and turn the control to escape. Setting Surface Controls Operating the Warming...

Use and Care Manual
Page 14
... you can be kept at serving temperatures on until the control is to keep hot cooked foods at serving temperature. Setting Warming Drawer Controls (some models) Arranging Warming Drawer Rack Positions The rack can be used to select the temperature of the Warming Drawer. It turns on the rack.
... you can be kept at serving temperatures on until the control is to keep hot cooked foods at serving temperature. Setting Warming Drawer Controls (some models) Arranging Warming Drawer Rack Positions The rack can be used to select the temperature of the Warming Drawer. It turns on the rack.
Use and Care Manual
Page 23
... may be explosive and water can cause a grease fire to broil. (Fig. 2). 6. Place the broiler pan insert on the broiler pan insert (some models). The exposed grease could catch fire. Fig. 3 5. The oven will begin to spread and cause personal injury. & Insert. Note: Always pull the rack...Home Products, Inc. DO NOT put water or flour on the rack. Broiling Table (Refer to 5 the stop position (See Fig. 5). some models Season and serve. Increase or decrease broiling times, or move the broiling pan to a different rack position to center the broiler pan directly under ...
... may be explosive and water can cause a grease fire to broil. (Fig. 2). 6. Place the broiler pan insert on the broiler pan insert (some models). The exposed grease could catch fire. Fig. 3 5. The oven will begin to spread and cause personal injury. & Insert. Note: Always pull the rack...Home Products, Inc. DO NOT put water or flour on the rack. Broiling Table (Refer to 5 the stop position (See Fig. 5). some models Season and serve. Increase or decrease broiling times, or move the broiling pan to a different rack position to center the broiler pan directly under ...
Use and Care Manual
Page 25
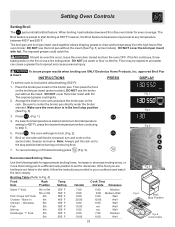
... food from all sides, sealing in juices and flavors. Press . (See Fig. 2) The convection fan icon will help prevent grease splatters. Roasting Rack Instructions (some models) Fig. 2 When preparing meats for meats and poultry. DO NOT use the broiler pan and insert along with aluminum foil. 3. Setting Oven Controls Setting Convection...
... food from all sides, sealing in juices and flavors. Press . (See Fig. 2) The convection fan icon will help prevent grease splatters. Roasting Rack Instructions (some models) Fig. 2 When preparing meats for meats and poultry. DO NOT use the broiler pan and insert along with aluminum foil. 3. Setting Oven Controls Setting Convection...

Use and Care Manual
Page 29
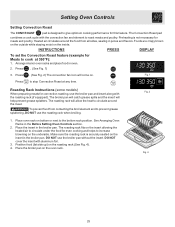
... still in the Sabbath feature, however the oven cannot be turned back on automatically. For further assistance, guidelines for proper usage, and a complete list of models with the Sabbath feature, please visit the web at least 3 seconds. After 3 hours the Keep Warm feature will shut off. Arrange interior oven racks and...
... still in the Sabbath feature, however the oven cannot be turned back on automatically. For further assistance, guidelines for proper usage, and a complete list of models with the Sabbath feature, please visit the web at least 3 seconds. After 3 hours the Keep Warm feature will shut off. Arrange interior oven racks and...
Use and Care Manual
Page 34
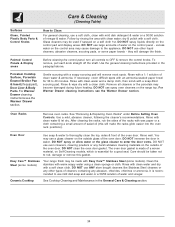
...the control area may use ANY store bought cleaners like Stainless Steel cleaners or any other liquid cleaners, abrasive cleaners, scouring pads, or some models) Your range finish may become damaged during future heating. For Warmer Drawer cleaning instructions see the Warmer Drawer section. Rinse with a soft clean cloth. ...You may cause damage to the appliance. Care should be used if sprayed on the control pad and display areas. It is essential for 30 to 40 minutes. Glass cleaners may be taken not to rub, damage or remove this will make the racks glide easier into the oven...
...the control area may use ANY store bought cleaners like Stainless Steel cleaners or any other liquid cleaners, abrasive cleaners, scouring pads, or some models) Your range finish may become damaged during future heating. For Warmer Drawer cleaning instructions see the Warmer Drawer section. Rinse with a soft clean cloth. ...You may cause damage to the appliance. Care should be used if sprayed on the control pad and display areas. It is essential for 30 to 40 minutes. Glass cleaners may be taken not to rub, damage or remove this will make the racks glide easier into the oven...

Use and Care Manual
Page 37
... oven & space pans to allow grease to drip into pan (some models) - Try adjusting the recipe's recommended temperature or baking time. Soil not completely removed after Self-Cleaning cycle Failure to make range appear not level. See "Cooktop Cleaning & Maintenance." (3) Cookware with ... utensils are cooked onto surface. Appliance must first be lifted over carpet. Incorrect control setting. Call your authorized service agent. (4) Electrical power outage. Cut fatty edges to operate the oven. Follow steps under "Stopping or Interrupting a Self-Cleaning Cycle" under Self-...
... oven & space pans to allow grease to drip into pan (some models) - Try adjusting the recipe's recommended temperature or baking time. Soil not completely removed after Self-Cleaning cycle Failure to make range appear not level. See "Cooktop Cleaning & Maintenance." (3) Cookware with ... utensils are cooked onto surface. Appliance must first be lifted over carpet. Incorrect control setting. Call your authorized service agent. (4) Electrical power outage. Cut fatty edges to operate the oven. Follow steps under "Stopping or Interrupting a Self-Cleaning Cycle" under Self-...


