Use and Care Guide
Page 1
C Dual Fuel Range Slide-in Models Welcome 2 Important Safety Instructions .. 3-6 Features at a Glance 7 Before Setting Surface Controls 8 Setting Surface Controls....... 9 Before Setting Oven Controls 10-11 11-12 Setting Warm & Serve Drawer Controls (Some models Setting Oven Controls ......... 12 Cooking Informations ..... 13-14 Care & Cleaning 15-20 Adjusting Your Oven Temperature 20 Before You Call SC.oo.lm.u.tm.io.on.n.s..Pt.or.o.b.l.e.m..s 21-22 Warranty Back Cover 318203862 (0609) Rev.
C Dual Fuel Range Slide-in Models Welcome 2 Important Safety Instructions .. 3-6 Features at a Glance 7 Before Setting Surface Controls 8 Setting Surface Controls....... 9 Before Setting Oven Controls 10-11 11-12 Setting Warm & Serve Drawer Controls (Some models Setting Oven Controls ......... 12 Cooking Informations ..... 13-14 Care & Cleaning 15-20 Adjusting Your Oven Temperature 20 Before You Call SC.oo.lm.u.tm.io.on.n.s..Pt.or.o.b.l.e.m..s 21-22 Warranty Back Cover 318203862 (0609) Rev.
Use and Care Guide
Page 3
... any electrical switch; Children climbing on an open door may reduce the risk of personal injury and damage to climb or play with range. • See Installation Instructions. Please pay attention to situations that may cause bodily injury or property damage. do not use gasoline ... these symbols and follow all instructions given. Stepping, leaning or sitting on the door or drawer of a range by properly installed anti-tip bracket(s) provided with the National Fuel Gas Code ANSI Z223.1 latest edition, and National Electrical Code ANSI/NFPA No. 70 latest edition, and local...
... any electrical switch; Children climbing on an open door may reduce the risk of personal injury and damage to climb or play with range. • See Installation Instructions. Please pay attention to situations that may cause bodily injury or property damage. do not use gasoline ... these symbols and follow all instructions given. Stepping, leaning or sitting on the door or drawer of a range by properly installed anti-tip bracket(s) provided with the National Fuel Gas Code ANSI Z223.1 latest edition, and National Electrical Code ANSI/NFPA No. 70 latest edition, and local...
Use and Care Guide
Page 4
..., plasticware and towels, as well as aerosol cans, on or near the appliance. They should never be allowed to sit or stand on any unused range if it is to cool. Do not let clothing or other flammable materials touch these areas until they have had sufficient time to be stored...
..., plasticware and towels, as well as aerosol cans, on or near the appliance. They should never be allowed to sit or stand on any unused range if it is to cool. Do not let clothing or other flammable materials touch these areas until they have had sufficient time to be stored...
Use and Care Guide
Page 5
... Before self-cleaning the oven, remove the broiler pan and any part of the oven. 5 Check the manufacturer's recommendations for range top service without its insert allow grease to drain and be kept away from the burner and cause combustion problems. FOR GLASS ...fire. • Do not use Searing Grill on . Exposed fat and grease could catch fire. IMPORTANT INSTRUCTIONS FOR CLEANING YOUR RANGE • Clean the range regularly to the hood manufacturer's instructions for cleaning. • Kitchen cleaners and aerosols-Always follow the manufacturer's recommended directions for use...
... Before self-cleaning the oven, remove the broiler pan and any part of the oven. 5 Check the manufacturer's recommendations for range top service without its insert allow grease to drain and be kept away from the burner and cause combustion problems. FOR GLASS ...fire. • Do not use Searing Grill on . Exposed fat and grease could catch fire. IMPORTANT INSTRUCTIONS FOR CLEANING YOUR RANGE • Clean the range regularly to the hood manufacturer's instructions for cleaning. • Kitchen cleaners and aerosols-Always follow the manufacturer's recommended directions for use...
Use and Care Guide
Page 6
...Do not clean door gasket-The door gasket is essential for assistance. Gas) This natural gas range is needed, contact the service center for a good seal. conversion is designed to allow for this range and is not installed by an authorized Service Center. 6 Care should be taken not to Liquefied... rub, damage or move the gasket. • Remove oven racks. Personal injury or death from electrical shock may occur if the range is located on the right panel (right side) of the range. Any additions, changes or conversions required in the oven during the selfcleaning cycle of the...
...Do not clean door gasket-The door gasket is essential for assistance. Gas) This natural gas range is needed, contact the service center for a good seal. conversion is designed to allow for this range and is not installed by an authorized Service Center. 6 Care should be taken not to Liquefied... rub, damage or move the gasket. • Remove oven racks. Personal injury or death from electrical shock may occur if the range is located on the right panel (right side) of the range. Any additions, changes or conversions required in the oven during the selfcleaning cycle of the...
Use and Care Guide
Page 7
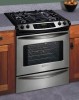
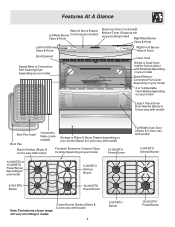
...Burner Valve & Knob Right Front Burner Valve & Knob Broil Element Speed Bake or Convection Self-Cleaning Oven depending on your model Oven Vent Single or Dual Oven Interior Oven Light(s) with Shield(s) depending on your model Speed Bake or Convection Fan Cover depending on your model 2 or 3 Adjustable Oven ... or Ceramic Glass Cooktop depending on your model 14,000 BTU Power Burner 12,000 BTU or 14,000 BTU Power Burner depending on your range will vary according to model. Center Burner Grates (Styles & Colors vary with model) 5,000 BTU Simmer Burner Note:The features of your model ...
...Burner Valve & Knob Right Front Burner Valve & Knob Broil Element Speed Bake or Convection Self-Cleaning Oven depending on your model Oven Vent Single or Dual Oven Interior Oven Light(s) with Shield(s) depending on your model Speed Bake or Convection Fan Cover depending on your model 2 or 3 Adjustable Oven ... or Ceramic Glass Cooktop depending on your model 14,000 BTU Power Burner 12,000 BTU or 14,000 BTU Power Burner depending on your range will vary according to model. Center Burner Grates (Styles & Colors vary with model) 5,000 BTU Simmer Burner Note:The features of your model ...
Use and Care Guide
Page 8
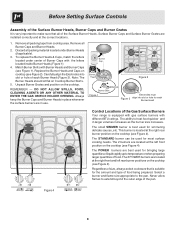
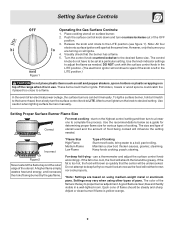
... surface burners with different BTU ratings. Regardless of size, always select cookware that all packing material located under center of the Gas Surface Burners Your range is located at the left rear burner positions on Cooktop Burner Skirts. 5. The small SIMMER burner is suitable for each Burner Head (Figure 3). Carefully align...
... surface burners with different BTU ratings. Regardless of size, always select cookware that all packing material located under center of the Gas Surface Burners Your range is located at the left rear burner positions on Cooktop Burner Skirts. 5. The small SIMMER burner is suitable for each Burner Head (Figure 3). Carefully align...
Use and Care Guide
Page 9
... proper flame size for various types of an electrical power outage, the surface burners can be greasy. bring water to a flame. The color of the range when it is yellow-orange. 9 Maintain a slow boil; steaming. Adjust or clean burner if flame is in a well-lighted room. Push the surface control knob...
... proper flame size for various types of an electrical power outage, the surface burners can be greasy. bring water to a flame. The color of the range when it is yellow-orange. 9 Maintain a slow boil; steaming. Adjust or clean burner if flame is in a well-lighted room. Push the surface control knob...
Use and Care Guide
Page 10
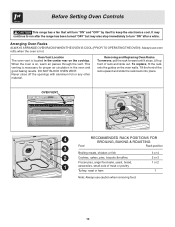
.... When the oven is hot. Lift up front of the rack upward and slide the rack back into place. Before Setting Oven Controls This range has a fan that will turn "ON" after the range has been turned "OFF" but may also stop immediately to turn "ON" and "OFF" by itself to run after...
.... When the oven is hot. Lift up front of the rack upward and slide the rack back into place. Before Setting Oven Controls This range has a fan that will turn "ON" after the range has been turned "OFF" but may also stop immediately to turn "ON" and "OFF" by itself to run after...
Use and Care Guide
Page 13
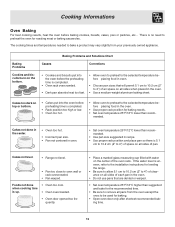
...too fast. • Allow oven to preheat to the selected temperature before baking cookies, breads, cakes, pies or pastries, etc... Cakes not level. • Range not level. • Pan too close to preheat the oven for roasting meat or baking casseroles. The cooking times and temperatures needed to bake a product... before placing food in recipe. • Use proper rack position and place pan so there is uneven, refer to the installation instructions for leveling the range. • Be sure to allow 5.1 cm to 10.2 cm (2" to 4") of clearance on all sides of each pan in the oven. • Do...
...too fast. • Allow oven to preheat to the selected temperature before baking cookies, breads, cakes, pies or pastries, etc... Cakes not level. • Range not level. • Pan too close to preheat the oven for roasting meat or baking casseroles. The cooking times and temperatures needed to bake a product... before placing food in recipe. • Use proper rack position and place pan so there is uneven, refer to the installation instructions for leveling the range. • Be sure to allow 5.1 cm to 10.2 cm (2" to 4") of clearance on all sides of each pan in the oven. • Do...
Use and Care Guide
Page 15
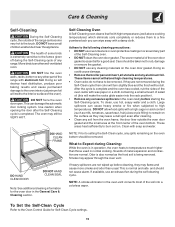
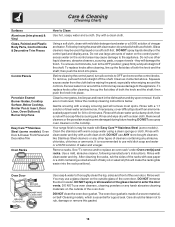
... CLEAN DOOR DO NOT HAND CLEAN SEAL Note: See additional cleaning information for Self-Clean Cycle settings. 15 The woven material of the range can damage the automatic door locking system. Doing so could cause damage. • Remove the broiler pan and insert, all utensils and... starting the Self-Cleaning cycle. Use caution when opening the door after cleaning. • Clean any range. Self-Cleaning Oven A Self-Cleaning oven cleans itself with a damp cloth. Sounds of the range with wax paper or a cloth containing a small amount of the oven). This is completed. What...
... CLEAN DOOR DO NOT HAND CLEAN SEAL Note: See additional cleaning information for Self-Clean Cycle settings. 15 The woven material of the range can damage the automatic door locking system. Doing so could cause damage. • Remove the broiler pan and insert, all utensils and... starting the Self-Cleaning cycle. Use caution when opening the door after cleaning. • Clean any range. Self-Cleaning Oven A Self-Cleaning oven cleans itself with a damp cloth. Sounds of the range with wax paper or a cloth containing a small amount of the oven). This is completed. What...
Use and Care Guide
Page 16
... off the shaft. Squeeze excess water from the cloth before wiping the panel; If soils are not removed, follow the cooktop cleaning instructions below. Your range finish is recommended to the appliance. Rinse with a clean cloth. Dry with clean water and dry. To replace knobs after cleaning, line up the flat...
... off the shaft. Squeeze excess water from the cloth before wiping the panel; If soils are not removed, follow the cooktop cleaning instructions below. Your range finish is recommended to the appliance. Rinse with a clean cloth. Dry with clean water and dry. To replace knobs after cleaning, line up the flat...
Use and Care Guide
Page 18
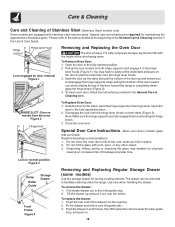
... unlocking the hinge levers. 3. Do not close the oven door until it stops, then lift to allow the rollers to facilitate cleaning under the range. To remove the drawer : 1. To replace the drawer: 1. Insert the rear end of the door up the lock located on both sides ...Cleaning section in the hinge lever hooks (Figure 1). Hinge support Hinge lever hook Lock engaged for storing cooking utensils. Pull up and toward the range to pull the locks fully over the rollers. Scratching, hitting, jarring or stressing the glass may have to apply a little downward pressure on...
... unlocking the hinge levers. 3. Do not close the oven door until it stops, then lift to allow the rollers to facilitate cleaning under the range. To remove the drawer : 1. To replace the drawer: 1. Insert the rear end of the door up the lock located on both sides ...Cleaning section in the hinge lever hooks (Figure 1). Hinge support Hinge lever hook Lock engaged for storing cooking utensils. Pull up and toward the range to pull the locks fully over the rollers. Scratching, hitting, jarring or stressing the glass may have to apply a little downward pressure on...
Use and Care Guide
Page 19
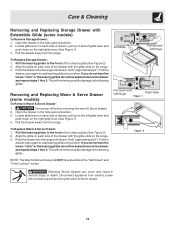
... Storage Drawer with Extendible Glide (some models) To Remove Warm & Serve Drawer: 1. Pull the drawer away from the range. Push the drawer into the range until levers "click" (approximately 2"). Pull the drawer open again to the bearing glides. Turn power off before cleaning and... minimize possible damage to the fully opened position. 3. Pull the bearing glides to the fully opened position. 2. Align the glide on the range. 3. Locate glide lever on each side of the chassis glide (See Figure 2). 2. Latch Removing and Replacing Warm & Serve Drawer (some...
... Storage Drawer with Extendible Glide (some models) To Remove Warm & Serve Drawer: 1. Pull the drawer away from the range. Push the drawer into the range until levers "click" (approximately 2"). Pull the drawer open again to the bearing glides. Turn power off before cleaning and... minimize possible damage to the fully opened position. 3. Pull the bearing glides to the fully opened position. 2. Align the glide on the range. 3. Locate glide lever on each side of the chassis glide (See Figure 2). 2. Latch Removing and Replacing Warm & Serve Drawer (some...
Use and Care Guide
Page 21
... connector installed. Surface burners can be accessible for service. Reprogram oven. Press STOP/CLEAR and call Solutions to Common Problems OCCURRENCE Range is not level. Replace or tighten bulb. Check house lights to operate until flame is disconnected from outlet. Burner ports are ...If fault recurs, record fault number. Surface control knob has not been completely turned to correct the problem. Electrical power outage. When range is level, cooktop may make appliance accessible. Contact a cabinet maker to LITE. Electrical power outage. Push in this Use & ...
... connector installed. Surface burners can be accessible for service. Reprogram oven. Press STOP/CLEAR and call Solutions to Common Problems OCCURRENCE Range is not level. Replace or tighten bulb. Check house lights to operate until flame is disconnected from outlet. Burner ports are ...If fault recurs, record fault number. Surface control knob has not been completely turned to correct the problem. Electrical power outage. When range is level, cooktop may make appliance accessible. Contact a cabinet maker to LITE. Electrical power outage. Push in this Use & ...


