Use and Care Guide
Page 1
C Dual Fuel Range Slide-in Models Welcome 2 Important Safety Instructions .. 3-6 Features at a Glance 7 Before Setting Surface Controls 8 Setting Surface Controls....... 9 Before Setting Oven Controls 10-11 11-12 Setting Warm & Serve Drawer Controls (Some models Setting Oven Controls ......... 12 Cooking Informations ..... 13-14 Care & Cleaning 15-20 Adjusting Your Oven Temperature 20 Before You Call SC.oo.lm.u.tm.io.on.n.s..Pt.or.o.b.l.e.m..s 21-22 Warranty Back Cover 318203862 (0609) Rev.
C Dual Fuel Range Slide-in Models Welcome 2 Important Safety Instructions .. 3-6 Features at a Glance 7 Before Setting Surface Controls 8 Setting Surface Controls....... 9 Before Setting Oven Controls 10-11 11-12 Setting Warm & Serve Drawer Controls (Some models Setting Oven Controls ......... 12 Cooking Informations ..... 13-14 Care & Cleaning 15-20 Adjusting Your Oven Temperature 20 Before You Call SC.oo.lm.u.tm.io.on.n.s..Pt.or.o.b.l.e.m..s 21-22 Warranty Back Cover 318203862 (0609) Rev.
Use and Care Guide
Page 2
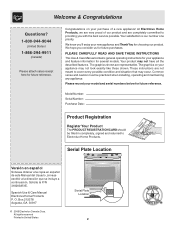
At Electrolux Home Products, we are completely committed to Electrolux Home Products. Your product may occur. Model Number: Serial Number: Purchase Date: Product Registration Register Your Product The PRODUCT REGISTRATION CARD should be practiced when installing, operating ... continuación. O. Box 212378 Augusta, GA 30917 © 2006 Electrolux Canada Corp. We hope you 'll enjoy your model and serial numbers below for several models. The graphics shown are not meant to cover every possible condition and situation that may not have all the described features. The...
At Electrolux Home Products, we are completely committed to Electrolux Home Products. Your product may occur. Model Number: Serial Number: Purchase Date: Product Registration Register Your Product The PRODUCT REGISTRATION CARD should be practiced when installing, operating ... continuación. O. Box 212378 Augusta, GA 30917 © 2006 Electrolux Canada Corp. We hope you 'll enjoy your model and serial numbers below for several models. The graphics shown are not meant to cover every possible condition and situation that may not have all the described features. The...
Use and Care Guide
Page 7
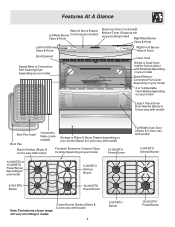
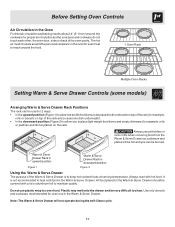
...Bake or Convection Self-Cleaning Oven depending on your model Oven Vent Single or Dual Oven Interior Oven Light(s) with Shield(s) depending on your model Speed Bake or Convection Fan Cover depending on your model 2 or 3 Adjustable Oven Racks depending on your model Large 1 Piece Oven Door Handle (Styles & ...Burner 12,000 BTU or 14,000 BTU Power Burner depending on your range will vary according to model. Center Burner Grates (Styles & Colors vary with model) 5,000 BTU Simmer Burner Note:The features of your model 5,000 BTU Simmer Burner 9,500 BTU Burner 16,000 BTU Power Burner...
...Bake or Convection Self-Cleaning Oven depending on your model Oven Vent Single or Dual Oven Interior Oven Light(s) with Shield(s) depending on your model Speed Bake or Convection Fan Cover depending on your model 2 or 3 Adjustable Oven Racks depending on your model Large 1 Piece Oven Door Handle (Styles & ...Burner 12,000 BTU or 14,000 BTU Power Burner depending on your range will vary according to model. Center Burner Grates (Styles & Colors vary with model) 5,000 BTU Simmer Burner Note:The features of your model 5,000 BTU Simmer Burner 9,500 BTU Burner 16,000 BTU Power Burner...
Use and Care Guide
Page 11
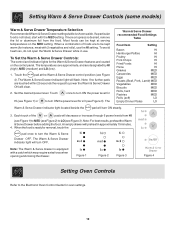
... pans and cookware in the oven for even heat to reach around the food. 1 Oven Rack Multiple Oven Racks Setting Warm & Serve Drawer Controls (some models) Arranging Warm & Serve Drawer Rack Positions The rack can be used in 2 ways: • In the upward position (Figure 1) to allow low profile food items...
... pans and cookware in the oven for even heat to reach around the food. 1 Oven Rack Multiple Oven Racks Setting Warm & Serve Drawer Controls (some models) Arranging Warm & Serve Drawer Rack Positions The rack can be used in 2 ways: • In the upward position (Figure 1) to allow low profile food items...
Use and Care Guide
Page 12
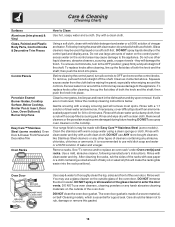
... Refer to the Electronic Oven Control Guide for LO (see Figure 1) or to turn the Warm & Serve Drawer OFF. Setting Warm & Serve Drawer Controls (some models) Warm & Serve Drawer Temperature Selection Recommended Warm & Serve Drawer settings table is equipped with a catch which may require extra force when opening and closing the...
... Refer to the Electronic Oven Control Guide for LO (see Figure 1) or to turn the Warm & Serve Drawer OFF. Setting Warm & Serve Drawer Controls (some models) Warm & Serve Drawer Temperature Selection Recommended Warm & Serve Drawer settings table is equipped with a catch which may require extra force when opening and closing the...
Use and Care Guide
Page 16
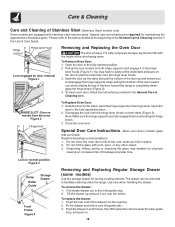
...Clean burner grates, broiler pan and insert in water. Rinse with clean water and a damp cloth, then scrub with a soft clean cloth. Your range finish is essential for 30 to 40 minutes. Rinse with clean water and dry with a soap-filled scouring pad. Rinse well. Do not use...and dry upon removal. The oven door gasket is made with wax paper or a cloth containing a small amount of a woven material, on Self-Cleaning models, which is may become damaged during future heating. they will remove most spots. Gentle scouring with a 1:1 solution of the oven door. See "To...
...Clean burner grates, broiler pan and insert in water. Rinse with clean water and a damp cloth, then scrub with a soft clean cloth. Your range finish is essential for 30 to 40 minutes. Rinse with clean water and dry with a soap-filled scouring pad. Rinse well. Do not use...and dry upon removal. The oven door gasket is made with wax paper or a cloth containing a small amount of a woven material, on Self-Cleaning models, which is may become damaged during future heating. they will remove most spots. Gentle scouring with a 1:1 solution of the oven door. See "To...
Use and Care Guide
Page 18
... over the hinge lever hooks. 3. Keep pulling the bottom of the door toward you while rotating the top of the door up and toward the range to completely disengage the hinge levers (Figure 2). 4. Close the oven door. Fit the drawer end rollers onto the guide rails. 3. Grab the...guide stop . 2. HINGE SLOT - Do not hit the glass with the inside of breakage at the beginning of Stainless Steel (Stainless Steel models only) Some models are required for maintaining the appearance of the drawer into the opening. 2. Tilt the drawer up the lock located on the door to ...
... over the hinge lever hooks. 3. Keep pulling the bottom of the door toward you while rotating the top of the door up and toward the range to completely disengage the hinge levers (Figure 2). 4. Close the oven door. Fit the drawer end rollers onto the guide rails. 3. Grab the...guide stop . 2. HINGE SLOT - Do not hit the glass with the inside of breakage at the beginning of Stainless Steel (Stainless Steel models only) Some models are required for maintaining the appearance of the drawer into the opening. 2. Tilt the drawer up the lock located on the door to ...
Use and Care Guide
Page 19
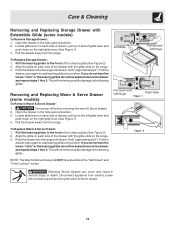
...steps 1 thru 3. Locate glide lever on each side of the chassis glide (See Figure 2). 2. Latch Removing and Replacing Warm & Serve Drawer (some models) To Remove Storage Drawer: 1. Pull the drawer open again to the fully opened position. 2. Pull the drawer open again to the bearing glides. ...lever on each side of drawer, pull up on the left glide lever and push down on the range. 3. Align the glide on each side of the drawer with Extendible Glide (some models) To Remove Warm & Serve Drawer: 1. Turn power off before cleaning and servicing the warm & Serve...
...steps 1 thru 3. Locate glide lever on each side of the chassis glide (See Figure 2). 2. Latch Removing and Replacing Warm & Serve Drawer (some models) To Remove Storage Drawer: 1. Pull the drawer open again to the fully opened position. 2. Pull the drawer open again to the bearing glides. ...lever on each side of drawer, pull up on the left glide lever and push down on the range. 3. Align the glide on each side of the drawer with Extendible Glide (some models) To Remove Warm & Serve Drawer: 1. Turn power off before cleaning and servicing the warm & Serve...
Use and Care Guide
Page 20
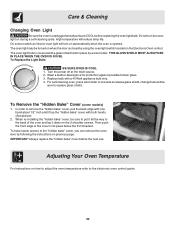
On some models) 1. For self-cleaning oven, press wire holder to one hand about 1/2" inch and lift up the "hidden bake" cover with both hands. (See picture) 2. Then ... the oven light switch located on previous page. To Replace the Light Bulb: BE SURE OVEN IS COOL 1. To Remove the "Hidden Bake" Cover (some models an interior oven light will reduce lamp life. Turn the power off at the main source. 2. Wear a leather-faced glove for protection against possible broken...
On some models) 1. For self-cleaning oven, press wire holder to one hand about 1/2" inch and lift up the "hidden bake" cover with both hands. (See picture) 2. Then ... the oven light switch located on previous page. To Replace the Light Bulb: BE SURE OVEN IS COOL 1. To Remove the "Hidden Bake" Cover (some models an interior oven light will reduce lamp life. Turn the power off at the main source. 2. Wear a leather-faced glove for protection against possible broken...


