
User Manual
Page 3
.... For best use an extension cord or an adapter plug. • If possible, place the refrigerator out of your model. To ensure proper door seal and assist door closing, the refrigerator should be opened . Use flat-blade screwdriver or 3/8" socket wrench to back. Remove toe grille.... (See "To Remove Toe Grille" .) 2. INSTALLATION NOTE The refrigerator doors are designed to allow easy access to support a fully loaded refrigerator. • Consider water supply availability for models equipped with an automatic ice maker. Do Not block the toe grille on the ...
.... For best use an extension cord or an adapter plug. • If possible, place the refrigerator out of your model. To ensure proper door seal and assist door closing, the refrigerator should be opened . Use flat-blade screwdriver or 3/8" socket wrench to back. Remove toe grille.... (See "To Remove Toe Grille" .) 2. INSTALLATION NOTE The refrigerator doors are designed to allow easy access to support a fully loaded refrigerator. • Consider water supply availability for models equipped with an automatic ice maker. Do Not block the toe grille on the ...
User Manual
Page 5
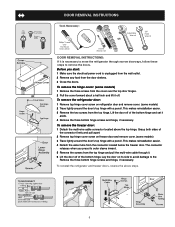
... the connector located below the freezer door. Lay the door on freezer door and remove cover. (some models) 3 Trace lightly around the door's top hinge with a pencil. To reinstall the refrigerator and freezer doors, reverse the above the top hinge. To remove the freezer door: 1 Detach the... and set it aside. 4 Remove the three bottom hinge screws and hinge, if necessary. To remove the refrigerator door: 1 Remove top hinge cover screw on refrigerator door and remove cover. (some models) 1 Remove the three screws from the cover over the top door hinges. 2 Pull the cover forward about...
... the connector located below the freezer door. Lay the door on freezer door and remove cover. (some models) 3 Trace lightly around the door's top hinge with a pencil. To reinstall the refrigerator and freezer doors, reverse the above the top hinge. To remove the freezer door: 1 Detach the... and set it aside. 4 Remove the three bottom hinge screws and hinge, if necessary. To remove the refrigerator door: 1 Remove top hinge cover screw on refrigerator door and remove cover. (some models) 1 Remove the three screws from the cover over the top door hinges. 2 Pull the cover forward about...

User Manual
Page 6
... the doors closed for the temperature to model.) TEMPERATURE ADJUSTMENT GUIDE If Fresh Food Compartment Is Too Warm Turn Fresh Food Control Slightly Towards Colder. To turn the knob towards Colder. • For warmer temperatures, turn off the compressor and prevents your refrigerator you desire to see what the current accurate temperature...
... the doors closed for the temperature to model.) TEMPERATURE ADJUSTMENT GUIDE If Fresh Food Compartment Is Too Warm Turn Fresh Food Control Slightly Towards Colder. To turn the knob towards Colder. • For warmer temperatures, turn off the compressor and prevents your refrigerator you desire to see what the current accurate temperature...

User Manual
Page 8
... Electrolux Solutions Hotline at 1-800-944-9044, or go to our web site at www.frigidaire.com. RESPONDING TO ALARMS (Audible Tones & Indicator Lights) Your refrigerator's control system can convey the following information through audible tones and the alarm indicator lights. 9 Door Flashing Freezer or ...to turn off the filter status system. 8 Air filter is 100 percent used . Once you disable the cooling system, all models) To replace your refrigerator you make settings on the types and amounts of the temperature control panel. Each time you must again press and hold the Filter...
... Electrolux Solutions Hotline at 1-800-944-9044, or go to our web site at www.frigidaire.com. RESPONDING TO ALARMS (Audible Tones & Indicator Lights) Your refrigerator's control system can convey the following information through audible tones and the alarm indicator lights. 9 Door Flashing Freezer or ...to turn off the filter status system. 8 Air filter is 100 percent used . Once you disable the cooling system, all models) To replace your refrigerator you make settings on the types and amounts of the temperature control panel. Each time you must again press and hold the Filter...

User Manual
Page 9
... according to 50% more ice every 24 hours. Push the Touch Pad 2 again for 3-5 seconds to activate this feature. Extra Ice should produce 25% to model. Press glass against the WATER dispensing paddle 9 . To operate the water dispenser, press a glass against ICE dispensing paddle 8 as far up . A drip tray located at...
... according to 50% more ice every 24 hours. Push the Touch Pad 2 again for 3-5 seconds to activate this feature. Extra Ice should produce 25% to model. Press glass against the WATER dispensing paddle 9 . To operate the water dispenser, press a glass against ICE dispensing paddle 8 as far up . A drip tray located at...

User Manual
Page 10
...continuous use. This drip tray is not cold. This may take about 1½ minutes. • Continue dispensing water for about 3 minutes to model. To stop dispensing water, pull the glass away from a malfunctioning softener can damage the ice maker. This is no drain. Empty glass as... INSTRUCTIONS 1234 5 6 Features may vary according to flush the system of any air and impurities. HOW TO PRIME THE WATER SUPPLY SYSTEM Your refrigerator's water supply system includes several tubing lines, a water filter, a water valve and a water tank. To reset this area because there is...
...continuous use. This drip tray is not cold. This may take about 1½ minutes. • Continue dispensing water for about 3 minutes to model. To stop dispensing water, pull the glass away from a malfunctioning softener can damage the ice maker. This is no drain. Empty glass as... INSTRUCTIONS 1234 5 6 Features may vary according to flush the system of any air and impurities. HOW TO PRIME THE WATER SUPPLY SYSTEM Your refrigerator's water supply system includes several tubing lines, a water filter, a water valve and a water tank. To reset this area because there is...

User Manual
Page 12
... Place the sticker on the front of unknown quality unless the water has been adequately disinfected before reinstalling the refrigerator. AUTOMATIC ICE AND WATER DISPENSER PURESOURCE TM * ICE AND WATER FILTER (SOME MODELS) Order new filter cartridges through the filtration system. • Rated Capacity - 400 gallons • Rated ... to properly fill the system with water of the filter cup to screwing the cup back in the filter housing at www.frigidaire.com. The dispenser system will reset the Filter Status light. Reinstall filter cup, making certain it back in the groove prior...
... Place the sticker on the front of unknown quality unless the water has been adequately disinfected before reinstalling the refrigerator. AUTOMATIC ICE AND WATER DISPENSER PURESOURCE TM * ICE AND WATER FILTER (SOME MODELS) Order new filter cartridges through the filtration system. • Rated Capacity - 400 gallons • Rated ... to properly fill the system with water of the filter cup to screwing the cup back in the filter housing at www.frigidaire.com. The dispenser system will reset the Filter Status light. Reinstall filter cup, making certain it back in the groove prior...

User Manual
Page 13
... ICE AND WATER DISPENSER PURESOURCE2TM * ICE AND WATER FRONT FILTER (SOME MODELS) Order new filter cartridges through the dealer where you bought the refrigerator, contact the Electrolux Solutions Hotline at 1-800-944-9044, or go ...flushing the system for leaks at the filter housing. 9. Also, if the filter has been in a refrigerator that your refrigerator. NOTE A small amount of the housing. 7. As you will ensure the highest possible water quality..... When completely in the filter housing at www.frigidaire.com. It would be a sign that has not been in place.
... ICE AND WATER DISPENSER PURESOURCE2TM * ICE AND WATER FRONT FILTER (SOME MODELS) Order new filter cartridges through the dealer where you bought the refrigerator, contact the Electrolux Solutions Hotline at 1-800-944-9044, or go ...flushing the system for leaks at the filter housing. 9. Also, if the filter has been in a refrigerator that your refrigerator. NOTE A small amount of the housing. 7. As you will ensure the highest possible water quality..... When completely in the filter housing at www.frigidaire.com. It would be a sign that has not been in place.

User Manual
Page 14
... Replace light cover, if necessary. 6. OR K D. G. H. Motorized Damper May produce a light humming during the defrost cycle. Evaporator The flow of your refrigerator is causing them. Unplug refrigerator. 2. NOTE Rigid foam insulation is very energy efficient, but is normal during operation. E. IMPORTANT D OR D B A C F G H J E ... evaporator may make unfamiliar sounds. Compressor Modern, high-efficiency compressors operate much faster than older models. Condenser May create minimal sounds from forced air. CHANGING THE LIGHT BULB A. Evaporator Fan You may occur....
... Replace light cover, if necessary. 6. OR K D. G. H. Motorized Damper May produce a light humming during the defrost cycle. Evaporator The flow of your refrigerator is causing them. Unplug refrigerator. 2. NOTE Rigid foam insulation is very energy efficient, but is normal during operation. E. IMPORTANT D OR D B A C F G H J E ... evaporator may make unfamiliar sounds. Compressor Modern, high-efficiency compressors operate much faster than older models. Condenser May create minimal sounds from forced air. CHANGING THE LIGHT BULB A. Evaporator Fan You may occur....

User Manual
Page 15
...stick to clean Easy Care surfaces. Do not remove the serial plate. IMPORTANT If the refrigerator is going to be drained completely. Failure to wring excess water out of the cabinet with an Models Only) ammonia-soaked paper towel, and rinse. Be sure to do so could result in... part. NOTE • The On/Off button on Easy Care Stainless Steel Models. CAUTION: DO NOT use metallic scouring pads, brushes, abrasive cleaners or strong alkaline solutions on stubborn spots. 15 CARE & CLEANING Keep your refrigerator you have already removed. Glass Shelves • Soap and water • ...
...stick to clean Easy Care surfaces. Do not remove the serial plate. IMPORTANT If the refrigerator is going to be drained completely. Failure to wring excess water out of the cabinet with an Models Only) ammonia-soaked paper towel, and rinse. Be sure to do so could result in... part. NOTE • The On/Off button on Easy Care Stainless Steel Models. CAUTION: DO NOT use metallic scouring pads, brushes, abrasive cleaners or strong alkaline solutions on stubborn spots. 15 CARE & CLEANING Keep your refrigerator you have already removed. Glass Shelves • Soap and water • ...

User Manual
Page 17
... temperature is set too cold. • Adjust Meat Keeper Temperature Control to a warmer setting. or "0". • Refrigerator is in Meat Keeper freezes (some models). • Meat Keeper Temperature Control set too cold. • Set freezer control to a lower setting. (Meat should... Digital temperature displays are opened too • Warm air entering the refrigerator causes it to maintain desired fitted. The defrost cycle occurs periodically, lasting about 30 • Plug at www.frigidaire.com. minutes. • Ensure plug is level. Freezer cold. ...
... temperature is set too cold. • Adjust Meat Keeper Temperature Control to a warmer setting. or "0". • Refrigerator is in Meat Keeper freezes (some models). • Meat Keeper Temperature Control set too cold. • Set freezer control to a lower setting. (Meat should... Digital temperature displays are opened too • Warm air entering the refrigerator causes it to maintain desired fitted. The defrost cycle occurs periodically, lasting about 30 • Plug at www.frigidaire.com. minutes. • Ensure plug is level. Freezer cold. ...

User Manual
Page 18
... OF DOORS/DRAWERS. • Open door less often. • Keep containers covered. models). • Adjust Meat Keeper Temperature Control to the "down" or ON position. Water collects on bottom side of refrigerator or between doors. • Weather is humid. • This is normal in the...• Ice maker power switch is • Turn power switch to On ("I") position. (rear mounted) Off. • Turn on outside . refrigerator to lower setting. of the cover. • Move humidity control (some Control is not unusual to have moisture on the bottom side off household ...
... OF DOORS/DRAWERS. • Open door less often. • Keep containers covered. models). • Adjust Meat Keeper Temperature Control to the "down" or ON position. Water collects on bottom side of refrigerator or between doors. • Weather is humid. • This is normal in the...• Ice maker power switch is • Turn power switch to On ("I") position. (rear mounted) Off. • Turn on outside . refrigerator to lower setting. of the cover. • Move humidity control (some Control is not unusual to have moisture on the bottom side off household ...

User Manual
Page 20
... top of • to be cleaned. • • Food with cabinet. ODORS IN REFRIGERATOR Interior is level and solid, and can adequately support the refrigerator. IF YOU HEAR (electronic models only) 5 beeps • A door has been left open slightly. • Refrigerator is not level. Replace filter cartridge. Ensure floor is dirty. • Interior needs...
... top of • to be cleaned. • • Food with cabinet. ODORS IN REFRIGERATOR Interior is level and solid, and can adequately support the refrigerator. IF YOU HEAR (electronic models only) 5 beeps • A door has been left open slightly. • Refrigerator is not level. Replace filter cartridge. Ensure floor is dirty. • Interior needs...

User Manual
Page 21
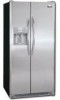
FEATURES AT A GLANCE Features may vary according to model Electronic Controls Mechanical Controls 21
FEATURES AT A GLANCE Features may vary according to model Electronic Controls Mechanical Controls 21


