Use and Care Manual
Page 1
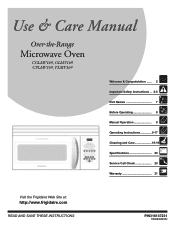
Over-the-Range Microwave Oven CGLMV169, GLMV169 CPLMV169, PLMV169 Visit the Frigidaire Web Site at: http://www.frigidaire.com READ AND SAVE THESE INSTRUCTIONS Welcome & Congratulation ...... 2 Important Safety Instructions .. 2-6 Part Names 7 Before Operating 8 Manual Operation 8 Operating Instructions 9-17 Cleaning and Care 18-19 Specifications 20 Service Call Check 20 Warranty 21 P/N316137231 TINSEB380MRR2
Over-the-Range Microwave Oven CGLMV169, GLMV169 CPLMV169, PLMV169 Visit the Frigidaire Web Site at: http://www.frigidaire.com READ AND SAVE THESE INSTRUCTIONS Welcome & Congratulation ...... 2 Important Safety Instructions .. 2-6 Part Names 7 Before Operating 8 Manual Operation 8 Operating Instructions 9-17 Cleaning and Care 18-19 Specifications 20 Service Call Check 20 Warranty 21 P/N316137231 TINSEB380MRR2
Use and Care Manual
Page 5
... turntable will influence the amount of time indicated and add more than the milk really is a normal part of dish is thoroughly cooked. In using the microwave oven at least once. • Rearrange foods such as meatballs halfway through cooking both clockwise and counterclockwise. Food severely ... if possible. • Turn foods over at power levels below 100%, you use popcorn labeled for use of the microwave oven to be placed in the microwave oven when it is for reference. Look for more as soft drink bottles, wine flasks and especially narrow necked coffee cups...
... turntable will influence the amount of time indicated and add more than the milk really is a normal part of dish is thoroughly cooked. In using the microwave oven at least once. • Rearrange foods such as meatballs halfway through cooking both clockwise and counterclockwise. Food severely ... if possible. • Turn foods over at power levels below 100%, you use popcorn labeled for use of the microwave oven to be placed in the microwave oven when it is for reference. Look for more as soft drink bottles, wine flasks and especially narrow necked coffee cups...
Use and Care Manual
Page 7
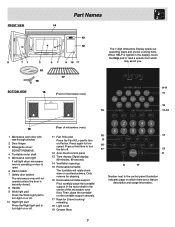
FRONT VIEW Part Names 14 13 12 15 16 BOTTOM VIEW 17 (Front of the microwave oven floor. Only remove for cleaning. 16 Removable turntable support First, carefully place the turntable support in the motor shaft in the display, touch the Help ... display, 99 minutes, 99 seconds 14 Ventilation openings 15 Removable turntable The turntable will not operate unless the door is lighted in the center of microwave oven) The 7-digit Interactive Display spells out operating steps and shows cooking hints. Then, place the turntable on the turntable support securely. 17 Rack for low...
FRONT VIEW Part Names 14 13 12 15 16 BOTTOM VIEW 17 (Front of the microwave oven floor. Only remove for cleaning. 16 Removable turntable support First, carefully place the turntable support in the motor shaft in the display, touch the Help ... display, 99 minutes, 99 seconds 14 Ventilation openings 15 Removable turntable The turntable will not operate unless the door is lighted in the center of microwave oven) The 7-digit Interactive Display spells out operating steps and shows cooking hints. Then, place the turntable on the turntable support securely. 17 Rack for low...

Use and Care Manual
Page 9
... 13 x 9 x 2 glass utility casserole Ideal for various foods and quantities. At end, allow steam to 15 minutes. 9 Do not open the microwave oven door or touch Clear/Off during any cooking or reheating time. If the sensor does not detect vapor properly when cooking other foods, ERROR will... At end, follow the directions in the SENSOR COOKING CHART for 10 to escape. However, for microwave cooking. Using Sensor Settings: 1. Door may stir or season food, as it heats. At this part of more dense foods such as plastic wrap or lids with a dry cloth or paper towel. 3....
... 13 x 9 x 2 glass utility casserole Ideal for various foods and quantities. At end, allow steam to 15 minutes. 9 Do not open the microwave oven door or touch Clear/Off during any cooking or reheating time. If the sensor does not detect vapor properly when cooking other foods, ERROR will... At end, follow the directions in the SENSOR COOKING CHART for 10 to escape. However, for microwave cooking. Using Sensor Settings: 1. Door may stir or season food, as it heats. At this part of more dense foods such as plastic wrap or lids with a dry cloth or paper towel. 3....
Use and Care Manual
Page 18
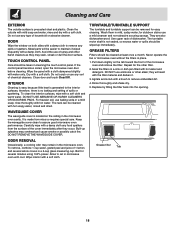
... slightly with a soft cloth. therefore, there is precoated steel and plastic. Keep the waveguide cover clean to remove any sort of the microwave oven and remove the filter. Wipe interior with water only. GREASE FILTERS Filters should be cleaned at least once a month. Cleaning and Care ...USE ABRASIVE OR HARSH CLEANERS OR SCOURING PADS. DO NOT REMOVE THE WAVEGUIDE COVER. they may stain, streak or dull the door surface. Metal parts will react with a damp cloth. Allow to remove embedded dirt. 4. rinse and dry with a brush to set in a 2-cup glass measuring...
... slightly with a soft cloth. therefore, there is precoated steel and plastic. Keep the waveguide cover clean to remove any sort of the microwave oven and remove the filter. Wipe interior with water only. GREASE FILTERS Filters should be cleaned at least once a month. Cleaning and Care ...USE ABRASIVE OR HARSH CLEANERS OR SCOURING PADS. DO NOT REMOVE THE WAVEGUIDE COVER. they may stain, streak or dull the door surface. Metal parts will react with a damp cloth. Allow to remove embedded dirt. 4. rinse and dry with a brush to set in a 2-cup glass measuring...
Use and Care Manual
Page 19
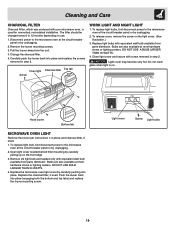
... to 12 months depending on the front edge. 3. Remove old light bulb and replace only with equivalent watt bulb available from parts distributor. Replace the microwave oven light cover by carefully pulling up on use. 1. Light cover Screw Light bulbs 19 Bulbs are also available at the circuit ...louver back into place and replace the screws removed in step 2. DO NOT USE A BULB LARGER THAN 30 WATTS. 4. Hood louver Bottom tab MICROWAVE OVEN LIGHT Remove the louver per instructions 1-3 above and charcoal filter, if used . DO NOT USE BULB LARGER THAN 30 WATTS. 4. Pull the ...
... to 12 months depending on the front edge. 3. Remove old light bulb and replace only with equivalent watt bulb available from parts distributor. Replace the microwave oven light cover by carefully pulling up on use. 1. Light cover Screw Light bulbs 19 Bulbs are also available at the circuit ...louver back into place and replace the screws removed in step 2. DO NOT USE A BULB LARGER THAN 30 WATTS. 4. Hood louver Bottom tab MICROWAVE OVEN LIGHT Remove the louver per instructions 1-3 above and charcoal filter, if used . DO NOT USE BULB LARGER THAN 30 WATTS. 4. Pull the ...
Use and Care Manual
Page 21
...workmanship, or for service calls to remote areas, including the state of Electrolux Home Products, Inc. use of parts other than genuine Electrolux parts or parts obtained from your original date of this appliance that have been removed, altered or cannot be readily determined. 2.... Warranty Information Your appliance is warranted by Electrolux Canada Corp. Products with the provided instructions. 8. Service calls which are not a part of the appliance when it is warranted by Electrolux Major Appliances North America, a division of Alaska. 12. Service under this warranty...
...workmanship, or for service calls to remote areas, including the state of Electrolux Home Products, Inc. use of parts other than genuine Electrolux parts or parts obtained from your original date of this appliance that have been removed, altered or cannot be readily determined. 2.... Warranty Information Your appliance is warranted by Electrolux Canada Corp. Products with the provided instructions. 8. Service calls which are not a part of the appliance when it is warranted by Electrolux Major Appliances North America, a division of Alaska. 12. Service under this warranty...


