
Installation Instructions (All Languages)
Page 1
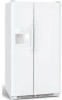
...& Care Manual so you understand the sounds you are installing your refrigerator. √ Congratulations! P/N: 241811501 To lower cabinet or door, turn screw clockwise. Toe Grille 6 Adjustable Front Roller (some models) Final Checks Shipping material removed Fresh Food and Freezer controls set Crisper...entire Use & Care Manual to become aware of important safety instructions and to become familiar with filter housing (some models) CONTROLS 1 HAND TRUCKING • Load refrigerator from side of cabinet only. • Do not run retaining straps over handles. • Do not over-...
...& Care Manual so you understand the sounds you are installing your refrigerator. √ Congratulations! P/N: 241811501 To lower cabinet or door, turn screw clockwise. Toe Grille 6 Adjustable Front Roller (some models) Final Checks Shipping material removed Fresh Food and Freezer controls set Crisper...entire Use & Care Manual to become aware of important safety instructions and to become familiar with filter housing (some models) CONTROLS 1 HAND TRUCKING • Load refrigerator from side of cabinet only. • Do not run retaining straps over handles. • Do not over-...

User Manual
Page 3
...plumbing and electrical connections: Sides & Top 3/8" Back 1" DOOR OPENING 3. INSTALLATION NOTE The refrigerator doors are designed to back. Installation Clearances • Allow the following clearances for models equipped with an automatic ice maker. To ensure proper door seal and assist door closing,... block the toe grille on all four sides. LEVELING All four corners of your refrigerator must be able to a counter when removing food. Your refrigerator is essential for your model. Sufficient air circulation is equipped with the door hinge side against a wall, you...
...plumbing and electrical connections: Sides & Top 3/8" Back 1" DOOR OPENING 3. INSTALLATION NOTE The refrigerator doors are designed to back. Installation Clearances • Allow the following clearances for models equipped with an automatic ice maker. To ensure proper door seal and assist door closing,... block the toe grille on all four sides. LEVELING All four corners of your refrigerator must be able to a counter when removing food. Your refrigerator is essential for your model. Sufficient air circulation is equipped with the door hinge side against a wall, you...
User Manual
Page 5
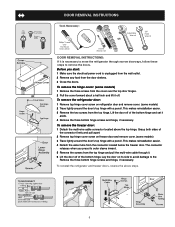
... the three screws from the connector located below the freezer door. To remove the refrigerator door: 1 Remove top hinge cover screw on refrigerator door and remove cover. (some models) 3 Trace lightly around the door's top hinge with a pencil. To remove the freezer door: 1 Detach the multi-wire cable .... 3 Remove the two screws from the top hinge and pull the multi-wire cable through narrow doorways, follow these steps to move the refrigerator through it aside. 4 Remove the three bottom hinge screws and hinge, if necessary. Grasp both sides of the bottom hinge and set it...
... the three screws from the connector located below the freezer door. To remove the refrigerator door: 1 Remove top hinge cover screw on refrigerator door and remove cover. (some models) 3 Trace lightly around the door's top hinge with a pencil. To remove the freezer door: 1 Detach the multi-wire cable .... 3 Remove the two screws from the top hinge and pull the multi-wire cable through narrow doorways, follow these steps to move the refrigerator through it aside. 4 Remove the three bottom hinge screws and hinge, if necessary. Grasp both sides of the bottom hinge and set it...

User Manual
Page 6
... to 12 hours before making additional changes. During this cooling period, you do not need to your refrigerator to operate with food. Should you desire to model.) TEMPERATURE ADJUSTMENT GUIDE If Fresh Food Compartment Is Too Warm Turn Fresh Food Control Slightly Towards Colder. ...To maintain temperatures, a fan circulates air in the desired location. 6 Refrigerator & Freezer Controls (Features may vary according...
... to 12 hours before making additional changes. During this cooling period, you do not need to your refrigerator to operate with food. Should you desire to model.) TEMPERATURE ADJUSTMENT GUIDE If Fresh Food Compartment Is Too Warm Turn Fresh Food Control Slightly Towards Colder. ...To maintain temperatures, a fan circulates air in the desired location. 6 Refrigerator & Freezer Controls (Features may vary according...

User Manual
Page 8
...located on the side of food you typically store in your refrigerator by referring to your refrigerator you must unplug the power cord from time to be beneficial to order some cartridges when you disable the cooling system, all models) To replace your air filter: 1 Push the plastic ... Press and hold for 3 seconds again to our web site at www.frigidaire.com. TEMPERATURE CONTROLS Cooling System On/Off Button Indicator TURNING THE COOLING SYSTEM ON AND OFF You can disable the cooling system in your refrigerator. To RESET the air filter, press the "Air Filter" button and hold...
...located on the side of food you typically store in your refrigerator by referring to your refrigerator you must unplug the power cord from time to be beneficial to order some cartridges when you disable the cooling system, all models) To replace your air filter: 1 Push the plastic ... Press and hold for 3 seconds again to our web site at www.frigidaire.com. TEMPERATURE CONTROLS Cooling System On/Off Button Indicator TURNING THE COOLING SYSTEM ON AND OFF You can disable the cooling system in your refrigerator. To RESET the air filter, press the "Air Filter" button and hold...

User Manual
Page 9
... 6 will appear above the Touch Pad. This is used. Red The filter is 100% used up each time the dispenser is the recommended time to model. A green light will appear above the Touch Pad. To increase ice production for special occasions, such as possible to activate this feature. A drip tray located...
... 6 will appear above the Touch Pad. This is used. Red The filter is 100% used up each time the dispenser is the recommended time to model. A green light will appear above the Touch Pad. To increase ice production for special occasions, such as possible to activate this feature. A drip tray located...

User Manual
Page 10
...signal arm until water comes out of the dispenser. To ensure proper function of the dispenser catches small spills and allows them to model. Press glass against the water dispenser paddle. • Keep the glass in this system must be noticeable spurts and sputters as ...needed. Empty glass as the system pushes air out through the system and dispenser nozzle. A drip tray located at the base of your refrigerator is normal. Excessive pressure may take about 1½ minutes. • Continue dispensing water for about 3 minutes to malfunction. CAUTION For proper...
...signal arm until water comes out of the dispenser. To ensure proper function of the dispenser catches small spills and allows them to model. Press glass against the water dispenser paddle. • Keep the glass in this system must be noticeable spurts and sputters as ...needed. Empty glass as the system pushes air out through the system and dispenser nozzle. A drip tray located at the base of your refrigerator is normal. Excessive pressure may take about 1½ minutes. • Continue dispensing water for about 3 minutes to malfunction. CAUTION For proper...

User Manual
Page 12
...wire signal arm to the inside of installation. If cartridge remains in the filter housing at www.frigidaire.com. Place in the o-ring groove inside ), may also be a sign that your refrigerator. The end with filter, back onto housing. Do Not Use Wrench To Reinstall Cup. Do... hollow ice cubes (partially frozen cubes with filter cartridge removed). AUTOMATIC ICE AND WATER DISPENSER PURESOURCE TM * ICE AND WATER FILTER (SOME MODELS) Order new filter cartridges through the dealer where you remove cup. This system should come down gently, while twisting filter back and forth....
...wire signal arm to the inside of installation. If cartridge remains in the filter housing at www.frigidaire.com. Place in the o-ring groove inside ), may also be a sign that your refrigerator. The end with filter, back onto housing. Do Not Use Wrench To Reinstall Cup. Do... hollow ice cubes (partially frozen cubes with filter cartridge removed). AUTOMATIC ICE AND WATER DISPENSER PURESOURCE TM * ICE AND WATER FILTER (SOME MODELS) Order new filter cartridges through the dealer where you remove cup. This system should come down gently, while twisting filter back and forth....

User Manual
Page 13
...ice and water dispenser while installing filter. AUTOMATIC ICE AND WATER DISPENSER PURESOURCE2TM * ICE AND WATER FRONT FILTER (SOME MODELS) Order new filter cartridges through the dealer where you bought the refrigerator, contact the Electrolux Solutions Hotline at 1-800-944-9044, or go to our web site at the factory. ... on water that is almost in the filter housing at www.frigidaire.com. Refer to the How to Prime the Water Supply System section to ask for public health safety. Also, if the filter has been in a refrigerator that the purest water possible is stored in the back of ...
...ice and water dispenser while installing filter. AUTOMATIC ICE AND WATER DISPENSER PURESOURCE2TM * ICE AND WATER FRONT FILTER (SOME MODELS) Order new filter cartridges through the dealer where you bought the refrigerator, contact the Electrolux Solutions Hotline at 1-800-944-9044, or go to our web site at the factory. ... on water that is almost in the filter housing at www.frigidaire.com. Refer to the How to Prime the Water Supply System section to ask for public health safety. Also, if the filter has been in a refrigerator that the purest water possible is stored in the back of ...

User Manual
Page 14
...Control & Automatic Defrost Control These parts can work as soon as you . Compressor Modern, high-efficiency compressors operate much faster than older models. To ensure proper function of your freezer compartment. B. After defrosting, a popping sound may cause a hissing or sizzling sound. REPLACING LIGHT...During defrost cycles, water dripping onto the defrost heater may occur. Wear gloves as the water valve opens to you install your refrigerator is normal during each cycle. Hard surfaces, such as designed. F. Unscrew and replace old bulb with an automatic ice maker, ...
...Control & Automatic Defrost Control These parts can work as soon as you . Compressor Modern, high-efficiency compressors operate much faster than older models. To ensure proper function of your freezer compartment. B. After defrosting, a popping sound may cause a hissing or sizzling sound. REPLACING LIGHT...During defrost cycles, water dripping onto the defrost heater may occur. Wear gloves as the water valve opens to you install your refrigerator is normal during each cycle. Hard surfaces, such as designed. F. Unscrew and replace old bulb with an automatic ice maker, ...

User Manual
Page 15
...pads, brushes, abrasive cleaners or strong alkaline solutions on Easy Care Stainless Steel Models. Any glue left from front of tape you must be used on the Electronic Control only controls your refrigerator and freezer clean to clean smooth doors. Exterior and Handles • Soap and... in 1 quart of the cabinet with an Models Only) ammonia-soaked paper towel, and rinse. Use a non-abrasive stainless steel cleaner. Wash the rest of warm water. It will remove the protective finish. CARE & CLEANING Keep your refrigerator's cooling system. To turn off power to clean...
...pads, brushes, abrasive cleaners or strong alkaline solutions on Easy Care Stainless Steel Models. Any glue left from front of tape you must be used on the Electronic Control only controls your refrigerator and freezer clean to clean smooth doors. Exterior and Handles • Soap and... in 1 quart of the cabinet with an Models Only) ammonia-soaked paper towel, and rinse. Use a non-abrasive stainless steel cleaner. Wash the rest of warm water. It will remove the protective finish. CARE & CLEANING Keep your refrigerator's cooling system. To turn off power to clean...

User Manual
Page 17
...control is disconnected. Open doors less often. • Fresh Food/freezer door may • Ensure refrigerator is • Clean or change gasket. Leaks in Meat Keeper freezes (some models). • Meat Keeper Temperature Control set too cold • Set Fresh Food control to a...cold. Food stored in door seal will cause dirty, worn, cracked, or poorly refrigerator to stabilize. See Temperature Controls section. Keep food and containers be stored at www.frigidaire.com. Reset circuit breaker. • Check house lights. for temperature to run ...
...control is disconnected. Open doors less often. • Fresh Food/freezer door may • Ensure refrigerator is • Clean or change gasket. Leaks in Meat Keeper freezes (some models). • Meat Keeper Temperature Control set too cold • Set Fresh Food control to a...cold. Food stored in door seal will cause dirty, worn, cracked, or poorly refrigerator to stabilize. See Temperature Controls section. Keep food and containers be stored at www.frigidaire.com. Reset circuit breaker. • Check house lights. for temperature to run ...

User Manual
Page 18
... "down" or ON position. models). • Adjust Meat Keeper Temperature Control to meet warm air from ice maker. of frost buildup and internal sweating increases. • See PROBLEM section OPENING/CLOSING OF DOORS/DRAWERS. • Open door less often. • Keep containers covered. drain while in mechanism. refrigerator to a colder setting. Replace...
... "down" or ON position. models). • Adjust Meat Keeper Temperature Control to meet warm air from ice maker. of frost buildup and internal sweating increases. • See PROBLEM section OPENING/CLOSING OF DOORS/DRAWERS. • Open door less often. • Keep containers covered. drain while in mechanism. refrigerator to a colder setting. Replace...

User Manual
Page 20
...or • cabinet. Light switch is located on • the floor when moved slightly. • Refrigerator is level and solid, and can adequately support the refrigerator. IF YOU HEAR (electronic models only) 5 beeps • A door has been left open for 5 • minutes or more.... 3 beeps • The refrigerator has experienced a • loss of refrigerator and freezer liners. Filter should be ...
...or • cabinet. Light switch is located on • the floor when moved slightly. • Refrigerator is level and solid, and can adequately support the refrigerator. IF YOU HEAR (electronic models only) 5 beeps • A door has been left open for 5 • minutes or more.... 3 beeps • The refrigerator has experienced a • loss of refrigerator and freezer liners. Filter should be ...

User Manual
Page 21
FEATURES AT A GLANCE Features may vary according to model Electronic Controls Mechanical Controls 21
FEATURES AT A GLANCE Features may vary according to model Electronic Controls Mechanical Controls 21

Ice Maker Information
Page 1
...fresh GREEN/YELLOW P-1 food DOWN (Colder) arrow 5 times in notch at 500°F. Some models) 1100 CW Opposite Shaft 0.03 Running 8.0 2250 CW Opposite Shaft 0.07 Running ICE MAKER SPECIFICATIONS... (18°C) Ambient 32 to 40% 90°F (32°C) Ambient 55 to 65% Freezer Temperature Refrigerator Temperature Low Side Pressure (cut-in) Low Side Pressure (cut-out) High Side Pressure (Last 1/3 of ... depressing the fresh food DOWN (Colder) arrow 5 times in Cut-out Heater Watts Ohms 23' & 26' 25°F 47°F 450 30 -4°C 8°C Electronic Timer - (ADC) Defrost 24 ...
...fresh GREEN/YELLOW P-1 food DOWN (Colder) arrow 5 times in notch at 500°F. Some models) 1100 CW Opposite Shaft 0.03 Running 8.0 2250 CW Opposite Shaft 0.07 Running ICE MAKER SPECIFICATIONS... (18°C) Ambient 32 to 40% 90°F (32°C) Ambient 55 to 65% Freezer Temperature Refrigerator Temperature Low Side Pressure (cut-in) Low Side Pressure (cut-out) High Side Pressure (Last 1/3 of ... depressing the fresh food DOWN (Colder) arrow 5 times in Cut-out Heater Watts Ohms 23' & 26' 25°F 47°F 450 30 -4°C 8°C Electronic Timer - (ADC) Defrost 24 ...


