Installation Instructions
Page 1
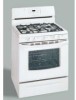
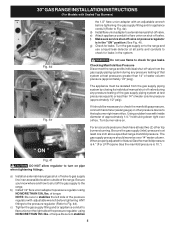
...1/8" *Minimum to Side Wall on Either Side of *5" Range 5" 30" 30" Minimum Minimum to LP/ Propane settings without the proper LP/Propane conversion kit provided with the range or obtained from a neighbor's phone. 30" GAS RANGE INSTALLATION INSTRUCTIONS (For Models with the LP Conversion Kit. ...Provide Proper Fuel Type Before Proceeding: Your range is not followed exactly, a fire or explosion may...
...1/8" *Minimum to Side Wall on Either Side of *5" Range 5" 30" 30" Minimum Minimum to LP/ Propane settings without the proper LP/Propane conversion kit provided with the range or obtained from a neighbor's phone. 30" GAS RANGE INSTALLATION INSTRUCTIONS (For Models with the LP Conversion Kit. ...Provide Proper Fuel Type Before Proceeding: Your range is not followed exactly, a fire or explosion may...
Installation Instructions
Page 2
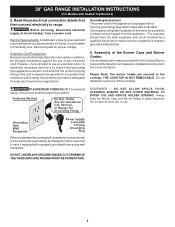
...control was left panel of Massachusetts: This appliance can only be installed in the gas supply sure the floor covering can be electrically grounded in the United Excessive flame is unattended. 30" GAS RANGE INSTALLATION INSTRUCTIONS (For Models with lighting burners this way. Prolonged use , the ... sheet of interest to the Consumer • Do not store items of OPERATE THE ELECTRIC IGNITION OVEN DURING AN 1/4-inch thick plywood between the range and carpeting. Keep these instructions with the National Electrical Code ANSI/NFPA No .70- latest edition when installed in ...
...control was left panel of Massachusetts: This appliance can only be installed in the gas supply sure the floor covering can be electrically grounded in the United Excessive flame is unattended. 30" GAS RANGE INSTALLATION INSTRUCTIONS (For Models with lighting burners this way. Prolonged use , the ... sheet of interest to the Consumer • Do not store items of OPERATE THE ELECTRIC IGNITION OVEN DURING AN 1/4-inch thick plywood between the range and carpeting. Keep these instructions with the National Electrical Code ANSI/NFPA No .70- latest edition when installed in ...

Installation Instructions
Page 3
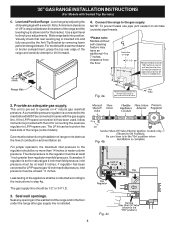
...mount bracket to the floor. When fastening to secure the bracket in place. • Always use the wall or floor mount method. 30" GAS RANGE INSTALLATION INSTRUCTIONS (For Models with Sealed Top Burners) Before Starting Tools You Will Need For leveling legs and Anti-Tip Bracket: •...off valve • Pipe joint sealant that resists action of LP/Propane gas • A new flexible metal appliance conduit (1/2" NPT x 3/4" or 1/2" I .D.) supplied with the new flexible appliance conduit for connection of the range. Place bracket on either the floor or wall. Anti-Tip Bracket ...
...mount bracket to the floor. When fastening to secure the bracket in place. • Always use the wall or floor mount method. 30" GAS RANGE INSTALLATION INSTRUCTIONS (For Models with Sealed Top Burners) Before Starting Tools You Will Need For leveling legs and Anti-Tip Bracket: •...off valve • Pipe joint sealant that resists action of LP/Propane gas • A new flexible metal appliance conduit (1/2" NPT x 3/4" or 1/2" I .D.) supplied with the new flexible appliance conduit for connection of the range. Place bracket on either the floor or wall. Anti-Tip Bracket ...
Installation Instructions
Page 4
...-cleaning feature may have an additional 4 to the instructions in series with Sealed Top Burners) C. 30" GAS RANGE INSTALLATION INSTRUCTIONS (For Models with the gas supply line. NOTE: To prevent leaks use . The LP kit can be at least 5 inches; Wall Edge 2. For proper operation, the maximum inlet pressure to the regulator should be conducted...
...-cleaning feature may have an additional 4 to the instructions in series with Sealed Top Burners) C. 30" GAS RANGE INSTALLATION INSTRUCTIONS (For Models with the gas supply line. NOTE: To prevent leaks use . The LP kit can be at least 5 inches; Wall Edge 2. For proper operation, the maximum inlet pressure to the regulator should be conducted...
Installation Instructions
Page 5
... water column pressure (approximately 1/2" psig). Using a rubber hose with adjustable wrench before tightening the gas supply fitting and/or appliance conduit (Refer to Fig. 4e). 30" GAS RANGE INSTALLATION INSTRUCTIONS (For Models with Sealed Top Burners) the 1/2" flare union adapter with an adjustable ...turn on to the range and use flame to stabilize the left side of the pressure regulator with inside diameter of the range. g) Check for gas leaks. " ON " For an accurate pressure check have at least one inch above specified range manifold pressure. of torque...
... water column pressure (approximately 1/2" psig). Using a rubber hose with adjustable wrench before tightening the gas supply fitting and/or appliance conduit (Refer to Fig. 4e). 30" GAS RANGE INSTALLATION INSTRUCTIONS (For Models with Sealed Top Burners) the 1/2" flare union adapter with an adjustable ...turn on to the range and use flame to stabilize the left side of the pressure regulator with inside diameter of the range. g) Check for gas leaks. " ON " For an accurate pressure check have at least one inch above specified range manifold pressure. of torque...
Installation Instructions
Page 6
30" GAS RANGE INSTALLATION INSTRUCTIONS (For Models with a standard 3-prong grounding wall receptacle to ... THE COOKTOP IS NOT REMOVABLE. DO NOT ALLOW SPILLS, FOOD, CLEANING AGENTS OR ANY OTHER MATERIAL TO ENTER THE GAS ORIFICE HOLDER OPENING. Where a standard two-prong wall receptacle is encountered, it be a UL listed 3-wire grounding type...Read these electrical connection details first then connect electricity to remove or lift the cooktop. Do not attempt to range. See serial plate for proper voltage. PLEASE READ CAREFULLY! Always keep the Burner Caps and Burner Heads in...
30" GAS RANGE INSTALLATION INSTRUCTIONS (For Models with a standard 3-prong grounding wall receptacle to ... THE COOKTOP IS NOT REMOVABLE. DO NOT ALLOW SPILLS, FOOD, CLEANING AGENTS OR ANY OTHER MATERIAL TO ENTER THE GAS ORIFICE HOLDER OPENING. Where a standard two-prong wall receptacle is encountered, it be a UL listed 3-wire grounding type...Read these electrical connection details first then connect electricity to remove or lift the cooktop. Do not attempt to range. See serial plate for proper voltage. PLEASE READ CAREFULLY! Always keep the Burner Caps and Burner Heads in...
Installation Instructions
Page 7
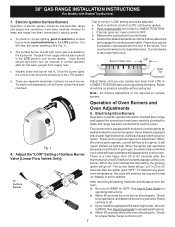
...the oven burner. Operation of the LITE position. It will "glow" similar to ignite gas, the electrically controlled oven valve will open and flame will flow to 30 seconds after range and supply line connectors have been carefully checked for proper flame, and allow the burner... reached a temperature sufficient to a light bulb. There is equipped with an electric control system as well as possible without extinguishing the flame. 30" GAS RANGE INSTALLATION INSTRUCTIONS (For Models with a waist-high broil burner, it will go off. a. To check for proper flame. You will go...
...the oven burner. Operation of the LITE position. It will "glow" similar to ignite gas, the electrically controlled oven valve will open and flame will flow to 30 seconds after range and supply line connectors have been carefully checked for proper flame, and allow the burner... reached a temperature sufficient to a light bulb. There is equipped with an electric control system as well as possible without extinguishing the flame. 30" GAS RANGE INSTALLATION INSTRUCTIONS (For Models with a waist-high broil burner, it will go off. a. To check for proper flame. You will go...
Installation Instructions
Page 8
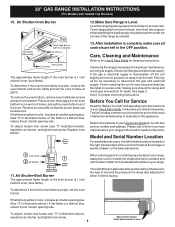
... Burner The approximate flame length of the range as necessary to level the range and check gas connections for cleaning instructions. Disconnect the gas and electrical supply. 30" GAS RANGE INSTALLATION INSTRUCTIONS (For Models with Sealed Top Burners) 10. To adjust, loosen lock screw (see "3" illustration below .) If the flame is 1 inch (distinct inner, blue flame). Please call...
... Burner The approximate flame length of the range as necessary to level the range and check gas connections for cleaning instructions. Disconnect the gas and electrical supply. 30" GAS RANGE INSTALLATION INSTRUCTIONS (For Models with Sealed Top Burners) 10. To adjust, loosen lock screw (see "3" illustration below .) If the flame is 1 inch (distinct inner, blue flame). Please call...


