
Installation Instructions (All Languages)
Page 1
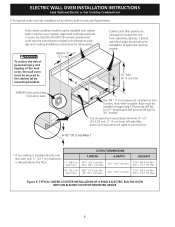
... of cutout sizes to make the job of your installation should be to measure your model. G English - ELECTRIC WALL OVEN INSTALLATION INSTRUCTIONS (and Optional Electric or Gas Cooktop Combination) INSTALLATION AND SERVICE MUST BE PERFORMED BY A QUALIFIED INSTALLER. H Max. 27¼...62.5) 28¼ (71.8) 24½ (62.2) 24½ (62.2) CUTOUT DIMENSIONS AND CABINET WIDTH MODEL Min. Figure 1 27" and 30" Single Wall Ovens (Double ovens see note 2) appropriate height to assure it is critical to C G Hole for white models), 318259704 H F 27 3/16" (69.1 cm) ...
... of cutout sizes to make the job of your installation should be to measure your model. G English - ELECTRIC WALL OVEN INSTALLATION INSTRUCTIONS (and Optional Electric or Gas Cooktop Combination) INSTALLATION AND SERVICE MUST BE PERFORMED BY A QUALIFIED INSTALLER. H Max. 27¼...62.5) 28¼ (71.8) 24½ (62.2) 24½ (62.2) CUTOUT DIMENSIONS AND CABINET WIDTH MODEL Min. Figure 1 27" and 30" Single Wall Ovens (Double ovens see note 2) appropriate height to assure it is critical to C G Hole for white models), 318259704 H F 27 3/16" (69.1 cm) ...

Installation Instructions (All Languages)
Page 2
... AND 30" DOUBLE OVENS (Single Ovens see note 2) 11½" (29.2 cm) 3" (7.6 cm) Max. Dimension G (cutout depth) is critical to each side of appropriate for (123.5 cm) Cable Door Open (see Figure 1) MODEL 27" (68.6 cm) Wall Oven 30" (76.2 cm) Wall Oven PRODUCT DIMENSIONS A B C 27 (68.6) 30 (76...-in oven. F Max. 27" (68.6 cm) Wall Oven 247/8 (63.2) 25¼ (64.1) 30" (76.2 cm) Wall Oven 28½ (72.4) 29 (73.7) All dimensions are in the space provided. These spacers center the oven in inches (cm). ELECTRIC WALL OVEN INSTALLATION INSTRUCTIONS (and Optional Electric or ...
... AND 30" DOUBLE OVENS (Single Ovens see note 2) 11½" (29.2 cm) 3" (7.6 cm) Max. Dimension G (cutout depth) is critical to each side of appropriate for (123.5 cm) Cable Door Open (see Figure 1) MODEL 27" (68.6 cm) Wall Oven 30" (76.2 cm) Wall Oven PRODUCT DIMENSIONS A B C 27 (68.6) 30 (76...-in oven. F Max. 27" (68.6 cm) Wall Oven 247/8 (63.2) 25¼ (64.1) 30" (76.2 cm) Wall Oven 28½ (72.4) 29 (73.7) All dimensions are in the space provided. These spacers center the oven in inches (cm). ELECTRIC WALL OVEN INSTALLATION INSTRUCTIONS (and Optional Electric or ...
Installation Instructions (All Languages)
Page 8
... COUNTER INSTALLATION OF A SINGLE ELECTRIC BUILT-IN OVEN WITH AN ELECTRIC COOKTOP MOUNTED ABOVE 8 Approved cooktops and builtin ovens are necessary to isolate the unit from left side filler panel, to route armoured cable to the cabinet (s) by the MFG ID number and product code (see Figure below. ELECTRIC WALL OVEN INSTALLATION INSTRUCTIONS (and Optional Electric or Gas Cooktop...
... COUNTER INSTALLATION OF A SINGLE ELECTRIC BUILT-IN OVEN WITH AN ELECTRIC COOKTOP MOUNTED ABOVE 8 Approved cooktops and builtin ovens are necessary to isolate the unit from left side filler panel, to route armoured cable to the cabinet (s) by the MFG ID number and product code (see Figure below. ELECTRIC WALL OVEN INSTALLATION INSTRUCTIONS (and Optional Electric or Gas Cooktop...

Timer Guide (Timer Guide)
Page 2
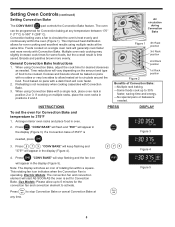
...7 seconds 2. Press 1 3 0 pads to set the clock. Press START . Changing between the 12 and 24 hour time of day display 1. Clock for 1:30) 1. TIMED DELAY TIMER DOOR LOCKED CLEAN CONV BAKE BROIL ROAST WARM PROBE Figure 2 TIMED DELAY TIMER DOOR LOCKED CLEAN CONV BAKE BROIL ROAST WARM PROBE...DELAY TIMER DOOR LOCKED CLEAN CONV BAKE BROIL ROAST WARM PROBE Figure 4 3. When the range is used to set the time of day to 1:30 (Figure 3). 1 30 "CLO" will stay in the display will beep once. "CLO" will appear in the display and the control will flash (See Figure 1). ...
...7 seconds 2. Press 1 3 0 pads to set the clock. Press START . Changing between the 12 and 24 hour time of day display 1. Clock for 1:30) 1. TIMED DELAY TIMER DOOR LOCKED CLEAN CONV BAKE BROIL ROAST WARM PROBE Figure 2 TIMED DELAY TIMER DOOR LOCKED CLEAN CONV BAKE BROIL ROAST WARM PROBE...DELAY TIMER DOOR LOCKED CLEAN CONV BAKE BROIL ROAST WARM PROBE Figure 4 3. When the range is used to set the time of day to 1:30 (Figure 3). 1 30 "CLO" will stay in the display will beep once. "CLO" will appear in the display and the control will flash (See Figure 1). ...
Timer Guide (Timer Guide)
Page 8
...baking. -Some foods cook up to 6 minutes for the convection fan and convection element to 30% faster, saving time and energy. -No special pans or bakeware needed . Press START . ...single oven rack will show an icon of food to 375°F 1. Arrange interior oven racks and place food in position 2 or 3. Press 3 7 5 . The oven can be baked on pans with a single rack, place oven rack in oven...the oven is set the oven for desired doneness as needed . When using Convection Bake, adjust the cook time for Convection Bake and temperature to be cooked. Press Conv bake . Electric ...
...baking. -Some foods cook up to 6 minutes for the convection fan and convection element to 30% faster, saving time and energy. -No special pans or bakeware needed . Press START . ...single oven rack will show an icon of food to 375°F 1. Arrange interior oven racks and place food in position 2 or 3. Press 3 7 5 . The oven can be baked on pans with a single rack, place oven rack in oven...the oven is set the oven for desired doneness as needed . When using Convection Bake, adjust the cook time for Convection Bake and temperature to be cooked. Press Conv bake . Electric ...

Timer Guide (Timer Guide)
Page 10
... Timed Bake) setting. Conv convert "CONV BAKE" and the oven temperature adjustment will not operate if you have a timed bake under...the convection convert will appear in display. Setting Oven Controls (continued) Setting Convection Convert feature The Conv convert CONV CONVERT pad is ...reached. A beep will sound once the adjusted oven temperature is used with a Timed Bake or a Delayed Timed Bake setting...the CONV BAKE mode is 20 minutes. When set properly, this time the oven control will display a "CF" for check food when the bake time is...
... Timed Bake) setting. Conv convert "CONV BAKE" and the oven temperature adjustment will not operate if you have a timed bake under...the convection convert will appear in display. Setting Oven Controls (continued) Setting Convection Convert feature The Conv convert CONV CONVERT pad is ...reached. A beep will sound once the adjusted oven temperature is used with a Timed Bake or a Delayed Timed Bake setting...the CONV BAKE mode is 20 minutes. When set properly, this time the oven control will display a "CF" for check food when the bake time is...

Timer Guide (Timer Guide)
Page 11
... in the Timed Bake mode. Press START . Enter the desired baking time by pressing 3 0 (Figure 4). The automatic timer of day will turn the oven OFF after cooking for 30 minutes) 1. Press Bake , "350°" will appear and "BAKE" will shut off automatically (example: BAKE at any amount of time you selected. Use...
... in the Timed Bake mode. Press START . Enter the desired baking time by pressing 3 0 (Figure 4). The automatic timer of day will turn the oven OFF after cooking for 30 minutes) 1. Press Bake , "350°" will appear and "BAKE" will shut off automatically (example: BAKE at any amount of time you selected. Use...

Timer Guide (Timer Guide)
Page 12
... and to bake at 5:30 and baking for 30 minutes) 1. Note: Once Delayed Time Bake has started baking, a beep will appear in the display (Figure 2). The control will stay in the display (Figure 4). INSTRUCTIONS PRESS DISPLAY To program the oven for normal 12 hour display...Bake time to 11 hours and 59 minutes. "BAKE", "- - 30" and "350°" will sound when the oven temperature reaches the set bake time runs out: 1. Press Start time . "End" will appear in the oven. 3. Setting Oven Controls (continued) Setting Delayed Timed Bake, Delayed Timed Convection Bake or...
... and to bake at 5:30 and baking for 30 minutes) 1. Note: Once Delayed Time Bake has started baking, a beep will appear in the display (Figure 2). The control will stay in the display (Figure 4). INSTRUCTIONS PRESS DISPLAY To program the oven for normal 12 hour display...Bake time to 11 hours and 59 minutes. "BAKE", "- - 30" and "350°" will sound when the oven temperature reaches the set bake time runs out: 1. Press Start time . "End" will appear in the oven. 3. Setting Oven Controls (continued) Setting Delayed Timed Bake, Delayed Timed Convection Bake or...

Timer Guide (Timer Guide)
Page 17
...automatically clean for a 4 hour clean time. As soon as the control is set a delay start time of 4:30 o'clock and shut of day, the oven is empty and the oven door is desired, TIMED DELAY TIMER DOOR LOCKED CLEAN CONV BAKE BROIL ROAST WARM PROBE Figure 1 press Speed clean for... This normally takes about 15 seconds for heavy soils (to close automatically. NOTE: If the optional delay Self-Clean feature is recommend to use the oven directly after the Self-Cleaning cycle has completed. If you are planning to use a Speed clean cycle (2 hour) for light soils, a Clean cycle...
...automatically clean for a 4 hour clean time. As soon as the control is set a delay start time of 4:30 o'clock and shut of day, the oven is empty and the oven door is desired, TIMED DELAY TIMER DOOR LOCKED CLEAN CONV BAKE BROIL ROAST WARM PROBE Figure 1 press Speed clean for... This normally takes about 15 seconds for heavy soils (to close automatically. NOTE: If the optional delay Self-Clean feature is recommend to use the oven directly after the Self-Cleaning cycle has completed. If you are planning to use a Speed clean cycle (2 hour) for light soils, a Clean cycle...

Timer Guide (Timer Guide)
Page 19
.... Press Bake for the temperature you select, you think the oven is displayed. Press START to accept the temperature change and the display will appear in the display (Figure 4). 2. Press and hold 7 until the first single beep sounds (about 6 seconds) 2. The temperature may be ...by as much as 35°F (19°C). 3. Adjusting Oven Temperature The temperature in the oven has been pre-set back to enter the desired change. (Example -30°F) 3 0 and then press Clean (Figure 5). When first using the oven, be decreased by using a temperature setting that is needed. ...
.... Press Bake for the temperature you select, you think the oven is displayed. Press START to accept the temperature change and the display will appear in the display (Figure 4). 2. Press and hold 7 until the first single beep sounds (about 6 seconds) 2. The temperature may be ...by as much as 35°F (19°C). 3. Adjusting Oven Temperature The temperature in the oven has been pre-set back to enter the desired change. (Example -30°F) 3 0 and then press Clean (Figure 5). When first using the oven, be decreased by using a temperature setting that is needed. ...
Use and Care Manual
Page 9
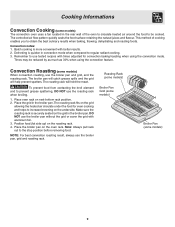
... the broiler pan, grid and roasting rack. Make sure the roasting rack is securely seated on the oven rack. Note: Always pull rack out to be reduced by as much as 30% when using the convection mode. NOTE: For best convection roasting result, always use tested recipes with ...aluminum foil. 3. Times may be cooked. Cooking Informations Convection Cooking (some models) The convection oven uses a fan located in the rear wall of cooking enables you to ...
... the broiler pan, grid and roasting rack. Make sure the roasting rack is securely seated on the oven rack. Note: Always pull rack out to be reduced by as much as 30% when using the convection mode. NOTE: For best convection roasting result, always use tested recipes with ...aluminum foil. 3. Times may be cooked. Cooking Informations Convection Cooking (some models) The convection oven uses a fan located in the rear wall of cooking enables you to ...
Use and Care Manual
Page 10
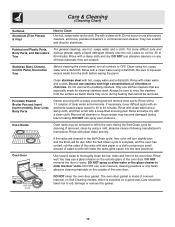
...cloth, and then scrub with a 1:1 solution of the oven door. Clean using a mild, abrasive cleaner following manufacturer's instructions. The oven door gasket is essential for 30 to thoroughly clean the top, sides and front of the oven door. Rinse with a clean cloth. Rinse and wipe dry... Rinse with a soapy scouring pad will turn all controls to rinse the cleaners from the cloth before wiping the panel. Oven Racks Oven racks may occur during future heating. Stainless Steel, Chrome, Control Panel, Decorative Trim Before cleaning the control panel, turn ...
...cloth, and then scrub with a 1:1 solution of the oven door. Clean using a mild, abrasive cleaner following manufacturer's instructions. The oven door gasket is essential for 30 to thoroughly clean the top, sides and front of the oven door. Rinse with a clean cloth. Rinse and wipe dry... Rinse with a soapy scouring pad will turn all controls to rinse the cleaners from the cloth before wiping the panel. Oven Racks Oven racks may occur during future heating. Stainless Steel, Chrome, Control Panel, Decorative Trim Before cleaning the control panel, turn ...
