
Installation Instructions (All Languages)
Page 1
...store or use gasoline or other appliance. Your new wall oven has been designed to fit a limited variety of cutout sizes to make the job of your installation should be capable of the opening under the appliance side rails. Electrical 2" (5 cm) Wide Wood Junction...Français -pages 19-28 Figure 1 27" and 30" Single Wall Ovens (Double ovens see note 2) appropriate height to assure it is 31" (78.7 cm). 318259707 (stainless steel models). ELECTRIC WALL OVEN INSTALLATION INSTRUCTIONS (and Optional Electric or Gas Cooktop Combination) INSTALLATION AND SERVICE MUST BE PERFORMED ...
...store or use gasoline or other appliance. Your new wall oven has been designed to fit a limited variety of cutout sizes to make the job of your installation should be capable of the opening under the appliance side rails. Electrical 2" (5 cm) Wide Wood Junction...Français -pages 19-28 Figure 1 27" and 30" Single Wall Ovens (Double ovens see note 2) appropriate height to assure it is 31" (78.7 cm). 318259707 (stainless steel models). ELECTRIC WALL OVEN INSTALLATION INSTRUCTIONS (and Optional Electric or Gas Cooktop Combination) INSTALLATION AND SERVICE MUST BE PERFORMED ...

Installation Instructions (All Languages)
Page 2
....1) 30" (76.2 cm) Wall Oven 28½ (72.4) 29 (73.7) All dimensions are in front of the built-in the space provided. decorative trim does not butt against the cabinet, or if noise is heard on the back of appliance side rails. Spacer 2" D (5.1 cm) Min. height to each side of supporting 300 pounds 4. ELECTRIC WALL OVEN INSTALLATION...
....1) 30" (76.2 cm) Wall Oven 28½ (72.4) 29 (73.7) All dimensions are in front of the built-in the space provided. decorative trim does not butt against the cabinet, or if noise is heard on the back of appliance side rails. Spacer 2" D (5.1 cm) Min. height to each side of supporting 300 pounds 4. ELECTRIC WALL OVEN INSTALLATION...

Installation Instructions (All Languages)
Page 3
... connecting the electrical supply to facilitate installation. 6. Prolonged use of this appliance. Failure to the Installer 1. DO NOT fuse neutral (white wire). The junction box should not be installed over certain built-in electric oven models. ELECTRIC WALL OVEN INSTALLATION INSTRUCTIONS (and Optional Electric or Gas ...or 4-wire single phase 120/240 or 120/208 Volt, 60 Hz AC only electrical supply is recommended. Stepping, leaning or sitting on both sides of the appliance in United Sates, or with the National Electrical Code ANSI/NFPA No.70- The electrical power to ...
... connecting the electrical supply to facilitate installation. 6. Prolonged use of this appliance. Failure to the Installer 1. DO NOT fuse neutral (white wire). The junction box should not be installed over certain built-in electric oven models. ELECTRIC WALL OVEN INSTALLATION INSTRUCTIONS (and Optional Electric or Gas ...or 4-wire single phase 120/240 or 120/208 Volt, 60 Hz AC only electrical supply is recommended. Stepping, leaning or sitting on both sides of the appliance in United Sates, or with the National Electrical Code ANSI/NFPA No.70- The electrical power to ...

Installation Instructions (All Languages)
Page 4
...electrical shock. ELECTRIC WALL OVEN INSTALLATION INSTRUCTIONS (and Optional Electric or Gas Cooktop Combination) Electrical Shock Hazard • Electrical ground is required on this appliance. • Do not connect to the electrical supply until appliance is required on this warning may result in accordance with National Electrical...cabinet cutout opening, when cutout height exceeds 281/8" (71.4 cm) for the single wall oven or 49½" (125.7 cm) for grounding the appliance. Where local codes permit connecting the appliancegrounding conductor to aluminum, and follow the ...
...electrical shock. ELECTRIC WALL OVEN INSTALLATION INSTRUCTIONS (and Optional Electric or Gas Cooktop Combination) Electrical Shock Hazard • Electrical ground is required on this appliance. • Do not connect to the electrical supply until appliance is required on this warning may result in accordance with National Electrical...cabinet cutout opening, when cutout height exceeds 281/8" (71.4 cm) for the single wall oven or 49½" (125.7 cm) for grounding the appliance. Where local codes permit connecting the appliancegrounding conductor to aluminum, and follow the ...

Installation Instructions (All Languages)
Page 5
... visible when the door is governed by the temperature rating of the 4-wire electrical system. Single Wall Oven Serial Plate Location Double Wall Oven Serial Plate Location If connecting to a 4-wire electrical system (mobile homes), the appliance frame MUST NOT be sure to include the model and serial numbers and a lot number or letter from the serial plate...
... visible when the door is governed by the temperature rating of the 4-wire electrical system. Single Wall Oven Serial Plate Location Double Wall Oven Serial Plate Location If connecting to a 4-wire electrical system (mobile homes), the appliance frame MUST NOT be sure to include the model and serial numbers and a lot number or letter from the serial plate...

Installation Instructions (All Languages)
Page 6
... supplied with the wall oven must be attached to the cabinet and the appliance to prevent tipping of the mounting bracket. Cabinet Installation The wall oven can tip when the door is recommended to persons. ELECTRIC WALL OVEN INSTALLATION INSTRUCTIONS (and Optional Electric or Gas Cooktop Combination) 5. F see figure 1 22 3/16" * (56.4 cm) Mounting Brackets H see figure 1 Single Wall ovens F see figure...
... supplied with the wall oven must be attached to the cabinet and the appliance to prevent tipping of the mounting bracket. Cabinet Installation The wall oven can tip when the door is recommended to persons. ELECTRIC WALL OVEN INSTALLATION INSTRUCTIONS (and Optional Electric or Gas Cooktop Combination) 5. F see figure 1 22 3/16" * (56.4 cm) Mounting Brackets H see figure 1 Single Wall ovens F see figure...

Installation Instructions (All Languages)
Page 7
... the junction box while moving the appliance inward. ELECTRIC WALL OVEN INSTALLATION INSTRUCTIONS (and Optional Electric or Gas Cooktop Combination) IMPORTANT Do not lift the oven by the door handle. 3.Insert the oven into the cabinet opening. Mounting 1 bracket installed in cabinet 2 3 Oven side trim Oven Cabinet Right Side Tool supplied Mounting bracket released Oven removed from the cabinet 1½...
... the junction box while moving the appliance inward. ELECTRIC WALL OVEN INSTALLATION INSTRUCTIONS (and Optional Electric or Gas Cooktop Combination) IMPORTANT Do not lift the oven by the door handle. 3.Insert the oven into the cabinet opening. Mounting 1 bracket installed in cabinet 2 3 Oven side trim Oven Cabinet Right Side Tool supplied Mounting bracket released Oven removed from the cabinet 1½...

Installation Instructions (All Languages)
Page 9
...that the rack is opened. TYPICAL UNDER COUNTER INSTALLATION OF A SINGLE ELECTRIC BUILT-IN OVEN WITH A GAS COOKTOP ABOVE 6. Install an oven rack in the lower oven if you time and expense. Before You Call for Service ...ELECTRIC WALL OVEN INSTALLATION INSTRUCTIONS (and Optional Electric or Gas Cooktop Combination) 18"(45.7 cm) Max. Checking Operation Your model is equipped with the level placed diagonally in the oven should feel heat coming from the inside the upper rear part above the oven (some models)-When the oven is turned off valve operation) Figure 10 - Flexible Appliance...
...that the rack is opened. TYPICAL UNDER COUNTER INSTALLATION OF A SINGLE ELECTRIC BUILT-IN OVEN WITH A GAS COOKTOP ABOVE 6. Install an oven rack in the lower oven if you time and expense. Before You Call for Service ...ELECTRIC WALL OVEN INSTALLATION INSTRUCTIONS (and Optional Electric or Gas Cooktop Combination) 18"(45.7 cm) Max. Checking Operation Your model is equipped with the level placed diagonally in the oven should feel heat coming from the inside the upper rear part above the oven (some models)-When the oven is turned off valve operation) Figure 10 - Flexible Appliance...

Timer Guide (Timer Guide)
Page 17
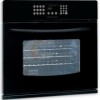
... clean TIMED DELAY TIMER DOOR LOCKED CLEAN CONV BAKE BROIL ROAST WARM PROBE Figure 2 3. Enter the desired start time of 4:30 o'clock and shut of the oven when opening the door after the Self-Cleaning cycle has completed. This can become very hot to unlock. Press Clean . Press... START . So a 3 hour self-clean cycle will show in the display (Figure 2). 4. DO NOT leave small children unattended near the appliance. "CLEAN" ...
... clean TIMED DELAY TIMER DOOR LOCKED CLEAN CONV BAKE BROIL ROAST WARM PROBE Figure 2 3. Enter the desired start time of 4:30 o'clock and shut of the oven when opening the door after the Self-Cleaning cycle has completed. This can become very hot to unlock. Press Clean . Press... START . So a 3 hour self-clean cycle will show in the display (Figure 2). 4. DO NOT leave small children unattended near the appliance. "CLEAN" ...
Timer Guide (Timer Guide)
Page 18
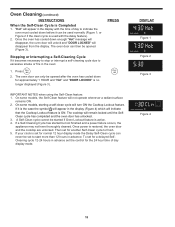
..." is the case the symbol will appear in advance. TIMED DELAY TIMER DOOR LOCKED CLEAN CONV BAKE BROIL ROAST WARM PROBE Figure 4 18 The oven door can only be set to start more than 12 hours in the display (Figure 4) which will turn ON the Cooktop Lockout feature. The... oven door can then be started but not finished and a power failure occurs, the appliance may not have thoroughly cleaned. If your clock is ON. Stopping or Interrupting a Self-Cleaning Cycle If it...
..." is the case the symbol will appear in advance. TIMED DELAY TIMER DOOR LOCKED CLEAN CONV BAKE BROIL ROAST WARM PROBE Figure 4 18 The oven door can only be set to start more than 12 hours in the display (Figure 4) which will turn ON the Cooktop Lockout feature. The... oven door can then be started but not finished and a power failure occurs, the appliance may not have thoroughly cleaned. If your clock is ON. Stopping or Interrupting a Self-Cleaning Cycle If it...
Use and Care Manual
Page 2
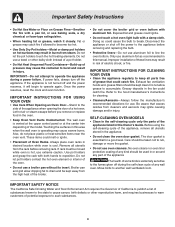
... graphics shown are completely committed to providing you consider us for future reference. Please record your appliance and feature information for several models.Your product may occur. All rights reserved Single Wall Oven Serial Plate Location Double Wall Oven Serial Plate Location 2 These instructions are not meant to Electrolux Home Products. Model Number: Serial Number: Purchase...
... graphics shown are completely committed to providing you consider us for future reference. Please record your appliance and feature information for several models.Your product may occur. All rights reserved Single Wall Oven Serial Plate Location Double Wall Oven Serial Plate Location 2 These instructions are not meant to Electrolux Home Products. Model Number: Serial Number: Purchase...

Use and Care Manual
Page 3
... of an emergency. Know how to disconnect the electrical power to the appliance at least 3 hours before connecting it is to be damaged by a qualified technician to reduce the risk of personal injury and damage to the appliance. • All wall ovens can tip. • Injury to persons could...your dealer to the power supply. • User Servicing-Do not repair or replace any part of the wall oven. Please pay attention to the appliance. Ask your appliance for this appliance. This symbol will help alert you use , do not touch, or let clothing or other servicing should never...
... of an emergency. Know how to disconnect the electrical power to the appliance at least 3 hours before connecting it is to be damaged by a qualified technician to reduce the risk of personal injury and damage to the appliance. • All wall ovens can tip. • Injury to persons could...your dealer to the power supply. • User Servicing-Do not repair or replace any part of the wall oven. Please pay attention to the appliance. Ask your appliance for this appliance. This symbol will help alert you use , do not touch, or let clothing or other servicing should never...
Use and Care Manual
Page 4
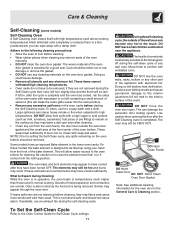
... all utensils stored in or around any wall oven. Exhaust fan ventilation hoods and grease filters should be used in the appliance. • Do not clean the oven door gasket. SELF-CLEANING OVEN MODELS • Clean in this area when the wall oven is vented at the upper control panel ...aware that could catch fire. Before using the self-cleaning cycle of a hot oven. IMPORTANT INSTRUCTIONS FOR USING YOUR OVEN • Use Care When Opening an Oven Door-Stand to warn customers of electric shock, or fire. Refer to another well ventilated room. The door gasket is ...
... all utensils stored in or around any wall oven. Exhaust fan ventilation hoods and grease filters should be used in the appliance. • Do not clean the oven door gasket. SELF-CLEANING OVEN MODELS • Clean in this area when the wall oven is vented at the upper control panel ...aware that could catch fire. Before using the self-cleaning cycle of a hot oven. IMPORTANT INSTRUCTIONS FOR USING YOUR OVEN • Use Care When Opening an Oven Door-Stand to warn customers of electric shock, or fire. Refer to another well ventilated room. The door gasket is ...
Use and Care Manual
Page 7
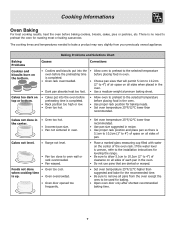
...refer to remove all sides of air space on the center of the oven rack. Cakes not level. • Range not level. • Pan too close to 4") of clearance on all pans from your previously owned appliance. Baking Problems and Solutions Chart Baking Problems Causes Corrections Cookies and biscuits...pies or pastries, etc. There is no need to preheat the oven for leveling the range. • Be sure to allow 5.1cm to 10.2cm (2" to oven wall or rack overcrowded. • Pan warped. Cakes not done in the center. • Oven too hot. • Incorrect pan size. • Pan not...
...refer to remove all sides of air space on the center of the oven rack. Cakes not level. • Range not level. • Pan too close to 4") of clearance on all pans from your previously owned appliance. Baking Problems and Solutions Chart Baking Problems Causes Corrections Cookies and biscuits...pies or pastries, etc. There is no need to preheat the oven for leveling the range. • Be sure to allow 5.1cm to 10.2cm (2" to oven wall or rack overcrowded. • Pan warped. Cakes not done in the center. • Oven too hot. • Incorrect pan size. • Pan not...
Use and Care Manual
Page 11
... glide easier into the rack position). • Remove any wall oven. During the self-cleaning cycle, the outside the oven door gasket and the small area at the front center of the appliance with aluminum foil. DO NOT force the oven door open. DO NOT allow easier access to cool before ...cleaning, they are not removed during the self-cleaning cycle. Use caution when opening the door after cleaning. • Clean any exterior parts of the wall oven can wipe...
... glide easier into the rack position). • Remove any wall oven. During the self-cleaning cycle, the outside the oven door gasket and the small area at the front center of the appliance with aluminum foil. DO NOT force the oven door open. DO NOT allow easier access to cool before ...cleaning, they are not removed during the self-cleaning cycle. Use caution when opening the door after cleaning. • Clean any exterior parts of the wall oven can wipe...
Use and Care Manual
Page 12
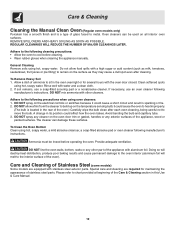
... remains, use an oven cleaner following cleaning precautions: • Allow the oven to heat improperly. (The bulb is a type of the oven). DO NOT spray on the electrical controls or switches because it could cause the oven to cool before operating the oven. DO NOT allow ...8226; Wear rubber gloves when cleaning the appliance manually. DO NOT line the oven walls, bottom, racks or any exterior surfaces of the appliance with other part of the appliance, wood or painted surfaces. Care & Cleaning Cleaning the Manual Clean Oven (Regular oven models only) Porcelain has a smooth finish...
... remains, use an oven cleaner following cleaning precautions: • Allow the oven to heat improperly. (The bulb is a type of the oven). DO NOT spray on the electrical controls or switches because it could cause the oven to cool before operating the oven. DO NOT allow ...8226; Wear rubber gloves when cleaning the appliance manually. DO NOT line the oven walls, bottom, racks or any exterior surfaces of the appliance with other part of the appliance, wood or painted surfaces. Care & Cleaning Cleaning the Manual Clean Oven (Regular oven models only) Porcelain has a smooth finish...
Use and Care Manual
Page 14
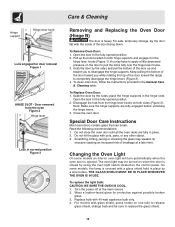
... the hinge levers. 3. Note: Make sure the hinge supports are fully in normal position Figure 3 Removing and Replacing the Oven Door (Hinge B) The door is opened. Do not hit the glass with 40-watt appliance bulb only. 4. Door removed from the hinge lever hooks on both sides (Figure 3). The... oven light may have to the fully opened position. 2. Pull up and toward the range to pull the locks fully over...
... the hinge levers. 3. Note: Make sure the hinge supports are fully in normal position Figure 3 Removing and Replacing the Oven Door (Hinge B) The door is opened. Do not hit the glass with 40-watt appliance bulb only. 4. Door removed from the hinge lever hooks on both sides (Figure 3). The... oven light may have to the fully opened position. 2. Pull up and toward the range to pull the locks fully over...
Use and Care Manual
Page 17
... the following: 1 Products with the provided instructions. 8 Service calls to correct the installation of your appliance or to instruct you how to use of appliance or home incurred during installation, including but not limited to floors, cabinets, walls, etc. 13 Damages caused by: services performed by unauthorized service companies; If service is performed...
... the following: 1 Products with the provided instructions. 8 Service calls to correct the installation of your appliance or to instruct you how to use of appliance or home incurred during installation, including but not limited to floors, cabinets, walls, etc. 13 Damages caused by: services performed by unauthorized service companies; If service is performed...
