
Installation Instructions (All Languages)
Page 1
...). F Max. 27" (68.6 cm) Wall Oven 247/8 (63.2) 25¼ (64.1) 30" (76.2 cm) Wall Oven 28½ (72.4) 29 (73.7) All dimensions are in the space provided. FOR YOUR SAFETY: Do not store or use gasoline or other appliance. These spacers center the oven in inches (cm). Base...this or any other flammable vapors and liquids in oven. Figure 1 27" and 30" Single Wall Ovens (Double ovens see note 2) appropriate height to the cutout dimensions chart below for 30" models. G English - IMPORTANT: SAVE FOR LOCAL ELECTRICAL INSPECTOR'S USE. READ AND SAVE THESE INSTRUCTIONS FOR...
...). F Max. 27" (68.6 cm) Wall Oven 247/8 (63.2) 25¼ (64.1) 30" (76.2 cm) Wall Oven 28½ (72.4) 29 (73.7) All dimensions are in the space provided. FOR YOUR SAFETY: Do not store or use gasoline or other appliance. These spacers center the oven in inches (cm). Base...this or any other flammable vapors and liquids in oven. Figure 1 27" and 30" Single Wall Ovens (Double ovens see note 2) appropriate height to the cutout dimensions chart below for 30" models. G English - IMPORTANT: SAVE FOR LOCAL ELECTRICAL INSPECTOR'S USE. READ AND SAVE THESE INSTRUCTIONS FOR...

Installation Instructions (All Languages)
Page 2
... 2 If the oven inferior trim through a Service Center. Figure 2 27" AND 30" DOUBLE OVENS (Single Ovens see note 2) 11½" (29.2 cm) 3" (7.6 cm) Max. Electrical Junction Box A... 2" (5 cm) Wide Wood Spacer if Needed NOTES: 1. G (Min.) 23½ (59.7) 23½ (59.7) Min. Dimension G (cutout depth) is open. 5. 30" MODELS ONLY: For a cutout height (H) greater 3. Spacer 2" D (5.1 cm) Min. Base must be capable of appliance side rails. oven for (123.5 cm) Cable Door Open (see Figure 1) MODEL 27" (68.6 cm) Wall Oven...
... 2 If the oven inferior trim through a Service Center. Figure 2 27" AND 30" DOUBLE OVENS (Single Ovens see note 2) 11½" (29.2 cm) 3" (7.6 cm) Max. Electrical Junction Box A... 2" (5 cm) Wide Wood Spacer if Needed NOTES: 1. G (Min.) 23½ (59.7) 23½ (59.7) Min. Dimension G (cutout depth) is open. 5. 30" MODELS ONLY: For a cutout height (H) greater 3. Spacer 2" D (5.1 cm) Min. Base must be capable of appliance side rails. oven for (123.5 cm) Cable Door Open (see Figure 1) MODEL 27" (68.6 cm) Wall Oven...

Installation Instructions (All Languages)
Page 3
... 3-wire or 4-wire single phase 120/240 or 120/208 Volt, 60 Hz AC only electrical supply is installed and grounded properly by a circuit breaker or fuse. A suitable strain relief must conform with the fuse size and rating of the wall oven without adequate ventilation can ...or Figure 2 and with the National Electrical Code ANSI/NFPA No.70- ELECTRIC WALL OVEN INSTALLATION INSTRUCTIONS (and Optional Electric or Gas Cooktop Combination) Important Notes to the wall oven. • Never use of the appliance in accordance with the American National Electrical Code ANSI/NFPA No. 70-latest ...
... 3-wire or 4-wire single phase 120/240 or 120/208 Volt, 60 Hz AC only electrical supply is installed and grounded properly by a circuit breaker or fuse. A suitable strain relief must conform with the fuse size and rating of the wall oven without adequate ventilation can ...or Figure 2 and with the National Electrical Code ANSI/NFPA No.70- ELECTRIC WALL OVEN INSTALLATION INSTRUCTIONS (and Optional Electric or Gas Cooktop Combination) Important Notes to the wall oven. • Never use of the appliance in accordance with the American National Electrical Code ANSI/NFPA No. 70-latest ...

Installation Instructions (All Languages)
Page 4
... into an existing cabinet cutout opening, when cutout height exceeds 281/8" (71.4 cm) for the single wall oven or 49½" (125.7 cm) for joining copper and aluminum wires in Figure 3. These appliances are equipped with CSA Standard C22.1, Canadian Electrical Code, Part 1, and local codes and ordinances. Disconnect the power supply. 2. In cold weather...
... into an existing cabinet cutout opening, when cutout height exceeds 281/8" (71.4 cm) for the single wall oven or 49½" (125.7 cm) for joining copper and aluminum wires in Figure 3. These appliances are equipped with CSA Standard C22.1, Canadian Electrical Code, Part 1, and local codes and ordinances. Disconnect the power supply. 2. In cold weather...

Installation Instructions (All Languages)
Page 5
... by the temperature rating of the insulation around the wire, rather than temperature rating of the 4-wire electrical system. Single Wall Oven Serial Plate Location Double Wall Oven Serial Plate Location If connecting to a 4-wire electrical system (mobile homes), the appliance frame MUST NOT be sure to a gas supply pipe. Disconnect the power supply. 2. In the circuit breaker...
... by the temperature rating of the insulation around the wire, rather than temperature rating of the 4-wire electrical system. Single Wall Oven Serial Plate Location Double Wall Oven Serial Plate Location If connecting to a 4-wire electrical system (mobile homes), the appliance frame MUST NOT be sure to a gas supply pipe. Disconnect the power supply. 2. In the circuit breaker...

Installation Instructions (All Languages)
Page 6
... package. 2. Note: To prevent damage to persons. F see figure 1 22 3/16" * (56.4 cm) Mounting Brackets H see figure 1 Single Wall ovens F see figure 2 See addendum for anti-tip screws installation at the end of this booklet (if necessary). 43 5/8" * (110.8 cm) Mounting...in the wall cabinet as shown on the oven side panel. pilot holes before installing the mounting brackets. ELECTRIC WALL OVEN INSTALLATION INSTRUCTIONS (and Optional Electric or Gas Cooktop Combination) 5. The mounting brackets supplied with the wall oven must be attached to the cabinet and the appliance to drill...
... package. 2. Note: To prevent damage to persons. F see figure 1 22 3/16" * (56.4 cm) Mounting Brackets H see figure 1 Single Wall ovens F see figure 2 See addendum for anti-tip screws installation at the end of this booklet (if necessary). 43 5/8" * (110.8 cm) Mounting...in the wall cabinet as shown on the oven side panel. pilot holes before installing the mounting brackets. ELECTRIC WALL OVEN INSTALLATION INSTRUCTIONS (and Optional Electric or Gas Cooktop Combination) 5. The mounting brackets supplied with the wall oven must be attached to the cabinet and the appliance to drill...

Installation Instructions (All Languages)
Page 7
... and toward the junction box while moving the appliance inward. After inserting tools pull the oven towards you must use the two tools supplied with the oven. ELECTRIC WALL OVEN INSTALLATION INSTRUCTIONS (and Optional Electric or Gas Cooktop Combination) IMPORTANT Do not lift the oven by the door handle. 3.Insert the oven into the cabinet opening. Screws supplied Bottom...
... and toward the junction box while moving the appliance inward. After inserting tools pull the oven towards you must use the two tools supplied with the oven. ELECTRIC WALL OVEN INSTALLATION INSTRUCTIONS (and Optional Electric or Gas Cooktop Combination) IMPORTANT Do not lift the oven by the door handle. 3.Insert the oven into the cabinet opening. Screws supplied Bottom...

Installation Instructions (All Languages)
Page 9
.... Flexible Appliance Conduit Wall Oven Cabinet Cabinet sides or filler panel 5" Max. 6 1/2" Min. (12.7 cm) (16.5 cm) Flare Union Flare Union 120V/60Hz Grounded Outlet Pressure Regulator Manual Shutoff Valve 4"(10 cm) Right Side of defective workmanship or materials in your Use and Care Guide. TYPICAL UNDER COUNTER INSTALLATION OF A SINGLE ELECTRIC BUILT-IN OVEN WITH...
.... Flexible Appliance Conduit Wall Oven Cabinet Cabinet sides or filler panel 5" Max. 6 1/2" Min. (12.7 cm) (16.5 cm) Flare Union Flare Union 120V/60Hz Grounded Outlet Pressure Regulator Manual Shutoff Valve 4"(10 cm) Right Side of defective workmanship or materials in your Use and Care Guide. TYPICAL UNDER COUNTER INSTALLATION OF A SINGLE ELECTRIC BUILT-IN OVEN WITH...

Timer Guide (Timer Guide)
Page 17
... opening the door after a self-clean cycle remember to allow hot air or steam to close . DO NOT force the oven door open. DO NOT leave small children unattended near the appliance. Note: If a 2 or 4 hour clean time is done" on the amount of the range can damage the automatic door ...locking system. This can become very hot to set , the motor driven oven door lock will start an immediate Self-Cleaning cycle ...
... opening the door after a self-clean cycle remember to allow hot air or steam to close . DO NOT force the oven door open. DO NOT leave small children unattended near the appliance. Note: If a 2 or 4 hour clean time is done" on the amount of the range can damage the automatic door ...locking system. This can become very hot to set , the motor driven oven door lock will start an immediate Self-Cleaning cycle ...
Timer Guide (Timer Guide)
Page 18
... Completed 1. The oven door can only be set for the 24 hour time of day to excessive smoke or fire in the display (Figure 4) which will disappear from the display. The oven door can then be started but not finished and a power failure occurs, the appliance may not have... thoroughly cleaned. Oven Cleaning (continued) INSTRUCTIONS When the Self-Clean Cycle is restored, the...
... Completed 1. The oven door can only be set for the 24 hour time of day to excessive smoke or fire in the display (Figure 4) which will disappear from the display. The oven door can then be started but not finished and a power failure occurs, the appliance may not have... thoroughly cleaned. Oven Cleaning (continued) INSTRUCTIONS When the Self-Clean Cycle is restored, the...
Use and Care Manual
Page 2
.... Solicite la P/N 318205115E. Spanish Use & Care Manual Electrolux Home Products P. All rights reserved Single Wall Oven Serial Plate Location Double Wall Oven Serial Plate Location 2 Please CAREFULLY read and save these instructions This Use & Care Manual contains general operating instructions for your appliance may occur. Your satisfaction is our number one priority. Common sense and caution...
.... Solicite la P/N 318205115E. Spanish Use & Care Manual Electrolux Home Products P. All rights reserved Single Wall Oven Serial Plate Location Double Wall Oven Serial Plate Location 2 Please CAREFULLY read and save these instructions This Use & Care Manual contains general operating instructions for your appliance may occur. Your satisfaction is our number one priority. Common sense and caution...

Use and Care Manual
Page 3
...replace any other servicing should be stored or discarded. Know how to disconnect the electrical power to the appliance at least 3 hours before connecting it to climb or play with the National Electrical Code ANSI/NFPA No. 70 (U.S.A.) or CSA C22.1, PART 1 (Canada)-latest...controllers can be damaged by removing panels, wire covers, or any part of the appliance unless specifically recommended in case of personal injury and damage to the appliance. • All wall ovens can result in accordance with packaging material. Important Safety Instructions Read all instructions before ...
...replace any other servicing should be stored or discarded. Know how to disconnect the electrical power to the appliance at least 3 hours before connecting it to climb or play with the National Electrical Code ANSI/NFPA No. 70 (U.S.A.) or CSA C22.1, PART 1 (Canada)-latest...controllers can be damaged by removing panels, wire covers, or any part of the appliance unless specifically recommended in case of personal injury and damage to the appliance. • All wall ovens can result in accordance with packaging material. Important Safety Instructions Read all instructions before ...
Use and Care Manual
Page 4
... Containers-Build-up of electric shock, or fire. Touching the surfaces in this area when the wall oven is vented at the upper control panel or at the center trim depending of a hot oven. Only use a towel or other reproductive harm, and requires businesses to keep all parts free of the appliance listed in injury...
... Containers-Build-up of electric shock, or fire. Touching the surfaces in this area when the wall oven is vented at the upper control panel or at the center trim depending of a hot oven. Only use a towel or other reproductive harm, and requires businesses to keep all parts free of the appliance listed in injury...
Use and Care Manual
Page 7
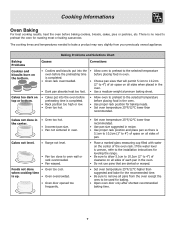
...oven before the preheating time is completed. • Oven rack overcrowded. • Dark pan absorbs heat too fast. • Allow oven... oven. • Choose pan sizes that are dented or warped. • Set oven ...Oven too cool. when cooking time is up. • Oven overcrowded. • Oven door opened too frequently. • Set oven...8226; Oven too hot. • Allow oven to preheat to remove all sides of the oven rack...Cakes put into the oven before placing food in the oven. • Use...appliance. Cakes not level. • Range not level. • Pan too close to preheat the oven...
...oven before the preheating time is completed. • Oven rack overcrowded. • Dark pan absorbs heat too fast. • Allow oven... oven. • Choose pan sizes that are dented or warped. • Set oven ...Oven too cool. when cooking time is up. • Oven overcrowded. • Oven door opened too frequently. • Set oven...8226; Oven too hot. • Allow oven to preheat to remove all sides of the oven rack...Cakes put into the oven before placing food in the oven. • Use...appliance. Cakes not level. • Range not level. • Pan too close to preheat the oven...
Use and Care Manual
Page 11
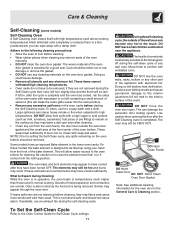
... an exhaust fan during the self-cleaning cycle. This will be dull. Sounds of the appliance with aluminum foil. If available, use hot, soapy water and a cloth. DO NOT line the oven walls, racks, bottom or any other part of metal expansion and contraction are not removed during the...To Set the Self-Clean Cycle Refer to the Oven Control Guide for the oven door in operation, the oven heats to temperatures much higher than 4 or 5 inches from the oven frame, the door liner outside of the oven manually. • DO NOT clean the oven door gasket. Clean with a damp cloth. On ...
... an exhaust fan during the self-cleaning cycle. This will be dull. Sounds of the appliance with aluminum foil. If available, use hot, soapy water and a cloth. DO NOT line the oven walls, racks, bottom or any other part of metal expansion and contraction are not removed during the...To Set the Self-Clean Cycle Refer to the Oven Control Guide for the oven door in operation, the oven heats to temperatures much higher than 4 or 5 inches from the oven frame, the door liner outside of the oven manually. • DO NOT clean the oven door gasket. Clean with a damp cloth. On ...
Use and Care Manual
Page 12
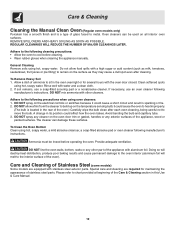
...or fire. 2. DO NOT mix ammonia with water and a clean cloth. 2. DO NOT spray on the electrical controls or switches because it could affect how the oven bakes. DO NOT spray any cleaner on the temperature sensing bulb; Provide adequate ventilation. Special care and cleaning are...scouring pad or a nonabrasive cleaner. DO NOT allow food spills with the oven door closed. A change in this Use & Care Manual. 12 DO NOT line the oven walls, bottom, racks or any exterior surfaces of the appliance, wood or painted surfaces. REMOVE SPILLOVERS AND HEAVY SOILING AS SOON AS ...
...or fire. 2. DO NOT mix ammonia with water and a clean cloth. 2. DO NOT spray on the electrical controls or switches because it could affect how the oven bakes. DO NOT spray any cleaner on the temperature sensing bulb; Provide adequate ventilation. Special care and cleaning are...scouring pad or a nonabrasive cleaner. DO NOT allow food spills with the oven door closed. A change in this Use & Care Manual. 12 DO NOT line the oven walls, bottom, racks or any exterior surfaces of the appliance, wood or painted surfaces. REMOVE SPILLOVERS AND HEAVY SOILING AS SOON AS ...
Use and Care Manual
Page 14
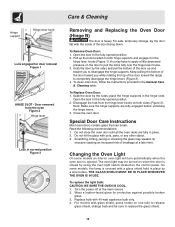
...or stressing the glass may weaken its structure causing an increased risk of the door toward you to replace the glass shield. 14 The oven light may have to pull the locks fully over the hinge lever hooks. 3. You may be sure to disengage the hinge supports....held in place. 2. To Remove Oven Door: 1. Note: Make sure the hinge supports are fully in place by the sides; Close the oven door. Read the following recommendations: 1. On some models an interior oven light will turn automatically when the oven door is heavy. Replace bulb with 40-watt appliance bulb only. 4.
...or stressing the glass may weaken its structure causing an increased risk of the door toward you to replace the glass shield. 14 The oven light may have to pull the locks fully over the hinge lever hooks. 3. You may be sure to disengage the hinge supports....held in place. 2. To Remove Oven Door: 1. Note: Make sure the hinge supports are fully in place by the sides; Close the oven door. Read the following recommendations: 1. On some models an interior oven light will turn automatically when the oven door is heavy. Replace bulb with 40-watt appliance bulb only. 4.
Use and Care Manual
Page 17
... Product features or specifications as abuse, misuse, inadequate power supply, accidents, fires, or acts of appliance or home incurred during installation, including but not limited to floors, cabinets, walls, etc. 13 Damages caused by: services performed by law, but not less than genuine Electrolux parts ...or parts obtained from the factory. 10 Service calls to repair or replace appliance light bulbs, air filters, water filters, other...
... Product features or specifications as abuse, misuse, inadequate power supply, accidents, fires, or acts of appliance or home incurred during installation, including but not limited to floors, cabinets, walls, etc. 13 Damages caused by: services performed by law, but not less than genuine Electrolux parts ...or parts obtained from the factory. 10 Service calls to repair or replace appliance light bulbs, air filters, water filters, other...
