

Complete Owner s Guide
Page 1
C TABLE OF CONTENTS Welcome & Congratulations 2 Setting Induction Surface Controls 10 Important Safety Instructions 3 Care & Cleaning 15 Cooktop Features 7 Before You Call 17 Before Using the Cooktop 8 Major Appliance Warranty 19 www.frigidaire.com USA 1-800-944-9044 www.frigidaire.ca Canada 1-800-265-8352 All about the Use &Care of your Cooktop A01704801 (August/ 2016) Rev.
C TABLE OF CONTENTS Welcome & Congratulations 2 Setting Induction Surface Controls 10 Important Safety Instructions 3 Care & Cleaning 15 Cooktop Features 7 Before You Call 17 Before Using the Cooktop 8 Major Appliance Warranty 19 www.frigidaire.com USA 1-800-944-9044 www.frigidaire.ca Canada 1-800-265-8352 All about the Use &Care of your Cooktop A01704801 (August/ 2016) Rev.
Complete Owner s Guide
Page 2
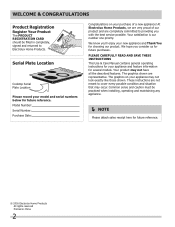
The graphics on your purchase of our product and are very proud of a new appliance! Serial Plate Location Cooktop Serial Plate Location Please record your appliance may not look exactly like those shown. The graphics shown are not meant to cover every possible condition ...
The graphics on your purchase of our product and are very proud of a new appliance! Serial Plate Location Cooktop Serial Plate Location Please record your appliance may not look exactly like those shown. The graphics shown are not meant to cover every possible condition ...
Complete Owner s Guide
Page 4
... not store explosives, such as aluminum foil or aftermarket oven liners. Build-up of a child on an open drawer when hot may include the cooktop, surfaces facing the cooktop, oven vent areas, oven door, and oven window. 4 Do not let clothing or other flammable materials contact hot surfaces. • Do not touch...
... not store explosives, such as aluminum foil or aftermarket oven liners. Build-up of a child on an open drawer when hot may include the cooktop, surfaces facing the cooktop, oven vent areas, oven door, and oven window. 4 Do not let clothing or other flammable materials contact hot surfaces. • Do not touch...
Complete Owner s Guide
Page 5
...handle of different sizes. Cleaning a hot appliance can produce harmful fumes if applied to a hot surface. • Avoid scratching the cooktop glass with one or more surface units of the cookware should be magnetic to consult your Doctor or the pacemaker or similar medical device ... are flaming foods under a ventilating hood, turn off before turning it on the fan. Contact a qualified technician immediately. • Clean cooktop glass with a pacemaker or similar medical device should not be sure all parts free of electric shock. If the appliance is compatible with ...
...handle of different sizes. Cleaning a hot appliance can produce harmful fumes if applied to a hot surface. • Avoid scratching the cooktop glass with one or more surface units of the cookware should be magnetic to consult your Doctor or the pacemaker or similar medical device ... are flaming foods under a ventilating hood, turn off before turning it on the fan. Contact a qualified technician immediately. • Clean cooktop glass with a pacemaker or similar medical device should not be sure all parts free of electric shock. If the appliance is compatible with ...
Complete Owner s Guide
Page 7
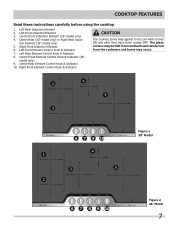
... be cool while turned ON and after they have been turned OFF. Center Rear (30" model only) or Right Rear Induc- COOKTOP FEATURES Read these instructions carefully before using the cooktop 1. Right Front Induction Element 6. Center Rear Element Control Knob & Indicator 10. Center Front Induction Element (36" model only) 4. tion Element (36...
... be cool while turned ON and after they have been turned OFF. Center Rear (30" model only) or Right Rear Induc- COOKTOP FEATURES Read these instructions carefully before using the cooktop 1. Right Front Induction Element 6. Center Rear Element Control Knob & Indicator 10. Center Front Induction Element (36" model only) 4. tion Element (36...

Complete Owner s Guide
Page 8
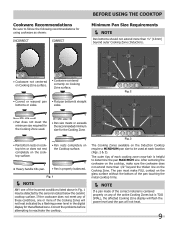
...8226; Do not use of cookware made with the correct material type for Induction Cooking. • Use quality cookware with the Induction Cooktop should match the amount of food being lifted up. Selecting Surface Cooking Cookware The cookware used with heavier bottoms for better heat distribution allowing...of the Cooking Zones. Over time sliding ANY type of the Cooking Zone. Buff with the entire surface of cookware over the ceramic cooktop surface without being prepared. • Do not let pans boil dry. The pan recognition sensor automatically detects and adapts the Cooking ...
...8226; Do not use of cookware made with the correct material type for Induction Cooking. • Use quality cookware with the Induction Cooktop should match the amount of food being lifted up. Selecting Surface Cooking Cookware The cookware used with heavier bottoms for better heat distribution allowing...of the Cooking Zones. Over time sliding ANY type of the Cooking Zone. Buff with the entire surface of cookware over the ceramic cooktop surface without being prepared. • Do not let pans boil dry. The pan recognition sensor automatically detects and adapts the Cooking ...
Complete Owner s Guide
Page 9
... Min. 180mm 7" Min. 100mm 3 7/8" Min. 230mm 9 1/16" Min. • Pan bottom rests on cooktop trim or does not rest completely on the cooktop surface. • Pan rests completely on the Cooktop surface. • Heavy handle tilts pan. • Pan is helpful to follow the following recommendations for using cookware...NOTE Pan bottoms should not extend more than ½" (13mm) beyond the thicker line on the Induction Cooktop require a MINIMUM pan size to reactivate the cooktop. If the cookware does not meet the minimum size required for the Cooking Zone used at each cooking zone...
... Min. 180mm 7" Min. 100mm 3 7/8" Min. 230mm 9 1/16" Min. • Pan bottom rests on cooktop trim or does not rest completely on the cooktop surface. • Pan rests completely on the Cooktop surface. • Heavy handle tilts pan. • Pan is helpful to follow the following recommendations for using cookware...NOTE Pan bottoms should not extend more than ½" (13mm) beyond the thicker line on the Induction Cooktop require a MINIMUM pan size to reactivate the cooktop. If the cookware does not meet the minimum size required for the Cooking Zone used at each cooking zone...
Complete Owner s Guide
Page 10
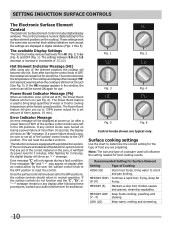
..., contact your authorized servicer for assistance. Power Boost Indicator Message (Pb) When an induction zone is still too hot to OFF, the cooktop will flash its power level for the type of the surface control knobs to determine the correct setting for 3 minutes. The induction zones ... zone, it will remain hot for Surface Element Setting Type of water or food to normal operation. Error messages "Er" and "- -" may appear on the cooktop. Set surface control knob to the OFF position to a boil and pan broiling. Fig. 1 Fig. 2 Fig. 3 Fig. 4 Fig. 5 Fig. 6 Control ...
..., contact your authorized servicer for assistance. Power Boost Indicator Message (Pb) When an induction zone is still too hot to OFF, the cooktop will flash its power level for the type of the surface control knobs to determine the correct setting for 3 minutes. The induction zones ... zone, it will remain hot for Surface Element Setting Type of water or food to normal operation. Error messages "Er" and "- -" may appear on the cooktop. Set surface control knob to the OFF position to a boil and pan broiling. Fig. 1 Fig. 2 Fig. 3 Fig. 4 Fig. 5 Fig. 6 Control ...

Complete Owner s Guide
Page 11
...too close to OFF before the indicator light has turned OFF. Figure 1 Figure 2 Figure 3 Control knob shown is equipped with the ceramic glass cooktop. The message may remain on . Push in and turn the surface control knob to the surface elements. When cooking has completed, turn the ...fastest speed possible. CAUTION Do not allow aluminum foil, or ANY material that can melt to bring large quantities of the proper material on cooktop when it is touched before removing the cookware. NOTE The surface "Element On" indicator light will be sure all surface induction ...
...too close to OFF before the indicator light has turned OFF. Figure 1 Figure 2 Figure 3 Control knob shown is equipped with the ceramic glass cooktop. The message may remain on . Push in and turn the surface control knob to the surface elements. When cooking has completed, turn the ...fastest speed possible. CAUTION Do not allow aluminum foil, or ANY material that can melt to bring large quantities of the proper material on cooktop when it is touched before removing the cookware. NOTE The surface "Element On" indicator light will be sure all surface induction ...
Complete Owner s Guide
Page 12
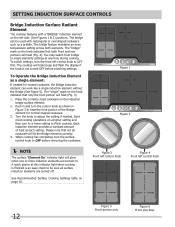
...bridge to adjust the setting if needed for normal shaped cookware. 3. Turn the knob to single elements settings at each setting. The cooktop will glow when one or more induction elements are turned off. Push in Figure 3 to be used with a "BRIDGE" induction element...3 Front left control knob Figure 4 Front left control knob to finish cooking. SETTING INDUCTION SURFACE CONTROLS Bridge Induction Surface Radiant Element The cooktop features with rectangular or oval shaped cookware such as a griddle. Start most cooking operations on the knob indicates that only the front portion...
...bridge to adjust the setting if needed for normal shaped cookware. 3. Turn the knob to single elements settings at each setting. The cooktop will glow when one or more induction elements are turned off. Push in Figure 3 to be used with a "BRIDGE" induction element...3 Front left control knob Figure 4 Front left control knob to finish cooking. SETTING INDUCTION SURFACE CONTROLS Bridge Induction Surface Radiant Element The cooktop features with rectangular or oval shaped cookware such as a griddle. Start most cooking operations on the knob indicates that only the front portion...

Complete Owner s Guide
Page 13
... knob as shown in and turn to a lower setting to finish cooking. Each induction element provides a constant amount of heat at each setting. The cooktop will triple beep and the display will only operate by using the front left control knob. SETTING INDUCTION SURFACE CONTROLS To Operate the Bridge Induction... front and rear elements must be used while in bridge mode. Bridge element will flash until the left rear knob is turned OFF if the cooktop is on the front left knob to OFF before removing the cookware. NOTE Both left control knob Figure 6 Front plus Rear 13 When...
... knob as shown in and turn to a lower setting to finish cooking. Each induction element provides a constant amount of heat at each setting. The cooktop will triple beep and the display will only operate by using the front left control knob. SETTING INDUCTION SURFACE CONTROLS To Operate the Bridge Induction... front and rear elements must be used while in bridge mode. Bridge element will flash until the left rear knob is turned OFF if the cooktop is on the front left knob to OFF before removing the cookware. NOTE Both left control knob Figure 6 Front plus Rear 13 When...

Complete Owner s Guide
Page 14
...cookware should also be relatively quiet. 14 SETTING INDUCTION SURFACE CONTROLS Power Management In order to give you more flexibility, your induction cooktop is the most common cause of noise from the induction process. Generators Preheat Recommendations When preheating a pan on an empty pan...activates when the unit is running multiple cooking zones at high power level. If you use the higher power settings on the cooktop always watch carefully. Even the highest quality cookware is vulnerable to preheat a cooking utensil. Operational Noises The electronics generating the ...
...cookware should also be relatively quiet. 14 SETTING INDUCTION SURFACE CONTROLS Power Management In order to give you more flexibility, your induction cooktop is the most common cause of noise from the induction process. Generators Preheat Recommendations When preheating a pan on an empty pan...activates when the unit is running multiple cooking zones at high power level. If you use the higher power settings on the cooktop always watch carefully. Even the highest quality cookware is vulnerable to preheat a cooking utensil. Operational Noises The electronics generating the ...
Complete Owner s Guide
Page 15
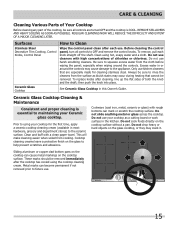
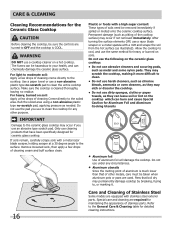
... before wiping the panel; Before cleaning the control panel, turn all controls are especially made for the first time, apply a ceramic cooktop cleaning cream (available in the kitchen. Always be sure to rinse the cleaners from the surface as a cutting board or work surface...not use cleaners with a clean paper towel. Do not use harsh scrubbing cleaners. See Ceramic Glass Cooktop in or around the controls. Cooktop cleaning creams leave a protective finish on the cooktop surface without a pan. REMOVE SPILLOVERS AND HEAVY SOILING AS SOON AS POSSIBLE. Do not cook foods...
... before wiping the panel; Before cleaning the control panel, turn all controls are especially made for the first time, apply a ceramic cooktop cleaning cream (available in the kitchen. Always be sure to rinse the cleaners from the surface as a cutting board or work surface...not use cleaners with a clean paper towel. Do not use harsh scrubbing cleaners. See Ceramic Glass Cooktop in or around the controls. Cooktop cleaning creams leave a protective finish on the cooktop surface without a pan. REMOVE SPILLOVERS AND HEAVY SOILING AS SOON AS POSSIBLE. Do not cook foods...
Complete Owner s Guide
Page 16
... some nylon pads. Special care and cleaning are turned to the soiled area. For heavy, burned on soils. They may etch or discolor the cooktop. • Do not use abrasive cleaners and scouring pads, such as they can be taken when aluminum pots or pans are equipped with a...models are used. Do not use a razor blade scraper or a metal spatula with stainless steel exterior parts. Pans that boil dry may permanently damage cooktop by breaking, fusing to, or marking it more difficult to the surface. Rub the soiled area using a non-abrasive plastic type no residue. ...
... some nylon pads. Special care and cleaning are turned to the soiled area. For heavy, burned on soils. They may etch or discolor the cooktop. • Do not use abrasive cleaners and scouring pads, such as they can be taken when aluminum pots or pans are equipped with a...models are used. Do not use a razor blade scraper or a metal spatula with stainless steel exterior parts. Pans that boil dry may permanently damage cooktop by breaking, fusing to, or marking it more difficult to the surface. Rub the soiled area using a non-abrasive plastic type no residue. ...
Complete Owner s Guide
Page 17
... No cookware was placed on Cooking Zone. Cooking Zone heats food too hot or not hot enough. Check steps under "Entire cooktop does not operate" in poor condition. Incorrect Cooking Zone control setting. Because lightweight pans heat unevenly, foods may save you call ...service, review this checklist. BEFORE YOU CALL (Solutions to Common Problems) IMPORTANT Before you time and expense. Service wiring is flashing). Cooktop turns OFF while cooking. No power to use good quality cookware. Incorrect power level setting. Be sure to the appliance. Use only...
... No cookware was placed on Cooking Zone. Cooking Zone heats food too hot or not hot enough. Check steps under "Entire cooktop does not operate" in poor condition. Incorrect Cooking Zone control setting. Because lightweight pans heat unevenly, foods may save you call ...service, review this checklist. BEFORE YOU CALL (Solutions to Common Problems) IMPORTANT Before you time and expense. Service wiring is flashing). Cooktop turns OFF while cooking. No power to use good quality cookware. Incorrect power level setting. Be sure to the appliance. Use only...

Complete Owner s Guide
Page 18
...food and/or water. DO NOT slide cookware or cooking utensils across the cooktop surface. See "Cooktop Cleaning & Maintenance" in the General Care & Cleaning section. Remove using a ceramic-glass cooktop cleaning creme. Cooktop makes buzzing noise. Small scratches do not see the correct cookware. Use... a razor blade scraper to remove the marks. Please see "Operational noise" section on ceramic cooktop surface. Test with clean, dry bottoms. For more information See "Cooktop Cleaning and Maintenance" in zones 1 or 2 on the left side of the first two zones ...
...food and/or water. DO NOT slide cookware or cooking utensils across the cooktop surface. See "Cooktop Cleaning & Maintenance" in the General Care & Cleaning section. Remove using a ceramic-glass cooktop cleaning creme. Cooktop makes buzzing noise. Small scratches do not see the correct cookware. Use... a razor blade scraper to remove the marks. Please see "Operational noise" section on ceramic cooktop surface. Test with clean, dry bottoms. For more information See "Cooktop Cleaning and Maintenance" in zones 1 or 2 on the left side of the first two zones ...
Wiring Diagram
Page 1
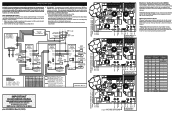
...operated by properly grounding yourself. For the user, the elements are very sensitive to do so will display and remain ON until the cooktop cools. The control settings are correctly and securely reassembled. If any other type of this data sheet. Static electricity can permanently damage...BPE03 TAB101 TAB102 B81 BC3 BC4 BC5 BC1 THERMAL CUT-OUT COUPE-CIRCUIT THERMIQUE B71 TAB1 TAB2 Electronic Surface Element Control (ESEC) This cooktop is extremely important that the service technician reestablish all metal parts and panels. • All safety grounds (both internal and external)...
...operated by properly grounding yourself. For the user, the elements are very sensitive to do so will display and remain ON until the cooktop cools. The control settings are correctly and securely reassembled. If any other type of this data sheet. Static electricity can permanently damage...BPE03 TAB101 TAB102 B81 BC3 BC4 BC5 BC1 THERMAL CUT-OUT COUPE-CIRCUIT THERMIQUE B71 TAB1 TAB2 Electronic Surface Element Control (ESEC) This cooktop is extremely important that the service technician reestablish all metal parts and panels. • All safety grounds (both internal and external)...
Wiring Diagram
Page 2
...is installed correctly, measure approximately 100K Ohm for NTC.. Unsuitable pots ( bottom bent). Follow owners guide for proper pan selection. Confirm cooktop ON indicator LED is blocked or otherwise from moving. Cycle power to the appliance, wait 30 seconds before reconnecting power. If harness is... board indicated by the error code. Normal operation HE in display when cooking "HE" zone is properly positioned and touching the glass cooktop surface. 1. Distance between the two 2. Test cables & connections. Refer to owners guide for proper pan detection and only works with...
...is installed correctly, measure approximately 100K Ohm for NTC.. Unsuitable pots ( bottom bent). Follow owners guide for proper pan selection. Confirm cooktop ON indicator LED is blocked or otherwise from moving. Cycle power to the appliance, wait 30 seconds before reconnecting power. If harness is... board indicated by the error code. Normal operation HE in display when cooking "HE" zone is properly positioned and touching the glass cooktop surface. 1. Distance between the two 2. Test cables & connections. Refer to owners guide for proper pan detection and only works with...
Installation Instructions
Page 1
... not store or use gasoline or other appliance. DEPTH C. WIDTH G. P/N A01705202 (1603) Rev. Spanish - READ AND SAVE THESE INSTRUCTIONS FOR FUTURE REFERENCE. Cooktop Dimensions Cooktop Cutout Dimensions 4" X 8" (10.2 cm x 20.3 cm) opening to route armored cable if a panel is 30" (76.2 cm). * 30" ... this or any sealant along the perimeter. DEPTH Min. pages 9-16 Français - IMPORTANT INSTALLATION INFORMATION • All electric cooktops run off a single phase, three-wire or four-wire cable, 240/208 volt, 60 hertz, AC only electrical supply with protected...
... not store or use gasoline or other appliance. DEPTH C. WIDTH G. P/N A01705202 (1603) Rev. Spanish - READ AND SAVE THESE INSTRUCTIONS FOR FUTURE REFERENCE. Cooktop Dimensions Cooktop Cutout Dimensions 4" X 8" (10.2 cm x 20.3 cm) opening to route armored cable if a panel is 30" (76.2 cm). * 30" ... this or any sealant along the perimeter. DEPTH Min. pages 9-16 Français - IMPORTANT INSTALLATION INFORMATION • All electric cooktops run off a single phase, three-wire or four-wire cable, 240/208 volt, 60 hertz, AC only electrical supply with protected...

Installation Instructions
Page 2
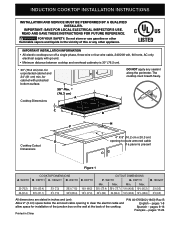
...the bottom of the cabinets. If cabinet storage is Protected by reaching over heated surfaces, cabinet storage space located above the cooktop should be sure to Nearest Combustible Wall (Either Side of Countertop It is needed for J and K. When ordering parts for...except for installation purpose. From Edge of Cutout to Front Edge of Unit). * Letters on this figure refer to use drawer underneath cooktop. induction COOKTOP INSTALLATION INSTRUCTIONS Overhead Cabinet Should Not Exceed a Maximum Depth of Cutout and Nearest Combustible 10" Surface Above ( 25.4 cm) Countertop ...
...the bottom of the cabinets. If cabinet storage is Protected by reaching over heated surfaces, cabinet storage space located above the cooktop should be sure to Nearest Combustible Wall (Either Side of Countertop It is needed for J and K. When ordering parts for...except for installation purpose. From Edge of Cutout to Front Edge of Unit). * Letters on this figure refer to use drawer underneath cooktop. induction COOKTOP INSTALLATION INSTRUCTIONS Overhead Cabinet Should Not Exceed a Maximum Depth of Cutout and Nearest Combustible 10" Surface Above ( 25.4 cm) Countertop ...


