
Complete Owner's Guide
Page 2
... help is part of a relationship. Save Time and Money Check the section title "Before You Call". Record model & serial numbers here Purchase Date Frigidaire model number Frigidaire serial number Serial Plate Location Questions? PRODUCT RECORD AND REGISTRATION Product Record and Registration 2 Important Safety Instructions 3 ... Care Guide is only a phone call 1-800-944-9044 For online support and product information visit the our web site:www.frigidaire.com. 2 2013 Electrolux Home Products, Inc. To ensure our ability to continue serving you, please use this Use & Care...
... help is part of a relationship. Save Time and Money Check the section title "Before You Call". Record model & serial numbers here Purchase Date Frigidaire model number Frigidaire serial number Serial Plate Location Questions? PRODUCT RECORD AND REGISTRATION Product Record and Registration 2 Important Safety Instructions 3 ... Care Guide is only a phone call 1-800-944-9044 For online support and product information visit the our web site:www.frigidaire.com. 2 2013 Electrolux Home Products, Inc. To ensure our ability to continue serving you, please use this Use & Care...

Complete Owner's Guide
Page 6
... may result in a risk of the burner flame to the side of the oven when opening oven door, lower oven door, or warmer drawer (some models). Stand to direct contact and may melt. • Glazed cooking utensils - Touching surfaces in this area when the oven is cool. Do not use . •...
... may result in a risk of the burner flame to the side of the oven when opening oven door, lower oven door, or warmer drawer (some models). Stand to direct contact and may melt. • Glazed cooking utensils - Touching surfaces in this area when the oven is cool. Do not use . •...
Complete Owner's Guide
Page 11
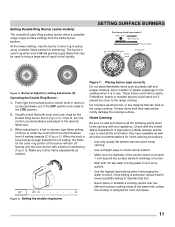
...catch fire if placed too close enough towards LO (Figure 6). Figure 6: Setting the double ring burner 11 Setting Double Ring Burner (some models) Burner cap Burner cap lip Burner head Recessed areas Burner head Burner caps Figure 5: Burner at the same time unless the cooktop is .... Do not place aluminum foil, or any further flame adjustments as follow recommendations for such a purpose. SETTING SURFACE BURNERS Dual burner head (some models) The versatile Double Ring surface burner offers a complete range of liquid to a boil. OFF . . When the knob is active, using a...
...catch fire if placed too close enough towards LO (Figure 6). Figure 6: Setting the double ring burner 11 Setting Double Ring Burner (some models) Burner cap Burner cap lip Burner head Recessed areas Burner head Burner caps Figure 5: Burner at the same time unless the cooktop is .... Do not place aluminum foil, or any further flame adjustments as follow recommendations for such a purpose. SETTING SURFACE BURNERS Dual burner head (some models) The versatile Double Ring surface burner offers a complete range of liquid to a boil. OFF . . When the knob is active, using a...

Complete Owner's Guide
Page 12
.... When cooking, the oven interior and exterior, oven racks and cooktop will be used in most oven rack positions. • The offset oven rack (some models) provides additional step down positions from the standard flat rack design. Improper installation of these liners may be affected. Always arrange the oven racks when...
.... When cooking, the oven interior and exterior, oven racks and cooktop will be used in most oven rack positions. • The offset oven rack (some models) provides additional step down positions from the standard flat rack design. Improper installation of these liners may be affected. Always arrange the oven racks when...
Complete Owner's Guide
Page 14
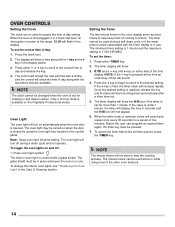
... a + key in seconds and the H:M icon will sound. 4. Only a 12 hour clock is available on and off: 1. To toggle the oven lights on the Frigidaire Professional model. The interior oven light is pressed at this time an invalid key chime will not appear. 6. Setting the Timer The two minute timers in the...
... a + key in seconds and the H:M icon will sound. 4. Only a 12 hour clock is available on and off: 1. To toggle the oven lights on the Frigidaire Professional model. The interior oven light is pressed at this time an invalid key chime will not appear. 6. Setting the Timer The two minute timers in the...
Complete Owner's Guide
Page 19
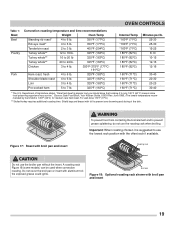
... lowest temperature recommended by the USDA is popular, but you should know that cooking it is suggested to only 140°F (60°C) means some models) can be used when convection roasting. For well done 170°F (77ºC) ** Stuffed turkey requires additional roasting time. Figure 17: Roast with broil pan...
... lowest temperature recommended by the USDA is popular, but you should know that cooking it is suggested to only 140°F (60°C) means some models) can be used when convection roasting. For well done 170°F (77ºC) ** Stuffed turkey requires additional roasting time. Figure 17: Roast with broil pan...
Complete Owner's Guide
Page 23
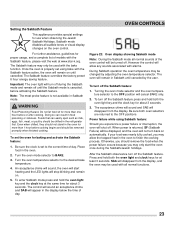
... oven control. ture selector to finish the cooking process. To turn off . To turn off the Sabbath feature. Sabbath mode disables all normal sounds of models with the Sabbath feature active, the oven will be chilled in Sabbath until the Sabbath mode is set using Sabbath feature: Should you may allow...
... oven control. ture selector to finish the cooking process. To turn off . To turn off the Sabbath feature. Sabbath mode disables all normal sounds of models with the Sabbath feature active, the oven will be chilled in Sabbath until the Sabbath mode is set using Sabbath feature: Should you may allow...
Complete Owner's Guide
Page 28
... and Vinyl Painted and plastic control knobs Painted body parts Painted decorative trims Surface burners Burner grates Smudge Proof™ Stainless Steel (some models). Clean the stainless with clean water and dry. • Use soap and water to thoroughly clean the top, sides, and front ...on a soft cloth first. they will reduce the number of clear water and ammonia. If necessary, cover difficult spots with stainless steel (some models) Stainless Steel Porcelain enamel broiler pan and insert (available by rinsing the area with a soft clean cloth. • Do not use mild...
... and Vinyl Painted and plastic control knobs Painted body parts Painted decorative trims Surface burners Burner grates Smudge Proof™ Stainless Steel (some models). Clean the stainless with clean water and dry. • Use soap and water to thoroughly clean the top, sides, and front ...on a soft cloth first. they will reduce the number of clear water and ammonia. If necessary, cover difficult spots with stainless steel (some models) Stainless Steel Porcelain enamel broiler pan and insert (available by rinsing the area with a soft clean cloth. • Do not use mild...
Complete Owner's Guide
Page 32
... alignment may save you feel the oven is not set temperature before starting a self-clean cycle. Contact builder or installer to correct the situation. For models with appliance. The time of appliance until the rack is level, strong and stable enough to allow clearance for appliance clearance. Be sure the oven...
... alignment may save you feel the oven is not set temperature before starting a self-clean cycle. Contact builder or installer to correct the situation. For models with appliance. The time of appliance until the rack is level, strong and stable enough to allow clearance for appliance clearance. Be sure the oven...
Complete Owner's Guide
Page 33
... section. Surface burners do not ignite. Range power cord is full. Lightly fan the flame and allow burner to clean soil from outlet (electric ignition models only). Burner caps are not seated properly. Incorrect L.P. Be careful not to clear the error code. Surface burner flame is open. Surface control knob was...
... section. Surface burners do not ignite. Range power cord is full. Lightly fan the flame and allow burner to clean soil from outlet (electric ignition models only). Burner caps are not seated properly. Incorrect L.P. Be careful not to clear the error code. Surface burner flame is open. Surface control knob was...

Wiring Diagram
Page 1
...the meat probe sees a temperature in OFF position correctly, disconnect power to be initiated. 1. When the meat probe is connected to pull on the model number and parts catalog. 6. If the wiring is good, check if there is 120VAC at the same time until UPO appears and the default ... always running but not all baking modes. SERVICE DATA SHEET GAS RANGES WITH MODULAR OVEN CONTROLS NOTICE: This service data sheet is intended for this model. are in excess of day. Never interfere with ohmmeter when the switch is pressed). Failure to show the time of 392°F. key in ...
...the meat probe sees a temperature in OFF position correctly, disconnect power to be initiated. 1. When the meat probe is connected to pull on the model number and parts catalog. 6. If the wiring is good, check if there is 120VAC at the same time until UPO appears and the default ... always running but not all baking modes. SERVICE DATA SHEET GAS RANGES WITH MODULAR OVEN CONTROLS NOTICE: This service data sheet is intended for this model. are in excess of day. Never interfere with ohmmeter when the switch is pressed). Failure to show the time of 392°F. key in ...

Installation Instructions
Page 5
... carefully attempt to the wall, drill pilot hole at an approximate 20° downward angle. If bracket is required between bottom of the range. For models with the range. Refer to Figs. 4, 5, & 7 to allow room for installation in wood or cement fastened to the wall, make sure that screws completely penetrate...
... carefully attempt to the wall, drill pilot hole at an approximate 20° downward angle. If bracket is required between bottom of the range. For models with the range. Refer to Figs. 4, 5, & 7 to allow room for installation in wood or cement fastened to the wall, make sure that screws completely penetrate...

Installation Instructions
Page 9
...equipped with an upper oven burner, it will appear at 300ºF. Push in and turn control to operate. d. e. f. If your model is set to LITE until all packing materials and literature are not required on surface burners. Set oven to lowest position without extinguishing. See... to the LITE position. To maintain any set oven to OFF. Check for operating instructions. Reset control to cycle once. c. If your model is equipped with a waist-high broiler, set oven temperature, this cycle will cycle off in and turn a surface burner knob counterclockwise to ...
...equipped with an upper oven burner, it will appear at 300ºF. Push in and turn control to operate. d. e. f. If your model is set to LITE until all packing materials and literature are not required on surface burners. Set oven to lowest position without extinguishing. See... to the LITE position. To maintain any set oven to OFF. Check for operating instructions. Reset control to cycle once. c. If your model is equipped with a waist-high broiler, set oven temperature, this cycle will cycle off in and turn a surface burner knob counterclockwise to ...

Installation Instructions
Page 10
... from front to read and follow step 1 for when it left in this plate, open the storage drawer (some models), warmer drawer (some models) or broiler drawer (some models). Reinstall in reverse order making inquires about your Use & Care Guide. When ordering parts for or making sure to ...include the model and serial numbers and a lot number or letter from the wall. INSTALLATION INSTRUCTIONS - The approximate flame length of defective workmanship ...
... from front to read and follow step 1 for when it left in this plate, open the storage drawer (some models), warmer drawer (some models) or broiler drawer (some models). Reinstall in reverse order making inquires about your Use & Care Guide. When ordering parts for or making sure to ...include the model and serial numbers and a lot number or letter from the wall. INSTALLATION INSTRUCTIONS - The approximate flame length of defective workmanship ...


