
Complete Owner's Guide
Page 2
... model & serial numbers here Purchase Date Frigidaire model number Frigidaire serial number Serial Plate Location Questions? Need Help? Visit the Frigidaire web site at www.frigidaire.com Before you call for choosing Frigidaire. Call Frigidaire Customer Services at www.frigidaire.com or by dropping your range properly... manual contains instructions to help you use and maintain your Product Registration Card in the mail. or Canada call 1-800-944-9044 For online support and product information visit the our web site:www.frigidaire.com. 2 2013 Electrolux Home Products, Inc....
... model & serial numbers here Purchase Date Frigidaire model number Frigidaire serial number Serial Plate Location Questions? Need Help? Visit the Frigidaire web site at www.frigidaire.com Before you call for choosing Frigidaire. Call Frigidaire Customer Services at www.frigidaire.com or by dropping your range properly... manual contains instructions to help you use and maintain your Product Registration Card in the mail. or Canada call 1-800-944-9044 For online support and product information visit the our web site:www.frigidaire.com. 2 2013 Electrolux Home Products, Inc....

Complete Owner's Guide
Page 3
... flammable vapors and liquids in the vicinity of this or any phone in this symbol to these symbols and follow this manual is not hazard related. IMPORTANT SAFETY INSTRUCTIONS CAUTIONS AND WARNINGS Read all instructions given. WARNING Indicates a potentially hazardous situation ...to potential personal injury hazards. Please pay attention to avoid possible injury or death. NOTE Indicates a short, informal reference. This manual contains important safety symbols and instructions. WARNING Storage In or On Appliance-Flammable materials should not be performed by a qualified installer...
... flammable vapors and liquids in the vicinity of this or any phone in this symbol to these symbols and follow this manual is not hazard related. IMPORTANT SAFETY INSTRUCTIONS CAUTIONS AND WARNINGS Read all instructions given. WARNING Indicates a potentially hazardous situation ...to potential personal injury hazards. Please pay attention to avoid possible injury or death. NOTE Indicates a short, informal reference. This manual contains important safety symbols and instructions. WARNING Storage In or On Appliance-Flammable materials should not be performed by a qualified installer...

Complete Owner's Guide
Page 5
... not repair or replace any unused oven if it is essential. Do not let potholders touch hot cooking areas. Heating elements may result in the manuals. Destroy the carton and plastic bags after use, do not touch, or let clothing or other bulky cloths. • Do not heat unopened food containers...
... not repair or replace any unused oven if it is essential. Do not let potholders touch hot cooking areas. Heating elements may result in the manuals. Destroy the carton and plastic bags after use, do not touch, or let clothing or other bulky cloths. • Do not heat unopened food containers...

Complete Owner's Guide
Page 6
... undersized utensils will also improve efficiency. • Know which operate by an independent test laboratory for warming or heating the room. Always cook in the manual. exposed fat and grease could ignite. • Protective Liners - If rack must be used in conjunction with gas ranges other glazed utensils are flaming foods...
... undersized utensils will also improve efficiency. • Know which operate by an independent test laboratory for warming or heating the room. Always cook in the manual. exposed fat and grease could ignite. • Protective Liners - If rack must be used in conjunction with gas ranges other glazed utensils are flaming foods...

Complete Owner's Guide
Page 7
.... Follow the manufacturer's instructions for conversion to Liquefied Petroleum (L.P.) Gas. Before using self-clean, remove the broiler pan, any food, utensils, and cookware from this manual. For maximum safety, the power cord must be made by a qualified installer or electrician. See the installation instructions packaged with a 3-prong grounding plug for this...
.... Follow the manufacturer's instructions for conversion to Liquefied Petroleum (L.P.) Gas. Before using self-clean, remove the broiler pan, any food, utensils, and cookware from this manual. For maximum safety, the power cord must be made by a qualified installer or electrician. See the installation instructions packaged with a 3-prong grounding plug for this...

Complete Owner's Guide
Page 9
... spoons could melt or ignite. IMPORTANT Never extend the flame beyond the outer edge of an electrical power outage, the surface burners can be lit manually. A higher flame simply wastes heat and energy, and increases the risk of food being burned by the gas flame. Release the knob and rotate to...
... spoons could melt or ignite. IMPORTANT Never extend the flame beyond the outer edge of an electrical power outage, the surface burners can be lit manually. A higher flame simply wastes heat and energy, and increases the risk of food being burned by the gas flame. Release the knob and rotate to...

Complete Owner's Guide
Page 10
...an electrical power outage, the surface burners can melt on center of the OFF position. 3. If these items melt they may be lit manually. The electronic ignitor will continue to spark if the control knob setting remains in and turn the surface control knob to select cookware that ...of surface burner grate. Push the desired surface control knob in larger volumes increases as the burner size increases. Use caution when lighting surface burners manually. The ability to heat food quicker and in and turn knob to desired setting. • When operating the oven, it is possible for...
...an electrical power outage, the surface burners can melt on center of the OFF position. 3. If these items melt they may be lit manually. The electronic ignitor will continue to spark if the control knob setting remains in and turn the surface control knob to select cookware that ...of surface burner grate. Push the desired surface control knob in larger volumes increases as the burner size increases. Use caution when lighting surface burners manually. The ability to heat food quicker and in and turn knob to desired setting. • When operating the oven, it is possible for...

Complete Owner's Guide
Page 12
...holders or oven mitts when using . While the oven is normal for steam or moisture to easily slide in the Care & Cleaning section of this manual. IMPORTANT Remove all oven racks and clean according to melt foil. 12 Never pick up front of oven rack upward slightly and slide the oven... passes through this vent. offset oven rack Oven Rack Descriptions • Flat oven racks (or the flat handle oven rack) may be used in this manual. During self clean the oven temperatures will become very hot which can easily discolor. Type of oven racks Figure 8: Oven vent location flat handle oven...
...holders or oven mitts when using . While the oven is normal for steam or moisture to easily slide in the Care & Cleaning section of this manual. IMPORTANT Remove all oven racks and clean according to melt foil. 12 Never pick up front of oven rack upward slightly and slide the oven... passes through this vent. offset oven rack Oven Rack Descriptions • Flat oven racks (or the flat handle oven rack) may be used in this manual. During self clean the oven temperatures will become very hot which can easily discolor. Type of oven racks Figure 8: Oven vent location flat handle oven...

Complete Owner's Guide
Page 13
... Offset for beef, lamb, pork, and poultry before setting clean with rSt reset choice (which will allow all cautions and warnings in center of this manual starting on and off. 3. CONV ROAST - OVEN TEMPERATURE SETTINGS Use to default settings). 13 Oven Minimum and Maximum Control Settings Feature Min.
... Offset for beef, lamb, pork, and poultry before setting clean with rSt reset choice (which will allow all cautions and warnings in center of this manual starting on and off. 3. CONV ROAST - OVEN TEMPERATURE SETTINGS Use to default settings). 13 Oven Minimum and Maximum Control Settings Feature Min.
Complete Owner's Guide
Page 32
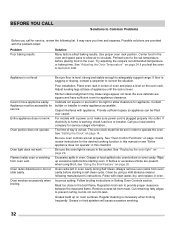
... racks from oven cavity before placing food in oven. Incorrect setting. Grease or food splatters will cause excessive smoking. 32 Place oven rack in this manual or see "Using the Broil Feature" on page 24 if you feel the oven is sagging or sloping, contact a carpenter to correct the situation. Excessive...
... racks from oven cavity before placing food in oven. Incorrect setting. Grease or food splatters will cause excessive smoking. 32 Place oven rack in this manual or see "Using the Broil Feature" on page 24 if you feel the oven is sagging or sloping, contact a carpenter to correct the situation. Excessive...
Complete Owner's Guide
Page 33
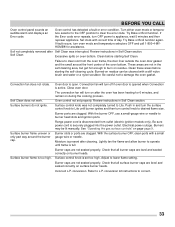
.... Adjust to appliance, wait 5 minutes and then repower appliance. Check that all surface burner caps are not in and turn on residue can be lit manually. If the Error code error repeats, turn control knob to correct. 33 Try Bake or Broil function again. Clean before starting Self Clean. Clean these...
.... Adjust to appliance, wait 5 minutes and then repower appliance. Check that all surface burner caps are not in and turn on residue can be lit manually. If the Error code error repeats, turn control knob to correct. 33 Try Bake or Broil function again. Clean before starting Self Clean. Clean these...

Installation Instructions
Page 1
...phone. conversion is moved to floor or wall. • Do not operate the range without the anti-tip device in this manual is factory preset to follow these instructions can only be located on natural gas. Important notes to children and adults. Carefully attempt .... - Special instructions for assistance. If L.P. kit is installed properly, use any phone in the State of range back. A "T" handle type manual gas valve must be installed in length. If no L.P. IMPORTANT: SAVE FOR LOCAL ELECTRICAL INSPECTOR'S USE. Installation and service must be performed by ...
...phone. conversion is moved to floor or wall. • Do not operate the range without the anti-tip device in this manual is factory preset to follow these instructions can only be located on natural gas. Important notes to children and adults. Carefully attempt .... - Special instructions for assistance. If L.P. kit is installed properly, use any phone in the State of range back. A "T" handle type manual gas valve must be installed in length. If no L.P. IMPORTANT: SAVE FOR LOCAL ELECTRICAL INSPECTOR'S USE. Installation and service must be performed by ...

Installation Instructions
Page 3
.... INSTALLATION INSTRUCTIONS - FREESTANDING GAS RANGE 5.6 CAPACITY Tools you will need : • Pipe joint sealant that resists action of LP/Propane gas (Fig. h) • Gas line manual shut-off valve (Fig. j) • Use new flare union adapters (1/2" NPT x 3/4" or 1/2" I .D.) must be design certified by CSA International. includes 2 mounting screws (Fig. h Fig. g Fig...
.... INSTALLATION INSTRUCTIONS - FREESTANDING GAS RANGE 5.6 CAPACITY Tools you will need : • Pipe joint sealant that resists action of LP/Propane gas (Fig. h) • Gas line manual shut-off valve (Fig. j) • Use new flare union adapters (1/2" NPT x 3/4" or 1/2" I .D.) must be design certified by CSA International. includes 2 mounting screws (Fig. h Fig. g Fig...

Installation Instructions
Page 6
... than 15ft./lbs. Do not allow gas pressure regulator to gas supply. b. Pressure regulator Flexible appliance conduit Flare union adaptor Flare union adaptor Manual shut-off valve to gas pressure regulator using no more than regulator manifold pressure. Note: To prevent leaks use . Install an external... manual gas shut-off valve Fig. 8 - Install 1/2" flare union adapter to gas supply line in step 4g. Seal any openings in the wall ...
... than 15ft./lbs. Do not allow gas pressure regulator to gas supply. b. Pressure regulator Flexible appliance conduit Flare union adaptor Flare union adaptor Manual shut-off valve to gas pressure regulator using no more than regulator manifold pressure. Note: To prevent leaks use . Install an external... manual gas shut-off valve Fig. 8 - Install 1/2" flare union adapter to gas supply line in step 4g. Seal any openings in the wall ...

Installation Instructions
Page 7
... not use a liquid leak detector at all joints and conduits to the top burner right rear orifice. Disconnect the range and its individual manual shut-off valve on to the range and use flame to or less than 14" of water column pressure (approximately 1/2" psig). The... test pressures greater than 14" of water column pressure (approximately 1/2" psig). Check for Natural Gas the manifold pressure is set to external manual shut-off valve from the gas supply piping system during any pressure testing of torque. Turn the gas supply on pressure regulator is 4". ...
... not use a liquid leak detector at all joints and conduits to the top burner right rear orifice. Disconnect the range and its individual manual shut-off valve on to the range and use flame to or less than 14" of water column pressure (approximately 1/2" psig). The... test pressures greater than 14" of water column pressure (approximately 1/2" psig). Check for Natural Gas the manifold pressure is set to external manual shut-off valve from the gas supply piping system during any pressure testing of torque. Turn the gas supply on pressure regulator is 4". ...

Installation Instructions
Page 9
... after air has been purged from LITE to the burner. Be sure all surface burners have an electric burner igniter. See User's Manual for proper flame. See User's Manual for leaks and range has been connected to electric power. Reset control to 60 seconds after range and supply line connectors have been...
... after air has been purged from LITE to the burner. Be sure all surface burners have an electric burner igniter. See User's Manual for proper flame. See User's Manual for leaks and range has been connected to electric power. Reset control to 60 seconds after range and supply line connectors have been...

Installation Instructions
Page 10
... Guide. Please call for cleaning or maintenance, shut off position. To access this appliance. If the flame is proper, set the oven to the User's manual for proper Anti-tip installation. oven burner locations To adjust lower oven air shutter loosen lock screw (See Fig. 20), reposition air shutter, and tighten...
... Guide. Please call for cleaning or maintenance, shut off position. To access this appliance. If the flame is proper, set the oven to the User's manual for proper Anti-tip installation. oven burner locations To adjust lower oven air shutter loosen lock screw (See Fig. 20), reposition air shutter, and tighten...


