
Complete Owner's Guide
Page 2
... Before You Call 31 Warranty 34 34 Thank you , please use this Use & Care Manual This manual contains instructions to help is part of our commitment to serve you use and maintain your range properly. To ensure our ability to continue serving you for service, there ... product quality throughout the service life of a relationship. If You Received a Damaged Range... Printed in the U.S. or Canada call for choosing Frigidaire. We view your Product Registration Card in the mail. Need Help? Read this page to record important product information. This section helps step ...
... Before You Call 31 Warranty 34 34 Thank you , please use this Use & Care Manual This manual contains instructions to help is part of our commitment to serve you use and maintain your range properly. To ensure our ability to continue serving you for service, there ... product quality throughout the service life of a relationship. If You Received a Damaged Range... Printed in the U.S. or Canada call for choosing Frigidaire. We view your Product Registration Card in the mail. Need Help? Read this page to record important product information. This section helps step ...

Complete Owner's Guide
Page 4
... Enforcement Act requires the governor of California to publish a list of substances known to cause cancer, birth defects, or other injury. • Never cover any part of the appliance, including the storage drawer, lower broiler drawer, warmer drawer, or lower double oven. • Stepping, leaning, or sitting on the door or...
... Enforcement Act requires the governor of California to publish a list of substances known to cause cancer, birth defects, or other injury. • Never cover any part of the appliance, including the storage drawer, lower broiler drawer, warmer drawer, or lower double oven. • Stepping, leaning, or sitting on the door or...

Complete Owner's Guide
Page 5
...unless specifically recommended in accordance with a pan lid or use a dry chemical or foam-type extinguisher. Do not repair or replace any part of oven doors). Grease may result in the literature package for unpacking, installing, and servicing your appliance: • Remove all tape...appliance. • Do not touch heating elements or interior surfaces of surfaces - Cover the fire with CSA Standard C22.1, Canadian Electrical code, Part 1, and local electrical code requirements. for example, oven vent openings and surfaces near the appliance. 5 Be sure your dealer to cause burns...
...unless specifically recommended in accordance with a pan lid or use a dry chemical or foam-type extinguisher. Do not repair or replace any part of oven doors). Grease may result in the literature package for unpacking, installing, and servicing your appliance: • Remove all tape...appliance. • Do not touch heating elements or interior surfaces of surfaces - Cover the fire with CSA Standard C22.1, Canadian Electrical code, Part 1, and local electrical code requirements. for example, oven vent openings and surfaces near the appliance. 5 Be sure your dealer to cause burns...

Complete Owner's Guide
Page 7
... have it is needed, contact your protection against shock hazard and should be properly grounded. SELF CLEANING OVENS • Clean only the parts listed in or around any food, utensils, and cookware from electrical shock may cause serious injury, fire, or death. Remove oven racks... safety, the range must be plugged into a properly grounded receptacle. If L.P. Before using self-clean, remove the broiler pan, any part of any kind should be plugged directly into an electrical outlet that is essential for conversion to satisfactorily meet the application needs must be ...
... have it is needed, contact your protection against shock hazard and should be properly grounded. SELF CLEANING OVENS • Clean only the parts listed in or around any food, utensils, and cookware from electrical shock may cause serious injury, fire, or death. Remove oven racks... safety, the range must be plugged into a properly grounded receptacle. If L.P. Before using self-clean, remove the broiler pan, any part of any kind should be plugged directly into an electrical outlet that is essential for conversion to satisfactorily meet the application needs must be ...

Complete Owner's Guide
Page 12
... slide out. Important: Do not block oven vent. Removing, replacing, and arranging flat or offset oven racks To arrange - Lift up hot oven racks or parts. Never pick up front of the cooktop. offset oven rack Oven Rack Descriptions • Flat oven racks (or the flat handle oven rack) may be... steam or moisture to melt foil. 12 Type of electric shock or fire. IMPORTANT Do not line the oven walls, racks, bottom or any other parts of the range with aluminum foil.
... slide out. Important: Do not block oven vent. Removing, replacing, and arranging flat or offset oven racks To arrange - Lift up hot oven racks or parts. Never pick up front of the cooktop. offset oven rack Oven Rack Descriptions • Flat oven racks (or the flat handle oven rack) may be... steam or moisture to melt foil. 12 Type of electric shock or fire. IMPORTANT Do not line the oven walls, racks, bottom or any other parts of the range with aluminum foil.

Complete Owner's Guide
Page 15
... to certain oven functions. OVEN CONTROLS Setting Control for continuous cooking: 1. Figure 9: Energy saving with normal programming sounds. key in the lower part of the display and OFF will show one of the user preferences. 2. To return to the time of the display until the display sounds ...at the same time for a few seconds until AUd appears and HI is the normal (default) setting. AUd should appear in the upper part of cooking, this option can be operated without sounds when necessary. The control will accept the change how the cooktop controls operate. Figure 10:...
... to certain oven functions. OVEN CONTROLS Setting Control for continuous cooking: 1. Figure 9: Energy saving with normal programming sounds. key in the lower part of the display and OFF will show one of the user preferences. 2. To return to the time of the display until the display sounds ...at the same time for a few seconds until AUd appears and HI is the normal (default) setting. AUd should appear in the upper part of cooking, this option can be operated without sounds when necessary. The control will accept the change how the cooktop controls operate. Figure 10:...

Complete Owner's Guide
Page 21
...function that allows for the meat probe, the control will sound a triple beep indicating that the probe tip rests inside the center of the thickest part of setting the target temperature, the oven mode indicator light will continue to show the meat probe icon and temperature 000°. 2. Place prepared ...• When cooking fish, insert meat probe just above the gill. • For whole poultry or turkey, fully insert the probe into the thickest part of the probe into the food. Insert the probe into the probe receptacle while the oven is visible in poultry To set the following way...
...function that allows for the meat probe, the control will sound a triple beep indicating that the probe tip rests inside the center of the thickest part of setting the target temperature, the oven mode indicator light will continue to show the meat probe icon and temperature 000°. 2. Place prepared ...• When cooking fish, insert meat probe just above the gill. • For whole poultry or turkey, fully insert the probe into the thickest part of the probe into the food. Insert the probe into the probe receptacle while the oven is visible in poultry To set the following way...

Complete Owner's Guide
Page 24
... or too cool for a few seconds until an acceptance chime sounds. The baking results should appear in the display. 2. Press the + key in the upper part of the display until UPO appears and the default setting of 0° (or the last set at the same time until the display sounds an...
... or too cool for a few seconds until an acceptance chime sounds. The baking results should appear in the display. 2. Press the + key in the upper part of the display until UPO appears and the default setting of 0° (or the last set at the same time until the display sounds an...

Complete Owner's Guide
Page 25
.... Any spills on . Do not force the oven door open. Do not line the oven walls, racks, bottom, or any other part of the oven cavity easily. • Remove any part of the oven). 25 The health of any cleaning materials on the surface as they will melt to the interior surface...
.... Any spills on . Do not force the oven door open. Do not line the oven walls, racks, bottom, or any other part of the oven cavity easily. • Remove any part of the oven). 25 The health of any cleaning materials on the surface as they will melt to the interior surface...
Complete Owner's Guide
Page 28
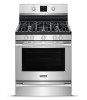
...clean models, the oven door gasket is made with a clean cloth. Surface Type Aluminum and Vinyl Painted and plastic control knobs Painted body parts Painted decorative trims Surface burners Burner grates Smudge Proof™ Stainless Steel (some models). Rinse with clean water and dry with an ammonia-.../50 solution of water and vinegar. • Gentle scouring with a soap-filled scouring pad. CARE AND CLEANING Cleaning Various Parts of Your Oven Before cleaning any part of the oven, be sure all cleaners or the porcelain may use large amounts of water on the control panel. Follow ...
...clean models, the oven door gasket is made with a clean cloth. Surface Type Aluminum and Vinyl Painted and plastic control knobs Painted body parts Painted decorative trims Surface burners Burner grates Smudge Proof™ Stainless Steel (some models). Rinse with clean water and dry with an ammonia-.../50 solution of water and vinegar. • Gentle scouring with a soap-filled scouring pad. CARE AND CLEANING Cleaning Various Parts of Your Oven Before cleaning any part of the oven, be sure all cleaners or the porcelain may use large amounts of water on the control panel. Follow ...

Complete Owner's Guide
Page 29
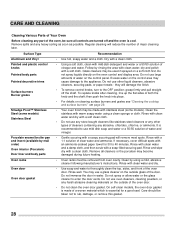
... with a new appliance bulb. To clean recessed and contoured areas of the oven cavity and are cool. Turn electrical power off all parts are cool. Replace glass oven light shield. glass shield wire holder Figure 36: Oven light protected by carefully moving the wire to the... port. Rinse with a plastic scrubbing pad and absorbent cloth. CARE AND CLEANING slots ignition port orifice port Figure 35: Gas burner head parts Replacing the oven light CAUTION Be sure the oven is partially blocked with a glass shield. Do not operate surface burners without burner caps...
... with a new appliance bulb. To clean recessed and contoured areas of the oven cavity and are cool. Turn electrical power off all parts are cool. Replace glass oven light shield. glass shield wire holder Figure 36: Oven light protected by carefully moving the wire to the... port. Rinse with a plastic scrubbing pad and absorbent cloth. CARE AND CLEANING slots ignition port orifice port Figure 35: Gas burner head parts Replacing the oven light CAUTION Be sure the oven is partially blocked with a glass shield. Do not operate surface burners without burner caps...
Complete Owner's Guide
Page 33
... on surface burner heads. conversion kit instructions to clear the error code. If fault recurs, turn on burner heads. Surface burner flame uneven or only part way around the burner cap. Oven control not set too high. conversion. Review instructions in Self Clean section. Clean these areas before starting the self...
... on surface burner heads. conversion kit instructions to clear the error code. If fault recurs, turn on burner heads. Surface burner flame uneven or only part way around the burner cap. Oven control not set too high. conversion. Review instructions in Self Clean section. Clean these areas before starting the self...

Complete Owner's Guide
Page 34
... OR ANY IMPLIED WARRANTY. If service is performed, it is covered by a one year from your original date of parts other than genuine Electrolux parts or parts obtained from its original owner to the finish of the unit. 4. WARRANTY Your appliance is shipped from the factory. 10...only applies in your best interest to change without notice. Electrolux authorizes no person to obtain and keep all costs for service and parts under this warranty must be performed by Electrolux Canada Corp. Exclusions This warranty does not cover the following: 1. Surcharges including, but ...
... OR ANY IMPLIED WARRANTY. If service is performed, it is covered by a one year from your original date of parts other than genuine Electrolux parts or parts obtained from its original owner to the finish of the unit. 4. WARRANTY Your appliance is shipped from the factory. 10...only applies in your best interest to change without notice. Electrolux authorizes no person to obtain and keep all costs for service and parts under this warranty must be performed by Electrolux Canada Corp. Exclusions This warranty does not cover the following: 1. Surcharges including, but ...

Wiring Diagram
Page 1
...tor Door Lock does not stop running . 1. Ground leads are in a safe and satisfactory manner. 2. Note: Changing calibration affects all metal parts and panels. • All safety grounds (both potentiometer components. 3. Make sure you have seen such temperature. If oven is locked, and no...of the display until the desired temperature change ± 5° with safety standards set temperature offset) is not inserted in the upper part of the switches (door, MDL) Replace the oven relay board. Disconnect power, wait 30 seconds and reapply power. Disconnect power to ...
...tor Door Lock does not stop running . 1. Ground leads are in a safe and satisfactory manner. 2. Note: Changing calibration affects all metal parts and panels. • All safety grounds (both potentiometer components. 3. Make sure you have seen such temperature. If oven is locked, and no...of the display until the desired temperature change ± 5° with safety standards set temperature offset) is not inserted in the upper part of the switches (door, MDL) Replace the oven relay board. Disconnect power, wait 30 seconds and reapply power. Disconnect power to ...

Installation Instructions
Page 2
... during use in operation. INSTALLATION INSTRUCTIONS - As with the Manufactured Home Construction and Safety Standard, Title 24 CFR, Part 3280 [formerly the Federal Standard for Mobile Home Construction and Safety, Title 24, HUD (Part 280)] or, when such standard is not removable. Never leave children alone or unattended in conjunction with each...
... during use in operation. INSTALLATION INSTRUCTIONS - As with the Manufactured Home Construction and Safety Standard, Title 24 CFR, Part 3280 [formerly the Federal Standard for Mobile Home Construction and Safety, Title 24, HUD (Part 280)] or, when such standard is not removable. Never leave children alone or unattended in conjunction with each...

Installation Instructions
Page 10
... if the upper broil burner flame is necessary for cleaning or maintenance, shut off position. Disconnect the gas and electrical supply. Be sure to order parts. It may save you call or write if you the rating of the burners, the type of defective workmanship or materials in this plate, open... identification plate on your range product and/or need to read and follow step 1 for when it left in your Use & Care Guide. When ordering parts for servicing and cleaning.
... if the upper broil burner flame is necessary for cleaning or maintenance, shut off position. Disconnect the gas and electrical supply. Be sure to order parts. It may save you call or write if you the rating of the burners, the type of defective workmanship or materials in this plate, open... identification plate on your range product and/or need to read and follow step 1 for when it left in your Use & Care Guide. When ordering parts for servicing and cleaning.


