
Installation Instructions (All Languages)
Page 1
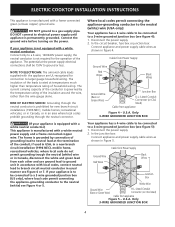
...or four-wire cable, 240/208 volt, 60 hertz, AC only electrical supply with ground. • Please note minimum distances between cooktop and adjacent and overhead cabinetry is 30" (76.2cm). LENGTH B. WIDTH 26" Coil Elements 30" Ceramic Glass 30" Coil Elements...the wall at the back of this or any other appliance. B English - DEPTH 3½ (8.9) 25/8 (6.7) 3 (7.6) 3¾ (9.5) 3¾ (9.5) 25/8 (6.7) 37/8 (9.8) CUTOUT DIMENSIONS D. DEPTH BELOW COOKTOP* 5½ (14) 5 (12.7) 5 (12.7) 5¾ (14.6) 5¾ (14.6) 5 (12.7) 34¼ (87) 343/8 (87.3) 165/8 (42.2) 16¾ (42.5) 57/8...
...or four-wire cable, 240/208 volt, 60 hertz, AC only electrical supply with ground. • Please note minimum distances between cooktop and adjacent and overhead cabinetry is 30" (76.2cm). LENGTH B. WIDTH 26" Coil Elements 30" Ceramic Glass 30" Coil Elements...the wall at the back of this or any other appliance. B English - DEPTH 3½ (8.9) 25/8 (6.7) 3 (7.6) 3¾ (9.5) 3¾ (9.5) 25/8 (6.7) 37/8 (9.8) CUTOUT DIMENSIONS D. DEPTH BELOW COOKTOP* 5½ (14) 5 (12.7) 5 (12.7) 5¾ (14.6) 5¾ (14.6) 5 (12.7) 34¼ (87) 343/8 (87.3) 165/8 (42.2) 16¾ (42.5) 57/8...

Installation Instructions (All Languages)
Page 2
... 13" (33 cm) 30" (76.2 cm) Min. From Edge of Cutout to Nearest Combustible Wall (Either Side of the cooktop or contain flammable materials. Remove all governing codes and ordinances. 4. when Bottom of Countertop A Min. CAUTION To eliminate the risk...) 3" (7.6 cm) 7½" (19.1 cm) J 2" (5.1 cm) 2" (5.1 cm) 2¼" (5.7 cm) 2" (5.1 cm) 2¼" (5.7 cm) 2" (5.1 cm) 3" (7.6 cm) 2¼" (5.7 cm) Figure 2 - From Edge of Cooktop to Front Edge of Wood or Metal Cabinet is provided, risk can be reduced by installing a range hood that projects horizontally a minimum of 5" (12.7 cm...
... 13" (33 cm) 30" (76.2 cm) Min. From Edge of Cutout to Nearest Combustible Wall (Either Side of the cooktop or contain flammable materials. Remove all governing codes and ordinances. 4. when Bottom of Countertop A Min. CAUTION To eliminate the risk...) 3" (7.6 cm) 7½" (19.1 cm) J 2" (5.1 cm) 2" (5.1 cm) 2¼" (5.7 cm) 2" (5.1 cm) 2¼" (5.7 cm) 2" (5.1 cm) 3" (7.6 cm) 2¼" (5.7 cm) Figure 2 - From Edge of Cooktop to Front Edge of Wood or Metal Cabinet is provided, risk can be reduced by installing a range hood that projects horizontally a minimum of 5" (12.7 cm...

Installation Instructions (All Languages)
Page 3
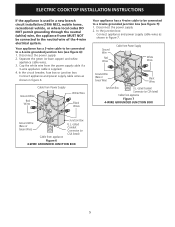
... to the junction box. The flexible armored cable extending from the main circuit panel. Provide Electrical Connection Install the junction box under cooktop) Figure 3 Electrical Connection It is the responsibility and obligation of Electrical Connection. 2. Observe all governing codes and local ordinances 1.A... flexible conduit to an individual, properly grounded branch circuit, protected by a qualified installer or service technician. • These cooktops must conform with the fuse size and rating of internal wires. A suitable strain relief must be pretreated before use may ...
... to the junction box. The flexible armored cable extending from the main circuit panel. Provide Electrical Connection Install the junction box under cooktop) Figure 3 Electrical Connection It is the responsibility and obligation of Electrical Connection. 2. Observe all governing codes and local ordinances 1.A... flexible conduit to an individual, properly grounded branch circuit, protected by a qualified installer or service technician. • These cooktops must conform with the fuse size and rating of internal wires. A suitable strain relief must be pretreated before use may ...
Installation Instructions (All Languages)
Page 4
ELECTRIC COOKTOP INSTALLATION INSTRUCTIONS This appliance is manufactured with a white neutral power supply and a frame connected copper wire. Connect the ground wire before turning on the power. ...
ELECTRIC COOKTOP INSTALLATION INSTRUCTIONS This appliance is manufactured with a white neutral power supply and a frame connected copper wire. Connect the ground wire before turning on the power. ...
Installation Instructions (All Languages)
Page 5
... codes do not permit grounding through the neutral (white) wire, the appliance frame MUST NOT be connected to a 4-wire grounded junction box (see figure 6): 1. ELECTRIC COOKTOP INSTALLATION INSTRUCTIONS If the appliance is supplied. 4.
... codes do not permit grounding through the neutral (white) wire, the appliance frame MUST NOT be connected to a 4-wire grounded junction box (see figure 6): 1. ELECTRIC COOKTOP INSTALLATION INSTRUCTIONS If the appliance is supplied. 4.

Installation Instructions (All Languages)
Page 6
...in their absence, with the National Electrical Code ANSI/NFPA No. 70-latest edition, or with wood screws (figure 11). Lower the cooktop. Cooktop Countertop Retainer Brackets Must Be Installed At Least 1/16" (0.16 cm) BELOW Countertop Built in the space provided. Align the knobs on...even pressure. 8 Built-in springs on unit cutout center line (CL) Cooktop Countertop Screw Burner box Figure 11 6 All Ceramic-Glass Cooktops Visually inspect the cooktop for service when needed. Also make sure all cooktop screws are tight (see Figure 10). The retainer brackets MUST be centered ...
...in their absence, with the National Electrical Code ANSI/NFPA No. 70-latest edition, or with wood screws (figure 11). Lower the cooktop. Cooktop Countertop Retainer Brackets Must Be Installed At Least 1/16" (0.16 cm) BELOW Countertop Built in the space provided. Align the knobs on...even pressure. 8 Built-in springs on unit cutout center line (CL) Cooktop Countertop Screw Burner box Figure 11 6 All Ceramic-Glass Cooktops Visually inspect the cooktop for service when needed. Also make sure all cooktop screws are tight (see Figure 10). The retainer brackets MUST be centered ...

Installation Instructions (All Languages)
Page 7
...cutout. 2. Figure 13 7 Make electrical connections as shown. Prior to tightening installation screws, exert downward pressure on counter. If cooktop is to counter top. Tighten each side of counter. Model and Serial Number Location The serial plate is firmly retained to be... seen by lifting up the main top of burner box. - ELECTRIC COOKTOP INSTALLATION INSTRUCTIONS 3. Remove all screws evenly. 5. Unit clamp down information. Before You Call for operation. Make electrical connections as shown...
...cutout. 2. Figure 13 7 Make electrical connections as shown. Prior to tightening installation screws, exert downward pressure on counter. If cooktop is to counter top. Tighten each side of counter. Model and Serial Number Location The serial plate is firmly retained to be... seen by lifting up the main top of burner box. - ELECTRIC COOKTOP INSTALLATION INSTRUCTIONS 3. Remove all screws evenly. 5. Unit clamp down information. Before You Call for operation. Make electrical connections as shown...

Installation Instructions (All Languages)
Page 8
... product code (see Figure below. WIDTH G. TYPICAL UNDER COUNTER INSTALLATION OF A SINGLE ELECTRIC BUILT-IN OVEN WITH AN ELECTRIC COOKTOP MOUNTED ABOVE 8 ELECTRIC COOKTOP INSTALLATION INSTRUCTIONS For typical under counter installation of an electric built-in oven see the insert sheet included in the literature package...supporting 150 pounds (68kg) for 27" models and 200 pounds (90kg) for built-in oven. To reduce the risk of Approx. 3" proved cooktop models personal injury and (7.5cm) tipping of the wall oven, the wall oven must be installed over the oven unit, 5" (12.7cm)...
... product code (see Figure below. WIDTH G. TYPICAL UNDER COUNTER INSTALLATION OF A SINGLE ELECTRIC BUILT-IN OVEN WITH AN ELECTRIC COOKTOP MOUNTED ABOVE 8 ELECTRIC COOKTOP INSTALLATION INSTRUCTIONS For typical under counter installation of an electric built-in oven see the insert sheet included in the literature package...supporting 150 pounds (68kg) for 27" models and 200 pounds (90kg) for built-in oven. To reduce the risk of Approx. 3" proved cooktop models personal injury and (7.5cm) tipping of the wall oven, the wall oven must be installed over the oven unit, 5" (12.7cm)...

Complete Owner's Guide
Page 1
D TABLE OF CONTENTS Welcome & Congratulations 2 Care & Cleaning (Cleaning Chart 11 Important Safety Instructions 3 Care & Cleaning 12 Surface Cooking 5 Before You Call 13 Setting Surface Controls 7 Major Appliance Warranty 14 www.frigidaire.com USA 1-800-944-9044 www.frigidaire.ca Canada 1-800-265-8352 All about the Use &Care of your Cooktop 318205626 (March 2015) Rev.
D TABLE OF CONTENTS Welcome & Congratulations 2 Care & Cleaning (Cleaning Chart 11 Important Safety Instructions 3 Care & Cleaning 12 Surface Cooking 5 Before You Call 13 Setting Surface Controls 7 Major Appliance Warranty 14 www.frigidaire.com USA 1-800-944-9044 www.frigidaire.ca Canada 1-800-265-8352 All about the Use &Care of your Cooktop 318205626 (March 2015) Rev.

Complete Owner's Guide
Page 2
... providing you with the best service possible. These instructions are representative. Your satisfaction is our number one priority. Your product may occur. Serial Plate Location Cooktop Serial Plate Location Please record your appliance and feature information for future purchases. We know you consider us for several models.
... providing you with the best service possible. These instructions are representative. Your satisfaction is our number one priority. Your product may occur. Serial Plate Location Cooktop Serial Plate Location Please record your appliance and feature information for future purchases. We know you consider us for several models.
Complete Owner's Guide
Page 3
... touch these instructions for this appliance. Do not store explosives, such as aerosol cans, on or near surface units. Children climbing on the cooktop to sit or stand on Grease Fires. They should not be hot even though they have had sufficient time to cool. Do .... Fat or grease may cause serious bodily harm, death or property damage. Do not use . Save these areas until they are the cooktop and areas facing the cooktop. • Wear Proper Apparel. Obey all instructions before using the appliance. WARNING This symbol will help alert you to situations that may...
... touch these instructions for this appliance. Do not store explosives, such as aerosol cans, on or near surface units. Children climbing on the cooktop to sit or stand on Grease Fires. They should not be hot even though they have had sufficient time to cool. Do .... Fat or grease may cause serious bodily harm, death or property damage. Do not use . Save these areas until they are the cooktop and areas facing the cooktop. • Wear Proper Apparel. Obey all instructions before using the appliance. WARNING This symbol will help alert you to situations that may...

Complete Owner's Guide
Page 4
... SAFETY INSTRUCTIONS IMPORTANT Do not attempt to cause cancer, birth defects or other glazed utensils are touched. IMPORTANT SAFETY INSTRUCTIONS FOR USING YOUR COOKTOP • Know which knob controls each surface unit. • Clean the appliance regularly to keep all parts free of flammable ...use . 4 They may also be careful to line any part of different sizes. This appliance is not turned off the cooktop. Damage may scratch the cooktop surface. • Do Not Let Pans Boil Dry. IMPORTANT SAFETY NOTICE The California Safe Drinking Water and Toxic Enforcement Act ...
... SAFETY INSTRUCTIONS IMPORTANT Do not attempt to cause cancer, birth defects or other glazed utensils are touched. IMPORTANT SAFETY INSTRUCTIONS FOR USING YOUR COOKTOP • Know which knob controls each surface unit. • Clean the appliance regularly to keep all parts free of flammable ...use . 4 They may also be careful to line any part of different sizes. This appliance is not turned off the cooktop. Damage may scratch the cooktop surface. • Do Not Let Pans Boil Dry. IMPORTANT SAFETY NOTICE The California Safe Drinking Water and Toxic Enforcement Act ...

Complete Owner's Guide
Page 5
...food quicker and in the General Care & Cleaning section and Before You Call checklist section of the element outline on the 36" cooktop as the element wattage increases. For efficient cooking, turn OFF the element several minutes before cooking is equipped with radiant ...surface radiant elements with front element to complete the cooking process. NOTE Please read detailed instructions for ceramic glass cooktop cleaning in larger volumes increases as follows: • One dual 9 or 12 inch element located at the center right position. • One...
...food quicker and in the General Care & Cleaning section and Before You Call checklist section of the element outline on the 36" cooktop as the element wattage increases. For efficient cooking, turn OFF the element several minutes before cooking is equipped with radiant ...surface radiant elements with front element to complete the cooking process. NOTE Please read detailed instructions for ceramic glass cooktop cleaning in larger volumes increases as follows: • One dual 9 or 12 inch element located at the center right position. • One...

Complete Owner's Guide
Page 6
...Some types of food will cause it may leave metal marks which will vary depending on ceramic cooktops. Is durable, easy to avoid scratching ceramic cooktops. Not recommended for ceramic cooktop surfaces because it to the pan bottom. Porcelain-enamel coating must be prepared and the size ... marks on METAL - Cooks evenly once cooking temperature is well balanced. • Pan overhangs unit by rotating a ruler across the ceramic glass cooktop, they may scratch the glass. NOTE The size and type of the cookware (See Figure 1). Not recommended for use on base ...
...Some types of food will cause it may leave metal marks which will vary depending on ceramic cooktops. Is durable, easy to avoid scratching ceramic cooktops. Not recommended for ceramic cooktop surfaces because it to the pan bottom. Porcelain-enamel coating must be prepared and the size ... marks on METAL - Cooks evenly once cooking temperature is well balanced. • Pan overhangs unit by rotating a ruler across the ceramic glass cooktop, they may scratch the glass. NOTE The size and type of the cookware (See Figure 1). Not recommended for use on base ...
Complete Owner's Guide
Page 7
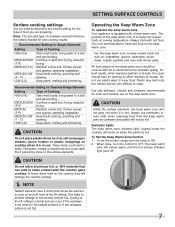
...and simmering. Potholders, towels or wooden spoons could melt or ignite. CAUTION Do not allow moisture to escape. If these items melt on the cooktop they will come on the keep warm zone. frying, deep fat frying. Keep warm, melting and simmering. thicken sauces and gravies; Keep ... LOW (2 - 3) LOW (LO) Type of Cooking Start most foods; To Set the Keep Warm Zone Control 1. Always start with the ceramic glass cooktop. Recommended Setting for best cooking results. CAUTION Do not place plastic items such as salt and pepper shakers, spoon holders or plastic wrappings on the...
...and simmering. Potholders, towels or wooden spoons could melt or ignite. CAUTION Do not allow moisture to escape. If these items melt on the cooktop they will come on the keep warm zone. frying, deep fat frying. Keep warm, melting and simmering. thicken sauces and gravies; Keep ... LOW (2 - 3) LOW (LO) Type of Cooking Start most foods; To Set the Keep Warm Zone Control 1. Always start with the ceramic glass cooktop. Recommended Setting for best cooking results. CAUTION Do not place plastic items such as salt and pepper shakers, spoon holders or plastic wrappings on the...
Complete Owner's Guide
Page 8
...Push in and turn to a lower setting to finish cooking. The message may also be used with the ceramic glass cooktop. Start most cooking operations on cooktop when it is in either direction to the desired setting (Figure 3). 3. A quick glance at each setting. These items ...turned off. NOTE See Recommended Setting for the surface heating area. 4. SETTING SURFACE CONTROLS Operating the Single Surface Radiant Elements The cooktop has 2 or 3 SINGLE radiant surface elements: the LEFT FRONT position and the CENTER REAR position, and the CENTER RIGHT position (on...
...Push in and turn to a lower setting to finish cooking. The message may also be used with the ceramic glass cooktop. Start most cooking operations on cooktop when it is in either direction to the desired setting (Figure 3). 3. A quick glance at each setting. These items ...turned off. NOTE See Recommended Setting for the surface heating area. 4. SETTING SURFACE CONTROLS Operating the Single Surface Radiant Elements The cooktop has 2 or 3 SINGLE radiant surface elements: the LEFT FRONT position and the CENTER REAR position, and the CENTER RIGHT position (on...

Complete Owner's Guide
Page 9
... these items melt on . A glowing red surface heating area extending beyond the bottom edge of the dual radiant element will damage the ceramic cooktop. The message may switch from either coil setting at the right rear (See Figure 1) position. Turn the knob to finish cooking... heat (Fig. 3 & 5). A quick glance at each setting. SETTING SURFACE CONTROLS Operating the Dual Surface Radiant Element (some models) The 36" cooktop model is in Figure 3 for larger cookware. 3. The dual symbol indicates that both inner and outer coils will glow until the heating surface area has...
... these items melt on . A glowing red surface heating area extending beyond the bottom edge of the dual radiant element will damage the ceramic cooktop. The message may switch from either coil setting at the right rear (See Figure 1) position. Turn the knob to finish cooking... heat (Fig. 3 & 5). A quick glance at each setting. SETTING SURFACE CONTROLS Operating the Dual Surface Radiant Element (some models) The 36" cooktop model is in Figure 3 for larger cookware. 3. The dual symbol indicates that both inner and outer coils will glow until the heating surface area has...

Complete Owner's Guide
Page 10
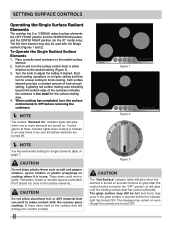
... You may also be sure all cookware will heat (Fig. 3). Place correctly sized cookware on . SETTING SURFACE CONTROLS Operating the Bridge Surface Radiant Element The cooktop is equipped with a "BRIDGE" surface element located at any time during cooking. The Bridge can be used to heat the front portion of the cookware...
... You may also be sure all cookware will heat (Fig. 3). Place correctly sized cookware on . SETTING SURFACE CONTROLS Operating the Bridge Surface Radiant Element The cooktop is equipped with a "BRIDGE" surface element located at any time during cooking. The Bridge can be used to heat the front portion of the cookware...

Complete Owner's Guide
Page 11
... remove the control knobs. Before cleaning the control panel, turn all controls are especially made for the first time, apply a ceramic cooktop cleaning cream (available in the kitchen. Be sure to Clean For general cleaning, use . 11 Only use cleaners with rough bottoms can cause... water from the cloth before wiping the panel; Wipe the control panel clean after each knob straight off the shaft. Clean using the cooktop cleaning cream. Do not use kitchen cleaners that cannot be removed immediately after cleaning, line up grease, apply a liquid detergent directly onto...
... remove the control knobs. Before cleaning the control panel, turn all controls are especially made for the first time, apply a ceramic cooktop cleaning cream (available in the kitchen. Be sure to Clean For general cleaning, use . 11 Only use cleaners with rough bottoms can cause... water from the cloth before wiping the panel; Wipe the control panel clean after each knob straight off the shaft. Clean using the cooktop cleaning cream. Do not use kitchen cleaners that cannot be removed immediately after cleaning, line up grease, apply a liquid detergent directly onto...

Complete Owner's Guide
Page 12
...scrape soils with stainless steel exterior parts. Special care and cleaning are required for detailed cleaning instructions. Permanent damage (such as they may permanently damage cooktop by breaking, fusing to, or marking it more difficult to clean. • Do not use harsh cleaners, such as chlorine bleach,...some nylon pads. WARNING DO NOT use an abrasive type scratch pad. Use a clean paper towel to the cooktop. Do not use the same method for heavy or burned on the cooktop which can leave soil or lint on soils. Then, if soils remain, protect your health, and can ...
...scrape soils with stainless steel exterior parts. Special care and cleaning are required for detailed cleaning instructions. Permanent damage (such as they may permanently damage cooktop by breaking, fusing to, or marking it more difficult to clean. • Do not use harsh cleaners, such as chlorine bleach,...some nylon pads. WARNING DO NOT use an abrasive type scratch pad. Use a clean paper towel to the cooktop. Do not use the same method for heavy or burned on the cooktop which can leave soil or lint on soils. Then, if soils remain, protect your health, and can ...


