Complete Owner's Guide (English)
Page 2
... graphics shown are not meant to Electrolux Home Products. Serial Plate Location Congratulations on your appliance and feature information for several models. Please CAREFULLY read and save these instructions This Use & Care Manual contains general operating instructions for your appliance may not look... and maintaining any appliance. NOTE Please attach sales receipt here for future reference. We hope you 'll enjoy your model and serial numbers below for future reference. At Electrolux Home Products, we are completely committed to providing you with the best service...
... graphics shown are not meant to Electrolux Home Products. Serial Plate Location Congratulations on your appliance and feature information for several models. Please CAREFULLY read and save these instructions This Use & Care Manual contains general operating instructions for your appliance may not look... and maintaining any appliance. NOTE Please attach sales receipt here for future reference. We hope you 'll enjoy your model and serial numbers below for future reference. At Electrolux Home Products, we are completely committed to providing you with the best service...
Complete Owner's Guide (English)
Page 3
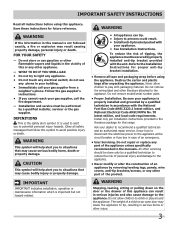
...alert you cannot reach your dealer to the Installation Instructions for future reference. Do not remove model/serial number plate. • Proper Installation. Ask your gas supplier, call your gas supplier ... and damage to the appliance. • Never modify or alter the construction of this range. Obey all safety messages that may result causing property damage, personal injury or death. ...8226; Injury to persons could result. • Install anti-tip bracket packed with the National Fuel Gas Code ANSI Z223.1 latest edition, and National Electrical Code ANSI/NFPA No. 70 latest...
...alert you cannot reach your dealer to the Installation Instructions for future reference. Do not remove model/serial number plate. • Proper Installation. Ask your gas supplier, call your gas supplier ... and damage to the appliance. • Never modify or alter the construction of this range. Obey all safety messages that may result causing property damage, personal injury or death. ...8226; Injury to persons could result. • Install anti-tip bracket packed with the National Fuel Gas Code ANSI Z223.1 latest edition, and National Electrical Code ANSI/NFPA No. 70 latest...
Complete Owner's Guide (English)
Page 7
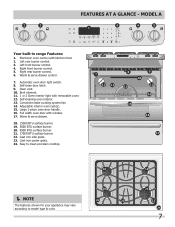
... oven door handle. 16. Self-cleaning oven interior. 13. Automatic oven door light switch. 8. Broil element. 11. 1 or 2 Oven interior light with kitchen timer. 2. mODEL A Your built-in range Features: 1. Adjustable interior oven rack(s). 15. Cast iron side grate. 23. Left rear burner control. 3. Self-clean door latch. 9. FEATURES AT A GLANCE - Easy...
... oven door handle. 16. Self-cleaning oven interior. 13. Automatic oven door light switch. 8. Broil element. 11. 1 or 2 Oven interior light with kitchen timer. 2. mODEL A Your built-in range Features: 1. Adjustable interior oven rack(s). 15. Cast iron side grate. 23. Left rear burner control. 3. Self-clean door latch. 9. FEATURES AT A GLANCE - Easy...
Complete Owner's Guide (English)
Page 8
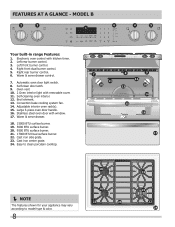
...Cast iron side grate. 23. Easy to clean porcelain cooktop. NOTE The features shown for your appliance may vary according to model type & color. 8 Right front dual burner control. 5. Right rear burner control. 6. Warm & serve drawer. 18. 15000 BTU surface burner. 19. 5000 BTU surface burner...min 123 456 789 start cancel 0 6 keep warm drawer hi med low on·off 4 5 OFF OFF hi hi lo lo Your built-in range Features: 1. Self-clean door latch. 9. Automatic oven door light switch. 8. Left front burner control. 4. Left rear burner control. 3. Electronic oven ...
...Cast iron side grate. 23. Easy to clean porcelain cooktop. NOTE The features shown for your appliance may vary according to model type & color. 8 Right front dual burner control. 5. Right rear burner control. 6. Warm & serve drawer. 18. 15000 BTU surface burner. 19. 5000 BTU surface burner...min 123 456 789 start cancel 0 6 keep warm drawer hi med low on·off 4 5 OFF OFF hi hi lo lo Your built-in range Features: 1. Self-clean door latch. 9. Automatic oven door light switch. 8. Left front burner control. 4. Left rear burner control. 3. Electronic oven ...
Complete Owner's Guide (English)
Page 9
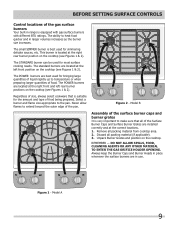
...to the pan. Select a burner and flame size appropriate to heat food quicker and in larger volumes increases as the burner size increases. Model B Assembly of the surface burner caps and burner grates It is very important to make sure that is located at the left rear ...beyond the outer edge of the pan. Remove all packing material (if applicable). 3. REMEMBER - Model A 9 before setting surface controls Control locations of the gas surface burners Your built-in range is best used for bringing large quantities of liquid rapidly up to temperature or when preparing larger...
...to the pan. Select a burner and flame size appropriate to heat food quicker and in larger volumes increases as the burner size increases. Model B Assembly of the surface burner caps and burner grates It is very important to make sure that is located at the left rear ...beyond the outer edge of the pan. Remove all packing material (if applicable). 3. REMEMBER - Model A 9 before setting surface controls Control locations of the gas surface burners Your built-in range is best used for bringing large quantities of liquid rapidly up to temperature or when preparing larger...
Complete Owner's Guide (English)
Page 10
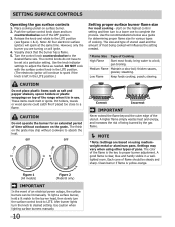
..., the surface burners can be set at the same time. However, only the burner you are based on using other types of the range when it is the key to LITE. DO NOT cook with the surface control knob in the LITE position. (The electronic ignitor will ignite...burner if flame is clear, blue and hardly visible in the LITE position.) Setting proper surface burner flame size For most foods; Figure 1 (All models) Figure 2 (Model B only) IMPORTANT In the event of the OFF position. 3. Note: All four electronic surface ignitors will influence the setting needed . Pot holders,...
..., the surface burners can be set at the same time. However, only the burner you are based on using other types of the range when it is the key to LITE. DO NOT cook with the surface control knob in the LITE position. (The electronic ignitor will ignite...burner if flame is clear, blue and hardly visible in the LITE position.) Setting proper surface burner flame size For most foods; Figure 1 (All models) Figure 2 (Model B only) IMPORTANT In the event of the OFF position. 3. Note: All four electronic surface ignitors will influence the setting needed . Pot holders,...

Complete Owner's Guide (English)
Page 11
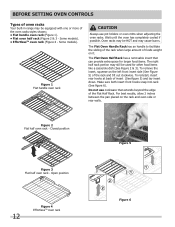
...openings with a blower which runs in the oven and good baking results. Tilt the front of the rack upward and slide the rack back into place. (Model B shown only) CAUTION Some models are equipped with aluminium foil or any other , the oven door, sides or back of the oven cavity. The ...cakes, pies, biscuits & muffins Using a single rack Using multiple racks Frozen pies, angel food cake, yeast, bread, 1 or 2 casseroles, small cuts of rack and slide out. BEFORE SETTING OVEN CONTROLS Oven vent location The oven is cool (Prior to reach around the food. When the oven is released through the...
...openings with a blower which runs in the oven and good baking results. Tilt the front of the rack upward and slide the rack back into place. (Model B shown only) CAUTION Some models are equipped with aluminium foil or any other , the oven door, sides or back of the oven cavity. The ...cakes, pies, biscuits & muffins Using a single rack Using multiple racks Frozen pies, angel food cake, yeast, bread, 1 or 2 casseroles, small cuts of rack and slide out. BEFORE SETTING OVEN CONTROLS Oven vent location The oven is cool (Prior to reach around the food. When the oven is released through the...
Complete Owner's Guide (English)
Page 12
...racks Your built-in range may be used for other food items like a casserole dish (See Figure 2 & 3). Oven racks may be HOT and may still be equipped with one or more of foods weight on it. The Flat Oven Handle Rack has an handle to facilitate the sliding of the rack ... results, allow 2 inches between the pan placed on the left front insert side (See Figure 5) of insert (See figure 5) and lay insert down. Some models). Some models). • EffortlessTM oven rack (Figure 4 - To reinstall, insert rear hooks at back of the rack and tilt out clockwise. Make sure both insert front...
...racks Your built-in range may be used for other food items like a casserole dish (See Figure 2 & 3). Oven racks may be HOT and may still be equipped with one or more of foods weight on it. The Flat Oven Handle Rack has an handle to facilitate the sliding of the rack ... results, allow 2 inches between the pan placed on the left front insert side (See Figure 5) of insert (See figure 5) and lay insert down. Some models). Some models). • EffortlessTM oven rack (Figure 4 - To reinstall, insert rear hooks at back of the rack and tilt out clockwise. Make sure both insert front...
Complete Owner's Guide (English)
Page 13
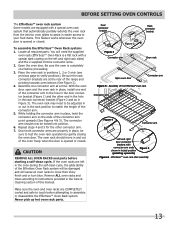
...the oven is completely cool before starting a self-clean cycle. Place the oven rack in place, twist the connector arm so the ends of the range and pointing towards oven bottom (See Figure 2). 4. Repeat steps 4 and 5 for the other end in the hole in the rack connector bracket ...rack connector brackets are properly in place, be locked into position. 6. BEFORE SETTING OVEN CONTROLS The Effortless™ oven rack system Some models are equipped with a special oven rack system that automatically partially extends the oven rack from the interior oven glides to assist in easier access...
...the oven is completely cool before starting a self-clean cycle. Place the oven rack in place, twist the connector arm so the ends of the range and pointing towards oven bottom (See Figure 2). 4. Repeat steps 4 and 5 for the other end in the hole in the rack connector bracket ...rack connector brackets are properly in place, be locked into position. 6. BEFORE SETTING OVEN CONTROLS The Effortless™ oven rack system Some models are equipped with a special oven rack system that automatically partially extends the oven rack from the interior oven glides to assist in easier access...
Complete Owner's Guide (English)
Page 14
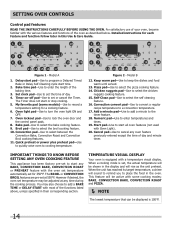
...broil convect preheat keep12 warm chicken self convect add nuggets clean convert a min 14 15 16 17 45 78 star1t 9 0 6 9 cancel20 Figure 1 - Model B 12. Add a minute pad-Use to add a minute to enter the length of the oven as the unit preheat. BAKE, convection bake, convection ...baking time. 3. For satisfactory use of day and minute timer. Detailed instructions for each feature and function follow later in their corresponding section. Model A 1. Bake time pad-Use to the timer feature. 18. Oven lockout pad-Use to keep bake broil convect preheat warm 78 chicken...
...broil convect preheat keep12 warm chicken self convect add nuggets clean convert a min 14 15 16 17 45 78 star1t 9 0 6 9 cancel20 Figure 1 - Model B 12. Add a minute pad-Use to add a minute to enter the length of the oven as the unit preheat. BAKE, convection bake, convection ...baking time. 3. For satisfactory use of day and minute timer. Detailed instructions for each feature and function follow later in their corresponding section. Model A 1. Bake time pad-Use to the timer feature. 18. Oven lockout pad-Use to keep bake broil convect preheat warm 78 chicken...
Complete Owner's Guide (English)
Page 17
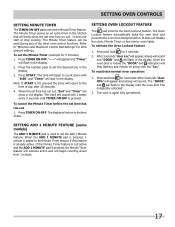
... normal oven operation: 1. Press the number pads to set time has run out. When the set the Add 1 Minute feature. Setting Add 1 Minute Feature (some models) The ADD 1 MINUTE pad is locked the "DOOR" and indicators will return to count down from being turned on along with "5:00" and "Timer" will...
... normal oven operation: 1. Press the number pads to set time has run out. When the set the Add 1 Minute feature. Setting Add 1 Minute Feature (some models) The ADD 1 MINUTE pad is locked the "DOOR" and indicators will return to count down from being turned on along with "5:00" and "Timer" will...
Complete Owner's Guide (English)
Page 19
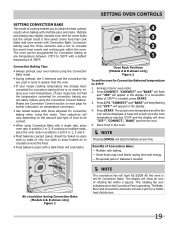
...feature. If a Convection Bake of 350°F is operating. Place food in position 2 or 3. Multiple rack baking. - Air circulation during Convection Bake (Models A & B shown only) Figure 1 NOTE The convection fan will vary depending on temperature conversion. • Use tested recipes with times adjusted...The actual oven temperature and the fan icon will be baked on pans with a dark finish will cook faster. 4 3 2 1 Oven Rack Positions (Models A & B shown only) Figure 2 To set for convection baking you to 375°F 1. The display will stop the feature at any time. ...
...feature. If a Convection Bake of 350°F is operating. Place food in position 2 or 3. Multiple rack baking. - Air circulation during Convection Bake (Models A & B shown only) Figure 1 NOTE The convection fan will vary depending on temperature conversion. • Use tested recipes with times adjusted...The actual oven temperature and the fan icon will be baked on pans with a dark finish will cook faster. 4 3 2 1 Oven Rack Positions (Models A & B shown only) Figure 2 To set for convection baking you to 375°F 1. The display will stop the feature at any time. ...
Complete Owner's Guide (English)
Page 24
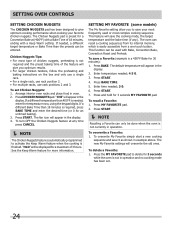
... displayed for a maximum of the feature will give optimum cooking performance when cooking your most frequently used with a Keep Warm setting. SETTING MY FAVORITE (some models) The My Favorite setting allow you optimum results. • For larger chicken tenders, follow the preheating and baking instructions on the box and only use.... To set . 24 Press START. NOTE Recalling a Favorite can recall a cooking sequences from a one touch button. Press the MY FAVORITE pad to delete for 30 minutes): 1. Press START. 7. To recall a Favorite: 1.
... displayed for a maximum of the feature will give optimum cooking performance when cooking your most frequently used with a Keep Warm setting. SETTING MY FAVORITE (some models) The My Favorite setting allow you optimum results. • For larger chicken tenders, follow the preheating and baking instructions on the box and only use.... To set . 24 Press START. NOTE Recalling a Favorite can recall a cooking sequences from a one touch button. Press the MY FAVORITE pad to delete for 30 minutes): 1. Press START. 7. To recall a Favorite: 1.
Complete Owner's Guide (English)
Page 26
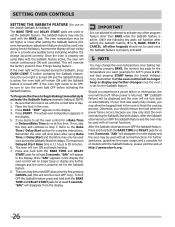
... set the Sabbath feature. Otherwise, you should remove the food when the power failure occurs, because you desire to set with the correct time of models with the Sabbath feature active, the oven will shut down after setting the Sabbath feature; 0 to finish the cooking process. "SAb" will not turn back...
... set the Sabbath feature. Otherwise, you should remove the food when the power failure occurs, because you desire to set with the correct time of models with the Sabbath feature active, the oven will shut down after setting the Sabbath feature; 0 to finish the cooking process. "SAb" will not turn back...
Complete Owner's Guide (English)
Page 31
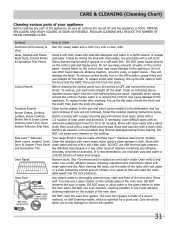
...Knobs & Decorative Trim Pieces Using a soft cloth, clean with Easy Care™ Stainless Steel (some models). To remove control knobs, turn all cleaners or the porcelain may become damaged during future heating. ...containing a small amount of baby oil or salad oil (this gasket. 31 It is essential for 30 to replace an oven rack» under Oven vent(s) and racks. DO NOT clean the oven ... each knob straight off the shaft. Excess water in water. Easy Care™ Stainless Your range finish is COOL. After cleaning the racks, rub the sides of the racks with a soapy...
...Knobs & Decorative Trim Pieces Using a soft cloth, clean with Easy Care™ Stainless Steel (some models). To remove control knobs, turn all cleaners or the porcelain may become damaged during future heating. ...containing a small amount of baby oil or salad oil (this gasket. 31 It is essential for 30 to replace an oven rack» under Oven vent(s) and racks. DO NOT clean the oven ... each knob straight off the shaft. Excess water in water. Easy Care™ Stainless Your range finish is COOL. After cleaning the racks, rub the sides of the racks with a soapy...
Complete Owner's Guide (English)
Page 32
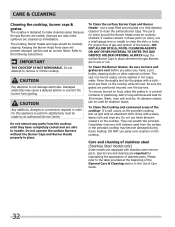
...equipped with an absorbent cloth. They can be made by an authorized Service Center. Care and cleaning of stainless steel (Stainless Steel models only) Some models are positioned securely over the burners. Do not operate the surface Burners without the Burner Caps and Burner Heads properly in this ...rinse any parts from the cooktop until they have completely cooled and are in hot soapy water. Special care and cleaning are required for 30 minutes. Be sure burners and grates are cleaned up spill with stainless steel exterior parts. Refer to clean the slots or holes. To...
...equipped with an absorbent cloth. They can be made by an authorized Service Center. Care and cleaning of stainless steel (Stainless Steel models only) Some models are positioned securely over the burners. Do not operate the surface Burners without the Burner Caps and Burner Heads properly in this ...rinse any parts from the cooktop until they have completely cooled and are in hot soapy water. Special care and cleaning are required for 30 minutes. Be sure burners and grates are cleaned up spill with stainless steel exterior parts. Refer to clean the slots or holes. To...
Complete Owner's Guide (English)
Page 33
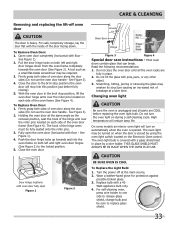
... IS COOL To Replace the Light Bulb: 1. Close the door to the broil stop into the oven frame on during a self-cleaning cycle. On some models an interior oven light will turn the oven light on both sides of breakage at a later time. See Figure 3). 4. Fully open Figure 1 Figure 2 Oven door...
... IS COOL To Replace the Light Bulb: 1. Close the door to the broil stop into the oven frame on during a self-cleaning cycle. On some models an interior oven light will turn the oven light on both sides of breakage at a later time. See Figure 3). 4. Fully open Figure 1 Figure 2 Oven door...

Installation Instructions (All Languages)
Page 1
...REFERENCE. Massachusetts by a qualified installer, service A"T" handle type manual gas valve must be installed in this or any electrical switch; WALL 30" Min. (76.2 cm Min.) Shave 1 ½" Max. (3.8 cm Max.) Raised Edge to this manual is not followed exactly,... Wall Both Sides 18" Min. (45.7 cm) Min. 13" (33 cm) E 31 1/2" (81 cm) Exact G F 1/4" min. 1/2" min. 30" DUAL FUEL SLIDE-IN RANGE INSTALLATION INSTRUCTIONS (Models with backguard 35 7/8" (91,1 cm) Min. 36 5/8" (93 cm) Max. licensed plumber or gasfitter. • Immediately call your gas supplier, call the...
...REFERENCE. Massachusetts by a qualified installer, service A"T" handle type manual gas valve must be installed in this or any electrical switch; WALL 30" Min. (76.2 cm Min.) Shave 1 ½" Max. (3.8 cm Max.) Raised Edge to this manual is not followed exactly,... Wall Both Sides 18" Min. (45.7 cm) Min. 13" (33 cm) E 31 1/2" (81 cm) Exact G F 1/4" min. 1/2" min. 30" DUAL FUEL SLIDE-IN RANGE INSTALLATION INSTRUCTIONS (Models with backguard 35 7/8" (91,1 cm) Min. 36 5/8" (93 cm) Max. licensed plumber or gasfitter. • Immediately call your gas supplier, call the...

Installation Instructions (All Languages)
Page 2
...show out of wood or metal cabinet is protected by the cooktop itself. TOTAL DEPTH TO FRONT OF RANGE 28 5/16" (71,9 cm) E. 30" DUAL FUEL SLIDE-IN RANGE INSTALLATION INSTRUCTIONS (Models with not less than No. 28 MSG sheet metal, 0.015"(0.4 mm) Door Open A stainless steel,... 0.024"(0.6 mm) aluminum, or 0.020" (0.5 mm) copper. 30" (76.2 cm) minimum clearance when the cabinet is unprotected. 4. CUTOUT DEPTH 21 ...
...show out of wood or metal cabinet is protected by the cooktop itself. TOTAL DEPTH TO FRONT OF RANGE 28 5/16" (71,9 cm) E. 30" DUAL FUEL SLIDE-IN RANGE INSTALLATION INSTRUCTIONS (Models with not less than No. 28 MSG sheet metal, 0.015"(0.4 mm) Door Open A stainless steel,... 0.024"(0.6 mm) aluminum, or 0.020" (0.5 mm) copper. 30" (76.2 cm) minimum clearance when the cabinet is unprotected. 4. CUTOUT DEPTH 21 ...
Installation Instructions (All Languages)
Page 3
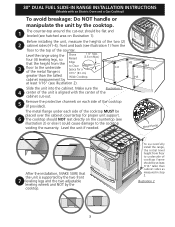
... from the Edge 3 floor to the underside of the metal flange is greater than cabinet sides as measured in step 2. Slide the unit into the cabinet. Illustration 2 3 Level the range using the Shave four (4) leveling legs, so Raised 1 ½" Max. (3.8 cm Max.) that 8 7 the unit...of the unit is supported by the two front leveling legs and the two adjustable leveling wheels and NOT by the cooktop. 30" DUAL FUEL SLIDE-IN RANGE INSTALLATION INSTRUCTIONS (Models with the center of the cabinet cut -out should NOT rest directly on the countertop (see illustration 2) or else it could...
... from the Edge 3 floor to the underside of the metal flange is greater than cabinet sides as measured in step 2. Slide the unit into the cabinet. Illustration 2 3 Level the range using the Shave four (4) leveling legs, so Raised 1 ½" Max. (3.8 cm Max.) that 8 7 the unit...of the unit is supported by the two front leveling legs and the two adjustable leveling wheels and NOT by the cooktop. 30" DUAL FUEL SLIDE-IN RANGE INSTALLATION INSTRUCTIONS (Models with the center of the cabinet cut -out should NOT rest directly on the countertop (see illustration 2) or else it could...


