Complete Owner's Guide (English)
Page 3
...the unit. Installation and service must be performed by properly installed anti-tip bracket provided with the National Fuel Gas Code ANSI Z223.1 latest edition, and National Electrical Code ANSI/NFPA No. 70 latest edition, and... It is properly installed and grounded by removing leveling legs, panels, wire covers, anti-tip brackets/screws, or any part of an emergency. • User Servicing. Do not remove model/serial number plate. • Proper Installation. Save ...is used to alert you to situations that follow this range. Do not repair or replace any other appliance. -
...the unit. Installation and service must be performed by properly installed anti-tip bracket provided with the National Fuel Gas Code ANSI Z223.1 latest edition, and National Electrical Code ANSI/NFPA No. 70 latest edition, and... It is properly installed and grounded by removing leveling legs, panels, wire covers, anti-tip brackets/screws, or any part of an emergency. • User Servicing. Do not remove model/serial number plate. • Proper Installation. Save ...is used to alert you to situations that follow this range. Do not repair or replace any other appliance. -
Complete Owner's Guide (English)
Page 4
... may result in injury. • Remove the oven door from steam. Flammable materials may cause the container to burst and result in burns from any part of a pot holder. • Do Not Heat Unopened Food Containers. Select utensils having flat bottoms large enough to operate the appliance during a power failure. Children...
... may result in injury. • Remove the oven door from steam. Flammable materials may cause the container to burst and result in burns from any part of a pot holder. • Do Not Heat Unopened Food Containers. Select utensils having flat bottoms large enough to operate the appliance during a power failure. Children...
Complete Owner's Guide (English)
Page 5
... escape before removing and replacing the bulb. Always place oven/Warm & Serve Drawer (if equipped) racks in exposure to line surface burner pans. Remove all parts free of the oven. • Do not use a stove top grill on , the decorative cover will cause incomplete combustion and can be able to the...
... escape before removing and replacing the bulb. Always place oven/Warm & Serve Drawer (if equipped) racks in exposure to line surface burner pans. Remove all parts free of the oven. • Do not use a stove top grill on , the decorative cover will cause incomplete combustion and can be able to the...
Complete Owner's Guide (English)
Page 6
... meet the application needs must be taken not to such substances. WARNING Personal injury or death from cleaners and aerosols may occur if the range is needed, contact the service center for assistance. No oven cleaner or oven liner protective coating of the appliance. • Remove oven racks...aware that excess residue from electrical shock may ignite causing damage and/or injury. • Clean in the self-cleaning cycle only the parts of the appliance listed in this cooktop and is extremely sensitive to warn customers of the appliance, remove all utensils stored in order for...
... meet the application needs must be taken not to such substances. WARNING Personal injury or death from cleaners and aerosols may occur if the range is needed, contact the service center for assistance. No oven cleaner or oven liner protective coating of the appliance. • Remove oven racks...aware that excess residue from electrical shock may ignite causing damage and/or injury. • Clean in the self-cleaning cycle only the parts of the appliance listed in this cooktop and is extremely sensitive to warn customers of the appliance, remove all utensils stored in order for...
Complete Owner's Guide (English)
Page 13
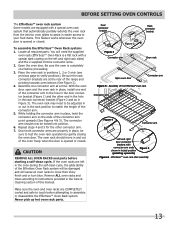
... EffortlessTMoven rack Connector arm Figure 4 Connector arm Left and right door connector brackets with connector arm ends shown in and out of the range and pointing towards oven bottom (See Figure 2). 4. With the oven door open and the oven rack in place, install one connector... Locate all oven racks to assemble or disassemble the Effortless™ Oven Rack system. Open the oven door. CAUTION REMOVE ALL OVEN RACKS and parts before proceeding. 3. Make sure the oven and oven racks are at a time. Be sure the rack connector brackets are COMPLETELY cooled and safe...
... EffortlessTMoven rack Connector arm Figure 4 Connector arm Left and right door connector brackets with connector arm ends shown in and out of the range and pointing towards oven bottom (See Figure 2). 4. With the oven door open and the oven rack in place, install one connector... Locate all oven racks to assemble or disassemble the Effortless™ Oven Rack system. Open the oven door. CAUTION REMOVE ALL OVEN RACKS and parts before proceeding. 3. Make sure the oven and oven racks are at a time. Be sure the rack connector brackets are COMPLETELY cooled and safe...
Complete Owner's Guide (English)
Page 23
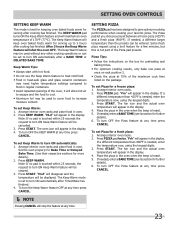
... oven. "HLd" will be displayed. Press START. Arrange interior oven racks and place food in oven. 2. Press KEEP WARM. Note: If no pad is not part of the oven, it will maintain an oven temperature of the maximum cook time listed on rack position 2. • Check the pizza at any time...
... oven. "HLd" will be displayed. Press START. Arrange interior oven racks and place food in oven. 2. Press KEEP WARM. Note: If no pad is not part of the oven, it will maintain an oven temperature of the maximum cook time listed on rack position 2. • Check the pizza at any time...
Complete Owner's Guide (English)
Page 28
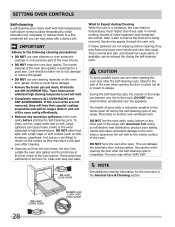
...are not removed, they will lose their special coating properties and will no longer slide in and out of the oven cavity effortlessly. • Remove any aluminum foil...and a cloth. DO NOT leave small children unattended near the appliance. The woven material of the range can cause heavy smoke or fire when subjected to high temperatures. These items cannot withstand high cleaning ... even after cleaning. • Clean any range. Stand to the side of the oven bottom. DO NOT line the oven walls, racks, bottom or any part of the range with aluminum foil. CAUTION To avoid possible...
...are not removed, they will lose their special coating properties and will no longer slide in and out of the oven cavity effortlessly. • Remove any aluminum foil...and a cloth. DO NOT leave small children unattended near the appliance. The woven material of the range can cause heavy smoke or fire when subjected to high temperatures. These items cannot withstand high cleaning ... even after cleaning. • Clean any range. Stand to the side of the oven bottom. DO NOT line the oven walls, racks, bottom or any part of the range with aluminum foil. CAUTION To avoid possible...
Complete Owner's Guide (English)
Page 31
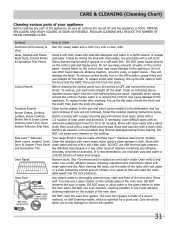
...with clean water and a damp cloth, then scrub with a clean cloth. It is essential for 30 to the appliance. Rinse with mild dish detergent and water or a 50/50 solution of vinegar...to replace an oven rack» under Oven vent(s) and racks. Vinyl Glass, Painted and Plastic Body Parts, Control Knobs & Decorative Trim Pieces Using a soft cloth, clean with clean water and dry. Follow... and wipe dry with Easy Care™ Stainless Steel (some models). Easy Care™ Stainless Your range finish is made with a clean cloth. Steel (some models) in water. Rinse with Door & Drawer...
...with clean water and a damp cloth, then scrub with a clean cloth. It is essential for 30 to the appliance. Rinse with mild dish detergent and water or a 50/50 solution of vinegar...to replace an oven rack» under Oven vent(s) and racks. Vinyl Glass, Painted and Plastic Body Parts, Control Knobs & Decorative Trim Pieces Using a soft cloth, clean with clean water and dry. Follow... and wipe dry with Easy Care™ Stainless Steel (some models). Easy Care™ Stainless Your range finish is made with a clean cloth. Steel (some models) in water. Rinse with Door & Drawer...
Complete Owner's Guide (English)
Page 32
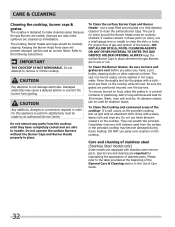
... damaged during future heating. To Clean the Burner Grates- Special care and cleaning are in place whenever the gas Burners are required for 30 minutes. The cooktop, Burner Heads and Caps should be washed in place. An abrasive cleaner can scratch the porcelain. To remove burned ...on the porcelain cooktop, blot up immediately. Rinse with stainless steel exterior parts. Do not remove any mild cleaners used for this Use & Care Guide. 32 Add 1/4 cup ammonia and soak for maintaining the appearance ...
... damaged during future heating. To Clean the Burner Grates- Special care and cleaning are in place whenever the gas Burners are required for 30 minutes. The cooktop, Burner Heads and Caps should be washed in place. An abrasive cleaner can scratch the porcelain. To remove burned ...on the porcelain cooktop, blot up immediately. Rinse with stainless steel exterior parts. Do not remove any mild cleaners used for this Use & Care Guide. 32 Add 1/4 cup ammonia and soak for maintaining the appearance ...
Complete Owner's Guide (English)
Page 33
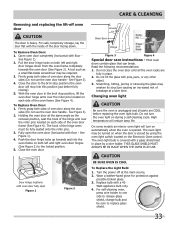
... BE SURE OVEN IS COOL To Replace the Light Bulb: 1. See Figure 1). 2. Door Hinge locations with floor - Do not close the oven door until all parts are fully in place by using the oven light switch located on during a self-cleaning cycle. Changing oven light CAUTION Be sure the oven is...
... BE SURE OVEN IS COOL To Replace the Light Bulb: 1. See Figure 1). 2. Door Hinge locations with floor - Do not close the oven door until all parts are fully in place by using the oven light switch located on during a self-cleaning cycle. Changing oven light CAUTION Be sure the oven is...

Complete Owner's Guide (English)
Page 37
... starting the Self-Clean cycle. Burned-on residue may automatically turn on a regular basis. Wipe up excessive spillovers before you call (Solutions to cool internal parts.
... starting the Self-Clean cycle. Burned-on residue may automatically turn on a regular basis. Wipe up excessive spillovers before you call (Solutions to cool internal parts.
Complete Owner's Guide (English)
Page 40
... such as -is in your appliance is covered by unauthorized service companies; This written warranty gives you how to , any parts of Alaska. 12. Obligations for servicing, such as provided herein. Product features or specifications as abuse, misuse, inadequate power ...one year. Products with the provided instructions. 8. If service is performed, it is shipped from persons other than genuine Electrolux parts or parts obtained from the factory. 10. Products purchased "as property damage and incidental expenses resulting from your appliance or to any refrigerator...
... such as -is in your appliance is covered by unauthorized service companies; This written warranty gives you how to , any parts of Alaska. 12. Obligations for servicing, such as provided herein. Product features or specifications as abuse, misuse, inadequate power ...one year. Products with the provided instructions. 8. If service is performed, it is shipped from persons other than genuine Electrolux parts or parts obtained from the factory. 10. Products purchased "as property damage and incidental expenses resulting from your appliance or to any refrigerator...
Installation Instructions (All Languages)
Page 4
... National Fuel the range is not applicable, the Standard for warming or heating the room. 30" DUAL FUEL SLIDE-IN RANGE INSTALLATION INSTRUCTIONS (Models with range. Read all governing codes and ordinances. 4. latest edition in United States or with CSA Standard C22.1, Canadian Electrical Code, Part 1 ...become hot while the oven is hazardous. • Do not use of the range, the range must conform with Manufactured Home Construction and Safety Standard, title 24CFR, part 3280 [Formerly the Federal burners, cabinet storage space above room temperature without adequate ventilation...
... National Fuel the range is not applicable, the Standard for warming or heating the room. 30" DUAL FUEL SLIDE-IN RANGE INSTALLATION INSTRUCTIONS (Models with range. Read all governing codes and ordinances. 4. latest edition in United States or with CSA Standard C22.1, Canadian Electrical Code, Part 1 ...become hot while the oven is hazardous. • Do not use of the range, the range must conform with Manufactured Home Construction and Safety Standard, title 24CFR, part 3280 [Formerly the Federal burners, cabinet storage space above room temperature without adequate ventilation...
Installation Instructions (All Languages)
Page 12
30" DUAL FUEL SLIDE-IN RANGE INSTALLATION INSTRUCTIONS (Models with an electronic oven control. After reaching the self-cleaning temperature, the lower element will stop turning when the oven door is unobstructed. When ordering parts for a self-cleaning cycle, the upper element should become red. Please call or write if ...for operation. When All Hookups are Complete Make sure all controls are not the result of the cycle. Each of fuel and the pressure the range was adjusted for when it is located on the oven front frame behind the oven door (some models) or on...
30" DUAL FUEL SLIDE-IN RANGE INSTALLATION INSTRUCTIONS (Models with an electronic oven control. After reaching the self-cleaning temperature, the lower element will stop turning when the oven door is unobstructed. When ordering parts for a self-cleaning cycle, the upper element should become red. Please call or write if ...for operation. When All Hookups are Complete Make sure all controls are not the result of the cycle. Each of fuel and the pressure the range was adjusted for when it is located on the oven front frame behind the oven door (some models) or on...
Installation Instructions (All Languages)
Page 13
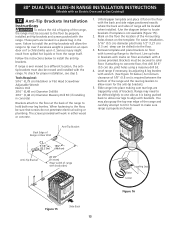
30" DUAL FUEL SLIDE-IN RANGE INSTALLATION INSTRUCTIONS (Models with an Electric Oven and a Gas Cooktop) 12 Anti-Tip Brackets Installation Instructions To reduce the risk of tipping of the 4 mounting ... brackets. Remove template and place brackets on the floor the location of the range, the range must be secured to the floor by properly installed anti-tip brackets and screws packed with the range. If attaching to the front. Those parts are trapped by adjusting 4 leg levelers with wrench. (See Figure 16 below to...
30" DUAL FUEL SLIDE-IN RANGE INSTALLATION INSTRUCTIONS (Models with an Electric Oven and a Gas Cooktop) 12 Anti-Tip Brackets Installation Instructions To reduce the risk of tipping of the 4 mounting ... brackets. Remove template and place brackets on the floor the location of the range, the range must be secured to the floor by properly installed anti-tip brackets and screws packed with the range. If attaching to the front. Those parts are trapped by adjusting 4 leg levelers with wrench. (See Figure 16 below to...


