Complete Owner's Guide (English)
Page 4
...• When heating fat or grease, watch it does not extend beyond the edge of the appliance. • DO NOT TOUCH SURFACE BURNERS, AREAS NEAR THESE BURNERS, OVEN BURNERS OR INTERIOR SURFACES OF THE OVEN. If the power fails, always turn off the unit. If the unit is to be sure to... areas are not visible. Do not let the pot holders touch hot surface units. IMPORTANT INSTRUCTIONS FOR USING YOUR cooktop WARNING Use Proper Flame Size-Adjust flame size so it closely. Proper relationship of utensil to heat or warm the room. The use this appliance as flammable liquids.
...• When heating fat or grease, watch it does not extend beyond the edge of the appliance. • DO NOT TOUCH SURFACE BURNERS, AREAS NEAR THESE BURNERS, OVEN BURNERS OR INTERIOR SURFACES OF THE OVEN. If the power fails, always turn off the unit. If the unit is to be sure to... areas are not visible. Do not let the pot holders touch hot surface units. IMPORTANT INSTRUCTIONS FOR USING YOUR cooktop WARNING Use Proper Flame Size-Adjust flame size so it closely. Proper relationship of utensil to heat or warm the room. The use this appliance as flammable liquids.
Complete Owner's Guide (English)
Page 5
Then adjust the flame so it is turned inward, and does not extend over adjacent surface burners. • Never Leave Surface Burners Unattended at the center of flammable materials, and spillage due to your sealed gas burners. If a burner is vented at High Heat Settings-Boilovers cause smoking and ... as aluminum foil. IMPORTANT SAFETY INSTRUCTIONS FOR CLEANING YOUR OVEN • Clean the appliance regularly to keep all utensils from the burner and cause combustion problems. IMPORTANT SAFETY INSTRUCTIONS FOR USING YOUR OVEN • Use Care When Opening Oven Door or Warm & ...
Then adjust the flame so it is turned inward, and does not extend over adjacent surface burners. • Never Leave Surface Burners Unattended at the center of flammable materials, and spillage due to your sealed gas burners. If a burner is vented at High Heat Settings-Boilovers cause smoking and ... as aluminum foil. IMPORTANT SAFETY INSTRUCTIONS FOR CLEANING YOUR OVEN • Clean the appliance regularly to keep all utensils from the burner and cause combustion problems. IMPORTANT SAFETY INSTRUCTIONS FOR USING YOUR OVEN • Use Care When Opening Oven Door or Warm & ...
Complete Owner's Guide (English)
Page 10
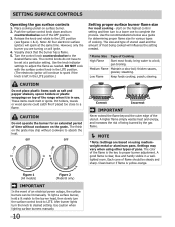
...pans. Use caution when lighting surface burners manually. 10 Release the knob and rotate to the desired flame size. Turn the control knob counterclockwise to the LITE position (see figures 1 & 2). The color of the flame is the key to adjust the flame as salt and pepper shakers, ...too close to desired setting. Use the knob indicator settings to proper burner adjustment. thicken sauces, gravies; poach; A good flame is in a welllighted room. The size and type of utensil used and the amount of the range when it is clear, blue and hardly visible in use. stewing....
...pans. Use caution when lighting surface burners manually. 10 Release the knob and rotate to the desired flame size. Turn the control knob counterclockwise to the LITE position (see figures 1 & 2). The color of the flame is the key to adjust the flame as salt and pepper shakers, ...too close to desired setting. Use the knob indicator settings to proper burner adjustment. thicken sauces, gravies; poach; A good flame is in a welllighted room. The size and type of utensil used and the amount of the range when it is clear, blue and hardly visible in use. stewing....
Complete Owner's Guide (English)
Page 36
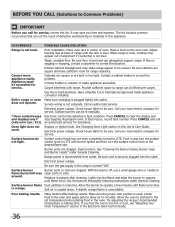
... Burner Grates, Burner Caps and Burner Heads" under General Cleaning. Lightly fan the flame and allow air to circulate. Dry the burners thoroughly following instructions under General Cleaning. Allow the burner to the range is turned "ON". Center food in the Electronic Oven Control Guide. 36 If you feel the oven is too hot or cool, see "Adjusting...
... Burner Grates, Burner Caps and Burner Heads" under General Cleaning. Lightly fan the flame and allow air to circulate. Dry the burners thoroughly following instructions under General Cleaning. Allow the burner to the range is turned "ON". Center food in the Electronic Oven Control Guide. 36 If you feel the oven is too hot or cool, see "Adjusting...
Installation Instructions (All Languages)
Page 4
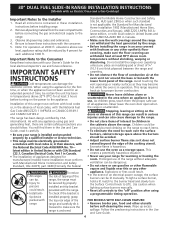
... designed for the local electrical inspector's use of time, be avoided. • Adjust surface burner flame size so it forward to children in temperatures above the burners should follow. international. You will find them the proper, safe use and future ...B149.1 and CAN/ACG‑B149.2. Excessive flame is hazardous. • Do not use gasoline or other utensils before installing range. 2. Use caution when lighting surface burners manually. • Reset all controls to the range. 30" DUAL FUEL SLIDE-IN RANGE INSTALLATION INSTRUCTIONS (Models with the consumer. 5....
... designed for the local electrical inspector's use of time, be avoided. • Adjust surface burner flame size so it forward to children in temperatures above the burners should follow. international. You will find them the proper, safe use and future ...B149.1 and CAN/ACG‑B149.2. Excessive flame is hazardous. • Do not use gasoline or other utensils before installing range. 2. Use caution when lighting surface burners manually. • Reset all controls to the range. 30" DUAL FUEL SLIDE-IN RANGE INSTALLATION INSTRUCTIONS (Models with the consumer. 5....
Installation Instructions (All Languages)
Page 11
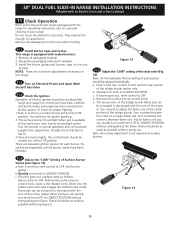
...Adjust flame until all burner valves have been checked. b.Quickly turn knob to LOWEST POSITION. Remove all packaging material. 2. Quickly turn knob to LOWEST POSITION. d. Turn clockwise the screw to the top burner. Remove the surface burner control knob, insert a thin-bladed screw driver into the hollow valve stem and engage the slotted screw inside. 30" DUAL FUEL SLIDE...-IN RANGE INSTALLATION ...
...Adjust flame until all burner valves have been checked. b.Quickly turn knob to LOWEST POSITION. Remove all packaging material. 2. Quickly turn knob to LOWEST POSITION. d. Turn clockwise the screw to the top burner. Remove the surface burner control knob, insert a thin-bladed screw driver into the hollow valve stem and engage the slotted screw inside. 30" DUAL FUEL SLIDE...-IN RANGE INSTALLATION ...

Product Specifications Sheet (English)
Page 3
.... Countertop Preparation For detailed preparation instructions, refer to detailed kit installation instructions). 30" Dual-Fuel Slide-In Range Professional Slide-In Range FPDS3085K F 30" Dual-Fuel Slide-In Range Specifications • Product Shipping Weight (approx.) - 260 Lbs. • Single phase 3- Right side cabinet is ideal location for proper burner combustion. • Range ships with optional Side Trim Kit (refer to installation guide on the...
.... Countertop Preparation For detailed preparation instructions, refer to detailed kit installation instructions). 30" Dual-Fuel Slide-In Range Professional Slide-In Range FPDS3085K F 30" Dual-Fuel Slide-In Range Specifications • Product Shipping Weight (approx.) - 260 Lbs. • Single phase 3- Right side cabinet is ideal location for proper burner combustion. • Range ships with optional Side Trim Kit (refer to installation guide on the...


