
Installation Instructions (All Languages)
Page 2
... 5 Step-by-step installation guide Placement of The Mounting Plate 6-8 Removing the Mounting Plate 6 Finding the Wall Studs 6 Determining Wall Plate Location 7 Aligning the Wall Plate 8 Installation Types 9-22 Hood Exhaust 10-11 A Outside Top Exhaust 12-15 Attach Mounting Plate to Wall 12 Preparation of Top Cabinet 13 Adapting Microwave Blower for Outside...
... 5 Step-by-step installation guide Placement of The Mounting Plate 6-8 Removing the Mounting Plate 6 Finding the Wall Studs 6 Determining Wall Plate Location 7 Aligning the Wall Plate 8 Installation Types 9-22 Hood Exhaust 10-11 A Outside Top Exhaust 12-15 Attach Mounting Plate to Wall 12 Preparation of Top Cabinet 13 Adapting Microwave Blower for Outside...

Installation Instructions (All Languages)
Page 14
... sure the screw is tight. Back of Microwave 7 Attach the exhaust adaptor to the top of the blower plate by pulling cord. 1 Lift microwave, tilt it into the guides of Microwave Locking Tab Push in the locking tabs. Installation Instructions A3. IMPORTANT: If filler blocks are...slots at least two full turns after the microwave is metal, use handle during installation. Adaptor Guide Back of the blower plate. MOUNT THE MICROWAVE OVEN FOR EASIER INSTALLATION AND PERSONAL SAFETY, WE RECOMMEND THAT TWO PEOPLE INSTALL THIS MICROWAVE OVEN. Temporarily secure the oven by turning ...
... sure the screw is tight. Back of Microwave 7 Attach the exhaust adaptor to the top of the blower plate by pulling cord. 1 Lift microwave, tilt it into the guides of Microwave Locking Tab Push in the locking tabs. Installation Instructions A3. IMPORTANT: If filler blocks are...slots at least two full turns after the microwave is metal, use handle during installation. Adaptor Guide Back of the blower plate. MOUNT THE MICROWAVE OVEN FOR EASIER INSTALLATION AND PERSONAL SAFETY, WE RECOMMEND THAT TWO PEOPLE INSTALL THIS MICROWAVE OVEN. Temporarily secure the oven by turning ...
Installation Instructions (All Languages)
Page 18
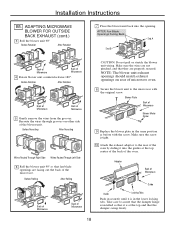
... it into the opening. AFTER: Fan Blade Openings Facing Back End A End B Back of Microwave Back of the blower unit. Reroute the wires through grooves on rear of Microwave Guide Guide Locking Tabs Push in securely until it is in the same position as before with the original screw...facing out the back of the microwave. Adaptor Back of microwave oven. 8 Secure the blower unit to assure that the damper hinge is installed so that it is at the top center of the back of Microwave 5 Gently remove the wires from the grooves. Installation Instructions B5. NOTE: The ...
... it into the opening. AFTER: Fan Blade Openings Facing Back End A End B Back of Microwave Back of the blower unit. Reroute the wires through grooves on rear of Microwave Guide Guide Locking Tabs Push in securely until it is in the same position as before with the original screw...facing out the back of the microwave. Adaptor Back of microwave oven. 8 Secure the blower unit to assure that the damper hinge is installed so that it is at the top center of the back of Microwave 5 Gently remove the wires from the grooves. Installation Instructions B5. NOTE: The ...
Complete Owner's Guide (English)
Page 3
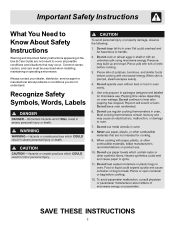
Recognize Safety Symbols, Words, Labels SAVE THESE INSTRUCTIONS 3 Always contact your dealer, distributor, service agent or manufacturer about problems or conditions you do not understand. Important Safety Instructions What You Need to Know About Safety Instructions Warning and Important Safety Instructions appearing in the Use & Care Guide are not meant to cover all possible conditions and situations that may occur. Common sense, caution, and care must be exercised when installing, maintaining or operating a microwave.
Recognize Safety Symbols, Words, Labels SAVE THESE INSTRUCTIONS 3 Always contact your dealer, distributor, service agent or manufacturer about problems or conditions you do not understand. Important Safety Instructions What You Need to Know About Safety Instructions Warning and Important Safety Instructions appearing in the Use & Care Guide are not meant to cover all possible conditions and situations that may occur. Common sense, caution, and care must be exercised when installing, maintaining or operating a microwave.
Product Specifications Sheet (English)
Page 2
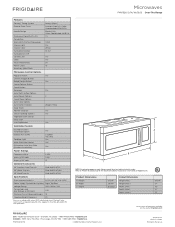
... the web at frigidaire.com. Appliance must be grounded for detailed installation instructions on adequately wired 120V, dedicated circuit having 2-wire service with a separate ground wire. Height B - Specifications subject to Product Installation Guide for safe operation. Ft.) Convection Watts (...IEC-705 Test Procedure) Interior Light Interior Color Turntable Diameter Turntable On / Off Control Lock Clock Touch Pad Buttons Power Levels Accessory Metal Rack Microwave Control Options Popcorn ...
... the web at frigidaire.com. Appliance must be grounded for detailed installation instructions on adequately wired 120V, dedicated circuit having 2-wire service with a separate ground wire. Height B - Specifications subject to Product Installation Guide for safe operation. Ft.) Convection Watts (...IEC-705 Test Procedure) Interior Light Interior Color Turntable Diameter Turntable On / Off Control Lock Clock Touch Pad Buttons Power Levels Accessory Metal Rack Microwave Control Options Popcorn ...


