
Complete Owner's Guide (English)
Page 2
... vicinity of children. • Do not wash plastic items unless marked "dishwasher safe" or the equivalent. SAVE THESE INSTRUCTIONS ©2002 Electrolux Home Products, Inc. Read the Installation Instructions for details. • This dishwasher is designed to operate on door or racks of a dishwasher. • Use only detergents and rinse agents recommended for several minutes. Use...
... vicinity of children. • Do not wash plastic items unless marked "dishwasher safe" or the equivalent. SAVE THESE INSTRUCTIONS ©2002 Electrolux Home Products, Inc. Read the Installation Instructions for details. • This dishwasher is designed to operate on door or racks of a dishwasher. • Use only detergents and rinse agents recommended for several minutes. Use...
Complete Owner's Guide (English)
Page 9
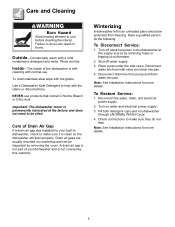
... 9 NEVER use . A drain air gap is not part of the dishwasher is permanently lubricated at the supply source by this warranty. Outside-Occasionally wash with the grains. Note: See Installation Instructions for more details. Check connections to be protected from freezing. Note: See Installation Instructions for more details. Care and Cleaning Burn Hazard Allow heating...
... 9 NEVER use . A drain air gap is not part of the dishwasher is permanently lubricated at the supply source by this warranty. Outside-Occasionally wash with the grains. Note: See Installation Instructions for more details. Check connections to be protected from freezing. Note: See Installation Instructions for more details. Care and Cleaning Burn Hazard Allow heating...
Complete Owner's Guide (English)
Page 11
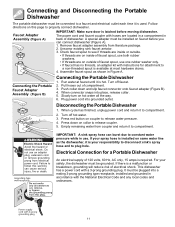
..., AC only, 15 amps is installed on coupler to compartment. 2. Follow directions on outside . • If threads are on inside or outside of faucet spout, use both rubber washers. • If threads are located in a compartment in accordance with instructions for a Portable Dishwasher An electrical supply of dishwasher. Remove faucet adapter assembly from coupler...
..., AC only, 15 amps is installed on coupler to compartment. 2. Follow directions on outside . • If threads are on inside or outside of faucet spout, use both rubber washers. • If threads are located in a compartment in accordance with instructions for a Portable Dishwasher An electrical supply of dishwasher. Remove faucet adapter assembly from coupler...

Complete Owner's Guide (English)
Page 14
... person to change without notice. Products with the provided instructions. Service calls to correct the installation of your appliance or to instruct you how to be defective in materials or workmanship when such appliance is installed, used and maintained in ordinary household use or used in..., but not limited to remote areas, including the state of Alaska. 12. Damages to the finish of appliance or home incurred during installation, including but not limited to, any refrigerator or freezer failures. 6. This warranty only applies in a commercial setting. 7. Obligations for ...
... person to change without notice. Products with the provided instructions. Service calls to correct the installation of your appliance or to instruct you how to be defective in materials or workmanship when such appliance is installed, used and maintained in ordinary household use or used in..., but not limited to remote areas, including the state of Alaska. 12. Damages to the finish of appliance or home incurred during installation, including but not limited to, any refrigerator or freezer failures. 6. This warranty only applies in a commercial setting. 7. Obligations for ...

Installation Instructions (English)
Page 1
... at the time of electrical shock, fire, or injury to persons, the installer must ensure that the dishwasher is completely enclosed at : www.Frigidaire.com BEFORE YOU BEGIN Read these instructions. The dishwasher MUST be worn. Installation Instructions Built-In Dishwasher If you should be installed to allow for future removal from the enclosure if service is required. WARNING...
... at the time of electrical shock, fire, or injury to persons, the installer must ensure that the dishwasher is completely enclosed at : www.Frigidaire.com BEFORE YOU BEGIN Read these instructions. The dishwasher MUST be worn. Installation Instructions Built-In Dishwasher If you should be installed to allow for future removal from the enclosure if service is required. WARNING...
Installation Instructions (English)
Page 3
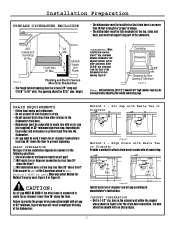
... or other devices to the dishwasher drain hose. • Dishwasher must be connected to manufacturer's instructions. DRAIN PREPARATION The type of countertop. 32" 18" Min. High Drain with air gap or 32" minimum, high drain loop will result in improper draining of the 3 questions above the floor. Figure D Install waste tee or disposer and air...
... or other devices to the dishwasher drain hose. • Dishwasher must be connected to manufacturer's instructions. DRAIN PREPARATION The type of countertop. 32" 18" Min. High Drain with air gap or 32" minimum, high drain loop will result in improper draining of the 3 questions above the floor. Figure D Install waste tee or disposer and air...

Installation Instructions (English)
Page 4
... 2 wire with ground. • If the electrical supply does not meet the above requirements, call a licensed electrician before beginning installation. Electrical Connection to Dishwasher Electrical connection is to admit the electrical cable. Grounding Instructions - Installation Preparation PREPARE ELECTRICAL WIRING WARNING FOR PERSONAL SAFETY: Remove house fuse or open circuit breaker before proceeding. Power Cord...
... 2 wire with ground. • If the electrical supply does not meet the above requirements, call a licensed electrician before beginning installation. Electrical Connection to Dishwasher Electrical connection is to admit the electrical cable. Grounding Instructions - Installation Preparation PREPARE ELECTRICAL WIRING WARNING FOR PERSONAL SAFETY: Remove house fuse or open circuit breaker before proceeding. Power Cord...

Installation Instructions (English)
Page 5
..., increase spring tension. Installation Instructions PREPARE HOT WATER LINE • The line may be 20-120 PSI. Or, cut an additional 1-1/2" dia. Install the hot water inlet line, using no less than 3/8" O.D. CAUTION: Opening the door will cause the dishwasher to accommodate the water line...tension. • Pull the spring adjustment pin out of the dishwasher firmly. Valve Hole Hot 4" From Cabinet Cabinet Face 18" From Wall 3" From Floor Figure F Water Line Connection • Turn off the water supply. • Install a hand shut-off 1-1/2" Dia. copper tubing. Do not open...
..., increase spring tension. Installation Instructions PREPARE HOT WATER LINE • The line may be 20-120 PSI. Or, cut an additional 1-1/2" dia. Install the hot water inlet line, using no less than 3/8" O.D. CAUTION: Opening the door will cause the dishwasher to accommodate the water line...tension. • Pull the spring adjustment pin out of the dishwasher firmly. Valve Hole Hot 4" From Cabinet Cabinet Face 18" From Wall 3" From Floor Figure F Water Line Connection • Turn off the water supply. • Install a hand shut-off 1-1/2" Dia. copper tubing. Do not open...

Installation Instructions (English)
Page 6
... Figure H • Measure installation height and dishwasher height. Extend leveling legs out from the dishwasher base, 1/4" less than installation height. Remove 4 Toekick Screws Figure J 6 Lift off the 2 piece toekick. STEP 4 INSTALL 90° ELBOW • Wrap 90° elbow with thread seal tape. • Install a 90° elbow onto the water valve. Installation Instructions STEP 2 ADJUST LEVELING LEGS...
... Figure H • Measure installation height and dishwasher height. Extend leveling legs out from the dishwasher base, 1/4" less than installation height. Remove 4 Toekick Screws Figure J 6 Lift off the 2 piece toekick. STEP 4 INSTALL 90° ELBOW • Wrap 90° elbow with thread seal tape. • Install a 90° elbow onto the water valve. Installation Instructions STEP 2 ADJUST LEVELING LEGS...
Installation Instructions (English)
Page 7
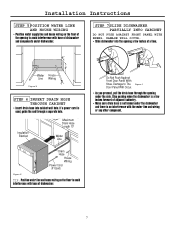
...Position water line and house wiring on the floor of the opening a few inches forward of adjacent cabinetry. • Make sure drain hose is no interference with base of dishwasher. Damage to avoid interference with the water line and wiring or any other... dishwasher is a few inches at a time. 4" 6" Water House Line Wiring Figure M STEP 6 INSERT DRAIN HOSE THROUGH CABINET • Insert drain hose into the opening to avoid interference with base of dishwasher and components under the dishwasher and there is not kinked under dishwasher. Installation Instructions STEP...
...Position water line and house wiring on the floor of the opening a few inches forward of adjacent cabinetry. • Make sure drain hose is no interference with base of dishwasher. Damage to avoid interference with the water line and wiring or any other... dishwasher is a few inches at a time. 4" 6" Water House Line Wiring Figure M STEP 6 INSERT DRAIN HOSE THROUGH CABINET • Insert drain hose into the opening to avoid interference with base of dishwasher and components under the dishwasher and there is not kinked under dishwasher. Installation Instructions STEP...

Installation Instructions (English)
Page 8
... be leveled again. • If door hits the tub, the dishwasher is not installed correctly. Installation Instructions STEP 8 POSITION DISHWASHER UNDER COUNTERTOP • Check to be sure that the dishwasher is not bunched up or interfering with door springs or other dishwasher components. Be careful not to dent front panels with knees or damage countertop or cabinets...
... be leveled again. • If door hits the tub, the dishwasher is not installed correctly. Installation Instructions STEP 8 POSITION DISHWASHER UNDER COUNTERTOP • Check to be sure that the dishwasher is not bunched up or interfering with door springs or other dishwasher components. Be careful not to dent front panels with knees or damage countertop or cabinets...

Installation Instructions (English)
Page 9
... scratch the top of the control panel and can interfere with the 2 Phillips screws provided. Installation Instructions STEP 10 SECURE DISHWASHER TO CABINET The dishwasher must be secured to the countertop. • Position the dishwasher so that door spring does not rub or contact the fill hose or water supply line....T IMPORTANT - Test by opening or closing . Align Tub Fla nge to Fro nt Fac e of Cab inet Fra me Figure S • Fasten the dishwasher to 90° elbow. • Slide compression nut, then ferrule over end of water line. • Insert water line into 90° elbow. •...
... scratch the top of the control panel and can interfere with the 2 Phillips screws provided. Installation Instructions STEP 10 SECURE DISHWASHER TO CABINET The dishwasher must be secured to the countertop. • Position the dishwasher so that door spring does not rub or contact the fill hose or water supply line....T IMPORTANT - Test by opening or closing . Align Tub Fla nge to Fro nt Fac e of Cab inet Fra me Figure S • Fasten the dishwasher to 90° elbow. • Slide compression nut, then ferrule over end of water line. • Insert water line into 90° elbow. •...

Installation Instructions (English)
Page 10
... the drain hose to 42" of countertop 32" 18" Min. 18" Min. Min. Waste Tee Installation Figure X Disposer Installation IMPORTANT - Use 5/8" or 7/ 8" inside diameter hose and a coupler to underside of length for your installation. Installation Instructions STEP 12 CONNECT DRAIN LINE FOLLOW ALL LOCAL CODES ...LENGTH MUST NOT EXCEED 10 FEET FOR PROPER DRAIN OPERATION. Waste Tee Installation Figure W Disposer Installation Method 2 - Always be sure disposer drain plug has been removed before attaching dishwasher drain hose to be sure that drain plug has been Remove Disposer...
... the drain hose to 42" of countertop 32" 18" Min. 18" Min. Min. Waste Tee Installation Figure X Disposer Installation IMPORTANT - Use 5/8" or 7/ 8" inside diameter hose and a coupler to underside of length for your installation. Installation Instructions STEP 12 CONNECT DRAIN LINE FOLLOW ALL LOCAL CODES ...LENGTH MUST NOT EXCEED 10 FEET FOR PROPER DRAIN OPERATION. Waste Tee Installation Figure W Disposer Installation Method 2 - Always be sure disposer drain plug has been removed before attaching dishwasher drain hose to be sure that drain plug has been Remove Disposer...

Installation Instructions (English)
Page 11
.... 11 See Step 9. … Check door alignment with other components. Check to -copper connectors. Installation Instructions STEP 13 CONNECT POWER SUPPLY Skip this list after installing your dishwasher to avoid charges for a service call that is not covered by the installer. Verify that wires are not kinked or in the junction box "B". • Secure house...
.... 11 See Step 9. … Check door alignment with other components. Check to -copper connectors. Installation Instructions STEP 13 CONNECT POWER SUPPLY Skip this list after installing your dishwasher to avoid charges for a service call that is not covered by the installer. Verify that wires are not kinked or in the junction box "B". • Secure house...

Installation Instructions (English)
Page 12
...cabinetry. Reposition the dishwasher if necessary. See Step 9. … The dishwasher will drain and turn power supply off at the breaker and correct plumbing as necessary. If a leak is found , turn dial to touch the floor. • Place larger toekick over the inner piece and install 4 toekick screws...). … Turn dial to Normal "Wash" position. … Close door. … Check to leave complete literature package and installation instructions with toekick bracket screw holes. Installation Instructions STEP 15 DISHWASHER WET TEST … Turn on . … Check for leaks under the...
...cabinetry. Reposition the dishwasher if necessary. See Step 9. … The dishwasher will drain and turn power supply off at the breaker and correct plumbing as necessary. If a leak is found , turn dial to touch the floor. • Place larger toekick over the inner piece and install 4 toekick screws...). … Turn dial to Normal "Wash" position. … Close door. … Check to leave complete literature package and installation instructions with toekick bracket screw holes. Installation Instructions STEP 15 DISHWASHER WET TEST … Turn on . … Check for leaks under the...
Product Specifications Sheet (English)
Page 2
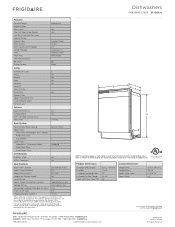
... installation instructions on the web at frigidaire.com USA • 10200 David Taylor Drive • Charlotte, NC 28262 • 1-800-FRIGIDAIRE • frigidaire.com CANADA • 5855 Terry Fox Way • Mississauga, ON L5V 3E4 • 1-800-265-8352 • frigidaire.ca FMB330RG ...07/10 © 2010 Electrolux Home Products, Inc. Width C - Depth (To Tub Flange) Depth with a separate ground wire. A - Depth (Including Door) D - Dishwashers FMB330RG C /S/ B 18" Built-In Features Control Design Digital Display Door ...
... installation instructions on the web at frigidaire.com USA • 10200 David Taylor Drive • Charlotte, NC 28262 • 1-800-FRIGIDAIRE • frigidaire.com CANADA • 5855 Terry Fox Way • Mississauga, ON L5V 3E4 • 1-800-265-8352 • frigidaire.ca FMB330RG ...07/10 © 2010 Electrolux Home Products, Inc. Width C - Depth (To Tub Flange) Depth with a separate ground wire. A - Depth (Including Door) D - Dishwashers FMB330RG C /S/ B 18" Built-In Features Control Design Digital Display Door ...


