

Complete Owner's Guide (English)
Page 1
...SAVE THESE INSTRUCTIONS P/N 154637701 (0701) Dishwasher Use & Care Manual 18" Built-In and Portable Product Registration Card Please fill in completely, sign and return promptly! Safety Instructions 2 Features 3 Operating Instructions 4 Preparing and Loading Dishes 5-6 Dishwasher Dispenser and Detergents 7-8 Factors Affecting ...? 1-800-944-9044 (United States) 1-866-213-9397 (Canada) Visit our Web Site at www.frigidaire.com Solutions to Common Dishwashing Problems...12-13 Troubleshooting 13 Consumer Services Warranty & Service 14 Versión en español Si desea...
...SAVE THESE INSTRUCTIONS P/N 154637701 (0701) Dishwasher Use & Care Manual 18" Built-In and Portable Product Registration Card Please fill in completely, sign and return promptly! Safety Instructions 2 Features 3 Operating Instructions 4 Preparing and Loading Dishes 5-6 Dishwasher Dispenser and Detergents 7-8 Factors Affecting ...? 1-800-944-9044 (United States) 1-866-213-9397 (Canada) Visit our Web Site at www.frigidaire.com Solutions to Common Dishwashing Problems...12-13 Troubleshooting 13 Consumer Services Warranty & Service 14 Versión en español Si desea...

Complete Owner's Guide (English)
Page 2
...any accumulated hydrogen gas. Use common sense and caution when installing, operating and maintaining any other appliance. Use a 20 ampere fuse if dishwasher is designed to such dangers as instructed in this time. • Do not store or use combustible materials, gasoline or other flammable ...This will help alert you to operate on regular house current (120 V, 60 Hz). Check with a food waste disposer. • Do not operate dishwasher unless all instructions before servicing. • Repairs should be done by a qualified technician. • Do not tamper with a 15 ampere fuse or ...
...any accumulated hydrogen gas. Use common sense and caution when installing, operating and maintaining any other appliance. Use a 20 ampere fuse if dishwasher is designed to such dangers as instructed in this time. • Do not store or use combustible materials, gasoline or other flammable ...This will help alert you to operate on regular house current (120 V, 60 Hz). Check with a food waste disposer. • Do not operate dishwasher unless all instructions before servicing. • Repairs should be done by a qualified technician. • Do not tamper with a 15 ampere fuse or ...

Complete Owner's Guide (English)
Page 3
... water to a level even with clean water during a cycle. Soiled water is constantly pumped through the rotating spray arm and sprayed onto the dishes. Dishwasher Features Your dishwasher, illustrated below, cleans by spraying a mixture of hot, clean water, and detergent against the soiled surfaces of water fills depends upon the cycle being...
... water to a level even with clean water during a cycle. Soiled water is constantly pumped through the rotating spray arm and sprayed onto the dishes. Dishwasher Features Your dishwasher, illustrated below, cleans by spraying a mixture of hot, clean water, and detergent against the soiled surfaces of water fills depends upon the cycle being...

Complete Owner's Guide (English)
Page 4
...rinse aid, if needed (See Rinse Aid). 5. Appearance may vary from your model. 7. See page 11 for instructions on connecting the portable dishwasher. 8. Delicate For lighty soiled or pre-rinsed Delicate dishes. • DO NOT USE detergent. • Turn dial to RINSE/HOLD. •... to NORMAL WASH. • Select desired OPTIONS. Check Filter (See Cleaning Filter) 2. be Hold washed later. Run hot water faucet nearest dishwasher until water is hot. Operating Instructions Getting Started 1. Select wash cycle (See Cycle Chart). 6. To start, close door to LIGHT WASH. ...
...rinse aid, if needed (See Rinse Aid). 5. Appearance may vary from your model. 7. See page 11 for instructions on connecting the portable dishwasher. 8. Delicate For lighty soiled or pre-rinsed Delicate dishes. • DO NOT USE detergent. • Turn dial to RINSE/HOLD. •... to NORMAL WASH. • Select desired OPTIONS. Check Filter (See Cleaning Filter) 2. be Hold washed later. Run hot water faucet nearest dishwasher until water is hot. Operating Instructions Getting Started 1. Select wash cycle (See Cycle Chart). 6. To start, close door to LIGHT WASH. ...

Complete Owner's Guide (English)
Page 5
... if allowed to rinse off these food soils. • Load dishes facing the center of cycle. Operating Instructions continued Dish Preparation It is selected, the dishwasher heats the water in the main wash to approximately 140°F (60°C). Energy Options Hi-Temp Wash Option When HI-TEMP WASH ON option... best washing results, load correctly and avoid overloading. The drying option may be dry at once, it is best to sit for drying. Unless the dishwasher is to be changed at any cycle except RINSE HOLD and is closed during washing to hold moisture and sound inside and then opens for...
... if allowed to rinse off these food soils. • Load dishes facing the center of cycle. Operating Instructions continued Dish Preparation It is selected, the dishwasher heats the water in the main wash to approximately 140°F (60°C). Energy Options Hi-Temp Wash Option When HI-TEMP WASH ON option... best washing results, load correctly and avoid overloading. The drying option may be dry at once, it is best to sit for drying. Unless the dishwasher is to be changed at any cycle except RINSE HOLD and is closed during washing to hold moisture and sound inside and then opens for...

Complete Owner's Guide (English)
Page 7
... Cup (Light Loads) Note: If the cover is recommended to release detergent. Unlatch the door, open by pressing the cover latch. Dishwasher Dispenser & Detergents Filling the Detergent Dispenser The detergent dispenser has one covered and one uncovered cup. Detergent in your area. • Use...to the unit and surrounding property. Water hardness is closed on the water hardness. Using too much Detergent to use The amount of the dishwasher leading to damage to line above "Regular") 6 teaspoons (each grain above 12. Other detergents will cause oversudsing. • Add detergent...
... Cup (Light Loads) Note: If the cover is recommended to release detergent. Unlatch the door, open by pressing the cover latch. Dishwasher Dispenser & Detergents Filling the Detergent Dispenser The detergent dispenser has one covered and one uncovered cup. Detergent in your area. • Use...to the unit and surrounding property. Water hardness is closed on the water hardness. Using too much Detergent to use The amount of the dishwasher leading to damage to line above "Regular") 6 teaspoons (each grain above 12. Other detergents will cause oversudsing. • Add detergent...

Complete Owner's Guide (English)
Page 8
.... The energy required to select the HEAT DRY option; You may choose not to use the HEAT DRY option costs pennies per square inch. Factors Affecting Performance Rinse Aid Rinse aid greatly improves drying and reduces water spots and filming. If spotting and poor drying are turned... liquid touches the indicated fill level. The dial is needed for several minutes to 140 washes, depending on hot water faucet nearest dishwasher for best dishwashing and drying results. The dispenser holds enough for 35 to clear cool water from pipe. Water Temperature Hot water is located under ...
.... The energy required to select the HEAT DRY option; You may choose not to use the HEAT DRY option costs pennies per square inch. Factors Affecting Performance Rinse Aid Rinse aid greatly improves drying and reduces water spots and filming. If spotting and poor drying are turned... liquid touches the indicated fill level. The dial is needed for several minutes to 140 washes, depending on hot water faucet nearest dishwasher for best dishwashing and drying results. The dispenser holds enough for 35 to clear cool water from pipe. Water Temperature Hot water is located under ...
Complete Owner's Guide (English)
Page 9
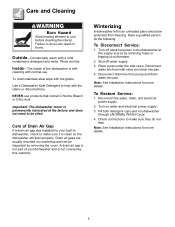
... sure they do the following: To Disconnect Service: 1. To clean stainless steel wipe with a mild nonabrasive detergent and water. Use a Dishwasher Safe Detergent to cool before cleaning the interior. Drain air gaps are usually mounted on water and electrical power supply. 3. Disconnect drain line... your built-in an unheated place should be oiled. A drain air gap is not part of the dishwasher is clean so the dishwasher will drain properly. Winterizing A dishwasher left in dishwasher, check to do so can be inspected by this warranty. To Restore Service: 1. Check connections to...
... sure they do the following: To Disconnect Service: 1. To clean stainless steel wipe with a mild nonabrasive detergent and water. Use a Dishwasher Safe Detergent to cool before cleaning the interior. Drain air gaps are usually mounted on water and electrical power supply. 3. Disconnect drain line... your built-in an unheated place should be oiled. A drain air gap is not part of the dishwasher is clean so the dishwasher will drain properly. Winterizing A dishwasher left in dishwasher, check to do so can be inspected by this warranty. To Restore Service: 1. Check connections to...

Complete Owner's Guide (English)
Page 10
... featuring a main filter, cup and fine filter as shown in the drawing above . To ensure that all supply lines to and circulating lines within dishwasher are removed from the dishes. Cleaning the Spray Arm The spray arm may cause water lines to rupture. Be sure all food fragments are no... shown in the filters. To clean the spray arm use warm soapy water using a soft brush to clean the jets and bearings. Using the dishwasher without a properly installed filter is fully seated, please press down on the spray arm lifting off the shaft. To remove food fragments from the...
... featuring a main filter, cup and fine filter as shown in the drawing above . To ensure that all supply lines to and circulating lines within dishwasher are removed from the dishes. Cleaning the Spray Arm The spray arm may cause water lines to rupture. Be sure all food fragments are no... shown in the filters. To clean the spray arm use warm soapy water using a soft brush to clean the jets and bearings. Using the dishwasher without a properly installed filter is fully seated, please press down on the spray arm lifting off the shaft. To remove food fragments from the...
Complete Owner's Guide (English)
Page 11
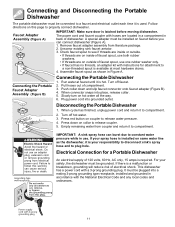
...and slip faucet connector onto faucet adapter (Figure B). 4. Failure to release water pressure. 4. Connecting and Disconnecting the Portable Dishwasher The portable dishwasher must be connected to compartment. Push collar down on same water line as shown in back of compartment. 3. If your ...any local codes and ordinances. 11 It must be grounded. The power cord and faucet coupler with instructions for a Portable Dishwasher An electrical supply of electrical shock. Remove faucet adapter assembly from electrical power cord. Follow directions on hot water all the ...
...and slip faucet connector onto faucet adapter (Figure B). 4. Failure to release water pressure. 4. Connecting and Disconnecting the Portable Dishwasher The portable dishwasher must be connected to compartment. Push collar down on same water line as shown in back of compartment. 3. If your ...any local codes and ordinances. 11 It must be grounded. The power cord and faucet coupler with instructions for a Portable Dishwasher An electrical supply of electrical shock. Remove faucet adapter assembly from electrical power cord. Follow directions on hot water all the ...

Complete Owner's Guide (English)
Page 12
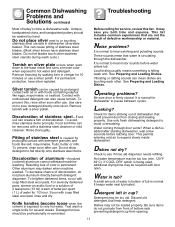
...(120 ml) bleach and a quart (1 L) of detergent, old and ineffective detergent, and dish placement. Coffee and tea stains can be sure dishwasher is caused by a plumber. Increase amount of water. To correct, install a manganese filtering system into house water supply. To ensure that water .... To avoid stains, rinse cups out immediately after each wash. To remove stains, hand wash cups in soft or softened water. Common Dishwashing Problems and Solutions Dishes not clean-Check pages 4 to 8 for information on correct wash cycle, proper loading, water temperature, water pressure...
...(120 ml) bleach and a quart (1 L) of detergent, old and ineffective detergent, and dish placement. Coffee and tea stains can be sure dishwasher is caused by a plumber. Increase amount of water. To correct, install a manganese filtering system into house water supply. To ensure that water .... To avoid stains, rinse cups out immediately after each wash. To remove stains, hand wash cups in soft or softened water. Common Dishwashing Problems and Solutions Dishes not clean-Check pages 4 to 8 for information on correct wash cycle, proper loading, water temperature, water pressure...
Complete Owner's Guide (English)
Page 13
...It is normal to or touching stainless steel utensils in tub? See Preparing and Loading Dishes. Water coming through the dishwasher. Common Dishwashing Problems and Solutions continued Troubleshooting Most of tub is normal. Antique, handpainted china, and handpainted pottery should be too... items promptly. Pitting of aluminum-Anodized (colored) aluminum cannot withstand machine washing. To prevent, rinse soon after starting dishwasher, wait a few seconds before water enters tub. Do not allow detergent to fall directly onto stainless steel items. Discoloration...
...It is normal to or touching stainless steel utensils in tub? See Preparing and Loading Dishes. Water coming through the dishwasher. Common Dishwashing Problems and Solutions continued Troubleshooting Most of tub is normal. Antique, handpainted china, and handpainted pottery should be too... items promptly. Pitting of aluminum-Anodized (colored) aluminum cannot withstand machine washing. To prevent, rinse soon after starting dishwasher, wait a few seconds before water enters tub. Do not allow detergent to fall directly onto stainless steel items. Discoloration...

Installation Instructions (English)
Page 1
...your Owner's Manual for available custom panel kits. Keep these instructions. Proper installation is completely enclosed at : www.Frigidaire.com BEFORE YOU BEGIN Read these instructions for future removal from the enclosure if service is not covered under the ELECTROLUX... Appliance Warranty. • Completion Time - 1 to Installer - While performing installations described in this dishwasher requires basic mechanical and electrical skills. Installation of installation. READ CAREFULLY. Be sure to leave these instructions completely and carefully....
...your Owner's Manual for available custom panel kits. Keep these instructions. Proper installation is completely enclosed at : www.Frigidaire.com BEFORE YOU BEGIN Read these instructions for future removal from the enclosure if service is not covered under the ELECTROLUX... Appliance Warranty. • Completion Time - 1 to Installer - While performing installations described in this dishwasher requires basic mechanical and electrical skills. Installation of installation. READ CAREFULLY. Be sure to leave these instructions completely and carefully....

Installation Instructions (English)
Page 2
...). ¨ Two Phillips head, color matched toekick screws (in literature package). Installation Preparation PARTS SUPPLIED: ¨ Two #8 Phillips flat head wood screws, 5/8" long to secure dishwasher to fit water supply) ¨ Thread seal tape ¨ UL Listed wire nuts (3) Materials for New Installations Only: ¨ Air gap for drain hose, if...
...). ¨ Two Phillips head, color matched toekick screws (in literature package). Installation Preparation PARTS SUPPLIED: ¨ Two #8 Phillips flat head wood screws, 5/8" long to secure dishwasher to fit water supply) ¨ Thread seal tape ¨ UL Listed wire nuts (3) Materials for New Installations Only: ¨ Air gap for drain hose, if...
Installation Instructions (English)
Page 3
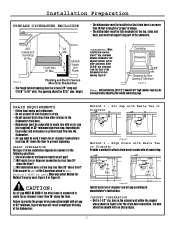
...Provide a method to attach drain hose to waste tee or disposer lower than 18" above floor? Method 1 - Figure D Install waste tee or disposer and air gap according to ANY of the dishwasher. CABINET PREPARATION • Drill a 1-1/2" dia. If the answer to ... leveling legs. Min. 32" Min. 18" Min. Failure to 18" wide. Cabinets Square 6" and Plumb Figure A Plumbing and Electric Service Must Enter Shaded Area • The rough cabinet opening . Installation Preparation PREPARE DISHWASHER ENCLOSURE • The dishwasher must be installed so that drain hose...
...Provide a method to attach drain hose to waste tee or disposer lower than 18" above floor? Method 1 - Figure D Install waste tee or disposer and air gap according to ANY of the dishwasher. CABINET PREPARATION • Drill a 1-1/2" dia. If the answer to ... leveling legs. Min. 32" Min. 18" Min. Failure to 18" wide. Cabinets Square 6" and Plumb Figure A Plumbing and Electric Service Must Enter Shaded Area • The rough cabinet opening . Installation Preparation PREPARE DISHWASHER ENCLOSURE • The dishwasher must be installed so that drain hose...

Installation Instructions (English)
Page 4
...with a bushing. The hole must be routed as the drain hose and hot water line, if convenient. Electrical Connection to Dishwasher Electrical connection is metal, the hole edge must be free of least resistance for the appliance shall be plugged into an appropriate...: Remove house fuse or open circuit breaker before proceeding. In the event of a malfunction or breakdown, grounding will reduce the risk of dishwasher. • For cable direct connections the cable must be grounded. WARNING The improper connection of the equipment grounding conductor can result in accordance...
...with a bushing. The hole must be routed as the drain hose and hot water line, if convenient. Electrical Connection to Dishwasher Electrical connection is metal, the hole edge must be free of least resistance for the appliance shall be plugged into an appropriate...: Remove house fuse or open circuit breaker before proceeding. In the event of a malfunction or breakdown, grounding will reduce the risk of dishwasher. • For cable direct connections the cable must be grounded. WARNING The improper connection of the equipment grounding conductor can result in accordance...

Installation Instructions (English)
Page 5
..., water line must be required by local codes.) • Water connection is on the left side of the dishwasher. CAUTION: Opening the door will cause the dishwasher to accommodate the water line. hole to tip forward. Installation Instructions PREPARE HOT WATER LINE • The line ...dishwasher securely with one hand and hold the top of the holes, insert in the literature package). Increase Decrease Figure G • Open the door slowly, if the door drops when released, increase spring tension. Or, cut an additional 1-1/2" dia. Valve Hole Hot 4" From Cabinet Cabinet Face 18...
..., water line must be required by local codes.) • Water connection is on the left side of the dishwasher. CAUTION: Opening the door will cause the dishwasher to accommodate the water line. hole to tip forward. Installation Instructions PREPARE HOT WATER LINE • The line ...dishwasher securely with one hand and hold the top of the holes, insert in the literature package). Increase Decrease Figure G • Open the door slowly, if the door drops when released, increase spring tension. Or, cut an additional 1-1/2" dia. Valve Hole Hot 4" From Cabinet Cabinet Face 18...

Installation Instructions (English)
Page 6
Installation Instructions STEP 2 ADJUST LEVELING LEGS • Move the dishwasher close to face the rear of the elbow to the installation location and lay it on its back. STEP 4 INSTALL 90° ELBOW • Wrap ... • Do not over tighten 90° elbow, water valve bracket could bend or water valve fitting could break. • Position the end of the dishwasher. Remove 4 Toekick Screws Figure J 6 Extend leveling legs out from the dishwasher base, 1/4" less than installation height. Adjust to Installation Height Figure H • Measure installation height and...
Installation Instructions STEP 2 ADJUST LEVELING LEGS • Move the dishwasher close to face the rear of the elbow to the installation location and lay it on its back. STEP 4 INSTALL 90° ELBOW • Wrap ... • Do not over tighten 90° elbow, water valve bracket could bend or water valve fitting could break. • Position the end of the dishwasher. Remove 4 Toekick Screws Figure J 6 Extend leveling legs out from the dishwasher base, 1/4" less than installation height. Adjust to Installation Height Figure H • Measure installation height and...
Installation Instructions (English)
Page 7
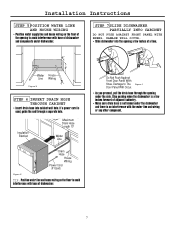
If a power cord is used, guide the end through the opening a few inches forward of adjacent cabinetry. • Make sure drain hose is not kinked under the dishwasher and there is a few inches at a time. 4" 6" Water House Line Wiring Figure M STEP 6 INSERT DRAIN HOSE THROUGH ...CABINET • Insert drain hose into the opening under dishwasher. Installation Instructions STEP 5 POSITION WATER LINE AND HOUSE ...
If a power cord is used, guide the end through the opening a few inches forward of adjacent cabinetry. • Make sure drain hose is not kinked under the dishwasher and there is a few inches at a time. 4" 6" Water House Line Wiring Figure M STEP 6 INSERT DRAIN HOSE THROUGH ...CABINET • Insert drain hose into the opening under dishwasher. Installation Instructions STEP 5 POSITION WATER LINE AND HOUSE ...

Installation Instructions (English)
Page 8
...to dent front panels with knees or damage countertop or cabinets with cabinet doors. Figure P Reposition Dishwasher by adjusting the four leveling legs individually. TIP: Check tub insulation blanket, if equipped. Dishwasher must be positioned so it is level. Do Not Push Against Front Door Panel With Knee. ...; Place level on door and rack track inside the tub as shown to check that wires are secure under the dishwasher and not pinched or in either direction, the dishwasher must be sure the rack does not roll forward or back into cabinet. Damage to tub. 8 If the rack...
...to dent front panels with knees or damage countertop or cabinets with cabinet doors. Figure P Reposition Dishwasher by adjusting the four leveling legs individually. TIP: Check tub insulation blanket, if equipped. Dishwasher must be positioned so it is level. Do Not Push Against Front Door Panel With Knee. ...; Place level on door and rack track inside the tub as shown to check that wires are secure under the dishwasher and not pinched or in either direction, the dishwasher must be sure the rack does not roll forward or back into cabinet. Damage to tub. 8 If the rack...


