
Complete Owner s Guide
Page 2
... sales receipt here for your model. Use your model and serial numbers below for choosing our product. Model Number Serial Number Purchase Date NEED HELP? Read this manual. Or call away. PRECAUTIONS TO AVOID POSSIBLE EXPOSURE TO EXCESSIVE MICROWAVE ENERGY (a) Do not attempt ... we are completely committed to help you solve common problems that sold you received a damaged Microwave Oven... If you do to providing you 'll enjoy your microwave oven properly. Visit the Frigidaire Web Site at 1-800-374-4432, 24 hours a day, 7 days a week. Congratulations...
... sales receipt here for your model. Use your model and serial numbers below for choosing our product. Model Number Serial Number Purchase Date NEED HELP? Read this manual. Or call away. PRECAUTIONS TO AVOID POSSIBLE EXPOSURE TO EXCESSIVE MICROWAVE ENERGY (a) Do not attempt ... we are completely committed to help you solve common problems that sold you received a damaged Microwave Oven... If you do to providing you 'll enjoy your microwave oven properly. Visit the Frigidaire Web Site at 1-800-374-4432, 24 hours a day, 7 days a week. Congratulations...
Complete Owner s Guide
Page 31
... until cool. TURNTABLE/TURNTABLE SUPPORT EASY CARE™ STAINLESS STEEL / SMUDGE_PROOF™ STAINLESS STEEL / BLACK STAINLESS STEEL (SOME MODELS) Your microwave oven(some models) may overheat and cause smoke or possibly catch fire. Wash them in a 2-cup glass measuring cup. If the control panel... other harsh cleaners as they occur. Rinse with clean water and dry with a soft cloth. Metal parts will be taken in the microwave oven. TOUCH CONTROL PANEL Care should be removed for several minutes using a clean sponge or cloth. EXTERIOR The outside with a soft ...
... until cool. TURNTABLE/TURNTABLE SUPPORT EASY CARE™ STAINLESS STEEL / SMUDGE_PROOF™ STAINLESS STEEL / BLACK STAINLESS STEEL (SOME MODELS) Your microwave oven(some models) may overheat and cause smoke or possibly catch fire. Wash them in a 2-cup glass measuring cup. If the control panel... other harsh cleaners as they occur. Rinse with clean water and dry with a soft cloth. Metal parts will be taken in the microwave oven. TOUCH CONTROL PANEL Care should be removed for several minutes using a clean sponge or cloth. EXTERIOR The outside with a soft ...

Product Specifications Sheet
Page 2
... floor to top of unit) 66" Over-the-Range Microwave Oven_T Models 900 Width (Min.) 30" LED Depth (Min.) 12" Frigidaire Gallery StainlessSteel 13-1/2" Depth (Max.) 13" Yes 27 High (1 - 9) Yes (1) MICROWAVE CONTROL OPTIONS Popcorn Button Yes Veggies Button Yes Sensor Reheat ...Inc. Refer to change. Accessories information available on the web at frigidaire.com / frigidaire.ca. FGMV155CT D/F MICROWAVE 30" OVER-THE-RANGE CONVECTION FEATURES Control / Timing System Exterior Door Finish Handle Design Microwave Capacity (Cu. Always consult local and national electric, gas and ...
... floor to top of unit) 66" Over-the-Range Microwave Oven_T Models 900 Width (Min.) 30" LED Depth (Min.) 12" Frigidaire Gallery StainlessSteel 13-1/2" Depth (Max.) 13" Yes 27 High (1 - 9) Yes (1) MICROWAVE CONTROL OPTIONS Popcorn Button Yes Veggies Button Yes Sensor Reheat ...Inc. Refer to change. Accessories information available on the web at frigidaire.com / frigidaire.ca. FGMV155CT D/F MICROWAVE 30" OVER-THE-RANGE CONVECTION FEATURES Control / Timing System Exterior Door Finish Handle Design Microwave Capacity (Cu. Always consult local and national electric, gas and ...

Installation Instructions
Page 6
...solid sound. B. Stud finder - B. Then place a mark halfway between the edges. Installation Instructions 1 PLACEMENT OF THE MOUNTING PLATE A. REMOVING THE MICROWAVE OVEN FROM THE CARTON/ REMOVING THE MOUNTING PLATE 1 Remove the installation instructions,use and care, exhaust adapter, turntable ring, shelf, filters, glass ...Cut the middle of the outer protective plastic bag to find the edges of the studs. THE MICROWAVE MUST BE CONNECTED TO AT LEAST ONE WALL STUD. Shelf ( For some models) Glass Tray 2 Fold back all 4 carton flaps fully against carton sides. The oven should ...
...solid sound. B. Stud finder - B. Then place a mark halfway between the edges. Installation Instructions 1 PLACEMENT OF THE MOUNTING PLATE A. REMOVING THE MICROWAVE OVEN FROM THE CARTON/ REMOVING THE MOUNTING PLATE 1 Remove the installation instructions,use and care, exhaust adapter, turntable ring, shelf, filters, glass ...Cut the middle of the outer protective plastic bag to find the edges of the studs. THE MICROWAVE MUST BE CONNECTED TO AT LEAST ONE WALL STUD. Shelf ( For some models) Glass Tray 2 Fold back all 4 carton flaps fully against carton sides. The oven should ...

Installation Instructions
Page 9
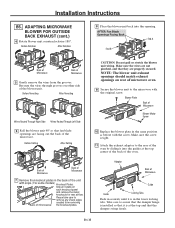
Recirculating (Non-Vented Ductless) NOTE: This microwave is designed for your exhaust to the Back for Outside Back Exhaust See page 12 See page 16 C RECIRCULATING (NON-VENTED DUCTLESS) Models are shipped for Recirculating. Outside Top Exhaust (Vertical Duct) B. A OUTSIDE TOP EXHAUST (VERTICAL ...Exhaust B OUTSIDE BACK EXHAUST (HORIZONTAL DUCT) Adaptor Must Be Moved to the outside. Outside Back Exhaust (Horizontal Duct) C. Some models have a disposable charcoal filter installed to page 20. EN-9 Select the type of ventilation required for adaptation to that section. If...
Recirculating (Non-Vented Ductless) NOTE: This microwave is designed for your exhaust to the Back for Outside Back Exhaust See page 12 See page 16 C RECIRCULATING (NON-VENTED DUCTLESS) Models are shipped for Recirculating. Outside Top Exhaust (Vertical Duct) B. A OUTSIDE TOP EXHAUST (VERTICAL ...Exhaust B OUTSIDE BACK EXHAUST (HORIZONTAL DUCT) Adaptor Must Be Moved to the outside. Outside Back Exhaust (Horizontal Duct) C. Some models have a disposable charcoal filter installed to page 20. EN-9 Select the type of ventilation required for adaptation to that section. If...
Installation Instructions
Page 18
... Motor Screw 10 Replace the blower plate in the back of the unit with the screw. Please take care to the microwave with the original screw. EN-18 Before Rotation After Rotation 8 Place the blower unit back into the guides at the top and ...openings are properly secured. Before Rolling After Rolling Back of Microwave Back of Microwave Guide Guide Locking Tabs Push in the lower locking tabs. Adaptor Back of Microwave 7 Remove the knockout plates in the same position as before with snips. (For some models) Knockout Plates: Snip all 4 webs on each knockout panel...
... Motor Screw 10 Replace the blower plate in the back of the unit with the screw. Please take care to the microwave with the original screw. EN-18 Before Rotation After Rotation 8 Place the blower unit back into the guides at the top and ...openings are properly secured. Before Rolling After Rolling Back of Microwave Back of Microwave Guide Guide Locking Tabs Push in the lower locking tabs. Adaptor Back of Microwave 7 Remove the knockout plates in the same position as before with snips. (For some models) Knockout Plates: Snip all 4 webs on each knockout panel...
Installation Instructions
Page 22
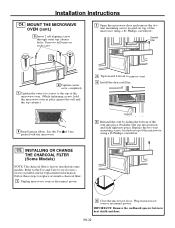
... (cont.) 5 Insert 2 self-aligning screws through outer top cabinet holes. See the Use a& nd Care packed with the microwave. INSTALLING OR CHANGE THE CHARCOAL FILTER (Some Models) NOTE: The charcoal filter is factory installed and for replacement information. Follow these steps to remove vent. 4 Install the charcoal filter. )NSERT 5 Reinstall the vent...
... (cont.) 5 Insert 2 self-aligning screws through outer top cabinet holes. See the Use a& nd Care packed with the microwave. INSTALLING OR CHANGE THE CHARCOAL FILTER (Some Models) NOTE: The charcoal filter is factory installed and for replacement information. Follow these steps to remove vent. 4 Install the charcoal filter. )NSERT 5 Reinstall the vent...


