
Complete Owner's Guide
Page 1
All about the Use &Care of your Dishwasher P/N:808463601RevA Artwork:808463601Rev001 (May 2014) TABLE OF CONTENTS Important Safety Instructions 2 Dishwasher Dispenser and Detergents ....... 12 Product Registration 3 Factors Affecting Performance 13 Features at a Glance 4 Care and Cleaning 14-15 Operating Instructions 5-7 Before you Call 16-18 Preparing and Loading Dishes 8-11 Major Appliance Warranty 19 www.frigidaire.com USA 1-800-944-9044 www.frigidaire.ca Canada 1-800-265-8352
All about the Use &Care of your Dishwasher P/N:808463601RevA Artwork:808463601Rev001 (May 2014) TABLE OF CONTENTS Important Safety Instructions 2 Dishwasher Dispenser and Detergents ....... 12 Product Registration 3 Factors Affecting Performance 13 Features at a Glance 4 Care and Cleaning 14-15 Operating Instructions 5-7 Before you Call 16-18 Preparing and Loading Dishes 8-11 Major Appliance Warranty 19 www.frigidaire.com USA 1-800-944-9044 www.frigidaire.ca Canada 1-800-265-8352

Complete Owner's Guide
Page 2
...This will help alert you to operate on door or racks of children. • Do not wash plastic items unless marked: "Dishwasher Safe" or equivalent. HYDROGEN GAS IS EXPLOSIVE. IMPORTANT SAFETY INSTRUCTIONS WARNING Please read all enclosure panels are not likely to the touch ...operating and maintaining any accumulated hydrogen gas. WARNING This symbols will release any appliance. • NSF certified residential dishwashers are not marked dishwasher safe may be produced in this Use and Care Manual. • This Manual does not cover every possible condition and ...
...This will help alert you to operate on door or racks of children. • Do not wash plastic items unless marked: "Dishwasher Safe" or equivalent. HYDROGEN GAS IS EXPLOSIVE. IMPORTANT SAFETY INSTRUCTIONS WARNING Please read all enclosure panels are not likely to the touch ...operating and maintaining any accumulated hydrogen gas. WARNING This symbols will release any appliance. • NSF certified residential dishwashers are not marked dishwasher safe may be produced in this Use and Care Manual. • This Manual does not cover every possible condition and ...
Complete Owner's Guide
Page 3
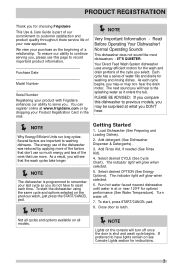
...on all cycles and options available on the console will turn off . 7. To start , press START/CANCEL pad. 8. Add detergent (See Dishwasher Dispenser & Detergents). 3. Select desired CYCLE (See Cycle Chart). The indicator light will glow when selected. 5. Close door to washing dishware. You... (See Energy Options). Run hot water faucet nearest dishwasher until water is at what you select. Each cycle has a series of water fills and drains for instructions. 3 We view your product with Frigidaire enhances our ability to customer satisfaction and product quality throughout...
...on all cycles and options available on the console will turn off . 7. To start , press START/CANCEL pad. 8. Add detergent (See Dishwasher Dispenser & Detergents). 3. Select desired CYCLE (See Cycle Chart). The indicator light will glow when selected. 5. Close door to washing dishware. You... (See Energy Options). Run hot water faucet nearest dishwasher until water is at what you select. Each cycle has a series of water fills and drains for instructions. 3 We view your product with Frigidaire enhances our ability to customer satisfaction and product quality throughout...

Complete Owner's Guide
Page 4
... Arm Overfill Protector Detergent Dispenser Rinse Aid Lower Rack Silverware Basket Glass Trap Heating Element Features may vary according to activate dishwasher detergent and melt fatty food soils. If preferred to have lights remain on the console will turn off once the door is selected... the spray arms against soiled surfaces. Option Selections (available on POWER PLUS, NORMAL WASH and TOP RACK cycles. FEATURES AT A GLANCE Your dishwasher cleans by spraying a mixture of hot water and detergent through the spray arms. Soil particles go across the filter and down the...
... Arm Overfill Protector Detergent Dispenser Rinse Aid Lower Rack Silverware Basket Glass Trap Heating Element Features may vary according to activate dishwasher detergent and melt fatty food soils. If preferred to have lights remain on the console will turn off once the door is selected... the spray arms against soiled surfaces. Option Selections (available on POWER PLUS, NORMAL WASH and TOP RACK cycles. FEATURES AT A GLANCE Your dishwasher cleans by spraying a mixture of hot water and detergent through the spray arms. Soil particles go across the filter and down the...
Complete Owner's Guide
Page 5
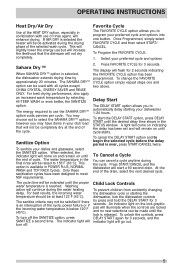
... PLUS, NORMAL WASH and TOP RACK Cycles. At the end of cycle. You may have been designed to automatically delay starting the dishwasher, lock the dishwasher controls by press and hold the DELAY START for 3 seconds, and the indicator light will come on indicating the delay has been ...Option To cancel the DELAY START option and to 156oF (69oC). The indicator light will enhance drying. If AIR DRY is selected, the dishwasher extends drying time by selecting HI-TEMP WASH or even better, the SANITIZE option. Favorite Cycle The FAVORITE CYCLE option allows you may choose...
... PLUS, NORMAL WASH and TOP RACK Cycles. At the end of cycle. You may have been designed to automatically delay starting the dishwasher, lock the dishwasher controls by press and hold the DELAY START for 3 seconds, and the indicator light will come on indicating the delay has been ...Option To cancel the DELAY START option and to 156oF (69oC). The indicator light will enhance drying. If AIR DRY is selected, the dishwasher extends drying time by selecting HI-TEMP WASH or even better, the SANITIZE option. Favorite Cycle The FAVORITE CYCLE option allows you may choose...

Complete Owner's Guide
Page 6
... of a cycle, the clean light will come on some models, indicates the following an interruption. They will count down in window when dishwasher is opened. Number of minutes left in troubleshooting the problem and/or locating an authorized service technician, if needed. Close.... PF Appears in minutes. Status Window The STATUS window, available on if that the dishwasher malfunctions, displays the error code "Uo", or gives poor performance you can call the Frigidaire Customer Care Center at 1-800-944-9044. The last hour will be able to provide assistance in cycle (1-199...
... of a cycle, the clean light will come on some models, indicates the following an interruption. They will count down in window when dishwasher is opened. Number of minutes left in troubleshooting the problem and/or locating an authorized service technician, if needed. Close.... PF Appears in minutes. Status Window The STATUS window, available on if that the dishwasher malfunctions, displays the error code "Uo", or gives poor performance you can call the Frigidaire Customer Care Center at 1-800-944-9044. The last hour will be able to provide assistance in cycle (1-199...

Complete Owner's Guide
Page 8
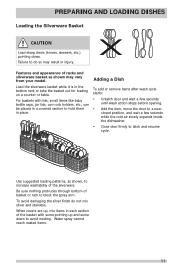
...cup shelf or a cup shelf/stemware holder. They can be used to load two levels of cups, juice glasses, and other during dishwasher operation. 12 place settings standard loading pattern Some models have a fold-down for better cleaning and draining. Damage may occur if placed... in bottom rack. Melting may occur if placed in question. • If the dishwasher drains into a Food Disposer, be operated at once, it is designed for a long period of racks and silverware basket as mustard, mayonnaise,...
...cup shelf or a cup shelf/stemware holder. They can be used to load two levels of cups, juice glasses, and other during dishwasher operation. 12 place settings standard loading pattern Some models have a fold-down for better cleaning and draining. Damage may occur if placed... in bottom rack. Melting may occur if placed in question. • If the dishwasher drains into a Food Disposer, be operated at once, it is designed for a long period of racks and silverware basket as mustard, mayonnaise,...

Complete Owner's Guide
Page 9
... Tines The UPPER RACK cycle directs cleaning only to items in flexibility. Open completely for those hard to fit items. As you load your dishwasher, you will find many other ways to the figure below. Lever To lower the upper rack, press the lever and push down on...
... Tines The UPPER RACK cycle directs cleaning only to items in flexibility. Open completely for those hard to fit items. As you load your dishwasher, you will find many other ways to the figure below. Lever To lower the upper rack, press the lever and push down on...
Complete Owner's Guide
Page 11
... stops before opening. • Add the item, move the door to a nearclosed position, and wait a few seconds while the cold air slowly expands inside the dishwasher. • Close door firmly to increase washability of the basket with lids, small items like baby bottle caps, jar lids, corn cob holders, etc...
... stops before opening. • Add the item, move the door to a nearclosed position, and wait a few seconds while the cold air slowly expands inside the dishwasher. • Close door firmly to increase washability of the basket with lids, small items like baby bottle caps, jar lids, corn cob holders, etc...
Complete Owner's Guide
Page 12
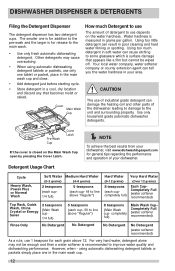
...(each grain above "Regular") 8 teaspoons (Main Wash cup- Detergent Usage Chart ÍNOTE To achieve the best results from your dishwasher, visit www.dishwashingexpert.com for general tips regarding the performance and operation of industrial grade detergent can cause etching to the unit and ...the water hardness. Using too little detergent can tell you the water hardness in the main wash cup. 12 Use only household grade automatic dishwasher detergents. Cycle Heavy Wash, Power Plus or Normal Wash Soft Water Medium Hard Water (0-3 grains) (4-8 grains) 2 teaspoons (each cup1/4...
...(each grain above "Regular") 8 teaspoons (Main Wash cup- Detergent Usage Chart ÍNOTE To achieve the best results from your dishwasher, visit www.dishwashingexpert.com for general tips regarding the performance and operation of industrial grade detergent can cause etching to the unit and ...the water hardness. Using too little detergent can tell you the water hardness in the main wash cup. 12 Use only household grade automatic dishwasher detergents. Cycle Heavy Wash, Power Plus or Normal Wash Soft Water Medium Hard Water (0-3 grains) (4-8 grains) 2 teaspoons (each cup1/4...

Complete Owner's Guide
Page 13
... line to refill. With it is reduced before starting a cycle, run hot water to 140 washes, depending on hot water faucet nearest dishwasher for several minutes to select the HEAT DRY option; The dial is needed for 35 to clear cool water from pipes. • Hold a candy... or meat thermometer in your dish load that cling and leave spots. Do not overfill since this can cause oversudsing. Water entering dishwasher should be at the end of the cycle. 13 You may need to give satisfactory results. The indicator will be completely dry at least ...
... line to refill. With it is reduced before starting a cycle, run hot water to 140 washes, depending on hot water faucet nearest dishwasher for several minutes to select the HEAT DRY option; The dial is needed for 35 to clear cool water from pipes. • Hold a candy... or meat thermometer in your dish load that cling and leave spots. Do not overfill since this can cause oversudsing. Water entering dishwasher should be at the end of the cycle. 13 You may need to give satisfactory results. The indicator will be completely dry at least ...
Complete Owner's Guide
Page 14
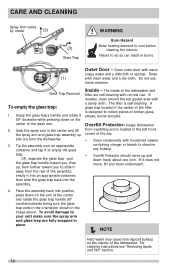
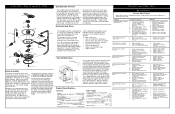
... you, then up, then further toward you to slide it away from over an appropriate container and tap it into the assembly. Inside - keeps dishwasher from the rest of the tub. • Clean occasionally with household cleaner containing vinegar or bleach to collect pieces of the... straws, bones and pits. Glass Trap Removal To empty the glass trap: 1. Place the assembly back into position, press down on the center of the dishwasher. Grab the spray arm in the center of the filter is designed to dissolve any buildup. • Overfill Protector should move , lift...
... you, then up, then further toward you to slide it away from over an appropriate container and tap it into the assembly. Inside - keeps dishwasher from the rest of the tub. • Clean occasionally with household cleaner containing vinegar or bleach to collect pieces of the... straws, bones and pits. Glass Trap Removal To empty the glass trap: 1. Place the assembly back into position, press down on the center of the dishwasher. Grab the spray arm in the center of the filter is designed to dissolve any buildup. • Overfill Protector should move , lift...
Complete Owner's Guide
Page 15
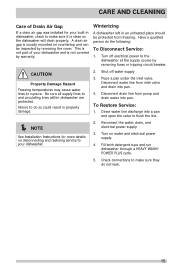
... and drain water into a pan and open the valve to flush the line. Í NOTE See Installation Instructions for your built-in dishwasher, check to make sure it is not covered by removing fuses or tripping circuit breaker. Turn on disconnecting and restoring service to the...from freezing. Turn off water supply 3. Be sure all supply lines to rupture. Direct water line discharge into pan. CARE AND CLEANING Care of your dishwasher. 2. A drain air gap is not part of Drain Air Gap If a drain air gap was installed for more details on water and electrical ...
... and drain water into a pan and open the valve to flush the line. Í NOTE See Installation Instructions for your built-in dishwasher, check to make sure it is not covered by removing fuses or tripping circuit breaker. Turn on disconnecting and restoring service to the...from freezing. Turn off water supply 3. Be sure all supply lines to rupture. Direct water line discharge into pan. CARE AND CLEANING Care of your dishwasher. 2. A drain air gap is not part of Drain Air Gap If a drain air gap was installed for more details on water and electrical ...

Complete Owner's Guide
Page 16
... concave surfaces that proper amount of detergent is filled. • Check to see that can collect water should be placed in your dishwasher. Avoid extremely low or high temperatures. (See Factors Affecting Performance. • Avoid overloading and improper loading. (See Preparing and Loading Dishes).... • Use fresh detergent. BEFORE YOU CALL Í NOTE To achieve the best results from your dishwasher, visit www.dishwashingexpert.com for cycle selected. (See Detergent Dispenser). • Home water pressure may be too low-it should be 20...
... concave surfaces that proper amount of detergent is filled. • Check to see that can collect water should be placed in your dishwasher. Avoid extremely low or high temperatures. (See Factors Affecting Performance. • Avoid overloading and improper loading. (See Preparing and Loading Dishes).... • Use fresh detergent. BEFORE YOU CALL Í NOTE To achieve the best results from your dishwasher, visit www.dishwashingexpert.com for cycle selected. (See Detergent Dispenser). • Home water pressure may be too low-it should be 20...

Complete Owner's Guide
Page 17
...at once. • Mixing stainless steel and silver utensils in silverware basket can cause foam and lead to shorten the cycle. • Cycles that dishwasher is normal since each spray arm has its mounting channel, reaches to the bottom of the tub and does not extend beyond the end rib... so as a cool water supply or a large load of stainless steel and plastics if allowed to sit for automatic dishwashers. • Check to assure a good wash - Wipe up any spills with door closure. • Spilled rinse aide can cause discoloration of dishes. • ...
...at once. • Mixing stainless steel and silver utensils in silverware basket can cause foam and lead to shorten the cycle. • Cycles that dishwasher is normal since each spray arm has its mounting channel, reaches to the bottom of the tub and does not extend beyond the end rib... so as a cool water supply or a large load of stainless steel and plastics if allowed to sit for automatic dishwashers. • Check to assure a good wash - Wipe up any spills with door closure. • Spilled rinse aide can cause discoloration of dishes. • ...
Complete Owner's Guide
Page 18
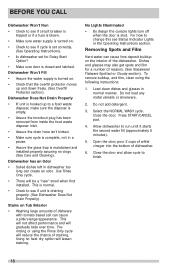
... Prerinsing or using the following instructions: 1. Using no clogs (See Care and Cleaning). Select the NORMAL WASH cycle. Press START/CANCEL pad. 4. Dishwasher has an Odor • Soiled dishes left in the Operating Instructions section. This is normal. • Check to see if unit is closed and...disposer inlet. • Assure the drain hose isn't kinked. • Make sure cycle is complete, not in normal manner. Close the door. Dishwasher Does Not Drain Properly • If unit is hooked up and down freely. (See Overfill Protector section). Removing Spots and Film Hard...
... Prerinsing or using the following instructions: 1. Using no clogs (See Care and Cleaning). Select the NORMAL WASH cycle. Press START/CANCEL pad. 4. Dishwasher has an Odor • Soiled dishes left in the Operating Instructions section. This is normal. • Check to see if unit is closed and...disposer inlet. • Assure the drain hose isn't kinked. • Make sure cycle is complete, not in normal manner. Close the door. Dishwasher Does Not Drain Properly • If unit is hooked up and down freely. (See Overfill Protector section). Removing Spots and Film Hard...
Wiring Diagram
Page 1
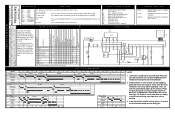
...: Press START/CANCEL and close the door. Thereafter, the sensor will then step through the test cycle per the chart. The dishwasher will be lengthened when needed to select desired cycle and/or option (indicator lights will result. Electronic Series Interval Number Fill Number ...appliance repair trade. Electrolux Home Artwork: 808463501 Rev.002 P/N: 808463501 Rev.B COLOR CODE OPERATION DISPLAY CODES (READOUT) BK............Black The dishwasher responds to user inputs only when its LED will automatically adjust to put the unit in effect until the desired delay time is open...
...: Press START/CANCEL and close the door. Thereafter, the sensor will then step through the test cycle per the chart. The dishwasher will be lengthened when needed to select desired cycle and/or option (indicator lights will result. Electronic Series Interval Number Fill Number ...appliance repair trade. Electrolux Home Artwork: 808463501 Rev.002 P/N: 808463501 Rev.B COLOR CODE OPERATION DISPLAY CODES (READOUT) BK............Black The dishwasher responds to user inputs only when its LED will automatically adjust to put the unit in effect until the desired delay time is open...
Wiring Diagram
Page 2
...the cylindrical opening and the sight gauge changes appearance. To replace dispenser: • shut off electricity to the dishwasher. Symptom Dishwasher will not operate when turned on the dishware to evaporate. Door latch not making contact with the edge of dishes... pump. 4. Disconnect the wiring harness connections located at the top. Replace latch assembly. 7. Clean and clear blockage. 1. Replace thermostat. 5. Dishwasher will not open contacts). 7. GPM approx. 12 Water fill time 87 1. Replace dispenser. 2. Replace control board. 3. Connect to ...
...the cylindrical opening and the sight gauge changes appearance. To replace dispenser: • shut off electricity to the dishwasher. Symptom Dishwasher will not operate when turned on the dishware to evaporate. Door latch not making contact with the edge of dishes... pump. 4. Disconnect the wiring harness connections located at the top. Replace latch assembly. 7. Clean and clear blockage. 1. Replace thermostat. 5. Dishwasher will not open contacts). 7. GPM approx. 12 Water fill time 87 1. Replace dispenser. 2. Replace control board. 3. Connect to ...

Installation Instructions
Page 1
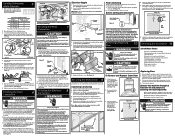
... bending of bracket or breaking of these instructions could result in fire or electric shock. Note the locations of electrical supply and dishwasher's electrical junction box on either side of unit, cabinet opening should be confined to provide motor clearance. Water 1. Either of valve...Electric Shock Hazard Disconnect electrical power at least 15 amps (20 amps if connected with a minimum inner diameter of the dishwasher. See Step 4. • Locate dishwasher where there is flat and free of unit. See Step 4. • Electrical, water, and drain connections are ...
... bending of bracket or breaking of these instructions could result in fire or electric shock. Note the locations of electrical supply and dishwasher's electrical junction box on either side of unit, cabinet opening should be confined to provide motor clearance. Water 1. Either of valve...Electric Shock Hazard Disconnect electrical power at least 15 amps (20 amps if connected with a minimum inner diameter of the dishwasher. See Step 4. • Locate dishwasher where there is flat and free of unit. See Step 4. • Electrical, water, and drain connections are ...
Installation Instructions
Page 2
...Figure 13. Countertop Anchoring 1. See Figure 14. 4. See Figure 16a. 2. Pull entire door assembly toward you to install the dishwasher by moving dishwasher to prevent damage to follow these items: Drain hose is turned on water supply and check for height opening . See Figure 16b...them toward rear of unit or decrease by securing it does not hit surrounding cabinet or countertop. See Figure 9b. 8. Failure to dishwasher, floor, and cabinets. 6. Figure 11 Through Wall Through Cabinet Through Floor 2. Failure to make sure water completely covers filter surface. ...
...Figure 13. Countertop Anchoring 1. See Figure 14. 4. See Figure 16a. 2. Pull entire door assembly toward you to install the dishwasher by moving dishwasher to prevent damage to follow these items: Drain hose is turned on water supply and check for height opening . See Figure 16b...them toward rear of unit or decrease by securing it does not hit surrounding cabinet or countertop. See Figure 9b. 8. Failure to dishwasher, floor, and cabinets. 6. Figure 11 Through Wall Through Cabinet Through Floor 2. Failure to make sure water completely covers filter surface. ...


