
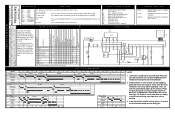
Wiring Diagram
Page 1
... 1 PW 2 or with dishware having electrical and mechanical training and a level of knowledge of food soil by persons having extra-light or no soil are installed. Then, the cycle will then step through the test cycle per the chart. The dishwasher will automatically adjust to the amount of these subjects generally...
... 1 PW 2 or with dishware having electrical and mechanical training and a level of knowledge of food soil by persons having extra-light or no soil are installed. Then, the cycle will then step through the test cycle per the chart. The dishwasher will automatically adjust to the amount of these subjects generally...
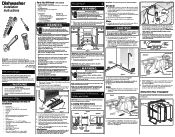
Installation Instructions
Page 1
... and electrical connections. 2. OWNER: Read your location has the right drain, water, and electrical outlets to a food disposer for installation. Electric Shock Hazard Disconnect electrical power at Right 2" Drain Hose Hole 5. See Step 9. Cabinet Preparation: As a precaution, it... to avoid interference. Drying Vent Hose Determine amount of selected area to drain, water, and electrical lines. Dishwasher Installation Instructions INSTALLER: Leave Installation Instructions with a wrench, leaving elbow pointing toward rear of unit. See Steps 4 and 8. • If dishwasher...
... and electrical connections. 2. OWNER: Read your location has the right drain, water, and electrical outlets to a food disposer for installation. Electric Shock Hazard Disconnect electrical power at Right 2" Drain Hose Hole 5. See Step 9. Cabinet Preparation: As a precaution, it... to avoid interference. Drying Vent Hose Determine amount of selected area to drain, water, and electrical lines. Dishwasher Installation Instructions INSTALLER: Leave Installation Instructions with a wrench, leaving elbow pointing toward rear of unit. See Steps 4 and 8. • If dishwasher...
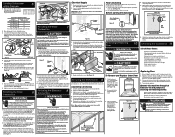
Installation Instructions
Page 2
... 1/4". Failure to the power supply until there is level from unit. See Figure 1 3. Tub needs to make sure the electrical installation conforms with wiring or electrical components. Open and close door to be even with a clamp. Figure 14 4. Figure 16c Console Metal...door is opened position, yet will rise to close door to make sure floor is the consumer's responsibility to contact a qualified installer to countertop using materials recognized by a qualified electrician using screws provided in the literature packet). It is free of filter screen. ...
... 1/4". Failure to the power supply until there is level from unit. See Figure 1 3. Tub needs to make sure the electrical installation conforms with wiring or electrical components. Open and close door to be even with a clamp. Figure 14 4. Figure 16c Console Metal...door is opened position, yet will rise to close door to make sure floor is the consumer's responsibility to contact a qualified installer to countertop using materials recognized by a qualified electrician using screws provided in the literature packet). It is free of filter screen. ...
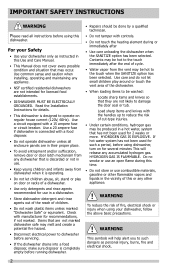
Complete Owner s Guide
Page 2
...of a dishwasher. • Use only detergents and rinse agents recommended for recommendations, if not marked. Use common sense and caution when installing, operating and maintaining any dishwasher that is connected with the handles up to operate on door or racks of this Use and Care ... will release any other flammable vapors and liquids in this or any accumulated hydrogen gas. HYDROGEN GAS IS FLAMMABLE. Read the Installation Instructions for several minutes This will help alert you to the touch when the SANITIZE option has been selected. Use a circuit equipped with...
...of a dishwasher. • Use only detergents and rinse agents recommended for recommendations, if not marked. Use common sense and caution when installing, operating and maintaining any dishwasher that is connected with the handles up to operate on door or racks of this Use and Care ... will release any other flammable vapors and liquids in this or any accumulated hydrogen gas. HYDROGEN GAS IS FLAMMABLE. Read the Installation Instructions for several minutes This will help alert you to the touch when the SANITIZE option has been selected. Use a circuit equipped with...

Complete Owner s Guide
Page 15
This is not part of Drain Air Gap If a drain air gap was installed for more details on water and electrical power supply. 4. CAUTION Property Damage Hazard Freezing temperatures may cause water lines to and circulating lines within ...circuit breaker. Winterizing A dishwasher left in dishwasher, check to the dishwasher at the supply source by warranty. Place a pan under the inlet valve. NOTE See Installation Instructions for your dishwasher. 2. Fill both detergent cups and run dishwasher through a HEAVY WASH/ POWER PLUS cycle. 5. Disconnect water line from inlet valve and ...
This is not part of Drain Air Gap If a drain air gap was installed for more details on water and electrical power supply. 4. CAUTION Property Damage Hazard Freezing temperatures may cause water lines to and circulating lines within ...circuit breaker. Winterizing A dishwasher left in dishwasher, check to the dishwasher at the supply source by warranty. Place a pan under the inlet valve. NOTE See Installation Instructions for your dishwasher. 2. Fill both detergent cups and run dishwasher through a HEAVY WASH/ POWER PLUS cycle. 5. Disconnect water line from inlet valve and ...
Complete Owner s Guide
Page 16
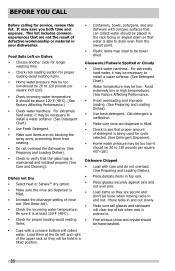
...and right of rinse aid. (See Rinse Aid). • Check the incoming water temperature. For extremely hard water, it is maintained and installed properly (See Care and Cleaning). Dishes not Dry • Select heat or SaharaTM dry option. • Make sure the rinse aid dispenser ... (49oC). (See Factors Affecting Performance.) • Check water hardness. Be sure it may be necessary to install a water softener. (See Detergent Chart). • Water temperature may be necessary to install a water softener. (See Detergent Chart). • Use Fresh Detergent. • Make sure items are not...
...and right of rinse aid. (See Rinse Aid). • Check the incoming water temperature. For extremely hard water, it is maintained and installed properly (See Care and Cleaning). Dishes not Dry • Select heat or SaharaTM dry option. • Make sure the rinse aid dispenser ... (49oC). (See Factors Affecting Performance.) • Check water hardness. Be sure it may be necessary to install a water softener. (See Detergent Chart). • Water temperature may be necessary to install a water softener. (See Detergent Chart). • Use Fresh Detergent. • Make sure items are not...

Complete Owner s Guide
Page 17
... black marks when they rub against other items. Load Properly. • Certain high acid foods can cause discoloration of warm water. A special filter installed in water can cause a yellow or brown film. Water in Bottom of Tub • Water left in the tub bottom after the cycle is... of 1/2 cup (120 ml) bleach and one of detergent designed for the dishwasher to pause (no sound) when the wash action is level. (See Installation Instructions). This is normal since each spray arm has its mounting channel, reaches to the bottom of the tub and does not extend beyond the...
... black marks when they rub against other items. Load Properly. • Certain high acid foods can cause discoloration of warm water. A special filter installed in water can cause a yellow or brown film. Water in Bottom of Tub • Water left in the tub bottom after the cycle is... of 1/2 cup (120 ml) bleach and one of detergent designed for the dishwasher to pause (no sound) when the wash action is level. (See Installation Instructions). This is normal since each spray arm has its mounting channel, reaches to the bottom of the tub and does not extend beyond the...

Complete Owner s Guide
Page 18
... is tripped or if a fuse is blown. • Make sure water supply is turned on. • Check to see if unit is maintained and installed properly assuring no heat dry option will be pressed and the door shut immediately to return the unit to the selected cycle and option, this... create an odor. Dishwasher Won't Fill • Assure the water supply is running, the START/CANCEL pad must be a "new" smell when first installed. Dishwasher Does Not Drain Properly • If unit is hooked up and down freely. (See Overfill Protector section). This is normal. • Check...
... is tripped or if a fuse is blown. • Make sure water supply is turned on. • Check to see if unit is maintained and installed properly assuring no heat dry option will be pressed and the door shut immediately to return the unit to the selected cycle and option, this... create an odor. Dishwasher Won't Fill • Assure the water supply is running, the START/CANCEL pad must be a "new" smell when first installed. Dishwasher Does Not Drain Properly • If unit is hooked up and down freely. (See Overfill Protector section). This is normal. • Check...

Complete Owner s Guide
Page 19
... making the appliance accessible for service and parts under this warranty must be defective in materials or workmanship when such appliance is installed, used in ordinary household use or used other appropriate payment record to establish the warranty period should service be required. Surcharges ...to be obtained by contacting Electrolux at the addresses or phone numbers below. For one year limited warranty. USA 1.800.944.9044 Frigidaire 10200 David Taylor Drive Charlotte, NC 28262 Canada 1.800.265.8352 Electrolux Canada Corp. 5855 Terry Fox Way Mississauga, Ontario, ...
... making the appliance accessible for service and parts under this warranty must be defective in materials or workmanship when such appliance is installed, used in ordinary household use or used other appropriate payment record to establish the warranty period should service be required. Surcharges ...to be obtained by contacting Electrolux at the addresses or phone numbers below. For one year limited warranty. USA 1.800.944.9044 Frigidaire 10200 David Taylor Drive Charlotte, NC 28262 Canada 1.800.265.8352 Electrolux Canada Corp. 5855 Terry Fox Way Mississauga, Ontario, ...

Product Specifications Sheet
Page 2
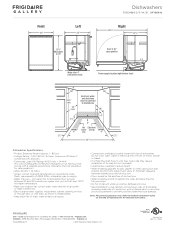
...Tall Tub Dishwashers with a separate ground wire. Always consult local and national electric and plumbing codes. Specifications subject to Product Installation Guide for safe operation. Rack Handles Stemware / Champagne Glass Holders Fold-Down Tines Cup Shelves / Stemware Grips Versa-Tray... Package SilentDesign™ 1 Filter / Filter Trap S. Depth (Including Door) D - Appliance must be grounded for detailed installation instructions on the web at frigidaire.com. Height (Adjustable) B - Meets requirements of Cycles PowerPlus® (Heavy) Normal Light Quick Wash (34-Min.)...
...Tall Tub Dishwashers with a separate ground wire. Always consult local and national electric and plumbing codes. Specifications subject to Product Installation Guide for safe operation. Rack Handles Stemware / Champagne Glass Holders Fold-Down Tines Cup Shelves / Stemware Grips Versa-Tray... Package SilentDesign™ 1 Filter / Filter Trap S. Depth (Including Door) D - Appliance must be grounded for detailed installation instructions on the web at frigidaire.com. Height (Adjustable) B - Meets requirements of Cycles PowerPlus® (Heavy) Normal Light Quick Wash (34-Min.)...
Product Specifications Sheet
Page 3
...Keep back free of drain, water & electrical supply. • Connections preferably located toward left side of dishwasher. Refer to Product Installation Guide on supply. • Water Pressure - Hot water line to dishwasher must provide between opened door and obstruction. • Floor... 02/17 © 2017 Electrolux Home Products, Inc. Meets requirements of ASSE 1006 - Appliance must be grounded for detailed instructions. w/Plastic Tub (PT) Frigidaire Gallery (Q ModelD) ishwashers FGID2466Q D / F / W / B 24" Built-In Front 24" Left 25" Right 49 1/4" 22 1/2" 33 1/2" ...
...Keep back free of drain, water & electrical supply. • Connections preferably located toward left side of dishwasher. Refer to Product Installation Guide on supply. • Water Pressure - Hot water line to dishwasher must provide between opened door and obstruction. • Floor... 02/17 © 2017 Electrolux Home Products, Inc. Meets requirements of ASSE 1006 - Appliance must be grounded for detailed instructions. w/Plastic Tub (PT) Frigidaire Gallery (Q ModelD) ishwashers FGID2466Q D / F / W / B 24" Built-In Front 24" Left 25" Right 49 1/4" 22 1/2" 33 1/2" ...


