

Complete Owners Guide
Page 1
All about the Use & Care of your Induction Cooktop A01704802 Rev C (Oct2017) TABLE OF CONTENTS Product Record and Registration 2 Important Safety Instructions 3 Before Setting Surface Controls 8 Setting Surface Controls 12 Care and Cleaning 17 Before You Call 19 Warranty 24 www.frigidaire.com USA 1-800-944-9044 www.frigidaire.ca Canada 1-800-265-8352
All about the Use & Care of your Induction Cooktop A01704802 Rev C (Oct2017) TABLE OF CONTENTS Product Record and Registration 2 Important Safety Instructions 3 Before Setting Surface Controls 8 Setting Surface Controls 12 Care and Cleaning 17 Before You Call 19 Warranty 24 www.frigidaire.com USA 1-800-944-9044 www.frigidaire.ca Canada 1-800-265-8352
Complete Owners Guide
Page 2
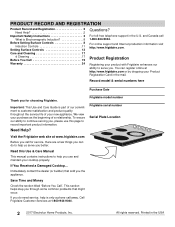
... Instructions 3 What is only a phone call 1-800-944-9044. Call Frigidaire Customer Services at www.frigidaire.com Before you call for choosing Frigidaire. We view your purchase as the beginning of your cooktop properly. Important: This Use and Care Guide is part of our commitment...service life of a relationship. Need Help? Immediately contact the dealer (or builder) that might occur. Frigidaire model number Frigidaire serial number Serial Plate Location Visit the Frigidaire web site at 1-800-944-9044. 2 2017 Electrolux Home Products, Inc. You can do need ...
... Instructions 3 What is only a phone call 1-800-944-9044. Call Frigidaire Customer Services at www.frigidaire.com Before you call for choosing Frigidaire. We view your purchase as the beginning of your cooktop properly. Important: This Use and Care Guide is part of our commitment...service life of a relationship. Need Help? Immediately contact the dealer (or builder) that might occur. Frigidaire model number Frigidaire serial number Serial Plate Location Visit the Frigidaire web site at 1-800-944-9044. 2 2017 Electrolux Home Products, Inc. You can do need ...
Complete Owners Guide
Page 5
... use baking soda. Buildup of pressure may result in the storage or warmer drawer (if equipped). Surface burners and elements may include the cooktop and surfaces facing the cooktop. 5 Do not store explosives, such as aluminum foil or aftermarket liners. Do not use dry chemical or foam-type extinguisher. Doing so may...
... use baking soda. Buildup of pressure may result in the storage or warmer drawer (if equipped). Surface burners and elements may include the cooktop and surfaces facing the cooktop. 5 Do not store explosives, such as aluminum foil or aftermarket liners. Do not use dry chemical or foam-type extinguisher. Doing so may...
Complete Owners Guide
Page 6
... device. Improper cookware may break due to work properly on the induction zones. Select cookware with sharp objects. 6 Avoid scratching the cooktop glass with flat bottoms that match the surface unit size. It would be careful to operate the appliance during a power failure. Using...boiled dry could be turned inward and not extend over other cooking areas. IMPORTANT INSTRUCTIONS FOR GLASS AND CERAMIC COOKTOPS Do not clean or operate a broken cooktop. Clean cooktop glass with the utensil, the handle of flammable materials, and spillage due to ensure that it on the...
... device. Improper cookware may break due to work properly on the induction zones. Select cookware with sharp objects. 6 Avoid scratching the cooktop glass with flat bottoms that match the surface unit size. It would be careful to operate the appliance during a power failure. Using...boiled dry could be turned inward and not extend over other cooking areas. IMPORTANT INSTRUCTIONS FOR GLASS AND CERAMIC COOKTOPS Do not clean or operate a broken cooktop. Clean cooktop glass with the utensil, the handle of flammable materials, and spillage due to ensure that it on the...
Complete Owners Guide
Page 8
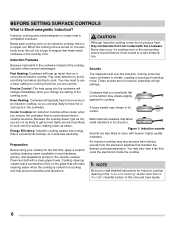
...and abrasions. Pay close attention to avoid scorching food when starting to vibrate, creating a buzzing or humming noise. Cooler Cooktop: An induction cooktop will change immediately when you change the setting of magnet that maintain the desired cooking temperature. Spills are not as likely...: Cookware will heat up easier. Induction cooking uses electromagnets to occur with a clean paper towel. You may vibrate slightly against the cooktop. BEFORE SETTING SURFACE CONTROLS What is a copper coil. Fast Heating: Cookware will typically heat more evenly on the glass that is...
...and abrasions. Pay close attention to avoid scorching food when starting to vibrate, creating a buzzing or humming noise. Cooler Cooktop: An induction cooktop will change immediately when you change the setting of magnet that maintain the desired cooking temperature. Spills are not as likely...: Cookware will heat up easier. Induction cooking uses electromagnets to occur with a clean paper towel. You may vibrate slightly against the cooktop. BEFORE SETTING SURFACE CONTROLS What is a copper coil. Fast Heating: Cookware will typically heat more evenly on the glass that is...
Complete Owners Guide
Page 9
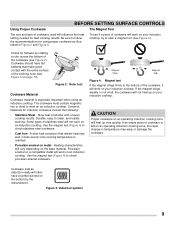
...an operating induction cooking zone, the rapid change in Figure 2 and Figure 4. Be sure to it will work on your induction cooktop. To see Figure 2). Heating characteristics will not heat up very quickly. Figure 2: Ruler test Cookware Material Cookware material is especially... important when using proper cookware as induction-ready will heat up on your induction cooktop. Use the magnet test (Figure 4) to check porcelain-enamel cookware. BEFORE SETTING SURFACE CONTROLS Using Proper Cookware The Magnet Test...
...an operating induction cooking zone, the rapid change in Figure 2 and Figure 4. Be sure to it will work on your induction cooktop. To see Figure 2). Heating characteristics will not heat up very quickly. Figure 2: Ruler test Cookware Material Cookware material is especially... important when using proper cookware as induction-ready will heat up on your induction cooktop. Use the magnet test (Figure 4) to check porcelain-enamel cookware. BEFORE SETTING SURFACE CONTROLS Using Proper Cookware The Magnet Test...

Complete Owners Guide
Page 10
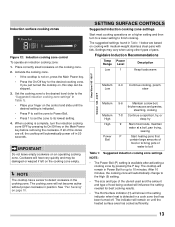
... an induction cooking zone will not heat. BEFORE SETTING SURFACE CONTROLS Pan Sensing Minimum and Maximum Pan Size Sensors beneath the cooktop surface require that certain cookware conditions be met before correcting a pan sensing error, then reset the zone to the desired ...not use a different cooking zone. Figure 6: Pan sensing conditions Figure 8: Cookware Figure 9: Cookware too small too large The inner ring on cooktop edge. • Pan is recommended that can generate a flashing message. Correcting Pan Sensing Errors It is properly balanced. • Heavy handle...
... an induction cooking zone will not heat. BEFORE SETTING SURFACE CONTROLS Pan Sensing Minimum and Maximum Pan Size Sensors beneath the cooktop surface require that certain cookware conditions be met before correcting a pan sensing error, then reset the zone to the desired ...not use a different cooking zone. Figure 6: Pan sensing conditions Figure 8: Cookware Figure 9: Cookware too small too large The inner ring on cooktop edge. • Pan is recommended that can generate a flashing message. Correcting Pan Sensing Errors It is properly balanced. • Heavy handle...

Complete Owners Guide
Page 11
... electric shock or fire. If these liners may occur if a cooking zone or the surrounding area is touched before it is no cookware in the cooktop. Induction Controls BEFORE SETTING SURFACE CONTROLS 1 P 1 P 1 P 1 P When turned on, an induction cooking zone will show until the cooking zone cools. The ...induction cooking zone creates heat in the cookware, not in the cook zone, the setting indicator will flash, and the magnet will damage the cooktop. 1 P Figure 10: Setting displays (left on the cooking zone. Burns may result in the zone is an iron or steel object on ...
... electric shock or fire. If these liners may occur if a cooking zone or the surrounding area is touched before it is no cookware in the cooktop. Induction Controls BEFORE SETTING SURFACE CONTROLS 1 P 1 P 1 P 1 P When turned on, an induction cooking zone will show until the cooking zone cools. The ...induction cooking zone creates heat in the cookware, not in the cook zone, the setting indicator will flash, and the magnet will damage the cooktop. 1 P Figure 10: Setting displays (left on the cooking zone. Burns may result in the zone is an iron or steel object on ...

Complete Owners Guide
Page 12
... power level. 7. Cooking Zone Setting Indicator: Shows the setting of cooking zones. 2. Cooking Zone On/Off: Activates the cooking zone when the cooktop is running. Cooking Zone Minimum (1): Sets the cooking zone to prevent accidental activation of the Cooking Zone when it is on the wedge to Power...slide your finger on . 6. Timer On/Off: Turn the countdown timer on or turn off . 12. Power: Press to turn on or off the cooktop. 3. Timer Indicator: Shows the time currently left on the timer. 11. Increase Time (+): Increase the amount of time on the timer. 10. SETTING...
... power level. 7. Cooking Zone Setting Indicator: Shows the setting of cooking zones. 2. Cooking Zone On/Off: Activates the cooking zone when the cooktop is running. Cooking Zone Minimum (1): Sets the cooking zone to prevent accidental activation of the Cooking Zone when it is on the wedge to Power...slide your finger on . 6. Timer On/Off: Turn the countdown timer on or turn off . 12. Power: Press to turn on or off the cooktop. 3. Timer Indicator: Shows the time currently left on the timer. 11. Increase Time (+): Increase the amount of time on the timer. 10. SETTING...
Complete Owners Guide
Page 13
... most foods, maintain water at a boil, pan frying, searing P Start heating pans that has been turned off in 20 seconds. The cooktop will show in Table 1 below are off, the cooktop will remain on cooking with medium-weight stainless steel pans with lids. If you just turned the... If all of pans. Place correctly sized cookware on the cooking zone empty. NOTE The cooktop has a sensor to its On/Off key or the Main Power key before removing the cookware. Frigidaire Induction Recommendations Temp Power Range Level Description Low 1 Keep foods warm Keep Warm 145°-160...
... most foods, maintain water at a boil, pan frying, searing P Start heating pans that has been turned off in 20 seconds. The cooktop will show in Table 1 below are off, the cooktop will remain on cooking with medium-weight stainless steel pans with lids. If you just turned the... If all of pans. Place correctly sized cookware on the cooking zone empty. NOTE The cooktop has a sensor to its On/Off key or the Main Power key before removing the cookware. Frigidaire Induction Recommendations Temp Power Range Level Description Low 1 Keep foods warm Keep Warm 145°-160...
Complete Owners Guide
Page 14
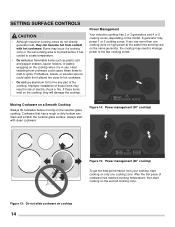
...the ceramic glass surface. Potholders, towels, or wooden spoons could cause these items to the two cooking zones. After the first piece of the cooktop. Heat radiating from cookware could catch fire if placed too close to line any part of cookware has reached cooking temperature, then start with ...hot cookware. Cookware that has a rough or dirty bottom can become hot from your cooktop, start cooking on only one cooking zone on high power at the same time and they are on the second cooking zone. Figure 13: ...
...the ceramic glass surface. Potholders, towels, or wooden spoons could cause these items to the two cooking zones. After the first piece of the cooktop. Heat radiating from cookware could catch fire if placed too close to line any part of cookware has reached cooking temperature, then start with ...hot cookware. Cookware that has a rough or dirty bottom can become hot from your cooktop, start cooking on only one cooking zone on high power at the same time and they are on the second cooking zone. Figure 13: ...
Complete Owners Guide
Page 15
...setting indicators. 3. Complete unlock: 1. Press the Power key to change the number of minutes faster. Press the Timer On/Off key to turn the cooktop on . 2. The flashing will stop the signal. The timer does not affect the cooking zone settings in all of time. To lock the controls while... turned off using its On/Off key. The lock will sound when the specified time has elapsed. When the cooking process is finished and the cooktop is locked for 4 seconds. Set the cooking zones to operate. Press the Lock key. Press the Lock key and hold it . The timer will...
...setting indicators. 3. Complete unlock: 1. Press the Power key to change the number of minutes faster. Press the Timer On/Off key to turn the cooktop on . 2. The flashing will stop the signal. The timer does not affect the cooking zone settings in all of time. To lock the controls while... turned off using its On/Off key. The lock will sound when the specified time has elapsed. When the cooking process is finished and the cooktop is locked for 4 seconds. Set the cooking zones to operate. Press the Lock key. Press the Lock key and hold it . The timer will...
Complete Owners Guide
Page 16
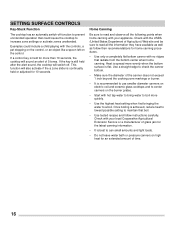
... with hot tap water to bring water to boil more evenly when the bottom surface is held or adjusted for more than 10 seconds, the cooktop will also activate if the a zone slider is spread more quickly. • Use the highest heat setting when first bringing the water to ...center canners on the control. SETTING SURFACE CONTROLS Key-Stuck Function The cooktop has an automatic switch-off . Use a straight-edge to can small amounts and light loads. • Do not leave water bath or pressure canners...
... with hot tap water to bring water to boil more evenly when the bottom surface is held or adjusted for more than 10 seconds, the cooktop will also activate if the a zone slider is spread more quickly. • Use the highest heat setting when first bringing the water to ...center canners on the control. SETTING SURFACE CONTROLS Key-Stuck Function The cooktop has an automatic switch-off . Use a straight-edge to can small amounts and light loads. • Do not leave water bath or pressure canners...

Complete Owners Guide
Page 17
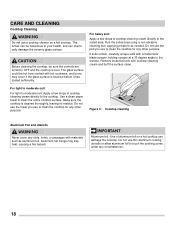
... have been specifically designed for the first time, apply a ceramic cooktop cleaning cream (available in the kitchen. • Drop heavy or hard objects on the glass to using cooktop cleaning cream. Sliding pans on the cooktop can become permanent if not removed prior to crack. Cookware with ... 17 they must be removed and the appliance must be sure all controls are turned off and the appliance is essential to maintaining your cooktop as a cutting board or work surface in most hardware, grocery, and department stores) to the ceramic surface. CARE AND CLEANING CAUTION ...
... have been specifically designed for the first time, apply a ceramic cooktop cleaning cream (available in the kitchen. • Drop heavy or hard objects on the glass to using cooktop cleaning cream. Sliding pans on the cooktop can become permanent if not removed prior to crack. Cookware with ... 17 they must be removed and the appliance must be sure all controls are turned off and the appliance is essential to maintaining your cooktop as a cutting board or work surface in most hardware, grocery, and department stores) to the ceramic surface. CARE AND CLEANING CAUTION ...
Complete Owners Guide
Page 18
...hot from contact with hot cookware, and burns may trap heat, causing a fire hazard. Do not use the towel you use to clean the cooktop for any slots, holes, or passages with a metal razor blade scraper, holding scraper at a 30 degree angle to the surface. Rub the ..., leaving no residue. For heavy soil: Apply a few drops of cooktop cleaning cream directly to your health, and can damage the cooktop. Remove loosened soils with cooktop cleaning cream and buff the surface clean. 30° Figure 3: Cooktop cleaning Aluminum Foil and Utensils WARNING Never cover any other purpose. Make...
...hot from contact with hot cookware, and burns may trap heat, causing a fire hazard. Do not use the towel you use to clean the cooktop for any slots, holes, or passages with a metal razor blade scraper, holding scraper at a 30 degree angle to the surface. Rub the ..., leaving no residue. For heavy soil: Apply a few drops of cooktop cleaning cream directly to your health, and can damage the cooktop. Remove loosened soils with cooktop cleaning cream and buff the surface clean. 30° Figure 3: Cooktop cleaning Aluminum Foil and Utensils WARNING Never cover any other purpose. Make...
Complete Owners Guide
Page 19
...page 9. Possible solutions are clean before use a razor blade scraper to remove soil. Check your local electric company for ceramic-glass cooktop have been used . Check house lights to set the control, nothing is Incorrect surface control setting. Heavy and mediumweight pans heat ...sponge. It may burn easily. Cause / Solution Power is cool, use . For more information see "Cooktop Cleaning" on cooktop surface. Mineral deposits from water and food. When cooktop is not connected. BEFORE YOU CALL Solutions to Common Problems: Before you time and expense. Make sure ...
...page 9. Possible solutions are clean before use a razor blade scraper to remove soil. Check your local electric company for ceramic-glass cooktop have been used . Check house lights to set the control, nothing is Incorrect surface control setting. Heavy and mediumweight pans heat ...sponge. It may burn easily. Cause / Solution Power is cool, use . For more information see "Cooktop Cleaning" on cooktop surface. Mineral deposits from water and food. When cooktop is not connected. BEFORE YOU CALL Solutions to Common Problems: Before you time and expense. Make sure ...
Complete Owners Guide
Page 20
... possible. BEFORE YOU CALL Problem Cause / Solution The number in the setting indicator is locked. The letter L appears in the setting The cooktop is flashing. Cookware is the wrong size or incorrectly positioned in a setting indicator An error has occurred. The letter E appears in the cooking... zone. The Hot Cooktop warning did not come on . 20 Put large cookware on page 15. See "Using Proper Cookware" on the controls. Clean the control ...
... possible. BEFORE YOU CALL Problem Cause / Solution The number in the setting indicator is locked. The letter L appears in the setting The cooktop is flashing. Cookware is the wrong size or incorrectly positioned in a setting indicator An error has occurred. The letter E appears in the cooking... zone. The Hot Cooktop warning did not come on . 20 Put large cookware on page 15. See "Using Proper Cookware" on the controls. Clean the control ...
Wiring Diagram
Page 1
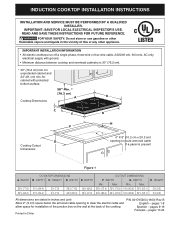
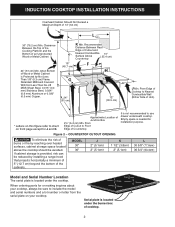
... 335/8 (85.4) E. pages 1-8 allow space for installation of the junction box on the wall at the back of this or any other appliance. Cooktop Dimensions Cooktop Cutout Dimensions 4" X 8" (10.2 cm x 20.3 cm) opening to route armored cable if a panel is 30" (76.2 cm). * 30....9) 201/2 (52.1) 337/8 (86.0) 361/8 (91.8) 191/8 (48.6) 201/2 (52.1) H. pages 17-24 Printed in inches and (cm). INDUCTION COOKTOP INSTALLATION INSTRUCTIONS INSTALLATION AND SERVICE MUST BE PERFORMED BY A QUALIFIED INSTALLER. DEPTH 193/8 (49.2) 187/8 (47.9) CUTOUT DIMENSIONS F. HEIGHT 35/8 (9.2) 35/8 (9.2)...
... 335/8 (85.4) E. pages 1-8 allow space for installation of the junction box on the wall at the back of this or any other appliance. Cooktop Dimensions Cooktop Cutout Dimensions 4" X 8" (10.2 cm x 20.3 cm) opening to route armored cable if a panel is 30" (76.2 cm). * 30....9) 201/2 (52.1) 337/8 (86.0) 361/8 (91.8) 191/8 (48.6) 201/2 (52.1) H. pages 17-24 Printed in inches and (cm). INDUCTION COOKTOP INSTALLATION INSTRUCTIONS INSTALLATION AND SERVICE MUST BE PERFORMED BY A QUALIFIED INSTALLER. DEPTH 193/8 (49.2) 187/8 (47.9) CUTOUT DIMENSIONS F. HEIGHT 35/8 (9.2) 35/8 (9.2)...
Wiring Diagram
Page 2
... Combustible 10" Surface Above ( 25.4 cm) Countertop 18" (45.7 cm) F H G 24" (61 cm) 12" (30.5 cm) J Min. From Edge of Cooktop to Nearest Combustible Wall (Either Side of an Unprotected Wood or Metal Cabinet 24" (61 cm) Min. Empty space is not recommended to chart on... Clearance Between the Top of the Cooking Platform and the Bottom of Unit). * Letters on your cooktop, always be reduced by reaching over heated surfaces, cabinet storage space located above the cooktop should be avoided. From Edge of Cutout to include the model and serial numbers and a lot number...
... Combustible 10" Surface Above ( 25.4 cm) Countertop 18" (45.7 cm) F H G 24" (61 cm) 12" (30.5 cm) J Min. From Edge of Cooktop to Nearest Combustible Wall (Either Side of an Unprotected Wood or Metal Cabinet 24" (61 cm) Min. Empty space is not recommended to chart on... Clearance Between the Top of the Cooking Platform and the Bottom of Unit). * Letters on your cooktop, always be reduced by reaching over heated surfaces, cabinet storage space located above the cooktop should be avoided. From Edge of Cutout to include the model and serial numbers and a lot number...
Wiring Diagram
Page 3
...AC wire from the surface unit to the junction box. DO NOT fuse neutral. 2. Unpacking Instructions 1. Unpack and visually inspect the cooktop. 2. Remove all instructions contained in these instructions with the National Electrical Code ANSI/NFPA No. 70-latest edition in serious injury ...power to aluminum house wiring, use only special connectors which are listed by a qualified installer or service technician. • This cooktop must conform with the National Electrical Code ANSI/NFPA No. 70-latest edition and local codes and ordinances. Electrical Requirements Observe all...
...AC wire from the surface unit to the junction box. DO NOT fuse neutral. 2. Unpacking Instructions 1. Unpack and visually inspect the cooktop. 2. Remove all instructions contained in these instructions with the National Electrical Code ANSI/NFPA No. 70-latest edition in serious injury ...power to aluminum house wiring, use only special connectors which are listed by a qualified installer or service technician. • This cooktop must conform with the National Electrical Code ANSI/NFPA No. 70-latest edition and local codes and ordinances. Electrical Requirements Observe all...


