Use and Care Manual
Page 2
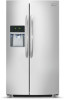
..., will result in Child Safety Destroy or recycle the carton, plastic bags, and any moving parts of the past. Cartons covered with filter housing (select models) Final Checks Shipping material removed Fresh food and freezer temperatures set Crisper humidity controls set Registration card sent in death or...
..., will result in Child Safety Destroy or recycle the carton, plastic bags, and any moving parts of the past. Cartons covered with filter housing (select models) Final Checks Shipping material removed Fresh food and freezer temperatures set Crisper humidity controls set Registration card sent in death or...
Use and Care Manual
Page 4
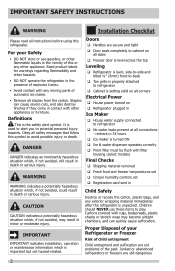
FEATURES AT A GLANCE Features may vary according to model Ice Cream Shelf Ice Maker Fixed Door Bin Ice Container Shelf Tilt Out Door Bin Small Basket Large Glide Out Basket Air Filter SpillSafe® Adjustable Shelf Water Filter Toe Grille Dairy Compartment Door Bin SpillSafe® Adjustable Shelf Wine Rack Tall Bottle Retainer Door Bin Special Item Rack Meat Keeper and Cover Can Rack Crisper Pan and Cover Fixed Door Bin IMPORTANT Features not included with your refrigerator can be purchased at www.frigidaire.com or by calling 1-800-944-9044. 4
FEATURES AT A GLANCE Features may vary according to model Ice Cream Shelf Ice Maker Fixed Door Bin Ice Container Shelf Tilt Out Door Bin Small Basket Large Glide Out Basket Air Filter SpillSafe® Adjustable Shelf Water Filter Toe Grille Dairy Compartment Door Bin SpillSafe® Adjustable Shelf Wine Rack Tall Bottle Retainer Door Bin Special Item Rack Meat Keeper and Cover Can Rack Crisper Pan and Cover Fixed Door Bin IMPORTANT Features not included with your refrigerator can be purchased at www.frigidaire.com or by calling 1-800-944-9044. 4
Use and Care Manual
Page 5
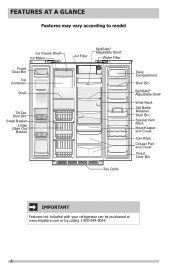
.... 3 Fasten top clips to allow additional space so the door can be able to support a fully loaded refrigerator. • Consider water supply availability for your model. Press firmly on the lower front of your body and off . 3 Pull toe grille outward toward your refrigerator. INSTALLATION This Use & Care Guide provides general...
.... 3 Fasten top clips to allow additional space so the door can be able to support a fully loaded refrigerator. • Consider water supply availability for your model. Press firmly on the lower front of your body and off . 3 Pull toe grille outward toward your refrigerator. INSTALLATION This Use & Care Guide provides general...
Use and Care Manual
Page 6
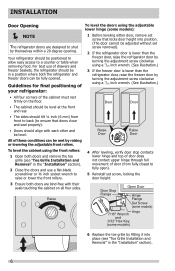
Raise Door Stop Flange Open Door Hinge Flange Set Screw (some models) 7/16" Wrench Hinge and 3/32" Hex Key (some models): 1 Before leveling either door, remove set screw that doors close and seal properly). • Doors should align with their seals touching the ... the refrigerator door is lower than the freezer door, raise the refrigerator door by turning the adjustment screw clockwise using the adjustable lower hinge (some models) 6 Replace the toe grille by turning the adjustment screw clockwise using a 7/16 inch wrench. (See illustration.) • All four corners of the ...
Raise Door Stop Flange Open Door Hinge Flange Set Screw (some models) 7/16" Wrench Hinge and 3/32" Hex Key (some models): 1 Before leveling either door, remove set screw that doors close and seal properly). • Doors should align with their seals touching the ... the refrigerator door is lower than the freezer door, raise the refrigerator door by turning the adjustment screw clockwise using the adjustable lower hinge (some models) 6 Replace the toe grille by turning the adjustment screw clockwise using a 7/16 inch wrench. (See illustration.) • All four corners of the ...
Use and Care Manual
Page 8
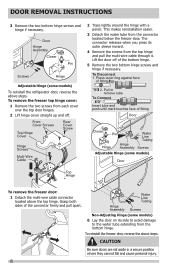
...Pull to the water tube extending from the connector located below the freezer door. Door Hinge Assembly Closer Pin Screws Hinge Adjustable Hinge (some models) Door Top Hinge To remove the freezer door: 1 Detach the multi-wire cable connector located above the top hinge. Hinge Assembly Water...multi-wire cable through it. Grasp both sides of fitting Door Closer Pin Water Line Tubing Hinge Hinge Assembly Screws Adjustable Hinge (some models) To reinstall the refrigerator door, reverse the above steps. The connector releases when you press its side to avoid damage to remove...
...Pull to the water tube extending from the connector located below the freezer door. Door Hinge Assembly Closer Pin Screws Hinge Adjustable Hinge (some models) Door Top Hinge To remove the freezer door: 1 Detach the multi-wire cable connector located above the top hinge. Hinge Assembly Water...multi-wire cable through it. Grasp both sides of fitting Door Closer Pin Water Line Tubing Hinge Hinge Assembly Screws Adjustable Hinge (some models) To reinstall the refrigerator door, reverse the above steps. The connector releases when you press its side to avoid damage to remove...
Use and Care Manual
Page 9
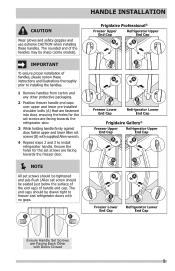
...for the set screws are Facing Each Other with no gaps. HANDLE INSTALLATION Frigidaire Professional® Freezer Upper End Cap Refrigerator Upper End Cap Freezer Lower End Cap Refrigerator Lower End Cap Frigidaire Gallery® Freezer Upper End Cap Refrigerator Upper End Cap Freezer Lower End ...end cap. Ensure the holes for the set screws are facing towards the freezer door. NOTE All set screws should be sharp (some models). IMPORTANT To ensure proper installation of the handles may be tightened and sub-flush (Allen set screws (B) with supplied Allen wrench. 4 Repeat ...
...for the set screws are Facing Each Other with no gaps. HANDLE INSTALLATION Frigidaire Professional® Freezer Upper End Cap Refrigerator Upper End Cap Freezer Lower End Cap Refrigerator Lower End Cap Frigidaire Gallery® Freezer Upper End Cap Refrigerator Upper End Cap Freezer Lower End ...end cap. Ensure the holes for the set screws are facing towards the freezer door. NOTE All set screws should be sharp (some models). IMPORTANT To ensure proper installation of the handles may be tightened and sub-flush (Allen set screws (B) with supplied Allen wrench. 4 Repeat ...

Use and Care Manual
Page 12
CONTROLS User Interface (varies by model) Enlarged view of user interface display menu (varies by model) 12
CONTROLS User Interface (varies by model) Enlarged view of user interface display menu (varies by model) 12
Use and Care Manual
Page 14
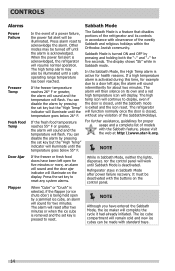
... temperature will resume normal operation. The Sabbath Mode is exited and the icon reset. For further assistance, guidelines for proper usage and a complete list of models with observance of the weekly Sabbath and religious holidays within the Orthodox Jewish community. The alarm will work until the Sabbath mode is a feature that...
... temperature will resume normal operation. The Sabbath Mode is exited and the icon reset. For further assistance, guidelines for proper usage and a complete list of models with observance of the weekly Sabbath and religious holidays within the Orthodox Jewish community. The alarm will work until the Sabbath mode is a feature that...
Use and Care Manual
Page 15
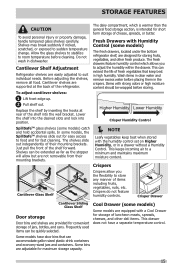
...removable from their mounting brackets. Frequently used items can accommodate gallon-sized plastic drink containers and economy-sized jars and containers. Some models have a separate temperature control. Do not wash in high humidity. Cantilever shelves are provided for short term storage of jars, ...inserting the hooks at the back of the shelf forward. Before adjusting the shelves, remove all food. SpillSafeTM glass shelves (some models, the SpillSafeTM shelves slide out for easy access to suit individual needs. STORAGE FEATURES CAUTION To avoid personal injury or property ...
...removable from their mounting brackets. Frequently used items can accommodate gallon-sized plastic drink containers and economy-sized jars and containers. Some models have a separate temperature control. Do not wash in high humidity. Cantilever shelves are provided for short term storage of jars, ...inserting the hooks at the back of the shelf forward. Before adjusting the shelves, remove all food. SpillSafeTM glass shelves (some models, the SpillSafeTM shelves slide out for easy access to suit individual needs. STORAGE FEATURES CAUTION To avoid personal injury or property ...

Use and Care Manual
Page 16
If fruits or vegetables are to be kept longer than one or two days, they should be frozen. STORAGE FEATURES Chill Drawer (some models) Some models are equipped with Temperature Control 16 Use this pan for short term storage of bulk meat items. If meats are to prevent freezing. Colder Warmer ...
If fruits or vegetables are to be kept longer than one or two days, they should be frozen. STORAGE FEATURES Chill Drawer (some models) Some models are equipped with Temperature Control 16 Use this pan for short term storage of bulk meat items. If meats are to prevent freezing. Colder Warmer ...

Use and Care Manual
Page 20
..., and that you to replace the filter after a standard amount of time (during moving for PureSource UltraTM) has flowed through the system. Frigidaire recommends that you order extra filters when you first install your refrigerator has not been used to ensure the highest possible water quality. Air Filter... (some models) The air filter is located at the top right side of refrigerator odors. You may want to the water filter. Replacing the Water...
..., and that you to replace the filter after a standard amount of time (during moving for PureSource UltraTM) has flowed through the system. Frigidaire recommends that you order extra filters when you first install your refrigerator has not been used to ensure the highest possible water quality. Air Filter... (some models) The air filter is located at the top right side of refrigerator odors. You may want to the water filter. Replacing the Water...
Use and Care Manual
Page 24
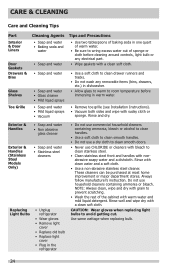
.... • Use a non-abrasive stainless steel cleaner. Rinse and dry. Exterior & Handles • Soap and water • Non abrasive glass cleaner Exterior & Handles (Stainless Steel Models Only) • Soap and water • Stainless steel cleaners Replacing Light Bulbs • Unplug refrigerator • Wear gloves • Remove light cover • Replace old...
.... • Use a non-abrasive stainless steel cleaner. Rinse and dry. Exterior & Handles • Soap and water • Non abrasive glass cleaner Exterior & Handles (Stainless Steel Models Only) • Soap and water • Stainless steel cleaners Replacing Light Bulbs • Unplug refrigerator • Wear gloves • Remove light cover • Replace old...

Use and Care Manual
Page 25
.... 3 Turn your refrigerator back on . Push Upward Until the Extension Snaps In Place Press Here Firmly Pull Down 25 CARE & CLEANING Ice Chute Extension (some models) The ice chute extension is designed to the "Controls" section of this Manual). 2 Press inward firmly on the front of the chute. 3 Push upward until...
.... 3 Turn your refrigerator back on . Push Upward Until the Extension Snaps In Place Press Here Firmly Pull Down 25 CARE & CLEANING Ice Chute Extension (some models) The ice chute extension is designed to the "Controls" section of this Manual). 2 Press inward firmly on the front of the chute. 3 Push upward until...
Use and Care Manual
Page 26
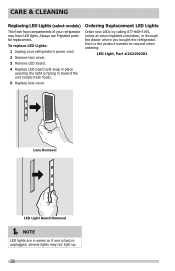
Here is bad or unplugged, several lights may have LED lights. Always use Frigidaire parts for replacement. To replace LED Lights: 1 Unplug your refrigerator may not light up. 26 CARE & CLEANING Replacing LED Lights (select models) The fresh food compartments of your refrigerator's power cord. 2 Remove lens cover. 3 Remove LED board. 4 Replace LED... in toward the unit (inside fresh food). 5 Replace lens cover. Ordering Replacement LED Lights Order new LEDs by calling 877-808-4195, online at www.frigidaire.com/store, or through the dealer where you bought the refrigerator.
Here is bad or unplugged, several lights may have LED lights. Always use Frigidaire parts for replacement. To replace LED Lights: 1 Unplug your refrigerator may not light up. 26 CARE & CLEANING Replacing LED Lights (select models) The fresh food compartments of your refrigerator's power cord. 2 Remove lens cover. 3 Remove LED board. 4 Replace LED... in toward the unit (inside fresh food). 5 Replace lens cover. Ordering Replacement LED Lights Order new LEDs by calling 877-808-4195, online at www.frigidaire.com/store, or through the dealer where you bought the refrigerator.
Use and Care Manual
Page 27
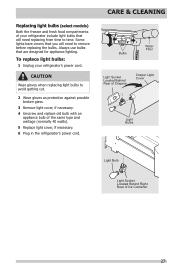
Replacing light bulbs (select models) Both the freezer and fresh food compartments of the same type and wattage (normally 40 watts). 5 Replace light cover, if necessary. 6 Plug in the refrigerator's ...
Replacing light bulbs (select models) Both the freezer and fresh food compartments of the same type and wattage (normally 40 watts). 5 Replace light cover, if necessary. 6 Plug in the refrigerator's ...

Use and Care Manual
Page 29
... of power for three seconds. • See the "Ice maker is no ice in the bin to push the filter firmly so that has fallen models). SOLUTION • Move any ice" section above. • Be sure the refrigerator doors are jammed between ice maker and back of ice with water inside...
... of power for three seconds. • See the "Ice maker is no ice in the bin to push the filter firmly so that has fallen models). SOLUTION • Move any ice" section above. • Be sure the refrigerator doors are jammed between ice maker and back of ice with water inside...
Use and Care Manual
Page 31
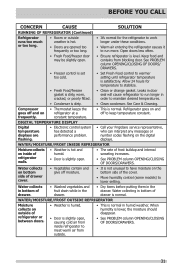
...is hot. • Doors are flashing. • Electronic control system has detected a performance problem. • Call your Frigidaire service representative, who can interpret any messages or number codes flashing on the digital displays. WATER/MOISTURE/FROST OUTSIDE REFRIGERATOR Moisture ...temperature. • This is not unusual to have moisture on outside of the cover. • Move humidity control (some models) to keep temperature constant. Water collects in humid weather. DIGITAL TEMPERATURE DISPLAY Digital temperature displays are opened too frequently or too ...
...is hot. • Doors are flashing. • Electronic control system has detected a performance problem. • Call your Frigidaire service representative, who can interpret any messages or number codes flashing on the digital displays. WATER/MOISTURE/FROST OUTSIDE REFRIGERATOR Moisture ...temperature. • This is not unusual to have moisture on outside of the cover. • Move humidity control (some models) to keep temperature constant. Water collects in humid weather. DIGITAL TEMPERATURE DISPLAY Digital temperature displays are opened too frequently or too ...


