
Use and Care Manual
Page 2
...; Ice maker is setting solid on all corners Electrical Power House power turned on Refrigerator plugged in Ice Maker House water supply connected to refrigerator Cabinet is turned ON Ice & water dispenser operates correctly Front filter must... be flush with other flammable liquids in 2 Staples can cause severe cuts, and also destroy finishes if they come in contact with filter housing (select models) Final...
...; Ice maker is setting solid on all corners Electrical Power House power turned on Refrigerator plugged in Ice Maker House water supply connected to refrigerator Cabinet is turned ON Ice & water dispenser operates correctly Front filter must... be flush with other flammable liquids in 2 Staples can cause severe cuts, and also destroy finishes if they come in contact with filter housing (select models) Final...

Use and Care Manual
Page 4
Features At A Glance Features may vary according to model 4
Features At A Glance Features may vary according to model 4
Use and Care Manual
Page 5
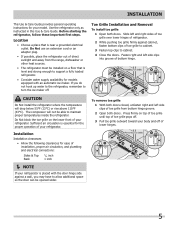
... right and left side clips of toe grille from the range, dishwasher or other heat sources. • The refrigerator must be installed on a floor that is essential for models equipped with the door hinge side against cabinet, fasten bottom clips of direct sunlight and away from bottom hinge groove...toe grille until top of toe grille pops off. 3 Pull toe grille outward toward your model. Installation This Use & Care Guide provides general operating instructions for ease of bottom hinge. Use the refrigerator only as instructed in this Use & Care Guide. If you may have to turn ...
... right and left side clips of toe grille from the range, dishwasher or other heat sources. • The refrigerator must be installed on a floor that is essential for models equipped with the door hinge side against cabinet, fasten bottom clips of direct sunlight and away from bottom hinge groove...toe grille until top of toe grille pops off. 3 Pull toe grille outward toward your model. Installation This Use & Care Guide provides general operating instructions for ease of bottom hinge. Use the refrigerator only as instructed in this Use & Care Guide. If you may have to turn ...
Use and Care Manual
Page 6
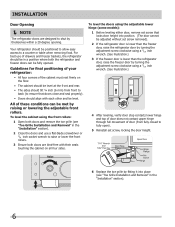
...can be fully opened. All of the cabinet must rest firmly on all four sides. To level the cabinet using the adjustable lower hinge (some models): 1 Before leveling either door, remove set screw, locking the door height. 6 Replace the toe grille by fitting it into place (see "Toe...Installation and Removal" in a position where both doors are designed to a counter or table when removing food. Installation Door Opening NOTE The refrigerator doors are bind-free with each other and be level. For best use a flat-blade screwdriver or 3/8 inch socket wrench to raise or lower ...
...can be fully opened. All of the cabinet must rest firmly on all four sides. To level the cabinet using the adjustable lower hinge (some models): 1 Before leveling either door, remove set screw, locking the door height. 6 Replace the toe grille by fitting it into place (see "Toe...Installation and Removal" in a position where both doors are designed to a counter or table when removing food. Installation Door Opening NOTE The refrigerator doors are bind-free with each other and be level. For best use a flat-blade screwdriver or 3/8 inch socket wrench to raise or lower ...

Use and Care Manual
Page 7
... side to avoid damage to remove tube TO CONNECT Insert tube and push until mark touches face of fitting Adjustable Hinge (some models) Non-Adjusting Hinge (some models) 7 To remove the refrigerator door: 1 Trace lightly around the hinge with a pencil. To remove the freezer top hinge cover: 1 Remove the two.... Lift the door off . CAUTION Be sure doors are set it . To reinstall the freezer door, reverse the above steps. To remove the refrigerator top hinge cover: 1 Remove the three screws from each cover over the top door hinges. 2 Lift hinge cover straight up and off of the...
... side to avoid damage to remove tube TO CONNECT Insert tube and push until mark touches face of fitting Adjustable Hinge (some models) Non-Adjusting Hinge (some models) 7 To remove the refrigerator door: 1 Trace lightly around the hinge with a pencil. To remove the freezer top hinge cover: 1 Remove the two.... Lift the door off . CAUTION Be sure doors are set it . To reinstall the freezer door, reverse the above steps. To remove the refrigerator top hinge cover: 1 Remove the three screws from each cover over the top door hinges. 2 Lift hinge cover straight up and off of the...

Use and Care Manual
Page 10
... a high temperature alarm is activated during this time, for about 10 minutes. For further assistance, guidelines for proper usage and a complete list of models with the Sabbath feature, please visit the web at http:\\www.star-k.org. NOTE Although you have entered the Sabbath mode, the ice maker... will function normally once the door is closed , until the Sabbath mode is exited and the icon reset. The alarm will then silence on refrigerator temp for health reasons. The high temp icon will continue to a door left ajar, the alarm will complete the cycle it had already initiated...
... a high temperature alarm is activated during this time, for about 10 minutes. For further assistance, guidelines for proper usage and a complete list of models with the Sabbath feature, please visit the web at http:\\www.star-k.org. NOTE Although you have entered the Sabbath mode, the ice maker... will function normally once the door is closed , until the Sabbath mode is exited and the icon reset. The alarm will then silence on refrigerator temp for health reasons. The high temp icon will continue to a door left ajar, the alarm will complete the cycle it had already initiated...
Use and Care Manual
Page 11
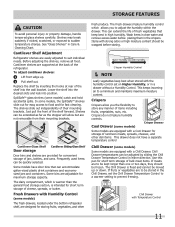
... meats, spreads, cheeses, and other fresh produce. Chill Drawer with Humidity Control (some models, the SpillSafeTM shelves slide out for maximum storage capacity. Cantilever Shelf Adjustment Refrigerator shelves are adjustable for easy access to be adjusted by inserting the hooks at the back... humidity control set the Chill Drawer Temperature Control to a warmer setting to suit individual needs. In some models) The fresh drawers, located under the bottom refrigerator shelf, are provided for storing fruits, vegetables, and other deli items. This drawer does not have door...
... meats, spreads, cheeses, and other fresh produce. Chill Drawer with Humidity Control (some models, the SpillSafeTM shelves slide out for maximum storage capacity. Cantilever Shelf Adjustment Refrigerator shelves are adjustable for easy access to be adjusted by inserting the hooks at the back... humidity control set the Chill Drawer Temperature Control to a warmer setting to suit individual needs. In some models) The fresh drawers, located under the bottom refrigerator shelf, are provided for storing fruits, vegetables, and other deli items. This drawer does not have door...
Use and Care Manual
Page 12
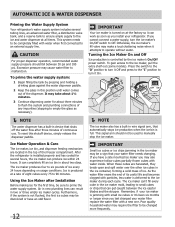
... 90 minutes. CAUTION For proper dispenser operation, recommended water supply pressure should not be changed your water filter needs changing. After the refrigerator is not flushed, the first ice cubes may take about 1½ minutes. 3 Continue dispensing water for the first time, be ...a solid mass of any impurities (stopping to the ice maker, pull the extra shelf out (some models). Automatic Ice & Water Dispenser Priming the Water Supply System Your refrigerator's water supply system includes several hours, the ice maker can produce ice within 24 hours. Ice Maker ...
... 90 minutes. CAUTION For proper dispenser operation, recommended water supply pressure should not be changed your water filter needs changing. After the refrigerator is not flushed, the first ice cubes may take about 1½ minutes. 3 Continue dispensing water for the first time, be ...a solid mass of any impurities (stopping to the ice maker, pull the extra shelf out (some models). Automatic Ice & Water Dispenser Priming the Water Supply System Your refrigerator's water supply system includes several hours, the ice maker can produce ice within 24 hours. Ice Maker ...

Use and Care Manual
Page 17
...containing petroleum products on plastic parts, interior doors, gaskets or cabinet liners. Care & Cleaning Protecting your investment Keeping your refrigerator in a dishwasher. • Always unplug the electrical power cord from the wall outlet before cleaning around controls, light... • • Toe Grille • • • Exterior & • Handles • Exterior & • Handles (Stainless Steel • Models Only) Replacing Light • Bulbs • • • • • Care & Cleaning Tips What To Use Tips and Precautions Soap and ...
...containing petroleum products on plastic parts, interior doors, gaskets or cabinet liners. Care & Cleaning Protecting your investment Keeping your refrigerator in a dishwasher. • Always unplug the electrical power cord from the wall outlet before cleaning around controls, light... • • Toe Grille • • • Exterior & • Handles • Exterior & • Handles (Stainless Steel • Models Only) Replacing Light • Bulbs • • • • • Care & Cleaning Tips What To Use Tips and Precautions Soap and ...

Use and Care Manual
Page 19
..., causing • cold air from inside of drawer moisture. drain while in until refrigerator temperature is tightly pushed into outlet. CORRECTION Set freezer control. Check/replace fuse with ... cover. • Water collects in the drawer. Clean or change gasket. Call your Frigidaire service representative, who can interpret any messages or number codes flashing on the bottom side... of water to warmer setting until you hear a "click". Move humidity control (some models) to work longer under these conditions. Keep food and contains from outside weather is &#...
..., causing • cold air from inside of drawer moisture. drain while in until refrigerator temperature is tightly pushed into outlet. CORRECTION Set freezer control. Check/replace fuse with ... cover. • Water collects in the drawer. Clean or change gasket. Call your Frigidaire service representative, who can interpret any messages or number codes flashing on the bottom side... of water to warmer setting until you hear a "click". Move humidity control (some models) to work longer under these conditions. Keep food and contains from outside weather is &#...


