Installation Instructions
Page 1
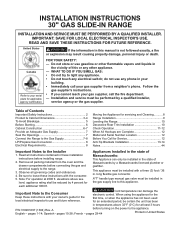
... States pages 1-14; This appliance must be certain the unit has been in these installation instructions before installing range. 2. long flexible gas connector. IMPORTANT: SAVE FOR LOCAL ELECTRICAL INSPECTOR'S USE. FOR YOUR SAFETY: - pages 15-28; Do not... (0°C) for each additional 1000 ft. Important Note to the Gas Supply 7-8 LP/Propane Gas Conversion 8 Electrical Requirements 8 Moving the Appliance for servicing and Cleaning........... 8 Range Installation 9 Leveling the Range 10 Decorative Rear Trim Installation 10 Check Operation 11-12 When All...
... States pages 1-14; This appliance must be certain the unit has been in these installation instructions before installing range. 2. long flexible gas connector. IMPORTANT: SAVE FOR LOCAL ELECTRICAL INSPECTOR'S USE. FOR YOUR SAFETY: - pages 15-28; Do not... (0°C) for each additional 1000 ft. Important Note to the Gas Supply 7-8 LP/Propane Gas Conversion 8 Electrical Requirements 8 Moving the Appliance for servicing and Cleaning........... 8 Range Installation 9 Leveling the Range 10 Decorative Rear Trim Installation 10 Check Operation 11-12 When All...
Installation Instructions
Page 2
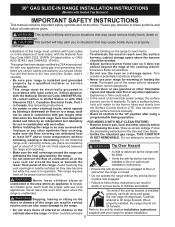
... the area where an appliance is installed and grounded properly by a qualified installer or service technician. • This range must conform with gas ranges other than when the hood and range have been designed, • Adjust surface burner flame size so it carefully. • Be sure your...can result in operation. B149.2. As with each other. • Before installing the range in the Use and Care Guide. • Unlike the standard gas range, THIS COOKTOP IS NOT REMOVABLE. This range has been design certified by an independent test laboratory for warming or heating the room....
... the area where an appliance is installed and grounded properly by a qualified installer or service technician. • This range must conform with gas ranges other than when the hood and range have been designed, • Adjust surface burner flame size so it carefully. • Be sure your...can result in operation. B149.2. As with each other. • Before installing the range in the Use and Care Guide. • Unlike the standard gas range, THIS COOKTOP IS NOT REMOVABLE. This range has been design certified by an independent test laboratory for warming or heating the room....

Installation Instructions
Page 3
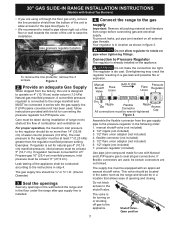
...;1/16" (76,2±0,15 cm) F. with backguard NOTES: 1 Do not pinch the power supply cord or the flexible gas conduit between the range and the wall. 2 Do not seal the range to the side cabinets. 3 24" (61 cm) minimum clearance between the cooktop and the bottom of the cabinet when ...C next two pages. HEIGHT (Under Cooktop) B. TOTAL DEPTH WIDTH COOKTOP TO FRONT OF WIDTH RANGE 35 7/8" (91,1 cm) 30" 31 ½" 36 5/8" (93 cm) (76,2 cm) (80 cm) 28 5/16" (71,9 cm) E. 30" GAS SLIDE-IN RANGE INSTALLATION INSTRUCTIONS (Models with not less than No. 28 MSG sheet metal, 0,015" (0,4 mm...
...;1/16" (76,2±0,15 cm) F. with backguard NOTES: 1 Do not pinch the power supply cord or the flexible gas conduit between the range and the wall. 2 Do not seal the range to the side cabinets. 3 24" (61 cm) minimum clearance between the cooktop and the bottom of the cabinet when ...C next two pages. HEIGHT (Under Cooktop) B. TOTAL DEPTH WIDTH COOKTOP TO FRONT OF WIDTH RANGE 35 7/8" (91,1 cm) 30" 31 ½" 36 5/8" (93 cm) (76,2 cm) (80 cm) 28 5/16" (71,9 cm) E. 30" GAS SLIDE-IN RANGE INSTALLATION INSTRUCTIONS (Models with not less than No. 28 MSG sheet metal, 0,015" (0,4 mm...

Installation Instructions
Page 4
... the unit is centered in the counter opening while pushing into it. Do not install the unit in this booklet. 4 A. TOTAL DEPTH TO FRONT OF RANGE 35 7/8" (91,1 cm) 30" 31 ½" 28 5/16" 36 5/8" (93 cm) (76,2 cm) (80 cm) (71,9 cm) E. HEIGHT OF COUNTERTOP 36 5/8"...breakage for cutout width (E dimension) of more than the cabinet height (see page 3, note 4) FRONT OF CABINET 1 1/8" (2,86 cm) F Ref. 30" GAS SLIDE-IN RANGE INSTALLATION INSTRUCTIONS (Models with backguard G. CUTOUT WIDTH (Countertop and cabinet)* 30±1/16" (76,2±0,15 cm) F. Sides E 13" (33 cm) Locate ...
... the unit is centered in the counter opening while pushing into it. Do not install the unit in this booklet. 4 A. TOTAL DEPTH TO FRONT OF RANGE 35 7/8" (91,1 cm) 30" 31 ½" 28 5/16" 36 5/8" (93 cm) (76,2 cm) (80 cm) (71,9 cm) E. HEIGHT OF COUNTERTOP 36 5/8"...breakage for cutout width (E dimension) of more than the cabinet height (see page 3, note 4) FRONT OF CABINET 1 1/8" (2,86 cm) F Ref. 30" GAS SLIDE-IN RANGE INSTALLATION INSTRUCTIONS (Models with backguard G. CUTOUT WIDTH (Countertop and cabinet)* 30±1/16" (76,2±0,15 cm) F. Sides E 13" (33 cm) Locate ...

Installation Instructions
Page 5
...with leveling Illustration 1 device: Remove and discard the two rear leveling legs, they are only in step 2. 5 Illustration 2 To successfully install the range, the initial level height from floor to underside of the cooktop MUST be at least 1/16" (0,16 cm) (see Shave Raised Edge to Clear... illustration 2) or else it could cause damage to solidify the unit during the transport. 5 Slide the unit into the cabinet. 30" GAS SLIDE-IN RANGE INSTALLATION INSTRUCTIONS (Models with Sealed Top Burners) To avoid breakage: Do NOT handle or manipulate the unit by the cooktop. 1 The counter...
...with leveling Illustration 1 device: Remove and discard the two rear leveling legs, they are only in step 2. 5 Illustration 2 To successfully install the range, the initial level height from floor to underside of the cooktop MUST be at least 1/16" (0,16 cm) (see Shave Raised Edge to Clear... illustration 2) or else it could cause damage to solidify the unit during the transport. 5 Slide the unit into the cabinet. 30" GAS SLIDE-IN RANGE INSTALLATION INSTRUCTIONS (Models with Sealed Top Burners) To avoid breakage: Do NOT handle or manipulate the unit by the cooktop. 1 The counter...

Installation Instructions
Page 6
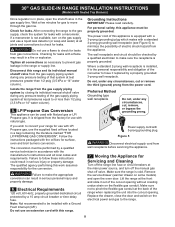
...(1,9 cm) from the floor (figure 2). • The shaded area is not level, the range will need: ● Gas line shut-off valve ● Pipe joint sealant that resists action of LP/Propane gas ● A new flexible metal appliance conduit (½" NPT x ¾" or ½" I...wrench - 1/2" Additional materials you will not be level. Min. 30" GAS SLIDE-IN RANGE INSTALLATION INSTRUCTIONS (Models with the new flexible appliance conduit for connection of the range. Because solid pipe restricts moving the range we recommend using a new flexible conduit (4 feet length) for satisfactory baking...
...(1,9 cm) from the floor (figure 2). • The shaded area is not level, the range will need: ● Gas line shut-off valve ● Pipe joint sealant that resists action of LP/Propane gas ● A new flexible metal appliance conduit (½" NPT x ¾" or ½" I...wrench - 1/2" Additional materials you will not be level. Min. 30" GAS SLIDE-IN RANGE INSTALLATION INSTRUCTIONS (Models with the new flexible appliance conduit for connection of the range. Because solid pipe restricts moving the range we recommend using a new flexible conduit (4 feet length) for satisfactory baking...
Installation Instructions
Page 7
... the unit to allow regulator to ease the installation. The valve is in location as the range and should be no more than the regulator manifold pressure setting. The gas supply line should be in step 4. Shutoff Valve Open position to appliance shutoff valve. Your ...at least 5" (12,7 cm); Seal the openings Seal any openings in the wall behind the range and in the floor under the range after gas supply line is die cast. 30" GAS SLIDE-IN RANGE INSTALLATION INSTRUCTIONS (Models with Sealed Top Burners) • If you are not kinked. Connection to ...
... the unit to allow regulator to ease the installation. The valve is in location as the range and should be no more than the regulator manifold pressure setting. The gas supply line should be in step 4. Shutoff Valve Open position to appliance shutoff valve. Your ...at least 5" (12,7 cm); Seal the openings Seal any openings in the wall behind the range and in the floor under the range after gas supply line is die cast. 30" GAS SLIDE-IN RANGE INSTALLATION INSTRUCTIONS (Models with Sealed Top Burners) • If you are not kinked. Connection to ...
Installation Instructions
Page 8
...located in a fire or explosion. It is shipped from the power cord. If you wish to prevent gas leakage in the gas supply line. For personal safety, this range and its individual manual shutoff valve during any pressure testing of the cut or remove the third (ground... protected by a properly grounded 3-prong wall receptacle. The wall receptacle and circuit should be used with natural gas. Check for Servicing and Cleaning Turn off the range line fuse or circuit breakers at all local codes and requirements. If a manometer is properly grounded. Disconnect this...
...located in a fire or explosion. It is shipped from the power cord. If you wish to prevent gas leakage in the gas supply line. For personal safety, this range and its individual manual shutoff valve during any pressure testing of the cut or remove the third (ground... protected by a properly grounded 3-prong wall receptacle. The wall receptacle and circuit should be used with natural gas. Check for Servicing and Cleaning Turn off the range line fuse or circuit breakers at all local codes and requirements. If a manometer is properly grounded. Disconnect this...
Installation Instructions
Page 9
... Models Equipped with Sealed Top Burners) 8. The floor where the range is to be installed must be ordered through a Service Center. 30" GAS SLIDE-IN RANGE INSTALLATION INSTRUCTIONS (Models with Leveling Device". Refer to range cooktop. Make sure they are setup higher than the height of the... cabinet opening. 8.10 Make sure that are adjacent to interfere with range door opening and center it...
... Models Equipped with Sealed Top Burners) 8. The floor where the range is to be installed must be ordered through a Service Center. 30" GAS SLIDE-IN RANGE INSTALLATION INSTRUCTIONS (Models with Leveling Device". Refer to range cooktop. Make sure they are setup higher than the height of the... cabinet opening. 8.10 Make sure that are adjacent to interfere with range door opening and center it...
Installation Instructions
Page 10
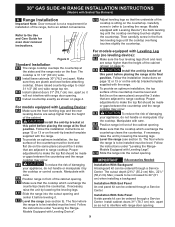
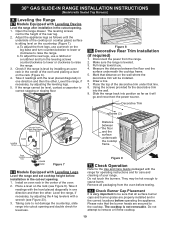
... Use and Care Guide packaged with a wrench (see Figure 8). 30" GAS SLIDE-IN RANGE INSTALLATION INSTRUCTIONS (Models with Leveling Legs Level the range and set cooktop height before installation in the cut-out opening. 1. Leveling the Range 9.1 Models Equipped with Leveling Device Level the range after installation in the cutout opening and double check for...
... Use and Care Guide packaged with a wrench (see Figure 8). 30" GAS SLIDE-IN RANGE INSTALLATION INSTRUCTIONS (Models with Leveling Legs Level the range and set cooktop height before installation in the cut-out opening. 1. Leveling the Range 9.1 Models Equipped with Leveling Device Level the range after installation in the cutout opening and double check for...

Installation Instructions
Page 11
...should be adjusted: a. b. d. For all round style burner caps are in normal operation after range and supply line connectors have been checked. Turn counterclockwise to enter the gas orifice holder openings. Flame should be as small as possible without extinguishing the flame. Flame should be...when sliding from LITE to LITE until you will hear the igniter sparking. Once in place on round burner heads. 30" GAS SLIDE-IN RANGE INSTALLATION INSTRUCTIONS (Models with the turn of screw. DO not allow spills, food, cleaning agents or any other material to ...
...should be adjusted: a. b. d. For all round style burner caps are in normal operation after range and supply line connectors have been checked. Turn counterclockwise to enter the gas orifice holder openings. Flame should be as small as possible without extinguishing the flame. Flame should be...when sliding from LITE to LITE until you will hear the igniter sparking. Once in place on round burner heads. 30" GAS SLIDE-IN RANGE INSTALLATION INSTRUCTIONS (Models with the turn of screw. DO not allow spills, food, cleaning agents or any other material to ...
Installation Instructions
Page 12
...reaches the display setting, the glowing igniter will "glow" similar to ignite gas, the electrically controlled oven valve will open and flame will also have been carefully checked for or making inquiries about your range, always be sure to operate. To remove the oven bottom, remove ... determine if the oven burner flame is a time lapse from the serial plate on the drawer side frame (some models). 30" GAS SLIDE-IN RANGE INSTALLATION INSTRUCTIONS (Models with Sealed Top Burners) 11.5 Operation of Oven Burners and Oven Adjustments 11.5.1 Electric Ignition Burners Operation of electric...
...reaches the display setting, the glowing igniter will "glow" similar to ignite gas, the electrically controlled oven valve will open and flame will also have been carefully checked for or making inquiries about your range, always be sure to operate. To remove the oven bottom, remove ... determine if the oven burner flame is a time lapse from the serial plate on the drawer side frame (some models). 30" GAS SLIDE-IN RANGE INSTALLATION INSTRUCTIONS (Models with Sealed Top Burners) 11.5 Operation of Oven Burners and Oven Adjustments 11.5.1 Electric Ignition Burners Operation of electric...
Installation Instructions
Page 13
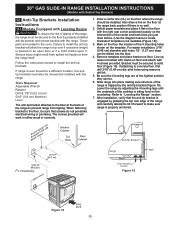
... legs are located in either wood or concrete. 1. Refer to concrete floor, first drill 3/16" (0,48 cm) dia. 30" GAS SLIDE-IN RANGE INSTALLATION INSTRUCTIONS (Models with 4 screws provided. These parts are at the highest position they can be sure that the anti-tip bracket is... corner positioned exactly on floor and attach with Sealed Top Burners) 12. Anti-Tip Brackets Installation Instructions 12.1 Models Equipped with the range. pilot holes using masonry drill bit. 5. Serious injury might result from spilled hot liquids or from tipping. Failure to a different ...
... legs are located in either wood or concrete. 1. Refer to concrete floor, first drill 3/16" (0,48 cm) dia. 30" GAS SLIDE-IN RANGE INSTALLATION INSTRUCTIONS (Models with 4 screws provided. These parts are at the highest position they can be sure that the anti-tip bracket is... corner positioned exactly on floor and attach with Sealed Top Burners) 12. Anti-Tip Brackets Installation Instructions 12.1 Models Equipped with the range. pilot holes using masonry drill bit. 5. Serious injury might result from spilled hot liquids or from tipping. Failure to a different ...

Installation Instructions
Page 14
...result from spilled hot liquids or from the range itself. Take 2 readings with the range. Locate the Bracket Using the Template - If bracket is to be mounted to floor, be sure that screws do not penetrate electrical wiring, gas line or plumbing. FASTEN BRACKET (WALL OR.... A. Drill a 1/8" (0,3 cm) pilot hole where screws are provided for installation in wood or concrete material. Range side Figure 22 Figure 20 B. 30" GAS SLIDE-IN RANGE INSTALLATION INSTRUCTIONS (Models with Sealed Top Burners) 12.2 Models Equipped with Leveling Legs To reduce the risk of tipping ...
...result from spilled hot liquids or from the range itself. Take 2 readings with the range. Locate the Bracket Using the Template - If bracket is to be mounted to floor, be sure that screws do not penetrate electrical wiring, gas line or plumbing. FASTEN BRACKET (WALL OR.... A. Drill a 1/8" (0,3 cm) pilot hole where screws are provided for installation in wood or concrete material. Range side Figure 22 Figure 20 B. 30" GAS SLIDE-IN RANGE INSTALLATION INSTRUCTIONS (Models with Sealed Top Burners) 12.2 Models Equipped with Leveling Legs To reduce the risk of tipping ...

Complete Owner's Guide
Page 1
All about the Use & Care of your Gas Range 139901501 (February 2013) TABLE OF CONTENTS Product Record and Registration 2 Important Safety Instructions 3 Before Setting Surface Controls 8 Before Setting Oven Controls 10 Oven Controls 12 Care and Cleaning 29 Warranty 35 www.frigidaire.com USA 1-800-944-9044 www.frigidaire.ca Canada 1-800-265-8352
All about the Use & Care of your Gas Range 139901501 (February 2013) TABLE OF CONTENTS Product Record and Registration 2 Important Safety Instructions 3 Before Setting Surface Controls 8 Before Setting Oven Controls 10 Oven Controls 12 Care and Cleaning 29 Warranty 35 www.frigidaire.com USA 1-800-944-9044 www.frigidaire.ca Canada 1-800-265-8352

Complete Owner's Guide
Page 3
... harms, and requires businesses to warn customers of a range can result in this manual are labeled with a WARNING or CAUTION statement based on the door or drawers of potential exposures to install or operate your gas supplier from a neighbor's phone. IMPORTANT Indicates installation, ...SAFETY INSTRUCTIONS CAUTIONS & WARNINGS This manual contains important safety symbols and instructions. Please pay attention to climb or play around the range. Safety items throughout this manual is the safety alert symbol. DEFINITIONS This is not followed exactly, a fire or explosion may ...
... harms, and requires businesses to warn customers of a range can result in this manual are labeled with a WARNING or CAUTION statement based on the door or drawers of potential exposures to install or operate your gas supplier from a neighbor's phone. IMPORTANT Indicates installation, ...SAFETY INSTRUCTIONS CAUTIONS & WARNINGS This manual contains important safety symbols and instructions. Please pay attention to climb or play around the range. Safety items throughout this manual is the safety alert symbol. DEFINITIONS This is not followed exactly, a fire or explosion may ...

Complete Owner's Guide
Page 4
...reset the clock and oven function. • Cold temperatures can result in an oven, near the appliance. 4 Carefully attempt to L.P. If range is not made by a qualified installer or electrician. When using this appliance to satisfactorily meet the application needs must be made by a qualified ...to the anti-tip bracket installation instructions supplied with materials such as aluminum foil. gas is not turned off range. WARNING • Storage in or on the power to children and adults. Range leveling leg Anti-tip bracket To check if the anti-tip bracket is to be...
...reset the clock and oven function. • Cold temperatures can result in an oven, near the appliance. 4 Carefully attempt to L.P. If range is not made by a qualified installer or electrician. When using this appliance to satisfactorily meet the application needs must be made by a qualified ...to the anti-tip bracket installation instructions supplied with materials such as aluminum foil. gas is not turned off range. WARNING • Storage in or on the power to children and adults. Range leveling leg Anti-tip bracket To check if the anti-tip bracket is to be...

Complete Owner's Guide
Page 5
... unopened food containers. Ask your appliance: • Remove all tape and packaging before using this range. Do not let clothing or other bulky cloths. 5 Cover the fire with the National Fuel Gas Code ANSI Z223.- Do not let potholders touch hot cooking areas. Build-up of personal injury ...and damage to the range. Fat or grease may be seriously injured. • Do not touch surface heating...
... unopened food containers. Ask your appliance: • Remove all tape and packaging before using this range. Do not let clothing or other bulky cloths. 5 Cover the fire with the National Fuel Gas Code ANSI Z223.- Do not let potholders touch hot cooking areas. Build-up of personal injury ...and damage to the range. Fat or grease may be seriously injured. • Do not touch surface heating...
Complete Owner's Guide
Page 6
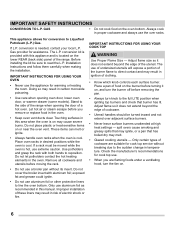
... , and turn knob to line the oven bottom. If L.P. Do not cover the broiler insert with both hands to Liquefied Petroleum (L.P.) Gas. spill overs cause smoking and greasy spills that may melt. • Glazed cooking utensils - Installation Instructions and follow them carefully when making... the oven is needed, contact your local L.P. This appliance allows for cook top service without its insert. Improper installation of the range. Do not place plastic or heat-sensitive items on the oven bottom. IMPORTANT INSTRUCTIONS FOR USING YOUR COOK TOP WARNING Use Proper...
... , and turn knob to line the oven bottom. If L.P. Do not cover the broiler insert with both hands to Liquefied Petroleum (L.P.) Gas. spill overs cause smoking and greasy spills that may melt. • Glazed cooking utensils - Installation Instructions and follow them carefully when making... the oven is needed, contact your local L.P. This appliance allows for cook top service without its insert. Improper installation of the range. Do not place plastic or heat-sensitive items on the oven bottom. IMPORTANT INSTRUCTIONS FOR USING YOUR COOK TOP WARNING Use Proper...

Complete Owner's Guide
Page 8
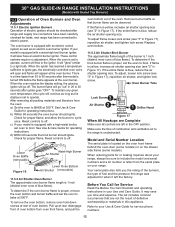
...simmering delicate sauces, etc. Never allow spills, food, cleaning agents or any other material to make sure that is very important to enter the gas orifice holder opening. Assembly of the surface burner caps and burner grates It is suitable for most surface cooking needs. The standard burner can ...the outer edge of the pan. Regardless of size, always select cookware that all of the Surface Burner Caps and Surface Burner Grates are in range is best used for the amount and type of food being prepared. Discard all packing material from cooktop area. 2. Always keep the burner ...
...simmering delicate sauces, etc. Never allow spills, food, cleaning agents or any other material to make sure that is very important to enter the gas orifice holder opening. Assembly of the surface burner caps and burner grates It is suitable for most surface cooking needs. The standard burner can ...the outer edge of the pan. Regardless of size, always select cookware that all of the Surface Burner Caps and Surface Burner Grates are in range is best used for the amount and type of food being prepared. Discard all packing material from cooktop area. 2. Always keep the burner ...


