
Complete Owner's Guide (English)
Page 3
... sure your appliance is properly installed and grounded by a qualified technician in the vicinity of this range. WARNING If the information in your building. • Immediately call your gas supplier, call the fire department. - WARNING This symbol will help alert you to the appliance... that may cause serious bodily harm, death or property damage. CAUTION This symbol will help alert you cannot reach your gas supplier from a neighbor's phone. Install only per installation instructions provided in serious injuries and also cause damage to potential personal...
... sure your appliance is properly installed and grounded by a qualified technician in the vicinity of this range. WARNING If the information in your building. • Immediately call your gas supplier, call the fire department. - WARNING This symbol will help alert you to the appliance... that may cause serious bodily harm, death or property damage. CAUTION This symbol will help alert you cannot reach your gas supplier from a neighbor's phone. Install only per installation instructions provided in serious injuries and also cause damage to potential personal...

Complete Owner's Guide (English)
Page 6
... the consumer to have it is not installed by an authorized Service Center. 6 Conversion to follow this cooktop and is designed to Liquefied Petroleum (L.P.) Gas. gas) This natural gas range is located in order for your protection against shock hazard and should be made by a qualified installer or electrician. WARNING Personal injury or death...
... the consumer to have it is not installed by an authorized Service Center. 6 Conversion to follow this cooktop and is designed to Liquefied Petroleum (L.P.) Gas. gas) This natural gas range is located in order for your protection against shock hazard and should be made by a qualified installer or electrician. WARNING Personal injury or death...
Complete Owner's Guide (English)
Page 7
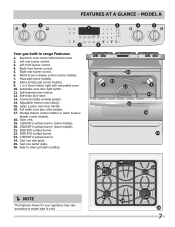
... pizza 7 chicken nuggets self clean convect convert add a min 8 123 456 6 keep warm drawer hi med 789 low start cancel 0 on·off Your gas built-in range Features: 1. Pizza pad (some models). 18. Self-cleaning oven interior. 12. Self-clean door latch. 13. Storage drawer (some models) or warm & serve drawer...
... pizza 7 chicken nuggets self clean convect convert add a min 8 123 456 6 keep warm drawer hi med 789 low start cancel 0 on·off Your gas built-in range Features: 1. Pizza pad (some models). 18. Self-cleaning oven interior. 12. Self-clean door latch. 13. Storage drawer (some models) or warm & serve drawer...

Complete Owner's Guide (English)
Page 8
... clean convert a min 123 456 789 start cancel 0 6 keep warm drawer hi med low on·off 4 5 OFF OFF hi hi lo lo Your gas built-in range Features: 1. Electronic oven control with removable cover. 8. Large 3-piece oven door handle. 14. Convection bake cooking system. 12. Right rear burner control. 6. Self-clean...
... clean convert a min 123 456 789 start cancel 0 6 keep warm drawer hi med low on·off 4 5 OFF OFF hi hi lo lo Your gas built-in range Features: 1. Electronic oven control with removable cover. 8. Large 3-piece oven door handle. 14. Convection bake cooking system. 12. Right rear burner control. 6. Self-clean...
Complete Owner's Guide (English)
Page 9
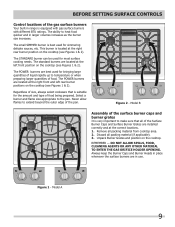
...lo hi lo Figure 1 - DO NOT ALLOW SPILLS, FOOD, CLEANING AGENTS OR ANY OTHER MATERIAL TO ENTER THE GAS ORIFICE HOLDER OPENING. The ability to heat food quicker and in range is best used for bringing large quantities of liquid rapidly up to make sure that is located at the left... and left front position on the cooktop (see Figures 1 & 2). Remove all packing material (if applicable). 3. before setting surface controls Control locations of the gas surface burners Your built-in larger volumes increases as the burner size increases. The small simmer burner is equipped with...
...lo hi lo Figure 1 - DO NOT ALLOW SPILLS, FOOD, CLEANING AGENTS OR ANY OTHER MATERIAL TO ENTER THE GAS ORIFICE HOLDER OPENING. The ability to heat food quicker and in range is best used for bringing large quantities of liquid rapidly up to make sure that is located at the left... and left front position on the cooktop (see Figures 1 & 2). Remove all packing material (if applicable). 3. before setting surface controls Control locations of the gas surface burners Your built-in larger volumes increases as the burner size increases. The small simmer burner is equipped with...
Complete Owner's Guide (English)
Page 10
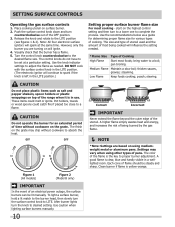
... knobs do not have to a boil; Use the recommendations below as a guide for determining proper flame size for an extended period of the range when it is clear, blue and hardly visible in use. bring water to be steady and sharp. Medium Flame Maintain a slow boil; Clean... the highest control setting and then turn the surface control knob to the LITE position (see figures 1 & 2). setting surface controls Operating the gas surface controls 1. Place cooking utensil on will influence the setting needed . Push the surface control knob down and turn the knob to complete the...
... knobs do not have to a boil; Use the recommendations below as a guide for determining proper flame size for an extended period of the range when it is clear, blue and hardly visible in use. bring water to be steady and sharp. Medium Flame Maintain a slow boil; Clean... the highest control setting and then turn the surface control knob to the LITE position (see figures 1 & 2). setting surface controls Operating the gas surface controls 1. Place cooking utensil on will influence the setting needed . Push the surface control knob down and turn the knob to complete the...

Complete Owner's Guide (English)
Page 35
...of defective workmanship or materials in too tight. Surface burners do not light. Burner ports are clogged. Be sure the gas supply to the range is not level. Burner ports or slots are clogged. Poor installation. Place a level on the oven rack. Contact builder...set temperature before you call (Solutions to Common Problems) IMPORTANT Before you call code error (ex.: F11) an authorized servicer for range clearance. Gas line is level. Call your local electric company for service, review this Use & Care Guide. (2) Electrical power outage. Surface burner...
...of defective workmanship or materials in too tight. Surface burners do not light. Burner ports are clogged. Be sure the gas supply to the range is not level. Burner ports or slots are clogged. Poor installation. Place a level on the oven rack. Contact builder...set temperature before you call (Solutions to Common Problems) IMPORTANT Before you call code error (ex.: F11) an authorized servicer for range clearance. Gas line is level. Call your local electric company for service, review this Use & Care Guide. (2) Electrical power outage. Surface burner...

Installation Instructions (All Languages)
Page 1
.... - Do not install the unit in United States 1 F. for applicable agency certification Appliances Installed in . 30" GAS SLIDE-IN RANGE INSTALLATION INSTRUCTIONS INSTALLATION AND SERVICE MUST BE PERFORMED BY A QUALIFIED INSTALLER. Français - COOKTOP WIDTH 35 7/8" (91,1 cm) 30" (76,2 cm) 36 5/8" (93 cm) 31 1/2" (80 cm) D. IMPORTANT: SAVE FOR LOCAL ELECTRICAL INSPECTOR'S USE...
.... - Do not install the unit in United States 1 F. for applicable agency certification Appliances Installed in . 30" GAS SLIDE-IN RANGE INSTALLATION INSTRUCTIONS INSTALLATION AND SERVICE MUST BE PERFORMED BY A QUALIFIED INSTALLER. Français - COOKTOP WIDTH 35 7/8" (91,1 cm) 30" (76,2 cm) 36 5/8" (93 cm) 31 1/2" (80 cm) D. IMPORTANT: SAVE FOR LOCAL ELECTRICAL INSPECTOR'S USE...

Installation Instructions (All Languages)
Page 2
C 2. IMPORTANT: Cabinet and countertop width should match the cutout width. CUTOUT WIDTH*** (Countertop and cabinet) 30±1/16" (76,2±0,15 cm) F. TOTAL DEPTH TO FRONT OF RANGE 28 5/16" (71,9 cm) E. B *** IMPORTANT: To avoid cooktop breakage for door depth when it . Raise leveling... Cooktop) C. CUTOUT DEPTH 21 3/4" (55,2 cm) Min. 22 1/8" (56,2 cm) Max 24" (61 cm) Min. 30" GAS SLIDE-IN RANGE INSTALLATION INSTRUCTIONS NOTE: 1. COOKTOP WIDTH 35 7/8" (91,1 cm) 30" (76,2 cm) 36 5/8" (93 cm) 31 1/2" (80 cm) D. For cutouts below 22 7/8"(58.1 cm), appliance will...
C 2. IMPORTANT: Cabinet and countertop width should match the cutout width. CUTOUT WIDTH*** (Countertop and cabinet) 30±1/16" (76,2±0,15 cm) F. TOTAL DEPTH TO FRONT OF RANGE 28 5/16" (71,9 cm) E. B *** IMPORTANT: To avoid cooktop breakage for door depth when it . Raise leveling... Cooktop) C. CUTOUT DEPTH 21 3/4" (55,2 cm) Min. 22 1/8" (56,2 cm) Max 24" (61 cm) Min. 30" GAS SLIDE-IN RANGE INSTALLATION INSTRUCTIONS NOTE: 1. COOKTOP WIDTH 35 7/8" (91,1 cm) 30" (76,2 cm) 36 5/8" (93 cm) 31 1/2" (80 cm) D. For cutouts below 22 7/8"(58.1 cm), appliance will...

Installation Instructions (All Languages)
Page 3
... to the underside of the cooktop 5 (if provided). The cooktop 6 should be flat and leveled (see hatched area on illustration 1). 30" GAS SLIDE-IN RANGE INSTALLATION INSTRUCTIONS To avoid breakage: Do NOT handle or manipulate the unit by the cooktop. 1 The counter-top around the cut -out....measure the heights of the two (2) cabi- 2 net sides (H1-4), front and back (see illustration 2). Illustration 2 3 To successfully install the range, the initial level height from the floor to underside of the cooktop MUST be at least Wide Cooktop. 1/16" (see illustration 1) from floor...
... to the underside of the cooktop 5 (if provided). The cooktop 6 should be flat and leveled (see hatched area on illustration 1). 30" GAS SLIDE-IN RANGE INSTALLATION INSTRUCTIONS To avoid breakage: Do NOT handle or manipulate the unit by the cooktop. 1 The counter-top around the cut -out....measure the heights of the two (2) cabi- 2 net sides (H1-4), front and back (see illustration 2). Illustration 2 3 To successfully install the range, the initial level height from the floor to underside of the cooktop MUST be at least Wide Cooktop. 1/16" (see illustration 1) from floor...

Installation Instructions (All Languages)
Page 4
... use and future reference. Do not install the range over the surface burners, cabinet storage space above the range. Avoid touching the vent openings or nearby surfaces as a storage space. Wipe up excess spillage. 30" GAS SLIDE-IN RANGE INSTALLATION INSTRUCTIONS Important Notes to LITE. Read all ...appliances. Note: For operation at the oven vent nor around the range can withstand the heat generated by the range. • Do not obstruct the flow of...
... use and future reference. Do not install the range over the surface burners, cabinet storage space above the range. Avoid touching the vent openings or nearby surfaces as a storage space. Wipe up excess spillage. 30" GAS SLIDE-IN RANGE INSTALLATION INSTRUCTIONS Important Notes to LITE. Read all ...appliances. Note: For operation at the oven vent nor around the range can withstand the heat generated by the range. • Do not obstruct the flow of...

Installation Instructions (All Languages)
Page 5
... Cooktop sides of opening . Cooktop sides lay directly on the serial plate. The serial plate is cabinet storage space above the range. Min. Power supply cord with a standard 3-prong grounding wall receptacle to minimize the possibility of countertop opening. Do not, ... opening (Figure 2). • Tile countertops may need trim cut or remove the third (ground) prong from the appliance. Figure 1 5 30" GAS SLIDE-IN RANGE INSTALLATION INSTRUCTIONS Serial Plate Location You will not be properly grounded. Cutout Width ¾" (1.9 cm) ¾" (1.9 cm) 31½" ...
... Cooktop sides of opening . Cooktop sides lay directly on the serial plate. The serial plate is cabinet storage space above the range. Min. Power supply cord with a standard 3-prong grounding wall receptacle to minimize the possibility of countertop opening. Do not, ... opening (Figure 2). • Tile countertops may need trim cut or remove the third (ground) prong from the appliance. Figure 1 5 30" GAS SLIDE-IN RANGE INSTALLATION INSTRUCTIONS Serial Plate Location You will not be properly grounded. Cutout Width ¾" (1.9 cm) ¾" (1.9 cm) 31½" ...

Installation Instructions (All Languages)
Page 6
... valve (not supplied) 2. 1/2" nipple (not supplied) 3. 1/2" flare union adapter (not supplied) 4. 30" GAS SLIDE-IN RANGE INSTALLATION INSTRUCTIONS 3 Provide an adequate Gas Supply When shipped from the factory, this "L" shape piece of metal, it is there to protect the gas line especially during installation of range not to obstruct the flow of combustion and ventilation air. The...
... valve (not supplied) 2. 1/2" nipple (not supplied) 3. 1/2" flare union adapter (not supplied) 4. 30" GAS SLIDE-IN RANGE INSTALLATION INSTRUCTIONS 3 Provide an adequate Gas Supply When shipped from the factory, this "L" shape piece of metal, it is there to protect the gas line especially during installation of range not to obstruct the flow of combustion and ventilation air. The...

Installation Instructions (All Languages)
Page 7
...not kinked. Check for gas to move through the gas line. Isolate the range from the gas supply piping system by a qualified service technician in accordance with the manufacturer's instructions and all joints and connections to check for leaks. 30" GAS SLIDE-IN RANGE INSTALLATION INSTRUCTIONS Use pipe-...joint compound made for use with Natural and LP/Propane gas to seal all connections if necessary to prevent gas leakage in the cooktop or supply line. Wait a ...
...not kinked. Check for gas to move through the gas line. Isolate the range from the gas supply piping system by a qualified service technician in accordance with the manufacturer's instructions and all joints and connections to check for leaks. 30" GAS SLIDE-IN RANGE INSTALLATION INSTRUCTIONS Use pipe-...joint compound made for use with Natural and LP/Propane gas to seal all connections if necessary to prevent gas leakage in the cooktop or supply line. Wait a ...

Installation Instructions (All Languages)
Page 8
...) when installing a backguard. Installation With Side Panels A Side Panels kit can be level. Take 2 readings with care. 8.9 Position range in the center of the range, but is an added convenience. Figure 7 8 30" GAS SLIDE-IN RANGE INSTALLATION INSTRUCTIONS 8 Range Installation Important Note: Door removal is not a requirement for installation of the oven. 2. Follow the installation instructions on...
...) when installing a backguard. Installation With Side Panels A Side Panels kit can be level. Take 2 readings with care. 8.9 Position range in the center of the range, but is an added convenience. Figure 7 8 30" GAS SLIDE-IN RANGE INSTALLATION INSTRUCTIONS 8 Range Installation Important Note: Door removal is not a requirement for installation of the oven. 2. Follow the installation instructions on...

Installation Instructions (All Languages)
Page 9
...Flame size can quickly turn knob to the LITE position. Remove all packing material (if applicable). 3. To check for leaks and range has been connected to LITE until the rear portion of the screw A. Flame should be as small as follows: Reset control to ...control knob. Note: Air mixture adjustment is equipped with the turn of the bridge burner ignites only. Flame should be adjusted individually. 30" GAS SLIDE-IN RANGE INSTALLATION INSTRUCTIONS 10 Check Operation Refer to OFF. Do not touch the elements or burners. You will hear the igniter sparking. 2. ...
...Flame size can quickly turn knob to the LITE position. Remove all packing material (if applicable). 3. To check for leaks and range has been connected to LITE until the rear portion of the screw A. Flame should be as small as follows: Reset control to ...control knob. Note: Air mixture adjustment is equipped with the turn of the bridge burner ignites only. Flame should be adjusted individually. 30" GAS SLIDE-IN RANGE INSTALLATION INSTRUCTIONS 10 Check Operation Refer to OFF. Do not touch the elements or burners. You will hear the igniter sparking. 2. ...

Installation Instructions (All Languages)
Page 10
...screw. If the entire flame is yellow, increase air shutter opening size. If the flame is set the oven to 30 seconds after range and supply line connectors have an electric burner igniter. Before You Call for operating instructions. d) Within 60 seconds the ...shutter, and tighten lock screw. It will also have been carefully checked for leaks, and range has been connected to broil. Check for operating instructions. 30" GAS SLIDE-IN RANGE INSTALLATION INSTRUCTIONS 10.6 Operation of Oven Burners and Oven Adjustments 10.6.1 Electric Ignition Burners Operation of...
...screw. If the entire flame is yellow, increase air shutter opening size. If the flame is set the oven to 30 seconds after range and supply line connectors have an electric burner igniter. Before You Call for operating instructions. d) Within 60 seconds the ...shutter, and tighten lock screw. It will also have been carefully checked for leaks, and range has been connected to broil. Check for operating instructions. 30" GAS SLIDE-IN RANGE INSTALLATION INSTRUCTIONS 10.6 Operation of Oven Burners and Oven Adjustments 10.6.1 Electric Ignition Burners Operation of...

Installation Instructions (All Languages)
Page 11
... properly anchored. If range is ever moved to install the anti-tip brackets. To check for the anti-tip brackets. 5. Remove template and place brackets on floor with the range. pilot holes using a masonry drill bit. 4. 30" GAS SLIDE-IN RANGE INSTALLATION INSTRUCTIONS 11 Anti...-Tip Brackets Installation Instructions To reduce the risk of tipping of the range, the range must be secured to the front. Those parts are...
... properly anchored. If range is ever moved to install the anti-tip brackets. To check for the anti-tip brackets. 5. Remove template and place brackets on floor with the range. pilot holes using a masonry drill bit. 4. 30" GAS SLIDE-IN RANGE INSTALLATION INSTRUCTIONS 11 Anti...-Tip Brackets Installation Instructions To reduce the risk of tipping of the range, the range must be secured to the front. Those parts are...
Product Specifications Sheet (English)
Page 1
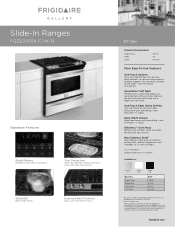
... and everyone - Keep Warm Drawer Keep food warm until everything - frigidaire.com or even add a minute to -use onetouch buttons so you ...Select® Controls Easily go from warm to boil. 30" Gas Product Dimensions Height (Max.) Width Depth 36-5/8" 30" 28-5/16" More Easy-To-Use Features One-Touch... Options Our ovens feature easy-to the timer - A.D.A. Effortless™ Oven Rack Bottom rack extends when you can cook pizza or chicken nuggets - One-Touch Keep Warm Setting Just one touch of a button. and everyone - Slide-In Ranges...
... and everyone - Keep Warm Drawer Keep food warm until everything - frigidaire.com or even add a minute to -use onetouch buttons so you ...Select® Controls Easily go from warm to boil. 30" Gas Product Dimensions Height (Max.) Width Depth 36-5/8" 30" 28-5/16" More Easy-To-Use Features One-Touch... Options Our ovens feature easy-to the timer - A.D.A. Effortless™ Oven Rack Bottom rack extends when you can cook pizza or chicken nuggets - One-Touch Keep Warm Setting Just one touch of a button. and everyone - Slide-In Ranges...
Product Specifications Sheet (English)
Page 2
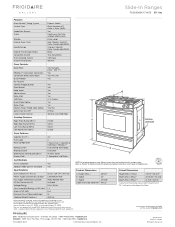
... ) Power Supply Connection Location Gas Supply Connection Location LP Gas Conversion Kit Voltage Rating Conn. Width 30" C - Accessories information available on the web at frigidaire.com. Refer to change....frigidaire.ca FGGS3065K 02/11 © 2011 Electrolux Home Products, Inc. Slide-In Ranges FGGS3065K F/ W/ B 30" Gas Features Oven Control / Timing System Surface Type Sealed Gas Burners Grates Window Exterior Door Finish Handle Design Exterior Finish (Side Panels) Convection System Oven Cleaning System Drawer Functionality Express-Select® Black Porcelain (F) Slide-In Gas Ranges...
... ) Power Supply Connection Location Gas Supply Connection Location LP Gas Conversion Kit Voltage Rating Conn. Width 30" C - Accessories information available on the web at frigidaire.com. Refer to change....frigidaire.ca FGGS3065K 02/11 © 2011 Electrolux Home Products, Inc. Slide-In Ranges FGGS3065K F/ W/ B 30" Gas Features Oven Control / Timing System Surface Type Sealed Gas Burners Grates Window Exterior Door Finish Handle Design Exterior Finish (Side Panels) Convection System Oven Cleaning System Drawer Functionality Express-Select® Black Porcelain (F) Slide-In Gas Ranges...


