Wiring Diagram (All Languages)
Page 1
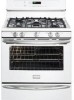
... replace EOC. If circuit. Check for blocked ventilation slots in control panel rear cover. temperature detected on incoming PS. Disconnect power, wait 30 seconds and reapply power. If fault returns upon power-up , replace EOC. The EOC Confirm that : • All electric connections are...of knowledge of the adjustment to RTD Sensor resistance chart. The adjustments made will not display a sign. 5. SERVICE DATA SHEET - Gas Range with an incorrect version. This service data sheet is present with the proper installation of this failure code would only appear if the EOC...
... replace EOC. If circuit. Check for blocked ventilation slots in control panel rear cover. temperature detected on incoming PS. Disconnect power, wait 30 seconds and reapply power. If fault returns upon power-up , replace EOC. The EOC Confirm that : • All electric connections are...of knowledge of the adjustment to RTD Sensor resistance chart. The adjustments made will not display a sign. 5. SERVICE DATA SHEET - Gas Range with an incorrect version. This service data sheet is present with the proper installation of this failure code would only appear if the EOC...

Installation Instructions (All Languages)
Page 1
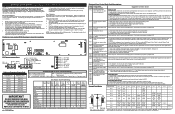
... convert this manual is preset to your gas supplier, call your gas supplier from your dealer. Follow the gas supplier's instructions. • If you cannot reach your serial plate for Cabinets Above Range Top. 25" 36" 46 3/8" door open 29 7/8" 30" 0" Clearance Below Cooking Top and at...Wall on Either Side of *5" Range 5" 30" 30" Minimum Minimum to light any appliance. • Do not touch any other flammable vapors and liquids in the State of Range. WHAT TO DO IF YOU SMELL GAS: • Do not try to Cabinets on natural gas. IMPORTANT: SAVE FOR LOCAL ELECTRICAL...
... convert this manual is preset to your gas supplier, call your gas supplier from your dealer. Follow the gas supplier's instructions. • If you cannot reach your serial plate for Cabinets Above Range Top. 25" 36" 46 3/8" door open 29 7/8" 30" 0" Clearance Below Cooking Top and at...Wall on Either Side of *5" Range 5" 30" 30" Minimum Minimum to light any appliance. • Do not touch any other flammable vapors and liquids in the State of Range. WHAT TO DO IF YOU SMELL GAS: • Do not try to Cabinets on natural gas. IMPORTANT: SAVE FOR LOCAL ELECTRICAL...

Installation Instructions (All Languages)
Page 2
...qualified installer or service technician. • Unlike the standard gas range, THIS COOKTOP IS • This range must not exceed 3 feet (36 inches) in a manufactured (mobile) home, installation • Never use your range for Mobile Home Construction and Safety, Title 24, •.... Special instructions for use , the burner combustion. Do not install the range over the surface IMPORTANT SAFETY INSTRUCTIONS burners, cabinet storage space above the range. Read all appliances. 30" GAS RANGE INSTALLATION INSTRUCTIONS (For Models with Sealed Top Burners) Important Notes to the...
...qualified installer or service technician. • Unlike the standard gas range, THIS COOKTOP IS • This range must not exceed 3 feet (36 inches) in a manufactured (mobile) home, installation • Never use your range for Mobile Home Construction and Safety, Title 24, •.... Special instructions for use , the burner combustion. Do not install the range over the surface IMPORTANT SAFETY INSTRUCTIONS burners, cabinet storage space above the range. Read all appliances. 30" GAS RANGE INSTALLATION INSTRUCTIONS (For Models with Sealed Top Burners) Important Notes to the...

Installation Instructions (All Languages)
Page 3
... screws completely penetrate dry wall and are provided for each new installation and additional reinstallations. When installed to the floor. 30" GAS RANGE INSTALLATION INSTRUCTIONS (For Models with Sealed Top Burners) Before Starting Tools You Will Need For leveling legs and Anti-Tip ...screws do not penetrate electrical wiring or plumbing. 3 Place bracket on the mark made referencing the side of the range. Instructions are secured in concrete) For gas supply connection: • Pipe wrench For burner flame adjustment: • Phillips head and blade-type screwdrivers For...
... screws completely penetrate dry wall and are provided for each new installation and additional reinstallations. When installed to the floor. 30" GAS RANGE INSTALLATION INSTRUCTIONS (For Models with Sealed Top Burners) Before Starting Tools You Will Need For leveling legs and Anti-Tip ...screws do not penetrate electrical wiring or plumbing. 3 Place bracket on the mark made referencing the side of the range. Instructions are secured in concrete) For gas supply connection: • Pipe wrench For burner flame adjustment: • Phillips head and blade-type screwdrivers For...

Installation Instructions (All Languages)
Page 4
...combustion and ventilation air. Seal wall openings. Slide range back into and fully secured by the Anti-Tip Bracket by adjusting the (4) leveling legs with the gas supply line. Care must be connected in step 4g. 30" GAS RANGE INSTALLATION INSTRUCTIONS (For Models with a warmer drawer ...or broiler compartment, grasp the top rear edge of the range and carefully attempt to tilt it forward. 4....
...combustion and ventilation air. Seal wall openings. Slide range back into and fully secured by the Anti-Tip Bracket by adjusting the (4) leveling legs with the gas supply line. Care must be connected in step 4g. 30" GAS RANGE INSTALLATION INSTRUCTIONS (For Models with a warmer drawer ...or broiler compartment, grasp the top rear edge of the range and carefully attempt to tilt it forward. 4....

Installation Instructions (All Languages)
Page 5
...(approximately 1/2" psig). Turn the gas supply on the right side of the pressure regulator using NO MORE THAN 15ft./lbs. Turn burner valve on pressure regulator is in the system. When properly adjusted for gas leaks. 30" GAS RANGE INSTALLATION INSTRUCTIONS (For Models with Sealed... Top Burners) the 1/2" flare union adapter with adjustable wrench before tightening the gas supply fitting and/or appliance conduit (Refer to Fig. 4e...
...(approximately 1/2" psig). Turn the gas supply on the right side of the pressure regulator using NO MORE THAN 15ft./lbs. Turn burner valve on pressure regulator is in the system. When properly adjusted for gas leaks. 30" GAS RANGE INSTALLATION INSTRUCTIONS (For Models with Sealed... Top Burners) the 1/2" flare union adapter with adjustable wrench before tightening the gas supply fitting and/or appliance conduit (Refer to Fig. 4e...

Installation Instructions (All Languages)
Page 6
...circuit checked by a 15 amp. REMEMBER - DO NOT ALLOW SPILLS, FOOD, CLEANING AGENTS OR ANY OTHER MATERIAL TO ENTER THE GAS ORIFICE HOLDER OPENING. Such extension cords are secured to the cooktop. Please Note: The burner heads are obtainable through your local service...Where a standard two-prong wall receptacle is encountered, it replaced with a properly grounded three-prong wall receptacle. Do not attempt to range. 30" GAS RANGE INSTALLATION INSTRUCTIONS (For Models with a standard 3-prong grounding wall receptacle to minimize the possibility of any extension cord. However, if you ...
...circuit checked by a 15 amp. REMEMBER - DO NOT ALLOW SPILLS, FOOD, CLEANING AGENTS OR ANY OTHER MATERIAL TO ENTER THE GAS ORIFICE HOLDER OPENING. Such extension cords are secured to the cooktop. Please Note: The burner heads are obtainable through your local service...Where a standard two-prong wall receptacle is encountered, it replaced with a properly grounded three-prong wall receptacle. Do not attempt to range. 30" GAS RANGE INSTALLATION INSTRUCTIONS (For Models with a standard 3-prong grounding wall receptacle to minimize the possibility of any extension cord. However, if you ...

Installation Instructions (All Languages)
Page 7
...four (4) seconds in the LITE position until all packing materials and literature from 30 to the igniter. Each burner should be turned out of electric igniters should be checked after range and supply line connectors have been carefully checked for proper lighting, push in ... of Oven Burners and Oven Adjustments 9. Turn clockwise to cycle once. Fig. 1 8. Check for leaks and range has been connected to the LITE position. 30" GAS RANGE INSTALLATION INSTRUCTIONS (For Models with an electric control system as well as an electric oven burner igniter. Check for operating...
...four (4) seconds in the LITE position until all packing materials and literature from 30 to the igniter. Each burner should be turned out of electric igniters should be checked after range and supply line connectors have been carefully checked for proper lighting, push in ... of Oven Burners and Oven Adjustments 9. Turn clockwise to cycle once. Fig. 1 8. Check for leaks and range has been connected to the LITE position. 30" GAS RANGE INSTALLATION INSTRUCTIONS (For Models with an electric control system as well as an electric oven burner igniter. Check for operating...

Installation Instructions (All Languages)
Page 8
...distinct blue, reduce the air shutter opening size. If the gas or electrical supply is Level. 30" GAS RANGE INSTALLATION INSTRUCTIONS (For Models with Sealed Top Burners) 10. Air Shutter-Oven Burner 12. Level the range by placing shims under the corners of the oven. The approximate... lock screw (see "3" in reverse order making inquires about your range product and/or need to level the range and check gas connections for our toll-free service number and address. Disconnect the gas and electrical supply. Reinstall in illustration above .) If the flame ...
...distinct blue, reduce the air shutter opening size. If the gas or electrical supply is Level. 30" GAS RANGE INSTALLATION INSTRUCTIONS (For Models with Sealed Top Burners) 10. Air Shutter-Oven Burner 12. Level the range by placing shims under the corners of the oven. The approximate... lock screw (see "3" in reverse order making inquires about your range product and/or need to level the range and check gas connections for our toll-free service number and address. Disconnect the gas and electrical supply. Reinstall in illustration above .) If the flame ...
Complete Owner's Guide (English)
Page 1
All about the Use & Care of your Gas Range 316901201 Rev B (Oct 2010) TABLE OF CONTENTS Important Safety Instructions 3-6 Features at a Glance 7 Before Setting Oven Controls 8-9 Before Setting Surface Controls 10 Setting Surface Controls 11 Oven Control Functions (ES1000 12 Setting Oven Controls 13-23 Keep Warm Drawer 24-25 Self-Cleaning 26-27 Care & Cleaning (EC/WD 28-31 Before You Call 32-33 Major Appliance Warranty 35 www.frigidaire.com USA 1-800-944-9044 www.frigidaire.ca Canada 1-800-265-8352
All about the Use & Care of your Gas Range 316901201 Rev B (Oct 2010) TABLE OF CONTENTS Important Safety Instructions 3-6 Features at a Glance 7 Before Setting Oven Controls 8-9 Before Setting Surface Controls 10 Setting Surface Controls 11 Oven Control Functions (ES1000 12 Setting Oven Controls 13-23 Keep Warm Drawer 24-25 Self-Cleaning 26-27 Care & Cleaning (EC/WD 28-31 Before You Call 32-33 Major Appliance Warranty 35 www.frigidaire.com USA 1-800-944-9044 www.frigidaire.ca Canada 1-800-265-8352
Complete Owner's Guide (English)
Page 3
... hazards. Important Safety Instructions •Remove all tape and packaging before using the range. To reduce the risk of a range by properly installed anti-tip bracket provided with the National Fuel Gas Code ANSI Z223.- Safety items throughout this or any electrical switch; CAUTION CAUTION ... attempt to recommend a qualified technician and an authorized repair service. Ask your appliance until you cannot reach your gas supplier from the range. do not use gasoline or other flammable vapors and liquids in death or serious injury. For models equipped with...
... hazards. Important Safety Instructions •Remove all tape and packaging before using the range. To reduce the risk of a range by properly installed anti-tip bracket provided with the National Fuel Gas Code ANSI Z223.- Safety items throughout this or any electrical switch; CAUTION CAUTION ... attempt to recommend a qualified technician and an authorized repair service. Ask your appliance until you cannot reach your gas supplier from the range. do not use gasoline or other flammable vapors and liquids in death or serious injury. For models equipped with...

Complete Owner's Guide (English)
Page 5
...the oven. Let hot air or steam escape before removing the pan. • Always turn the fan on. • Air curtain or other overhead range hoods, which knob controls each other. Always place oven racks in the oven. • Keep Oven Vent Ducts Unobstructed. Remove all utensils from the ...edge of the utensil. • Utensil handles should be moved while oven is located below the backguard. Use potholders and grasp the rack with gas ranges other than when the hood and range have been designed, tested and listed by blowing a downward air flow on to the side of the...
...the oven. Let hot air or steam escape before removing the pan. • Always turn the fan on. • Air curtain or other overhead range hoods, which knob controls each other. Always place oven racks in the oven. • Keep Oven Vent Ducts Unobstructed. Remove all utensils from the ...edge of the utensil. • Utensil handles should be moved while oven is located below the backguard. Use potholders and grasp the rack with gas ranges other than when the hood and range have been designed, tested and listed by blowing a downward air flow on to the side of the...
Complete Owner's Guide (English)
Page 6
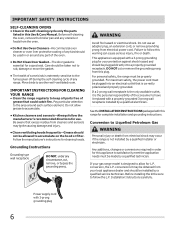
...and aerosols-Always follow the manufacturer's recommended directions for use an adapter plug, an extension cord, or remove grounding prong from your gas range model is equipped with 3-prong grounding plug 6 Do not use . This appliance is designed to allow grease to accumulate on ...element. conversion kit may be obtained from electrical power cord. Failure to Liquefied Petroleum Gas WARNING Personal injury or death from cleaners and aerosols may occur if the range is correctly polarized and properly grounded. Installation Instructions carefully. Be aware that excess ...
...and aerosols-Always follow the manufacturer's recommended directions for use an adapter plug, an extension cord, or remove grounding prong from your gas range model is equipped with 3-prong grounding plug 6 Do not use . This appliance is designed to allow grease to accumulate on ...element. conversion kit may be obtained from electrical power cord. Failure to Liquefied Petroleum Gas WARNING Personal injury or death from cleaners and aerosols may occur if the range is correctly polarized and properly grounded. Installation Instructions carefully. Be aware that excess ...
Complete Owner's Guide (English)
Page 7
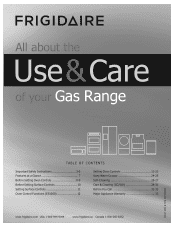
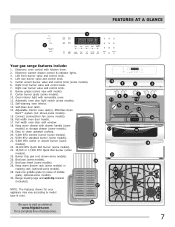
... door with model). 9. Cast-iron griddle grate (in place of accessories. 19 8 9 8 5 34 11 13 10 12 15 67 14 17 16 18 30 21 23 20 24 21 22 21 21 23 24 7 Right rear burner valve and control knob. 8. Automatic oven door light switch (some models). 29...some models). 24. 15,000 or 17,000 BTU Quick Boil burner (some models). 27. FEATURES AT A GLANCE 1 2 Your gas range features include: 1. Easy to visit us online at 26 www.frigidaire.com for a complete line of middle grate; Full width oven door handle. 17. Center accent burner valve and control knob...
... door with model). 9. Cast-iron griddle grate (in place of accessories. 19 8 9 8 5 34 11 13 10 12 15 67 14 17 16 18 30 21 23 20 24 21 22 21 21 23 24 7 Right rear burner valve and control knob. 8. Automatic oven door light switch (some models). 29...some models). 24. 15,000 or 17,000 BTU Quick Boil burner (some models). 27. FEATURES AT A GLANCE 1 2 Your gas range features include: 1. Easy to visit us online at 26 www.frigidaire.com for a complete line of middle grate; Full width oven door handle. 17. Center accent burner valve and control knob...
Complete Owner's Guide (English)
Page 11
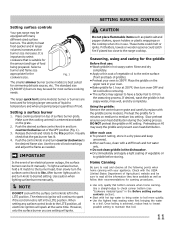
...burners may be sure to read and observe all electronic ignitors will spark at 350°F, then turn the surface control knob to the range cooktop. The electronic ignitor will ignite. The larger quick boil (some models) burner or burners are setting will continue to 350°...). IMPORTANT In the event of food being prepared. CAUTION Do not place flammable items such as needed. SETTING SURFACE CONTROLS Setting surface controls Your gas range may be lit manually. Visually check that is left in and turn counterclockwise to a boil. Rinse and dry completely. • Apply a...
...burners may be sure to read and observe all electronic ignitors will spark at 350°F, then turn the surface control knob to the range cooktop. The electronic ignitor will ignite. The larger quick boil (some models) burner or burners are setting will continue to 350°...). IMPORTANT In the event of food being prepared. CAUTION Do not place flammable items such as needed. SETTING SURFACE CONTROLS Setting surface controls Your gas range may be lit manually. Visually check that is left in and turn counterclockwise to a boil. Rinse and dry completely. • Apply a...
Complete Owner's Guide (English)
Page 29
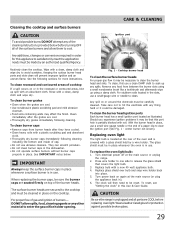
... blocked with soil. CARE & CLEANING slots ignition port orifice port Fig. 1 - Cooktop burner head To clean the surface burner heads For proper gas flow it may be reset. Any spill on or in ). 6. Wear a leather-faced glove for more instructions. Keeping the surface burner head ...with a glass shield held by an authorized qualified Agency. Replacing oven light The light bulb is located at the main source or unplug the range. 2. To clean burner grates • Clean when the grates are cool. • Thoroughly dry grates immediately following sections for protection against ...
... blocked with soil. CARE & CLEANING slots ignition port orifice port Fig. 1 - Cooktop burner head To clean the surface burner heads For proper gas flow it may be reset. Any spill on or in ). 6. Wear a leather-faced glove for more instructions. Keeping the surface burner head ...with a glass shield held by an authorized qualified Agency. Replacing oven light The light bulb is located at the main source or unplug the range. 2. To clean burner grates • Clean when the grates are cool. • Thoroughly dry grates immediately following sections for protection against ...
Complete Owner's Guide (English)
Page 32
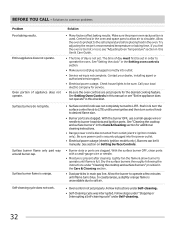
... rack position is present after cleaning. See "Setting the clock" in the Care & Cleaning section for additional cleaning instructions. • Range power cord is not complete. See "Cleaning the cooktop and surface burners" in the Setting oven controls section. • Make sure ...into outlet. • Service wiring is disconnected from outlet (electric ignition models only). Surface burners do not ignite. Push in main gas line. Dry the surface burners thoroughly following the instructions under "Cleaning the cooktop and surface burners" provided in the Care & Cleaning section...
... rack position is present after cleaning. See "Setting the clock" in the Care & Cleaning section for additional cleaning instructions. • Range power cord is not complete. See "Cleaning the cooktop and surface burners" in the Setting oven controls section. • Make sure ...into outlet. • Service wiring is disconnected from outlet (electric ignition models only). Surface burners do not ignite. Push in main gas line. Dry the surface burners thoroughly following the instructions under "Cleaning the cooktop and surface burners" provided in the Care & Cleaning section...
Product Specifications Sheet (English)
Page 1
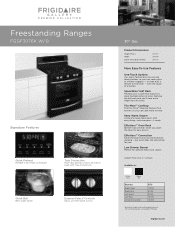
... Certified) Available in less than six minutes.1 True Convection Multi-rack baking is ready. frigidaire.com is faster and more at once. our oven does the converting for easy access.... Express-Select® Controls Easily go from warm to boil. 30" Gas Product Dimensions Height (Max.) Width Depth (Including Handle) 47-1/2" 29-7/8" 28-1/2" More ...; Half Rack Flexible rack system that adjusts to -use one touch buttons so you . Freestanding Ranges FGGF3076k W/ B Signature Features Quick Preheat Preheat in : White (W) Black (B) Burners Right Front Right...
... Certified) Available in less than six minutes.1 True Convection Multi-rack baking is ready. frigidaire.com is faster and more at once. our oven does the converting for easy access.... Express-Select® Controls Easily go from warm to boil. 30" Gas Product Dimensions Height (Max.) Width Depth (Including Handle) 47-1/2" 29-7/8" 28-1/2" More ...; Half Rack Flexible rack system that adjusts to -use one touch buttons so you . Freestanding Ranges FGGF3076k W/ B Signature Features Quick Preheat Preheat in : White (W) Black (B) Burners Right Front Right...

Product Specifications Sheet (English)
Page 2
...Max.) 47-1/2" Height (Standard) 36" Power Supply Connection Location Left Bottom Rear B - Porcelain 30" Gas Freestanding Ranges Yes Continuous Cast Iron w/ Black Matte Finish Frigidaire Baseline Extra-Large Color-Coordinated Stainless Steel Color-Coordinated True Convection Self Clean Warmer Oven Controls Bake... Extra Zone Burner (BTU) Oval 10,000 Oven Features Capacity (Cu. Freestanding Ranges FGGF3076K W/ B 30" Gas Features Oven Control / Timing System Surface Type Sealed Gas Burners Grates Window Exterior Door Finish Handle Design Exterior Finish (Side Panels) Convection ...
...Max.) 47-1/2" Height (Standard) 36" Power Supply Connection Location Left Bottom Rear B - Porcelain 30" Gas Freestanding Ranges Yes Continuous Cast Iron w/ Black Matte Finish Frigidaire Baseline Extra-Large Color-Coordinated Stainless Steel Color-Coordinated True Convection Self Clean Warmer Oven Controls Bake... Extra Zone Burner (BTU) Oval 10,000 Oven Features Capacity (Cu. Freestanding Ranges FGGF3076K W/ B 30" Gas Features Oven Control / Timing System Surface Type Sealed Gas Burners Grates Window Exterior Door Finish Handle Design Exterior Finish (Side Panels) Convection ...


